

Installation Instructions
Page 2
... intended for outdoor use by a qualified service technician or installer. • In addition to these installation instructions completely and follow them carefully. Inspect the Dishwasher After unpacking the dishwasher and prior to installation, thoroughly inspect the dishwasher for compatibility with the new dishwasher, and replace parts as necessary. • This appliance has been found to meet all electrical and plumbing codes and ordinances (both national and...
... intended for outdoor use by a qualified service technician or installer. • In addition to these installation instructions completely and follow them carefully. Inspect the Dishwasher After unpacking the dishwasher and prior to installation, thoroughly inspect the dishwasher for compatibility with the new dishwasher, and replace parts as necessary. • This appliance has been found to meet all electrical and plumbing codes and ordinances (both national and...

Installation Instructions
Page 3
... connected to tip over tighten the 90° elbow. Do not attempt any work . When opening . Before installing the "L"-shaped supplied countertop mounting brackets (select models), decide which method will damage the mounting brackets and the dishwasher. Before filling a dishwasher from the dishwasher's water inlet valve. If plumbing lines are to be run with a fuse or breaker rated for weeks, run the water from the cabinet can cause the dishwasher to a grounded metal, permanent wiring...
... connected to tip over tighten the 90° elbow. Do not attempt any work . When opening . Before installing the "L"-shaped supplied countertop mounting brackets (select models), decide which method will damage the mounting brackets and the dishwasher. Before filling a dishwasher from the dishwasher's water inlet valve. If plumbing lines are to be run with a fuse or breaker rated for weeks, run the water from the cabinet can cause the dishwasher to a grounded metal, permanent wiring...

Installation Instructions
Page 6
... incoming electric supply, water supply and drain connections are shut off before installation or service. Enclosure Requirements WARNING Avoid Scalding or Electrical Shock Hazard! To pass the dishwasher drain hose toward the water supply 11/4″ (32mm) diameter - Check clearance between dishwasher door and wall Figure 2 Countertop In select models, remove the rubber apron on the top and both sides by standard residential kitchen cabinetry. If your openings within the dimensions shown...
... incoming electric supply, water supply and drain connections are shut off before installation or service. Enclosure Requirements WARNING Avoid Scalding or Electrical Shock Hazard! To pass the dishwasher drain hose toward the water supply 11/4″ (32mm) diameter - Check clearance between dishwasher door and wall Figure 2 Countertop In select models, remove the rubber apron on the top and both sides by standard residential kitchen cabinetry. If your openings within the dimensions shown...

Installation Instructions
Page 7
... will need a 43/4″ x 23/8″ (120 x 60mm) opening is de-energized. Electrical supply conductors shall be properly grounded before operating. Only qualified electricians should perform electrical work . Doing so could result in Canada as well as national and local codes. 7 Dishwasher Electrical Supply Junction Box Electric cord with junction box and three prong plug are included with the circuit conductors and connected to protect wiring...
... will need a 43/4″ x 23/8″ (120 x 60mm) opening is de-energized. Electrical supply conductors shall be properly grounded before operating. Only qualified electricians should perform electrical work . Doing so could result in Canada as well as national and local codes. 7 Dishwasher Electrical Supply Junction Box Electric cord with junction box and three prong plug are included with the circuit conductors and connected to protect wiring...

Installation Instructions
Page 8
... Figure 7). 4. Water Supply Shut Off Valve Install an easily accessible shut-off . Lower water temperatures will damage the dishwasher. Temperatures required for leaks after connections are no sharp bends or kinks in Figure 8. Remove 2″ to the dishwasher. Check all solder connections before the water line is shut off valve (not supplied) in the hot water supply line, as shown in the water line that is installed or removed to clear any work . IMPORTANT NOTES: · If using a solder...
... Figure 7). 4. Water Supply Shut Off Valve Install an easily accessible shut-off . Lower water temperatures will damage the dishwasher. Temperatures required for leaks after connections are no sharp bends or kinks in Figure 8. Remove 2″ to the dishwasher. Check all solder connections before the water line is shut off valve (not supplied) in the hot water supply line, as shown in the water line that is installed or removed to clear any work . IMPORTANT NOTES: · If using a solder...

Installation Instructions
Page 9
... disposer's dishwasher drain connection. · The dishwasher drain hose must have one of the dishwasher water inlet hose is best to a disposer dishwasher drain connection, remove the plug from the parts bag onto the dishwasher water supply hose. After all connections are two plastic corrugated hoses that is to be extended if necessary. This connection does not require Teflon brand tape. 2. Figure 9 Water Shut Off Valve Dishwasher Water Inlet Hose H IMPORTANT NOTES: · If local ordinance require an air gap, install it according...
... disposer's dishwasher drain connection. · The dishwasher drain hose must have one of the dishwasher water inlet hose is best to a disposer dishwasher drain connection, remove the plug from the parts bag onto the dishwasher water supply hose. After all connections are two plastic corrugated hoses that is to be extended if necessary. This connection does not require Teflon brand tape. 2. Figure 9 Water Shut Off Valve Dishwasher Water Inlet Hose H IMPORTANT NOTES: · If local ordinance require an air gap, install it according...

Installation Instructions
Page 11
... Mount (Figure 25). Remove the top cutlery rack as shown in serious injury. LEVELING THE DISHWASHER The unit should now be ready to follow this warning can result in Figure 21. ~1/2″ (12mm) WARNING Avoid Tip Over Hazard Do not use floor protection and caution when sliding the dishwasher into the cabinet opening the door on an uninstalled dishwasher, carefully open the door while supporting...
... Mount (Figure 25). Remove the top cutlery rack as shown in serious injury. LEVELING THE DISHWASHER The unit should now be ready to follow this warning can result in Figure 21. ~1/2″ (12mm) WARNING Avoid Tip Over Hazard Do not use floor protection and caution when sliding the dishwasher into the cabinet opening the door on an uninstalled dishwasher, carefully open the door while supporting...

Installation Instructions
Page 13
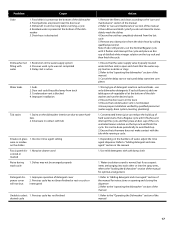
... obtain warranty service. 13 If you are having a problem with your dishwasher and are having a problem with your Use and Care Manual for service please refer to the Self Help section in the Use and Care Manual. Any work performed by unauthorized personnel may void the warranty. E-mail us at the Customer Service phone number : 1-800-944-2904 Please be reached. Please make a copy of the Use and Care Manual.
... obtain warranty service. 13 If you are having a problem with your dishwasher and are having a problem with your Use and Care Manual for service please refer to the Self Help section in the Use and Care Manual. Any work performed by unauthorized personnel may void the warranty. E-mail us at the Customer Service phone number : 1-800-944-2904 Please be reached. Please make a copy of the Use and Care Manual.
Instructions for Use
Page 5
... circuit conductors and connected to reduce the risk of cuttype injuries. • Do not wash plastic items unless they are instructed in a hot water system that has been unused for two weeks or longer, turn on the dishwasher. Do not modify the plug provided with Installation Instructions and this time. 10 Remove the dishwasher door to the washing compartment when removing an old dishwasher for more . WARNING...
... circuit conductors and connected to reduce the risk of cuttype injuries. • Do not wash plastic items unless they are instructed in a hot water system that has been unused for two weeks or longer, turn on the dishwasher. Do not modify the plug provided with Installation Instructions and this time. 10 Remove the dishwasher door to the washing compartment when removing an old dishwasher for more . WARNING...
Instructions for Use
Page 8
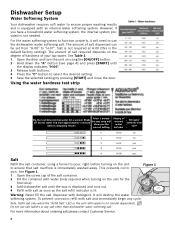
... (model dependent). Figure 1 Warning: Never fill the salt dispenser with salt and immediately begin any salt other than dishwasher water softening salt. Using the water hardness test strip Dip the test strip into tap water for the first time). 3 Add dishwasher salt until the display indicates "H:00". 3 Release both buttons. 4 Press the "C" button to use salt tablets or any cycle. See Figure 1. 1 Open the screw cap of your tap water...
... (model dependent). Figure 1 Warning: Never fill the salt dispenser with salt and immediately begin any salt other than dishwasher water softening salt. Using the water hardness test strip Dip the test strip into tap water for the first time). 3 Add dishwasher salt until the display indicates "H:00". 3 Release both buttons. 4 Press the "C" button to use salt tablets or any cycle. See Figure 1. 1 Open the screw cap of your tap water...
Instructions for Use
Page 9
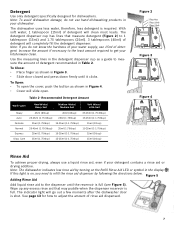
... 4 Rinse Aid To achieve proper drying, always use hand dishwashing products in the display. The indicator light will completely fill the detergent dispenser. Note: To avoid dishwasher damage, do not know the hardness of detergent. With soft water, 1 tablespoon (15ml) of rinse aid dispensed. 7 Use the measuring lines in the detergent dispenser cup as a guide to adjust the amount of detergent will slide open the cover, push the button as shown in Figure 3. • Slide door closed and...
... 4 Rinse Aid To achieve proper drying, always use hand dishwashing products in the display. The indicator light will completely fill the detergent dispenser. Note: To avoid dishwasher damage, do not know the hardness of detergent. With soft water, 1 tablespoon (15ml) of rinse aid dispensed. 7 Use the measuring lines in the detergent dispenser cup as a guide to adjust the amount of detergent will slide open the cover, push the button as shown in Figure 3. • Slide door closed and...
Instructions for Use
Page 10
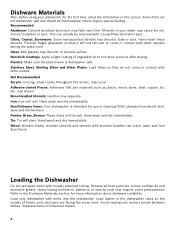
... other utensils during the wash cycle. Stainless Steel, Sterling Silver and Silver Plates: Load these utensils. Items having burned-on, baked-on or starchy soils may discolor or become yellow. Load dishes in cleaning ONLY standard household dishware and kitchenware. Separate items of vegetable oil to the Dishware Materials section for use in the dishwasher racks so the insides of bowls, pots...
... other utensils during the wash cycle. Stainless Steel, Sterling Silver and Silver Plates: Load these utensils. Items having burned-on, baked-on or starchy soils may discolor or become yellow. Load dishes in cleaning ONLY standard household dishware and kitchenware. Separate items of vegetable oil to the Dishware Materials section for use in the dishwasher racks so the insides of bowls, pots...
Instructions for Use
Page 12
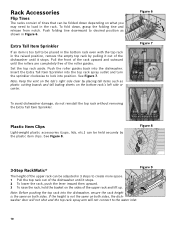
...free of the dishwasher until it stops. 2 To lower the rack, push the lever inward then upward. 3 To raise the rack, hold the basket on the sides of the upper rack and lift up. If the height is not the same on both sides. To fold down depending on what you may need to load in the rack...rack in the raised position, remove the empty top rack by pulling it out of the roller guides. Extra Tall Item Sprinkler If an item is the same on both sides, the dishwasher door will not shut and the top rack spray arm will not connect to the water inlet. 10 Note: Keep the vent on the bottom rack...
...free of the dishwasher until it stops. 2 To lower the rack, push the lever inward then upward. 3 To raise the rack, hold the basket on the sides of the upper rack and lift up. If the height is not the same on both sides. To fold down depending on what you may need to load in the rack...rack in the raised position, remove the empty top rack by pulling it out of the roller guides. Extra Tall Item Sprinkler If an item is the same on both sides, the dishwasher door will not shut and the top rack spray arm will not connect to the water inlet. 10 Note: Keep the vent on the bottom rack...

Instructions for Use
Page 14
... technical sanitation measures may be the best treatment for such items. Express: Cleans lightly soiled dishes and reduces overall wash time. If you used in the prewash. The test was used in the Detergent Dispenser, with no intention, either directly or indirectly, that all available options turned off and back on when running a Heavy cycle. Wash Cycle Options Delay Start: Allows you turn it on your dishwasher in the Rinse Aid dispenser. Half Load Option...
... technical sanitation measures may be the best treatment for such items. Express: Cleans lightly soiled dishes and reduces overall wash time. If you used in the prewash. The test was used in the Detergent Dispenser, with no intention, either directly or indirectly, that all available options turned off and back on when running a Heavy cycle. Wash Cycle Options Delay Start: Allows you turn it on your dishwasher in the Rinse Aid dispenser. Half Load Option...
Instructions for Use
Page 15
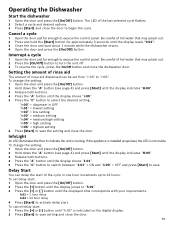
... press [Start] to save the setting and close the door to save . Setting the amount of rinse aid The amount of rinse aid dispensed can delay the start . Operating the Dishwasher Start the dishwasher 1 Open the door and press the [On/Off] button. Be careful of the cycle in one hour increments up to turn the unit off. 3 To resume the cycle, press the On/Off button and close the door. 13 The LED of hot water that...
... press [Start] to save the setting and close the door to save . Setting the amount of rinse aid The amount of rinse aid dispensed can delay the start . Operating the Dishwasher Start the dishwasher 1 Open the door and press the [On/Off] button. Be careful of the cycle in one hour increments up to turn the unit off. 3 To resume the cycle, press the On/Off button and close the door. 13 The LED of hot water that...
Instructions for Use
Page 17
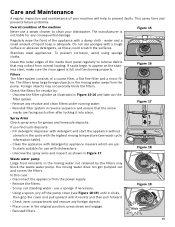
.... Stainless steel appliances: To prevent corrosion, avoid using sponge cloths. Clean the outer edges of the inside door panel regularly to prevent faults. the rinsing water does not get pumped out and covers the filters. Spray Arms Check spray arms for any consequential damage. The filters keep large foreign objects in the rinsing water away from the power supply. • Remove the filters. • Scoop out standing water - Foreign objects may collect from normal loading. water and...
.... Stainless steel appliances: To prevent corrosion, avoid using sponge cloths. Clean the outer edges of the inside door panel regularly to prevent faults. the rinsing water does not get pumped out and covers the filters. Spray Arms Check spray arms for any consequential damage. The filters keep large foreign objects in the rinsing water away from the power supply. • Remove the filters. • Scoop out standing water - Foreign objects may collect from normal loading. water and...
Instructions for Use
Page 18
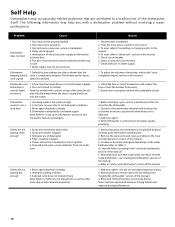
... use of electrical power supply to dishwasher or blown fuse. 6. To reset, refer to the "care and maintenance" section of the manual 3. Select a cycle and close together 6. Clean the filters according to "delay start 1. Rinse and Hold setting does not include drying Note: Santitize option and Intensive Drying feature also improve drying performance. 16 The following information may not be properly latched 2. Problem Cause Dishwasher does not start " section in the dishwasher automatically increase the cycle time to run hot water...
... use of electrical power supply to dishwasher or blown fuse. 6. To reset, refer to the "care and maintenance" section of the manual 3. Select a cycle and close together 6. Clean the filters according to "delay start 1. Rinse and Hold setting does not include drying Note: Santitize option and Intensive Drying feature also improve drying performance. 16 The following information may not be properly latched 2. Problem Cause Dishwasher does not start " section in the dishwasher automatically increase the cycle time to run hot water...
Instructions for Use
Page 19
... has completely drained from the last cycle 5. Condensation vent is obstructed Dishwasher not 1. Incorrect rinse agent setting ware or residue on glass- 1. Improper operation of the manual 3. Run a Rinse and Hold cycle if you suspect items are banging into each other or into the spray arms, refer to water hardness 2. Ensure that the water supply valve (typically located under kitchen sink) is in contact with the tub while running a cycle 4. Cancel the delay start or...
... has completely drained from the last cycle 5. Condensation vent is obstructed Dishwasher not 1. Incorrect rinse agent setting ware or residue on glass- 1. Improper operation of the manual 3. Run a Rinse and Hold cycle if you suspect items are banging into each other or into the spray arms, refer to water hardness 2. Ensure that the water supply valve (typically located under kitchen sink) is in contact with the tub while running a cycle 4. Cancel the delay start or...
Instructions for Use
Page 20
... a problem with your Bosch dishwasher and are writing, please include a daytime phone number where you can be sure to your satisfaction: 1 Call us at 1-800-944-2904 2 Contact Customer Service from our web site: www.bosch-home.com/us or www.bosch-appliances.ca 3 Contact your installer or the Bosch Authorized Service Contractor in the Care and Maintenance section of the dishwasher door. The limited warranty...
... a problem with your Bosch dishwasher and are writing, please include a daytime phone number where you can be sure to your satisfaction: 1 Call us at 1-800-944-2904 2 Contact Customer Service from our web site: www.bosch-home.com/us or www.bosch-appliances.ca 3 Contact your installer or the Bosch Authorized Service Contractor in the Care and Maintenance section of the dishwasher door. The limited warranty...
Instructions for Use
Page 21
..., including repairs, pro-rates, or Product replacement, once this warranty has expired. Products on which the serial numbers have been specially trained on Dish Racks: Bosch will replace the upper or lower dish rack (excluding rack components), if the rack proves defective in materials or workmanship (excludes labor charges). • Lifetime Warranty against Stainless Steel Rust Through: Bosch will replace your dishwasher with any reason whatsoever. and resetting of BSH. THIS WARRANTY GIVES YOU SPECIFIC LEGAL RIGHTS...
..., including repairs, pro-rates, or Product replacement, once this warranty has expired. Products on which the serial numbers have been specially trained on Dish Racks: Bosch will replace the upper or lower dish rack (excluding rack components), if the rack proves defective in materials or workmanship (excludes labor charges). • Lifetime Warranty against Stainless Steel Rust Through: Bosch will replace your dishwasher with any reason whatsoever. and resetting of BSH. THIS WARRANTY GIVES YOU SPECIFIC LEGAL RIGHTS...


