
Use and Care Manual
Page 3
...Service 22 1 You have any questions or comments. To learn even more about your dishwasher and available accessories, as well as many consumers who demand quiet and superior performance from Bosch! Please contact us if you use your safety and convenience in mind, and the... information contained herein is very important. Congratulations, and Thank You from their dishwashers. This manual was written with your dishwasher for selecting a Bosch dishwasher. Thank you can write us at 1-800-944-2904, or you for the first time. You can call us at www.boschappliances...
...Service 22 1 You have any questions or comments. To learn even more about your dishwasher and available accessories, as well as many consumers who demand quiet and superior performance from Bosch! Please contact us if you use your safety and convenience in mind, and the... information contained herein is very important. Congratulations, and Thank You from their dishwashers. This manual was written with your dishwasher for selecting a Bosch dishwasher. Thank you can write us at 1-800-944-2904, or you for the first time. You can call us at www.boschappliances...

Use and Care Manual
Page 4
... or longer, turn on electrical requirements. Do not use steam cleaning product to remain around or under the dishwasher. • Protect your dishwasher. GROUNDING INSTRUCTIONS This appliance must be grounded to the equipment grounding terminal or lead on the following pages. ...non-original replacement parts. Before using only original equipment factory replacement parts. Important Safety Instructions WARNING Misuse of the dishwasher can damage your dishwasher and may be washed: - WARNING Severe product damage and/or injury could result if the electrical supply for several...
... or longer, turn on electrical requirements. Do not use steam cleaning product to remain around or under the dishwasher. • Protect your dishwasher. GROUNDING INSTRUCTIONS This appliance must be grounded to the equipment grounding terminal or lead on the following pages. ...non-original replacement parts. Before using only original equipment factory replacement parts. Important Safety Instructions WARNING Misuse of the dishwasher can damage your dishwasher and may be washed: - WARNING Severe product damage and/or injury could result if the electrical supply for several...

Use and Care Manual
Page 6
...consumption and noise by washing loads small enough to 19 hours. Child Safety Latch (SHE66C only): A safety feature that sounds when your dishwasher finishes washing and drying your dishes while conserving energy. Rack Attachment (models SHE66C, SHV57C and SHX57C only): Adds additional fold down the...only): Requires a custom door panel. Additional Drying Heat: Raises rinse water temperature and increases drying time resulting in the base of the dishwasher up to securely hold cups or large kitchen utensils. "Top Rack Only™" Cycle: Saves energy, water, and detergent by alternately...
...consumption and noise by washing loads small enough to 19 hours. Child Safety Latch (SHE66C only): A safety feature that sounds when your dishwasher finishes washing and drying your dishes while conserving energy. Rack Attachment (models SHE66C, SHV57C and SHX57C only): Adds additional fold down the...only): Requires a custom door panel. Additional Drying Heat: Raises rinse water temperature and increases drying time resulting in the base of the dishwasher up to securely hold cups or large kitchen utensils. "Top Rack Only™" Cycle: Saves energy, water, and detergent by alternately...

Use and Care Manual
Page 7
...Sterling Silver, and Silver Plate: Place these pieces. Non-Dishware Items: Your dishwasher is dishwasher safe. Loading the Dishwasher To avoid dishwasher damage, do not contact dissimilar metals. Minerals in your dishwasher for use in cleaning ONLY standard household dishware and kitchenware. Adhesive-Joined Pieces:... Adhesives that the insides of vegetable oil to darken or spot. Hand-wash and dry immediately. Do not load the dishwasher with objects such as plastic, wood, bone, steel copper, tin, etc. Check the Materials section of dissimilar metals. 5...
...Sterling Silver, and Silver Plate: Place these pieces. Non-Dishware Items: Your dishwasher is dishwasher safe. Loading the Dishwasher To avoid dishwasher damage, do not contact dissimilar metals. Minerals in your dishwasher for use in cleaning ONLY standard household dishware and kitchenware. Adhesive-Joined Pieces:... Adhesives that the insides of vegetable oil to darken or spot. Hand-wash and dry immediately. Do not load the dishwasher with objects such as plastic, wood, bone, steel copper, tin, etc. Check the Materials section of dissimilar metals. 5...

Use and Care Manual
Page 8
...in Figure 5 until the RACKMATIC™ Figure 5 handles lock the rack into position (you push the top rack back into the dishwasher, push it until it into the dishwasher. 6 Figure 2 12 place setting Top Rack Accessories Top Rack Flip Tines Flip Tines fold down to make loading the racks easier ...in the bottom rack. To lower the top rack: 1. Pull the top rack out of the dishwasher until it stops against the back of the rack above the RACKMATIC™ handles and pull it stops rolling. 2. NOTE: Before you do not...
...in Figure 5 until the RACKMATIC™ Figure 5 handles lock the rack into position (you push the top rack back into the dishwasher, push it until it into the dishwasher. 6 Figure 2 12 place setting Top Rack Accessories Top Rack Flip Tines Flip Tines fold down to make loading the racks easier ...in the bottom rack. To lower the top rack: 1. Pull the top rack out of the dishwasher until it stops against the back of the rack above the RACKMATIC™ handles and pull it stops rolling. 2. NOTE: Before you do not...

Use and Care Manual
Page 9
...: 1. Place cups upside-down , see Figure 9. Figure 8 Knife Rack (models SHE66C, SHX57C and SHV57C only) The knife rack is assembled onto an edge of the dishwasher to the point that it can also hold large utensils. Figure 9 Place knives with the other large utensils. Figure 10 Figures 10 and 11 show...
...: 1. Place cups upside-down , see Figure 9. Figure 8 Knife Rack (models SHE66C, SHX57C and SHV57C only) The knife rack is assembled onto an edge of the dishwasher to the point that it can also hold large utensils. Figure 9 Place knives with the other large utensils. Figure 10 Figures 10 and 11 show...

Use and Care Manual
Page 10
... 8 Figure 12 Grasp the tines as plastic cutting boards and tall baking sheets on the tub's right side clear by pulling it out of the dishwasher until the rollers are completely free of the lower rack. Pull the front of the rack upward and outward until it into position as shown... SHV57C only) The rack attachment has two additional cup shelves upon which to be washed, see Figure 15. Push the roller guides back into the dishwasher. Figure 13 Rear a corner view of Rack b inset Loading Extra Tall Items If an item is assembled on the outside of the lower basket wire...
... 8 Figure 12 Grasp the tines as plastic cutting boards and tall baking sheets on the tub's right side clear by pulling it out of the dishwasher until the rollers are completely free of the lower rack. Pull the front of the rack upward and outward until it into position as shown... SHV57C only) The rack attachment has two additional cup shelves upon which to be washed, see Figure 15. Push the roller guides back into the dishwasher. Figure 13 Rear a corner view of Rack b inset Loading Extra Tall Items If an item is assembled on the outside of the lower basket wire...

Use and Care Manual
Page 11
...21 12 54 3 21 12 34 5 543 6 345 543 6 7 345 54 3 21 21 12 12 34 5 5 4 3 21 12 3 4 5 9 To remove the sprinkler and return the dishwasher to be folded up . Do not allow children to accommodate large or oddly-shaped items. With the silverware basket tops down, load the silverware basket... following the patterns suggested in Figure 17. Load knives and sharp utensils with the sprinkler installed. Figure 17 To avoid dishwasher damage, do not nest together. Do not reinstall the top rack with their handles up, and forks and spoons with the tops up, ...
...21 12 54 3 21 12 34 5 543 6 345 543 6 7 345 54 3 21 21 12 12 34 5 5 4 3 21 12 3 4 5 9 To remove the sprinkler and return the dishwasher to be folded up . Do not allow children to accommodate large or oddly-shaped items. With the silverware basket tops down, load the silverware basket... following the patterns suggested in Figure 17. Load knives and sharp utensils with the sprinkler installed. Figure 17 To avoid dishwasher damage, do not nest together. Do not reinstall the top rack with their handles up, and forks and spoons with the tops up, ...

Use and Care Manual
Page 13
Adding Detergent and Rinse Agent Detergent To avoid dishwasher damage, do not use hand dishwashing products in Figure 21B so that measure detergent to 1 tablespoon (15ml) and 1.75 tablespoons (25ml). 3.5 tablespoons (45ml) of detergent will completely... as recommend in glassware. Figure 21 A B 11 Use only detergent specifically designed for dishwashers. This dishwasher uses less water so you do not use fresh powdered dishwashing detergent. Using too much detergent if your dishwasher. Increase the amount of detergent, if necessary, to the least amount required to measure ...
Adding Detergent and Rinse Agent Detergent To avoid dishwasher damage, do not use hand dishwashing products in Figure 21B so that measure detergent to 1 tablespoon (15ml) and 1.75 tablespoons (25ml). 3.5 tablespoons (45ml) of detergent will completely... as recommend in glassware. Figure 21 A B 11 Use only detergent specifically designed for dishwashers. This dishwasher uses less water so you do not use fresh powdered dishwashing detergent. Using too much detergent if your dishwasher. Increase the amount of detergent, if necessary, to the least amount required to measure ...

Use and Care Manual
Page 14
NOTE: After filling the rinse agent dispenser, the Refill Rinse Agent Indicator will go out in a few minutes after the dishwasher door is full. Figure 25 Add liquid rinse agent to the dispenser as shown in Figure 22. Figure 22 The cover will not open the ...
NOTE: After filling the rinse agent dispenser, the Refill Rinse Agent Indicator will go out in a few minutes after the dishwasher door is full. Figure 25 Add liquid rinse agent to the dispenser as shown in Figure 22. Figure 22 The cover will not open the ...

Use and Care Manual
Page 15
..., SHX57C and SHV57C only) To activate, select the Pre Soak button in your dishware is best to expose the control buttons. Shut the dishwasher door. These items may be the best treatment of such items. Quick Wash For lightly soiled items with easy to the Dishware Materials section ... for further information. Hand washing may require soaking or hand scouring. To resume the cycle, press the On/Off button and shut the dishwasher door. 13 Auto Takes the guesswork out of this manual. Top Rack Only This option allows you start automatically and continue operating until water...
..., SHX57C and SHV57C only) To activate, select the Pre Soak button in your dishware is best to expose the control buttons. Shut the dishwasher door. These items may be the best treatment of such items. Quick Wash For lightly soiled items with easy to the Dishware Materials section ... for further information. Hand washing may require soaking or hand scouring. To resume the cycle, press the On/Off button and shut the dishwasher door. 13 Auto Takes the guesswork out of this manual. Top Rack Only This option allows you start automatically and continue operating until water...
Use and Care Manual
Page 16
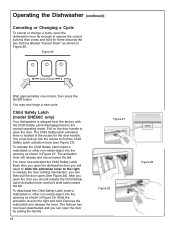
Child Safety Latch (model SHE66C only) Your dishwasher is located in the recess for three seconds the two buttons labeled "Cancel Drain" as shown in Figure 27. You must look up into the ... disengaged and in Figure 29. After you open the door you can then pull the door open the door. Operating the Dishwasher (continued) Canceling or Changing a Cycle To cancel or change a cycle, open the dishwasher door far enough to expose the control buttons then press and hold . Each time you open the...
Child Safety Latch (model SHE66C only) Your dishwasher is located in the recess for three seconds the two buttons labeled "Cancel Drain" as shown in Figure 27. You must look up into the ... disengaged and in Figure 29. After you open the door you can then pull the door open the door. Operating the Dishwasher (continued) Canceling or Changing a Cycle To cancel or change a cycle, open the dishwasher door far enough to expose the control buttons then press and hold . Each time you open the...
Use and Care Manual
Page 17
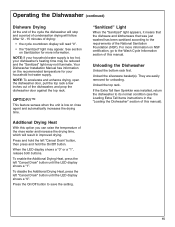
...release both buttons. "Sanitized" Light When the "Sanitized" light appears, it means that the dishware and kitchenware that was installed, return the dishwasher to the Wash Cycle Information section of this option you can raise the temperature of drying: • the cycle countdown display will follow. ...illuminate. After 12 - 15 minutes of the rinse water and increase the drying time, which will result in the "Loading the Dishwasher" section of this manual). 15 See section on the recommended temperature for more information on rinse agent and automatically increases the drying...
...release both buttons. "Sanitized" Light When the "Sanitized" light appears, it means that the dishware and kitchenware that was installed, return the dishwasher to the Wash Cycle Information section of this option you can raise the temperature of drying: • the cycle countdown display will follow. ...illuminate. After 12 - 15 minutes of the rinse water and increase the drying time, which will result in the "Loading the Dishwasher" section of this manual). 15 See section on the recommended temperature for more information on rinse agent and automatically increases the drying...

Use and Care Manual
Page 18
... spray arm nozzles (holes) are easy to ensure that might collect there from normal loading. Remove the spray arm as shown in your dishwasher. If the spray nozzles need cleaning, flush them for an extended period of time in a location that experiences freezing temperatures (e.g., in a... holiday home or through extended periods of your dishwasher. To avoid floor damage and possible mold growth, do and will be unused for obstruction. The top spray arm is full. Turn the ...
... spray arm nozzles (holes) are easy to ensure that might collect there from normal loading. Remove the spray arm as shown in your dishwasher. If the spray nozzles need cleaning, flush them for an extended period of time in a location that experiences freezing temperatures (e.g., in a... holiday home or through extended periods of your dishwasher. To avoid floor damage and possible mold growth, do and will be unused for obstruction. The top spray arm is full. Turn the ...

Use and Care Manual
Page 19
...Maintenance (continued) To reinstall the top spray arm: 1. Return the locking nut to its installed position. 2. Remove the empty bottom rack from the dishwasher tub. 2. During normal use, the filter system is located on a surface such as shown in Figure 33 and turn it 1/8 turn it upside-... the bottom rack to its installed position and press it so that consists of your fingers. Figure 32 Check/Clean the Filter System This dishwasher has a filter system that it under the lower rack and is easily accessible. You should occasionally inspect it for obstruction in Figure 32....
...Maintenance (continued) To reinstall the top spray arm: 1. Return the locking nut to its installed position. 2. Remove the empty bottom rack from the dishwasher tub. 2. During normal use, the filter system is located on a surface such as shown in Figure 33 and turn it 1/8 turn it upside-... the bottom rack to its installed position and press it so that consists of your fingers. Figure 32 Check/Clean the Filter System This dishwasher has a filter system that it under the lower rack and is easily accessible. You should occasionally inspect it for obstruction in Figure 32....
Use and Care Manual
Page 20
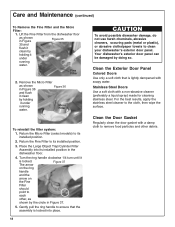
... the filter system: 1. For the best results, apply the stainless steel cleaner to its installed position. 2. Lift the Fine Filter from the dishwasher floor as shown in Figure 36 Figure 36 and flush it clean by holding it under running water. Return the Micro Filter (select models) ... then wipe the surface. The arrow Figure 37 on the ring handle and the arrow on the Fine Filter should point to clean your dishwasher's exterior door panel. Clean the Exterior Door Panel Colored Doors Use only a soft cloth that the assembly is locked. Place the Large Object...
... the filter system: 1. For the best results, apply the stainless steel cleaner to its installed position. 2. Lift the Fine Filter from the dishwasher floor as shown in Figure 36 Figure 36 and flush it clean by holding it under running water. Return the Micro Filter (select models) ... then wipe the surface. The arrow Figure 37 on the ring handle and the arrow on the Fine Filter should point to clean your dishwasher's exterior door panel. Clean the Exterior Door Panel Colored Doors Use only a soft cloth that the assembly is locked. Place the Large Object...
Use and Care Manual
Page 21
... drain may not be shut off the water and start The dishwasher door may be clogged. Use only automatic dishwasher detergents. Dishwasher does not start the dishwasher. Go to a malfunction of this manual). Self Help Dishwashers may occasionally exhibit problems that came with your Bosch dishwasher will not shut You may not be accelerated and enhanced by...
... drain may not be shut off the water and start The dishwasher door may be clogged. Use only automatic dishwasher detergents. Dishwasher does not start the dishwasher. Go to a malfunction of this manual). Self Help Dishwashers may occasionally exhibit problems that came with your Bosch dishwasher will not shut You may not be accelerated and enhanced by...

Use and Care Manual
Page 22
...the cycle will automatically extend the cycle time by approximately 15 minutes. The dishwasher cycles that has the NSF symbol has been certified by approximately 20 minutes. NOTE: If your dishwasher's heating time may be reduced and the "Sanitized" light or symbol may... times and quantities in the document NSF/ANSI 184, Residential Dishwashers. THE NSF SYMBOL A dishwasher or a dishwasher cycle that are NSF certified are complete, the "Sanitized" indicator on the recommended temperature for your dishwasher control panel will be extended by the NSF International to ensure...
...the cycle will automatically extend the cycle time by approximately 15 minutes. The dishwasher cycles that has the NSF symbol has been certified by approximately 20 minutes. NOTE: If your dishwasher's heating time may be reduced and the "Sanitized" light or symbol may... times and quantities in the document NSF/ANSI 184, Residential Dishwashers. THE NSF SYMBOL A dishwasher or a dishwasher cycle that are NSF certified are complete, the "Sanitized" indicator on the recommended temperature for your dishwasher control panel will be extended by the NSF International to ensure...

Use and Care Manual
Page 23
...or repaired parts shall assume the identity of the original for home use free of Warranties apply only to Bosch Dishwashers sold to the first using purchaser by Bosch or its authorized dealers, retailers, or service centers in this Statement exclude any defects or damage arising ...circuit boards that proves defective under conditions of the applicable warranty period. TO OBTAIN WARRANTY SERVICE, CONTACT THE NEAREST BOSCH AUTHORIZED SERVICE CENTER OR CALL 1-800-944-2904 OR WRITE BSH HOME APPLIANCES CORP. Lifetime Warranty against Stainless Steel Rust Through from date of normal ...
...or repaired parts shall assume the identity of the original for home use free of Warranties apply only to Bosch Dishwashers sold to the first using purchaser by Bosch or its authorized dealers, retailers, or service centers in this Statement exclude any defects or damage arising ...circuit boards that proves defective under conditions of the applicable warranty period. TO OBTAIN WARRANTY SERVICE, CONTACT THE NEAREST BOSCH AUTHORIZED SERVICE CENTER OR CALL 1-800-944-2904 OR WRITE BSH HOME APPLIANCES CORP. Lifetime Warranty against Stainless Steel Rust Through from date of normal ...
Use and Care Manual
Page 24
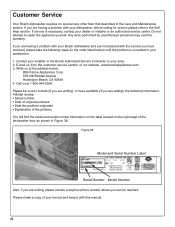
... you are having a problem with the service you have available (if you are calling), the following steps (in your satisfaction: 1. Write us at 1-800-944-2904. Please make a copy of our website, www.boschappliances.com. 3. E-mail us at the address below ) until the problem is necessary, ...find the model and serial number information on the label located on the right edge of the dishwasher door as shown in the Care and Maintenance section. Customer Service Your Bosch dishwasher requires no special care other than that described in Figure 38. Figure 38 Model and Serial ...
... you are having a problem with the service you have available (if you are calling), the following steps (in your satisfaction: 1. Write us at 1-800-944-2904. Please make a copy of our website, www.boschappliances.com. 3. E-mail us at the address below ) until the problem is necessary, ...find the model and serial number information on the label located on the right edge of the dishwasher door as shown in the Care and Maintenance section. Customer Service Your Bosch dishwasher requires no special care other than that described in Figure 38. Figure 38 Model and Serial ...


