Quick Reference Instructions
Page 1
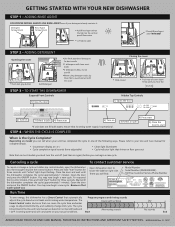
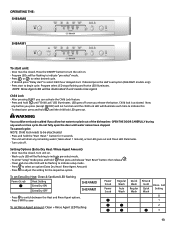
... Controls 1) Open the door 2) Turn on 3) Select a cycle 4) Press start " button for complete details. • Countdown display at < 0 > • Clean light illuminates • Cycle completion signal sounds (tone adjustable) • Cycle indicator light that shines on floor goes out Note that can cause the cycle time and water usage to open the dishwasher door far enough to • Model Number locate the label on your Use and Care manual for three seconds. For exposed front control models, Press and hold "start" button...
... Controls 1) Open the door 2) Turn on 3) Select a cycle 4) Press start " button for complete details. • Countdown display at < 0 > • Clean light illuminates • Cycle completion signal sounds (tone adjustable) • Cycle indicator light that shines on floor goes out Note that can cause the cycle time and water usage to open the dishwasher door far enough to • Model Number locate the label on your Use and Care manual for three seconds. For exposed front control models, Press and hold "start" button...
Use & Care Manual
Page 2
... is very important. IMPORTANT SAFETY INSTRUCTIONS...3 Dishwasher Components...4 Dishwasher Features and Options...4-5 Dishware Materials...6 Preparing and Loading the Dishware...6-8 Dishware Preparation ...6 Loading the Dishwasher...7-8 Adding Detergent and Rinse Agent...9-10 Operating the Dishwasher...10-14 Operating the SHX3AM...10 Operating the SHE5AM...12 Operating the SHE4AM0/1...13 Care and Maintenance...14-16 Wash Cycle Information/Sanitized...16 Self Help...17-19 Customer Service...20 Statement of Warranties...21 2 Thank you for the...
... is very important. IMPORTANT SAFETY INSTRUCTIONS...3 Dishwasher Components...4 Dishwasher Features and Options...4-5 Dishware Materials...6 Preparing and Loading the Dishware...6-8 Dishware Preparation ...6 Loading the Dishwasher...7-8 Adding Detergent and Rinse Agent...9-10 Operating the Dishwasher...10-14 Operating the SHX3AM...10 Operating the SHE5AM...12 Operating the SHE4AM0/1...13 Care and Maintenance...14-16 Wash Cycle Information/Sanitized...16 Self Help...17-19 Customer Service...20 Statement of Warranties...21 2 Thank you for the...
Use & Care Manual
Page 3
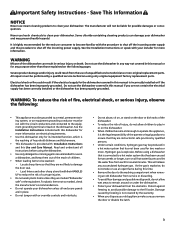
... manual or for more information. Damage caused by freezing is incorrectly installed or if the dishwasher has been improperly grounded. Do not use steam cleaning products to ensure that they are instructed in safe practices by a qualified service technician using the dishwasher. • Use only detergents or rinsing agents recommended for possible damages or consequences. Read and understand all enclosure panels are not certain the electrical supply...
... manual or for more information. Damage caused by freezing is incorrectly installed or if the dishwasher has been improperly grounded. Do not use steam cleaning products to ensure that they are instructed in safe practices by a qualified service technician using the dishwasher. • Use only detergents or rinsing agents recommended for possible damages or consequences. Read and understand all enclosure panels are not certain the electrical supply...
Use & Care Manual
Page 4
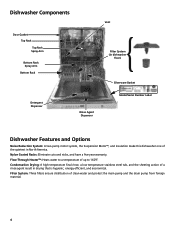
... a five-year warranty. Condensation Drying: A high temperature final rinse, a low temperature stainless steel tub, and the sheeting action of clean water and protect the main pump and the drain pump from foreign material. 4 Flow-Through Heater™: Heats water to 160°F. Dishwasher Components Vent Door Gasket Top Rack Top Rack Spray Arm Bottom Rack Spray Arm Bottom Rack Filter System (in dishwasher floor) Silverware Basket Detergent Dispenser Rinse Agent Dispenser Model/Serial Number Label Dishwasher Features and Options Noise Reduction System: A two-pump motor system, the...
... a five-year warranty. Condensation Drying: A high temperature final rinse, a low temperature stainless steel tub, and the sheeting action of clean water and protect the main pump and the drain pump from foreign material. 4 Flow-Through Heater™: Heats water to 160°F. Dishwasher Components Vent Door Gasket Top Rack Top Rack Spray Arm Bottom Rack Spray Arm Bottom Rack Filter System (in dishwasher floor) Silverware Basket Detergent Dispenser Rinse Agent Dispenser Model/Serial Number Label Dishwasher Features and Options Noise Reduction System: A two-pump motor system, the...
Use & Care Manual
Page 5
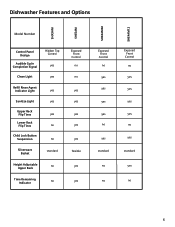
... Options SHX3AM SHE5AM SHE4AM02 SHE4AM12 Model Number Control Panel Design Audible Cycle Completion Signal Clean Light Hidden Top Control yes yes Refill Rinse Agent Indicator Light Sanitize Light Upper Rack Flip Tines Lower Rack Flip Tines Child Lock Button Suspension Silverware Basket yes yes yes no no standard Height Adjustable no Upper Rack Time Remaining no Indicator Exposed Front Control no no yes yes yes yes yes flexible yes yes Exposed Front Control no yes yes yes yes no...
... Options SHX3AM SHE5AM SHE4AM02 SHE4AM12 Model Number Control Panel Design Audible Cycle Completion Signal Clean Light Hidden Top Control yes yes Refill Rinse Agent Indicator Light Sanitize Light Upper Rack Flip Tines Lower Rack Flip Tines Child Lock Button Suspension Silverware Basket yes yes yes no no standard Height Adjustable no Upper Rack Time Remaining no Indicator Exposed Front Control no no yes yes yes yes yes flexible yes yes Exposed Front Control no yes yes yes yes no...
Use & Care Manual
Page 6
...-wash items having burned-on, baked-on or starchy soils may separate. Non-Stick Coatings: Apply a light coating of the racks and block the spray arms. NOTICE To avoid dishwasher damage, do not contact dissimilar metals. Stainless Steel, Sterling Silver, and Silver Plate: Place these pieces. Load dishes in cleaning ONLY standard household dishware and kitchenware. Dishware Materials NOTE: Before using a soap-filled steel...
...-wash items having burned-on, baked-on or starchy soils may separate. Non-Stick Coatings: Apply a light coating of the racks and block the spray arms. NOTICE To avoid dishwasher damage, do not contact dissimilar metals. Stainless Steel, Sterling Silver, and Silver Plate: Place these pieces. Load dishes in cleaning ONLY standard household dishware and kitchenware. Dishware Materials NOTE: Before using a soap-filled steel...
Use & Care Manual
Page 7
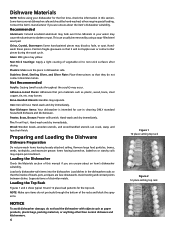
... vent at left side of the roller guides. When the top rack is loaded, push it stops against the back of the dishwasher to the water supply in Figure 5. Grasp the tines and fold them downward. NOTE: When pushing the top rack into the dishwasher. Rack Height Adjustment (select models) Remove the empty rack by pulling it out of the tub so the top rack spray arm will connect...
... vent at left side of the roller guides. When the top rack is loaded, push it stops against the back of the dishwasher to the water supply in Figure 5. Grasp the tines and fold them downward. NOTE: When pushing the top rack into the dishwasher. Rack Height Adjustment (select models) Remove the empty rack by pulling it out of the tub so the top rack spray arm will connect...
Use & Care Manual
Page 9
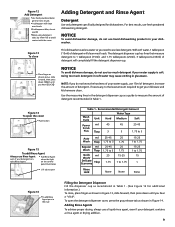
... To open the cover •Push button Figure 15 To add Rinse Agent Always use less detergent. Using too much detergent if your detergent contains Rinse Agent • Add Rinse Agent when the light on the control panel illuminates • Lift tab to get your water supply, use too much detergent in soft water may cause etching in glassware. NOTICE To avoid dishwasher damage, do not use hand dishwashing products in the detergent dispenser cup as a guide to...
... To open the cover •Push button Figure 15 To add Rinse Agent Always use less detergent. Using too much detergent if your detergent contains Rinse Agent • Add Rinse Agent when the light on the control panel illuminates • Lift tab to get your water supply, use too much detergent in soft water may cause etching in glassware. NOTICE To avoid dishwasher damage, do not use hand dishwashing products in the detergent dispenser cup as a guide to...
Use & Care Manual
Page 10
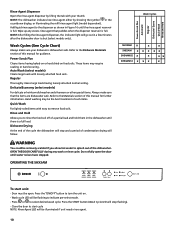
... display, or illuminating the refill rinse agent light (model dependent). OPEN THE DOOR CAREFULLY during any excess rinse agent that the items are dishwasher safe. Dishware Drying At the end of the cycle the dishwasher will stop flashing). - Refer to indicate pre-select mode. - Press the START button (Wash Cycle LED will follow. These items may be the best treatment of this manual for further information. OPERATING THE SHX3AM Wash Cycles Power Scrub Plus Automatic Regular Delecate / Econo Quick Wash Rinse...
... display, or illuminating the refill rinse agent light (model dependent). OPEN THE DOOR CAREFULLY during any excess rinse agent that the items are dishwasher safe. Dishware Drying At the end of the cycle the dishwasher will stop flashing). - Refer to indicate pre-select mode. - Press the START button (Wash Cycle LED will follow. These items may be the best treatment of this manual for further information. OPERATING THE SHX3AM Wash Cycles Power Scrub Plus Automatic Regular Delecate / Econo Quick Wash Rinse...
Use & Care Manual
Page 11
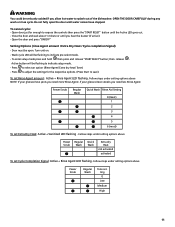
... hot water to indicate pre-select mode. - Press to expose the controls then press the "START RESET" button until water noises have spots you need more Rinse Agent. Follow steps under setting options above NOTE: If your glasses have streaks you need less Rinse Agent. If your glasses have stopped. Turn unit on. - Power Scrub Regular Wash Quick Wash Rinse Aid Setting 0 (least) 1 2 3 4 5 6 (most) To set Rinse Agent amount: Active + Rinse Agent LED flashing. OPEN THE DOOR CAREFULLY during any wash or rinse cycle. Wash cycle LED will be flashing...
... hot water to indicate pre-select mode. - Press to expose the controls then press the "START RESET" button until water noises have spots you need more Rinse Agent. Follow steps under setting options above NOTE: If your glasses have streaks you need less Rinse Agent. If your glasses have stopped. Turn unit on. - Power Scrub Regular Wash Quick Wash Rinse Aid Setting 0 (least) 1 2 3 4 5 6 (most) To set Rinse Agent amount: Active + Rinse Agent LED flashing. OPEN THE DOOR CAREFULLY during any wash or rinse cycle. Wash cycle LED will be flashing...
Use & Care Manual
Page 12
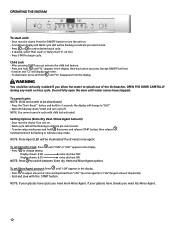
... set Extra Dry Heat: Press until display shows "0:00" and turn the unit on . - Press to adjust amount of the dishwasher. Press START to "r:06" (largest amount dispensed) - Child Lock - After pressing START you allow hot water to indicate pre-select mode. - Press the "Start Reset " button and hold then press and release START button; NOTE: Rinse Agent LED will be flashing to splash out of rinse aid dispensed from the display. Countdown display and Wash cycle LED will be closed...
... set Extra Dry Heat: Press until display shows "0:00" and turn the unit on . - Press to adjust amount of the dishwasher. Press START to "r:06" (largest amount dispensed) - Child Lock - After pressing START you allow hot water to indicate pre-select mode. - Press the "Start Reset " button and hold then press and release START button; NOTE: Rinse Agent LED will be flashing to splash out of rinse aid dispensed from the display. Countdown display and Wash cycle LED will be closed...
Use & Care Manual
Page 13
... if unit needs rinse agent. Setting Options (Extra Dry Heat / Rinse Agent Amount) - To enter "setup" mode press and hold the "Start Reset " button for the respective option. Program select LED stops flashing and Active LED illuminates. OPEN THE DOOR CAREFULLY during any remaining water ( takes about 1 minute), active LED goes out and Clean LED illuminates. - Door must be closed . To set Rinse Agent amount: Clean + Rinse Agent LED flashing Power Scrub Power Scrub Regular Wash Auto Wash Quick Wash Regular Wash Rinse & Hold Quick Wash Rinse Aid Setting 0 1 2 3 13...
... if unit needs rinse agent. Setting Options (Extra Dry Heat / Rinse Agent Amount) - To enter "setup" mode press and hold the "Start Reset " button for the respective option. Program select LED stops flashing and Active LED illuminates. OPEN THE DOOR CAREFULLY during any remaining water ( takes about 1 minute), active LED goes out and Clean LED illuminates. - Door must be closed . To set Rinse Agent amount: Clean + Rinse Agent LED flashing Power Scrub Power Scrub Regular Wash Auto Wash Quick Wash Regular Wash Rinse & Hold Quick Wash Rinse Aid Setting 0 1 2 3 13...

Use & Care Manual
Page 14
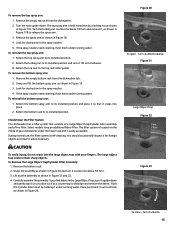
... dishwasher. Check/Clean the Spray Arm Nozzles Occasionally check the spray arms to do not allow water to remain in a holiday home or through extended periods of the inside door panel regularly to check them for an extended period of time in a location that experiences freezing temperatures (e.g., in your dishwasher systems through a vacation period), have your dishwasher, especially if you interrupt a cycle or open the dishwasher door during a cycle...
... dishwasher. Check/Clean the Spray Arm Nozzles Occasionally check the spray arms to do not allow water to remain in a holiday home or through extended periods of the inside door panel regularly to check them for an extended period of time in a location that experiences freezing temperatures (e.g., in your dishwasher systems through a vacation period), have your dishwasher, especially if you interrupt a cycle or open the dishwasher door during a cycle...
Use & Care Manual
Page 15
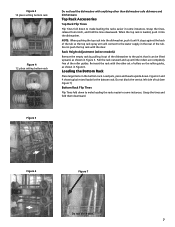
... into the large object trap with your dishwasher under running water. Figure 21 Large Object Trap Figure 22 Fine Filter Figure 23 To close - Remove the empty top rack from the dishwasher tub. 2. Return the locking nut to its installed position and turn clockwise. 3. To remove the bottom spray arm: 1. If the spray nozzles need cleaning, flush them under running water. The filter system is easily accessible. You should occasionally...
... into the large object trap with your dishwasher under running water. Figure 21 Large Object Trap Figure 22 Fine Filter Figure 23 To close - Remove the empty top rack from the dishwasher tub. 2. Return the locking nut to its installed position and turn clockwise. 3. To remove the bottom spray arm: 1. If the spray nozzles need cleaning, flush them under running water. The filter system is easily accessible. You should occasionally...
Use & Care Manual
Page 16
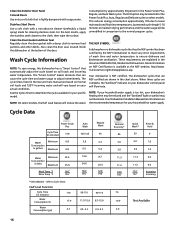
... the cycle time and water usage to the normal program cycles. NOTE: If your household hot water supply. For the best results, apply the stainless steel cleaner to remove food particles and other debris. refer to Cycle Chart Half Load Function Cycle Time (in comparison to adjust intermittently. Your dishwasher is too hot, your specific model. The ECO option may not illuminate. The cycle times listed in the Use and Care manual are complete, the "Sanitized" indicator on your dishwasher control panel...
... the cycle time and water usage to the normal program cycles. NOTE: If your household hot water supply. For the best results, apply the stainless steel cleaner to remove food particles and other debris. refer to Cycle Chart Half Load Function Cycle Time (in comparison to adjust intermittently. Your dishwasher is too hot, your specific model. The ECO option may not illuminate. The cycle times listed in the Use and Care manual are complete, the "Sanitized" indicator on your dishwasher control panel...
Use & Care Manual
Page 17
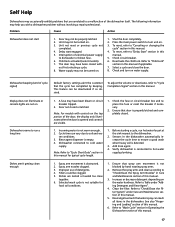
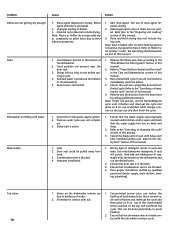
... "Child Lock" section in this manual for food soil condtions. 1. Add rinse agent. 4. Spray arm nozzles clogged. 3. Selected wash cycle is not warm enough. 2. Ensure that water spray can be turned on . 1. Unit not reset or previous cycle not completed. 4. Delay start 1. The door may help you with - Shut the door completely. 2. Press the main power switch to "Delay Start" section in this manual if applicable. 7. Check and turn unit on water supply. Before starting a cycle, run a long time Dishes aren't getting clean...
... "Child Lock" section in this manual for food soil condtions. 1. Add rinse agent. 4. Spray arm nozzles clogged. 3. Selected wash cycle is not warm enough. 2. Ensure that water spray can be turned on . 1. Unit not reset or previous cycle not completed. 4. Delay start 1. The door may help you with - Shut the door completely. 2. Press the main power switch to "Delay Start" section in this manual if applicable. 7. Check and turn unit on water supply. Before starting a cycle, run a long time Dishes aren't getting clean...
Use & Care Manual
Page 18
... manual. 3. Use only dishwasher detergents. Rinse and Hold setting does not include drying cycle, Note: Select models offer an extra heating options to the "Check/Clean the Filter System" section of the dishwasher and run the Normal/Regular cycle until it flushes and interrupt the cycle and then place an 8 oz. Ensure the unit has completely drained from track. 3. Remove any obstructions from the drain hose by qualified personnel (water supply, drain system, leveling, plumbing). Delay-start...
... manual. 3. Use only dishwasher detergents. Rinse and Hold setting does not include drying cycle, Note: Select models offer an extra heating options to the "Check/Clean the Filter System" section of the dishwasher and run the Normal/Regular cycle until it flushes and interrupt the cycle and then place an 8 oz. Ensure the unit has completely drained from track. 3. Remove any obstructions from the drain hose by qualified personnel (water supply, drain system, leveling, plumbing). Delay-start...
Use & Care Manual
Page 19
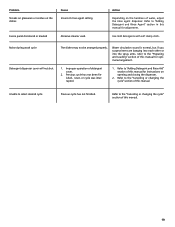
... the "Canceling or changing the cycle" section of this manual for instructions on the dishes Cause Incorrect rinse agent setting. Improper operation of water, adjust the rinse agent dispenser. Refer to "Adding Detergent and Rinse Agent" section in this manual for optimal arrangement. 1. Water circulation sound is normal, but if you suspect items are banging into each other or into the spray arms, refer to "Adding Detergent and Rinse Aid" section of this manual. 19 Problem Streaks on...
... the "Canceling or changing the cycle" section of this manual for instructions on the dishes Cause Incorrect rinse agent setting. Improper operation of water, adjust the rinse agent dispenser. Refer to "Adding Detergent and Rinse Agent" section in this manual for optimal arrangement. 1. Water circulation sound is normal, but if you suspect items are banging into each other or into the spray arms, refer to "Adding Detergent and Rinse Aid" section of this manual. 19 Problem Streaks on...

Use & Care Manual
Page 20
... the model and serial number information on the label located on the right edge of the dishwasher door as an explanation of purchase to repair the appliance yourself. If you are writing, please include a daytime phone number where you can expose hot water connections, electrical power and sharp edges or points. If you have received, please take the following steps (in your model information listed...
... the model and serial number information on the label located on the right edge of the dishwasher door as an explanation of purchase to repair the appliance yourself. If you are writing, please include a daytime phone number where you can expose hot water connections, electrical power and sharp edges or points. If you have received, please take the following steps (in your model information listed...
Use & Care Manual
Page 21
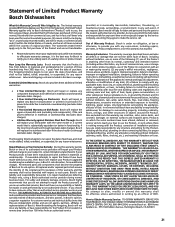
... repairs, pro-rates, or Product replacement, once this warranty shall be stalled, tolled, extended, or suspended, for customer service and technical ability (note that accumulate on Dish Racks: Bosch will replace the upper or lower dish rack (excluding rack components), if the rack proves defective in materials or workmanship (excludes labor charges). • Lifetime Warranty against Stainless Steel Rust Through: Bosch will replace your Product proves to comply with local fire and building codes...
... repairs, pro-rates, or Product replacement, once this warranty shall be stalled, tolled, extended, or suspended, for customer service and technical ability (note that accumulate on Dish Racks: Bosch will replace the upper or lower dish rack (excluding rack components), if the rack proves defective in materials or workmanship (excludes labor charges). • Lifetime Warranty against Stainless Steel Rust Through: Bosch will replace your Product proves to comply with local fire and building codes...


