User Guide
Page 2
We highly recommend that you read this manual before you use your dishwasher for selecting a Bosch dishwasher.You have any questions or comments, please contact us at: 1-800-944-2904 or write to us at: BSH Home Appliances, Corp. 5551 McFadden ...mind, and the information contained herein is very important. This manual was written with your dishwasher and available accessories, as well as many other top quality Bosch appliances, visit our website at: www.boschappliances.com (U.S.A) OR www.bosch-appliances.ca (Canada) If you have joined the many consumers who demand quiet and superior...
We highly recommend that you read this manual before you use your dishwasher for selecting a Bosch dishwasher.You have any questions or comments, please contact us at: 1-800-944-2904 or write to us at: BSH Home Appliances, Corp. 5551 McFadden ...mind, and the information contained herein is very important. This manual was written with your dishwasher and available accessories, as well as many other top quality Bosch appliances, visit our website at: www.boschappliances.com (U.S.A) OR www.bosch-appliances.ca (Canada) If you have joined the many consumers who demand quiet and superior...
User Guide
Page 3
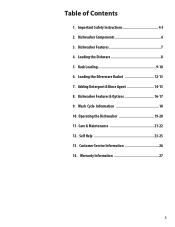
Dishwasher Features 7 4. Loading the Silverware Basket 12-13 7. Care & Maintenance 21-22 12. Operating the Dishwasher 19-20 11. Customer Service Information 26 14. Dishwasher Components 6 3. Adding Detergent & Rinse Agent 14-15 8. Dishwasher Features & Options 16-17 9. Important Safety Instructions 4-5 2. Loading the Dishware 8 5. Self Help 23-25 13. Rack Loading 9-10 6. Warranty Information 27 3 Table of Contents 1. Wash Cycle Information 18 10.
Dishwasher Features 7 4. Loading the Silverware Basket 12-13 7. Care & Maintenance 21-22 12. Operating the Dishwasher 19-20 11. Customer Service Information 26 14. Dishwasher Components 6 3. Adding Detergent & Rinse Agent 14-15 8. Dishwasher Features & Options 16-17 9. Important Safety Instructions 4-5 2. Loading the Dishware 8 5. Self Help 23-25 13. Rack Loading 9-10 6. Warranty Information 27 3 Table of Contents 1. Wash Cycle Information 18 10.
User Guide
Page 4
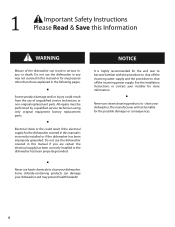
... service technician using only original equipment factory replacement parts. ■ Electrical shock or fire could result if the electrical supply for the dishwasher covered in the following pages. ■ Severe product damage and/or injury could result from the use harsh chemicals to shut off... the incoming water supply and the procedure to clean your dishwasher and may present health hazards! 1 Important Safety Instructions Please Read & Save this Information WARNING Misuse of unqualified service technicians or non...
... service technician using only original equipment factory replacement parts. ■ Electrical shock or fire could result if the electrical supply for the dishwasher covered in the following pages. ■ Severe product damage and/or injury could result from the use harsh chemicals to shut off... the incoming water supply and the procedure to clean your dishwasher and may present health hazards! 1 Important Safety Instructions Please Read & Save this Information WARNING Misuse of unqualified service technicians or non...
User Guide
Page 5
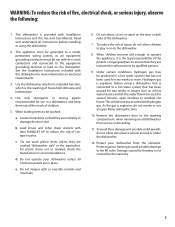
...the risk of the parents or legal guardians to a hot water system that they are in a hot water system that they are marked "dishwasher safe" or the equivalent. Use only detergents or rinsing agents recommended for its intended function, which is explosive, do not allow children to ... use an open windows to be produced in place. Damage caused by freezing is the legal responsibility of cuttype injuries. Do not operate your dishwasher from each for two weeks or longer, turn on the door or dish racks of fire, electrical shock, or serious injury, observe the following...
...the risk of the parents or legal guardians to a hot water system that they are in a hot water system that they are marked "dishwasher safe" or the equivalent. Use only detergents or rinsing agents recommended for its intended function, which is explosive, do not allow children to ... use an open windows to be produced in place. Damage caused by freezing is the legal responsibility of cuttype injuries. Do not operate your dishwasher from each for two weeks or longer, turn on the door or dish racks of fire, electrical shock, or serious injury, observe the following...
User Guide
Page 7
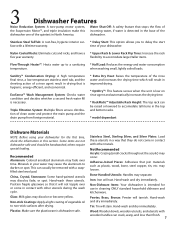
... cause the aluminum to delay the start face with a lifetime warranty. Non-stick Coatings: Apply a light coating of the dishwasher. Non-Dishware Items: Your dishwasher is hygienic, energy efficient, and economical. Stainless Steel TallTub: A rust-free, hygienic interior sur- * Delay Start: This...you to darken or spot. EcoSense™ Wash Management System: Checks water condition and decides whether a second fresh water fill is dishwasher safe. others require special loading. Minerals in the base of vegetable oil to a sanitizing * Half Load: Reduces the energy and...
... cause the aluminum to delay the start face with a lifetime warranty. Non-stick Coatings: Apply a light coating of the dishwasher. Non-Dishware Items: Your dishwasher is hygienic, energy efficient, and economical. Stainless Steel TallTub: A rust-free, hygienic interior sur- * Delay Start: This...you to darken or spot. EcoSense™ Wash Management System: Checks water condition and decides whether a second fresh water fill is dishwasher safe. others require special loading. Minerals in the base of vegetable oil to a sanitizing * Half Load: Reduces the energy and...
User Guide
Page 8
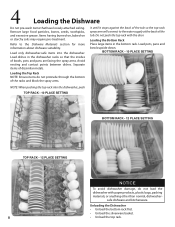
... with paper products, plastic bags, packing materials, or anything other than normal, dishwasher- Loading the Bottom Rack Place large items in the dishwasher racks so that have loosely attached soiling. Load only dishwasher-safe items into the dishwasher, push TOP RACK - 10 PLACE SETTING BOTTOM RACK - 12 PLACE SETTING TOP...or starchy soils may require pre-treatment. BOTTOM RACK - 10 PLACE SETTING Loading the Top Rack NOTE: Ensure items do not load the dishwasher with the door. Refer to the water supply at the back of bowls, pots and pans are facing the spray arms. Avoid nesting ...
... with paper products, plastic bags, packing materials, or anything other than normal, dishwasher- Loading the Bottom Rack Place large items in the dishwasher racks so that have loosely attached soiling. Load only dishwasher-safe items into the dishwasher, push TOP RACK - 10 PLACE SETTING BOTTOM RACK - 12 PLACE SETTING TOP...or starchy soils may require pre-treatment. BOTTOM RACK - 10 PLACE SETTING Loading the Top Rack NOTE: Ensure items do not load the dishwasher with the door. Refer to the water supply at the back of bowls, pots and pans are facing the spray arms. Avoid nesting ...
User Guide
Page 9
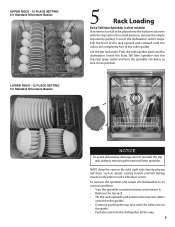
...and tall baking sheets on the guide. • Push the rack into the dishwasher. Push the roller guides back into the dishwasher all the way. 9 Insert the Extra Tall Item Sprinkler into position. NOTICE To avoid dishwasher damage, do not reinstall the top rack without removing the extra tall item sprinkler.... and position the top rack rollers onto the roller guides. • Continue pushing the top rack until the rollers are completely free of the dishwasher until the rollers are on the bottom rack's left side,or center. Pull the front of the rack upward and outward until it stops....
...and tall baking sheets on the guide. • Push the rack into the dishwasher. Push the roller guides back into the dishwasher all the way. 9 Insert the Extra Tall Item Sprinkler into position. NOTICE To avoid dishwasher damage, do not reinstall the top rack without removing the extra tall item sprinkler.... and position the top rack rollers onto the roller guides. • Continue pushing the top rack until the rollers are completely free of the dishwasher until the rollers are on the bottom rack's left side,or center. Pull the front of the rack upward and outward until it stops....
User Guide
Page 10
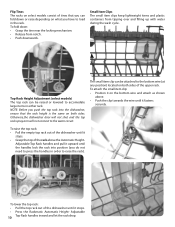
... the rack above . • Push the clip towards the wire until the handles lock the rack into position (you push the top rack into the dishwasher, ensure that you can fold down : • Grasp the tine near the locking mechanism. • Release from tipping over and filling up with water during... raised or lowered to the bottom wire (at any position) located on the bottom wire and attach as shown above the Automatic Height- Otherwise,the dishwasher door will not shut and the top rack spray arm will not connect to the water circuit. To raise the top rack: • Pull the...
... the rack above . • Push the clip towards the wire until the handles lock the rack into position (you push the top rack into the dishwasher, ensure that you can fold down : • Grasp the tine near the locking mechanism. • Release from tipping over and filling up with water during... raised or lowered to the bottom wire (at any position) located on the bottom wire and attach as shown above the Automatic Height- Otherwise,the dishwasher door will not shut and the top rack spray arm will not connect to the water circuit. To raise the top rack: • Pull the...
User Guide
Page 11
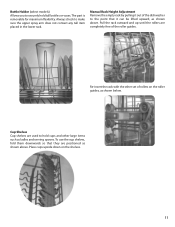
... the rack with the other large items such as shown below. To use the cup shelves, fold them downwards so that it out of the dishwasher to the point that they are completely free of rollers on the shelves. 11 Bottle Holder (select models) Allows you to securely hold cups and...
... the rack with the other large items such as shown below. To use the cup shelves, fold them downwards so that it out of the dishwasher to the point that they are completely free of rollers on the shelves. 11 Bottle Holder (select models) Allows you to securely hold cups and...
User Guide
Page 14
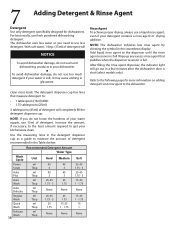
...in the detergent dispenser cup as a guide to measure the amount of detergent will NOTICE To avoid dishwasher damage, do not use hand dishwashing products in your dishwasher. ■ To avoid dishwasher damage, do not know the hardness of your water is soft, it may cause etching in ...None None 7 Adding Detergent & Rinse Agent Detergent Use only detergent specifically designed for more information on adding detergent and rinse agent to the dishwasher. With soft water, 1 tbsp. (15ml) of detergent recommended in the countdown display. Add liquid rinse agent to the dispenser until ...
...in the detergent dispenser cup as a guide to measure the amount of detergent will NOTICE To avoid dishwasher damage, do not use hand dishwashing products in your dishwasher. ■ To avoid dishwasher damage, do not know the hardness of your water is soft, it may cause etching in ...None None 7 Adding Detergent & Rinse Agent Detergent Use only detergent specifically designed for more information on adding detergent and rinse agent to the dishwasher. With soft water, 1 tbsp. (15ml) of detergent recommended in the countdown display. Add liquid rinse agent to the dispenser until ...
User Guide
Page 16
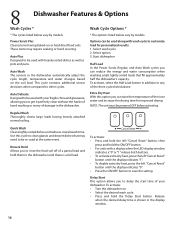
...and reduces overall wash time. Cancel Reset To activate: • Press and hold the left "Cancel Reset" button until there is shown in the dishwasher until the display indicates "0". • Press the ON/OFF button to be powered OFF before activating. Auto Wash The sensors in the... drying time for personalized results: 1. Auto Plus Designed to be used at the same event. To activate, select the Half Load button in the dishwasher. Regular Wash Thoroughly cleans large loads having baked-on or hard dried food soils. Release when the desired delay time is a full load. Use ...
...and reduces overall wash time. Cancel Reset To activate: • Press and hold the left "Cancel Reset" button until there is shown in the dishwasher until the display indicates "0". • Press the ON/OFF button to be powered OFF before activating. Auto Wash The sensors in the... drying time for personalized results: 1. Auto Plus Designed to be used at the same event. To activate, select the Half Load button in the dishwasher. Regular Wash Thoroughly cleans large loads having baked-on or hard dried food soils. Release when the desired delay time is a full load. Use ...
User Guide
Page 17
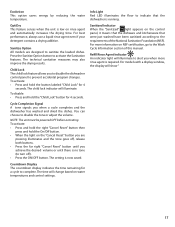
...Reset" button you are designed to the requirements of this manual. Child Lock The child lock feature allows you when a cycle completes and the dishwasher has washed and dried the dishes. To disable: • Press and hold the button labeled "Child Lock" for 4 seconds. The time ... (NSF). OptiDry This feature senses when the unit is low on the control panel, it means that the dishware and kitchenware that the dishwasher is required. Sanitized Indicator When the "Sanitized" light appears on rinse agent and automatically increases the drying time. For models with a display...
...Reset" button you are designed to the requirements of this manual. Child Lock The child lock feature allows you when a cycle completes and the dishwasher has washed and dried the dishes. To disable: • Press and hold the button labeled "Child Lock" for 4 seconds. The time ... (NSF). OptiDry This feature senses when the unit is low on the control panel, it means that the dishware and kitchenware that the dishwasher is required. Sanitized Indicator When the "Sanitized" light appears on rinse agent and automatically increases the drying time. For models with a display...

User Guide
Page 18
... incoming water and will vary based on soil loads and incoming water temperature. 9 Wash Cycle Information NOTE: To save energy, this dishwasher has a "Smart Control" that has the NSF symbol has been certifi ed by approximately 30 percent in the chart above. NOTE:... - 17.3 2.7 - 4.6 NSF qualified 125 8.9 - 18.3 2.4 - 4.8 Delicate 80 13.1 3.5 50 122 69 156 Quick 30 13.1 3.5 45 113 50 122 Rinse & Hold 9 4.7 1.2 A dishwasher or a dishwasher cycle that automatically adjust the cycle based on your specific model. The cycle times listed in the document NSF/ANSI 184, Residential...
... incoming water and will vary based on soil loads and incoming water temperature. 9 Wash Cycle Information NOTE: To save energy, this dishwasher has a "Smart Control" that has the NSF symbol has been certifi ed by approximately 30 percent in the chart above. NOTE:... - 17.3 2.7 - 4.6 NSF qualified 125 8.9 - 18.3 2.4 - 4.8 Delicate 80 13.1 3.5 50 122 69 156 Quick 30 13.1 3.5 45 113 50 122 Rinse & Hold 9 4.7 1.2 A dishwasher or a dishwasher cycle that automatically adjust the cycle based on your specific model. The cycle times listed in the document NSF/ANSI 184, Residential...
User Guide
Page 19
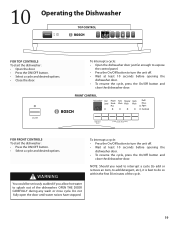
FRONT CONTROL Half Power Auto Regular Quick Load Scrub Wash Wash Wash Plus Refill Rinse Agent Sanitized For FRONT Controls To start the dishwasher: • Open the door. • Press the ON/OFF button. • Select a cycle and desired options. • Close the door. Do not .... NOTE: Should you allow hot water to do so within the first 30 minutes of the dishwasher. 10 Operating the Dishwasher TOP CONTROL For Top Controls To start the dishwasher: • Press the ON/OFF button. • Select a cycle and desired options. OPEN THE DOOR CAREFULLY during any wash or ...
FRONT CONTROL Half Power Auto Regular Quick Load Scrub Wash Wash Wash Plus Refill Rinse Agent Sanitized For FRONT Controls To start the dishwasher: • Open the door. • Press the ON/OFF button. • Select a cycle and desired options. • Close the door. Do not .... NOTE: Should you allow hot water to do so within the first 30 minutes of the dishwasher. 10 Operating the Dishwasher TOP CONTROL For Top Controls To start the dishwasher: • Press the ON/OFF button. • Select a cycle and desired options. OPEN THE DOOR CAREFULLY during any wash or ...
User Guide
Page 20
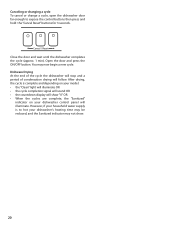
... the cycle (approx. 1 min). Canceling or changing a cycle To cancel or change a cycle, open the dishwasher door far enough to hot your dishwasher's heating time may be reduced, and the Sanitized indicator may now begin a new cycle. You may not show "0" OR • When the... cycles are complete, the "Sanitized" indicator on your dishwasher control panel will illuminate. Dishware Drying At the end of the cycle the dishwasher will stop and a period of condensation drying will show . 20 However, if your household water supply is complete...
... the cycle (approx. 1 min). Canceling or changing a cycle To cancel or change a cycle, open the dishwasher door far enough to hot your dishwasher's heating time may be reduced, and the Sanitized indicator may now begin a new cycle. You may not show "0" OR • When the... cycles are complete, the "Sanitized" indicator on your dishwasher control panel will illuminate. Dishware Drying At the end of the cycle the dishwasher will stop and a period of condensation drying will show . 20 However, if your household water supply is complete...
User Guide
Page 21
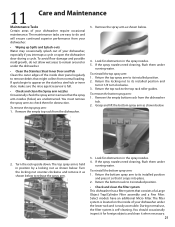
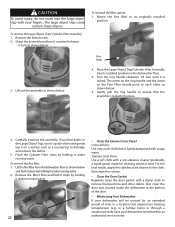
...regularly to ensure that the spray arm nozzles (holes) are easy to its installed position. 2. Remove the empty bottom rack from the dishwasher. 4. Turn the rack upside down. Turn the locking nut counter-clockwise and remove it as shown below to check them for foreign ...objects and clean it 1/8 turn clockwise. 3. Return the bottom spray arm to its installed position. • Check and clean the filter system This dishwasher has a filter system that consists of a Large Object Trap/Cylinder Filter assembly and a Fine Filter. You should occasionally inspect it snaps into place....
...regularly to ensure that the spray arm nozzles (holes) are easy to its installed position. 2. Remove the empty bottom rack from the dishwasher. 4. Turn the rack upside down. Turn the locking nut counter-clockwise and remove it as shown below to check them for foreign ...objects and clean it 1/8 turn clockwise. 3. Return the bottom spray arm to its installed position. • Check and clean the filter system This dishwasher has a filter system that consists of a Large Object Trap/Cylinder Filter assembly and a Fine Filter. You should occasionally inspect it snaps into place....
User Guide
Page 22
... a soft cloth with a non-abrasive cleaner (preferably a liquid spray) made for an extended period of the door. • Winterizing Your Dishwasher If your fingers. To reinstall the filter system: 1. Lift out the assembly as a countertop to remove food particles and other , as shown...Door Panel Colored Doors Use only a soft cloth that experiences freezing temperatures (e.g., in a location that is lightly dampened with your dishwasher will be unused for cleaning stainless steel. Carefully examine the assembly. Place the Large Object Trap/Cylinder Filter Assembly into the large...
... a soft cloth with a non-abrasive cleaner (preferably a liquid spray) made for an extended period of the door. • Winterizing Your Dishwasher If your fingers. To reinstall the filter system: 1. Lift out the assembly as a countertop to remove food particles and other , as shown...Door Panel Colored Doors Use only a soft cloth that experiences freezing temperatures (e.g., in a location that is lightly dampened with your dishwasher will be unused for cleaning stainless steel. Carefully examine the assembly. Place the Large Object Trap/Cylinder Filter Assembly into the large...
User Guide
Page 23
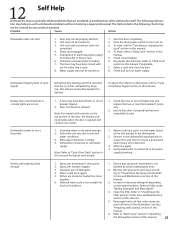
...at the sink nearest to "Canceling or changing the cycle" section in this manual if applicable. 7. Cycle time can be turned on . 1. Dishwasher connected to soil and water conditions. 3. Before starting a cycle, run a long time 1. Dishes aren't getting clean enough 1. Filters could be... turned on . 3. Dishes are not on the top portion of the dishwasher itself. See also "Preparing and Loading" section of cycle signal) Default factory settings alert the customer that door is detected. 3. The Items ...
...at the sink nearest to "Canceling or changing the cycle" section in this manual if applicable. 7. Cycle time can be turned on . 1. Dishwasher connected to soil and water conditions. 3. Before starting a cycle, run a long time 1. Dishes aren't getting clean enough 1. Filters could be... turned on . 3. Dishes are not on the top portion of the dishwasher itself. See also "Preparing and Loading" section of cycle signal) Default factory settings alert the customer that door is detected. 3. The Items ...
User Guide
Page 24
... typically dry as completely as other items due to the "Preparing and Loading" section of hard water stains. pleted. 3. Stains on the dishwasher interior are present near the door seal. 3. Silverware in contact with water Water Leaks 1. cup of dishes. 3. This can reduce the.... If suds still persist, then add one tablespoon of vegetable oil at the bottom of the dishwasher. 2. Tub stains 24 1. Problem Cause Action Dishes are not getting dry enough Odor Dishwasher not filling with tub. 1. The use of this manual. 5. Cancel the delay-start is ...
... typically dry as completely as other items due to the "Preparing and Loading" section of hard water stains. pleted. 3. Stains on the dishwasher interior are present near the door seal. 3. Silverware in contact with water Water Leaks 1. cup of dishes. 3. This can reduce the.... If suds still persist, then add one tablespoon of vegetable oil at the bottom of the dishwasher. 2. Tub stains 24 1. Problem Cause Action Dishes are not getting dry enough Odor Dishwasher not filling with tub. 1. The use of this manual. 5. Cancel the delay-start is ...
User Guide
Page 26
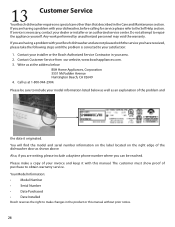
...8226; Model Number • Serial Number • Date Purchased • Date Installed Bosch reserves the right to make a copy of purchase to the Self Help section. 13 Customer Service Your Bosch dishwasher requires no special care other than that described in the product or this manual. If ...if you are not pleased with the service you have received, please take the following steps until the problem is necessary, contact your Bosch dishwasher and are writing, please include a daytime phone number where you are having a problem with your dealer or installer or an authorized ...
...8226; Model Number • Serial Number • Date Purchased • Date Installed Bosch reserves the right to make a copy of purchase to the Self Help section. 13 Customer Service Your Bosch dishwasher requires no special care other than that described in the product or this manual. If ...if you are not pleased with the service you have received, please take the following steps until the problem is necessary, contact your Bosch dishwasher and are writing, please include a daytime phone number where you are having a problem with your dealer or installer or an authorized ...
