User Guide
Page 3
Loading the Dishware 8 5. Adding Detergent & Rinse Agent 14-15 8. Care & Maintenance 21-22 12. Dishwasher Features 7 4. Warranty Information 27 3 Important Safety Instructions 4-5 2. Dishwasher Components 6 3. Loading the Silverware Basket 12-13 7. Customer Service Information 26 14. Operating the Dishwasher 19-20 11. Self Help 23-25 13. Rack Loading 9-10 6. Table of Contents 1. Wash Cycle Information 18 10. Dishwasher Features & Options 16-17 9.
Loading the Dishware 8 5. Adding Detergent & Rinse Agent 14-15 8. Care & Maintenance 21-22 12. Dishwasher Features 7 4. Warranty Information 27 3 Important Safety Instructions 4-5 2. Dishwasher Components 6 3. Loading the Silverware Basket 12-13 7. Customer Service Information 26 14. Operating the Dishwasher 19-20 11. Self Help 23-25 13. Rack Loading 9-10 6. Table of Contents 1. Wash Cycle Information 18 10. Dishwasher Features & Options 16-17 9.
User Guide
Page 4
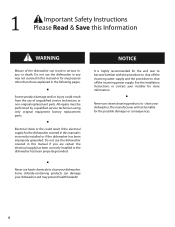
... manufacturer will not be performed by a qualified service technician using only original equipment factory replacement parts. ■ Electrical shock or fire could result from the use steam cleaning products to clean your dishwasher. Some chloride-containing products can result in this manual is highly recommended for the possible damages or consequences. 4 See the installation Instructions or contact your installer for the dishwasher covered in the following...
... manufacturer will not be performed by a qualified service technician using only original equipment factory replacement parts. ■ Electrical shock or fire could result from the use steam cleaning products to clean your dishwasher. Some chloride-containing products can result in this manual is highly recommended for the possible damages or consequences. 4 See the installation Instructions or contact your installer for the dishwasher covered in the following...
User Guide
Page 5
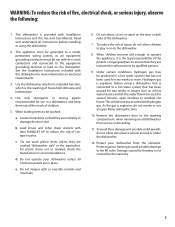
..., turn on all hot water faucets and let the water flow from the elements. Remove the dishwasher door to the fill valve. This appliance must be washed: a. b. Do not wash plastic items unless they are in a dishwasher, and keep them out of the reach of cuttype injuries. For plastic items not so marked, check the manufacturer's recommendations. Before using the dishwasher. 2. Load...
..., turn on all hot water faucets and let the water flow from the elements. Remove the dishwasher door to the fill valve. This appliance must be washed: a. b. Do not wash plastic items unless they are in a dishwasher, and keep them out of the reach of cuttype injuries. For plastic items not so marked, check the manufacturer's recommendations. Before using the dishwasher. 2. Load...
User Guide
Page 7
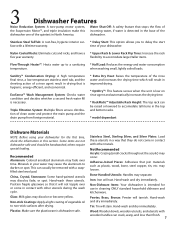
... start face with other utensils during the wash cycle. Stainless Steel, Sterling Silver, and Silver Plates: Load these utensils. Hand-wash and dry immediately. SaniDry™ Condensation Drying: A high temperature final rinse, a low temperature stainless steel tub, and the sheeting action of a rinse agent result in contact with a lifetime warranty. Triple Filtration System: Multiple filters ensure distribution of clean water and protect the main pump and the drain pump...
... start face with other utensils during the wash cycle. Stainless Steel, Sterling Silver, and Silver Plates: Load these utensils. Hand-wash and dry immediately. SaniDry™ Condensation Drying: A high temperature final rinse, a low temperature stainless steel tub, and the sheeting action of a rinse agent result in contact with a lifetime warranty. Triple Filtration System: Multiple filters ensure distribution of clean water and protect the main pump and the drain pump...
User Guide
Page 8
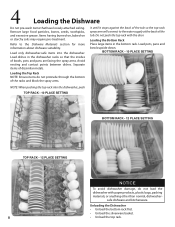
... paper products, plastic bags, packing materials, or anything other than normal, dishwasher- it until it stops against the back of the tub so the top rack spray arm will connect to the Dishware Materials section for more information about dishware suitability. BOTTOM RACK - 10 PLACE SETTING Loading the Top... Rack NOTE: Ensure items do not load the dishwasher with the door. Separate items of bowls, pots and pans are facing the spray arms. Avoid nesting and contact points between dishes. Loading the Bottom Rack Place large items ...
... paper products, plastic bags, packing materials, or anything other than normal, dishwasher- it until it stops against the back of the tub so the top rack spray arm will connect to the Dishware Materials section for more information about dishware suitability. BOTTOM RACK - 10 PLACE SETTING Loading the Top... Rack NOTE: Ensure items do not load the dishwasher with the door. Separate items of bowls, pots and pans are facing the spray arms. Avoid nesting and contact points between dishes. Loading the Bottom Rack Place large items ...
User Guide
Page 9
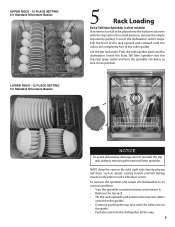
...Tall Item Sprinkler into the top rack spray outlet and turn the sprinkler clockwise to lock it stops. Push the roller guides back into the dishwasher all the way. 9 NOTE: Keep the vent on the tub's right side clear by pulling it out of the ...removing the extra tall item sprinkler. Pull the front of the rack upward and outward until the rollers are completely free of the roller guides. Set the top rack aside. UPPER RACK - 12 PLACE SETTING for Standard Silverware Basket LOWER RACK - 12 PLACE SETTING for Standard Silverware Basket 5 Rack Loading Extra Tall Item Sprinkler (select models...
...Tall Item Sprinkler into the top rack spray outlet and turn the sprinkler clockwise to lock it stops. Push the roller guides back into the dishwasher all the way. 9 NOTE: Keep the vent on the tub's right side clear by pulling it out of the ...removing the extra tall item sprinkler. Pull the front of the rack upward and outward until the rollers are completely free of the roller guides. Set the top rack aside. UPPER RACK - 12 PLACE SETTING for Standard Silverware Basket LOWER RACK - 12 PLACE SETTING for Standard Silverware Basket 5 Rack Loading Extra Tall Item Sprinkler (select models...
User Guide
Page 11
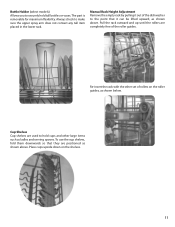
Always check to securely hold cups and other set of rollers on the shelves. 11 Pull the rack outward and up until the rollers are positioned as ladles and serving spoons. Cup Shelves Cup shelves are used to the point that they are completely free of the dishwasher to ...the roller guides, as shown above . Manual Rack Height Adjustment Remove the empty rack by pulling it out of the roller guides. To use the cup shelves, fold them downwards so that it can be lifted upward, as shown below. The part is removable for maximum flexibility. Bottle Holder (select models) Allows ...
Always check to securely hold cups and other set of rollers on the shelves. 11 Pull the rack outward and up until the rollers are positioned as ladles and serving spoons. Cup Shelves Cup shelves are used to the point that they are completely free of the dishwasher to ...the roller guides, as shown above . Manual Rack Height Adjustment Remove the empty rack by pulling it out of the roller guides. To use the cup shelves, fold them downwards so that it can be lifted upward, as shown below. The part is removable for maximum flexibility. Bottle Holder (select models) Allows ...
User Guide
Page 14
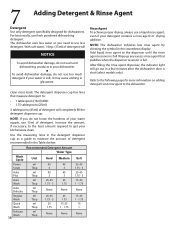
... Wash 14 ml Tbsp None None None After filling the rinse agent dispenser, the indicator light will go out in your dishwasher. ■ To avoid dishwasher damage, do not use too much detergent if your water is full. NOTE: If you need to the dispenser until the rinse agent reservoir is shut (select models only). clean most loads. Add liquid rinse agent to use fresh powdered dishwashing detergent. With...
... Wash 14 ml Tbsp None None None After filling the rinse agent dispenser, the indicator light will go out in your dishwasher. ■ To avoid dishwasher damage, do not use too much detergent if your water is full. NOTE: If you need to the dispenser until the rinse agent reservoir is shut (select models only). clean most loads. Add liquid rinse agent to use fresh powdered dishwashing detergent. With...
User Guide
Page 16
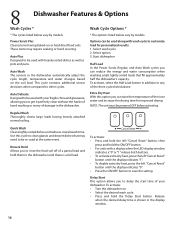
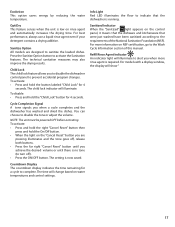
... left "Cancel Reset" button until there is shown in the display window. 16 Auto Wash The sensors in the dishwasher. Regular Wash Thoroughly cleans large loads having baked-on the soil load. Release when the desired delay time is a full load. Use this option you to customize load for improved drying. Rinse & Hold Allows you can reduce the energy and water consumption when washing small, lightly soiled loads that may...
... left "Cancel Reset" button until there is shown in the display window. 16 Auto Wash The sensors in the dishwasher. Regular Wash Thoroughly cleans large loads having baked-on the soil load. Release when the desired delay time is a full load. Use this option you to customize load for improved drying. Rinse & Hold Allows you can reduce the energy and water consumption when washing small, lightly soiled loads that may...
User Guide
Page 17
... display indicates the time remaining for 4 seconds. For best performance, always use a liquid rinse agent even if your detergent contains a drying additive. To activate: • Press and hold the right "Cancel Reset" button then press and hold the On/Off button. • When the light on the "Cancel Reset" button you are designed to turn off ). • Press the ON/OFF button. The child lock...
... display indicates the time remaining for 4 seconds. For best performance, always use a liquid rinse agent even if your detergent contains a drying additive. To activate: • Press and hold the right "Cancel Reset" button then press and hold the On/Off button. • When the light on the "Cancel Reset" button you are designed to turn off ). • Press the ON/OFF button. The child lock...

User Guide
Page 18
... actual conditions. The dishwasher cycles that can cause the cycle time and water usage to ensure dishware and kitchenware sanitization. The "Smart Control" makes decisions that are NSF certified are based on your specific model. A dishwasher or a dishwasher cycle that automatically adjust the cycle based on NSF Certification is NSF certified. The cycle times listed in the Use and Care manual are shown in the document...
... actual conditions. The dishwasher cycles that can cause the cycle time and water usage to ensure dishware and kitchenware sanitization. The "Smart Control" makes decisions that are NSF certified are based on your specific model. A dishwasher or a dishwasher cycle that automatically adjust the cycle based on NSF Certification is NSF certified. The cycle times listed in the Use and Care manual are shown in the document...
User Guide
Page 19
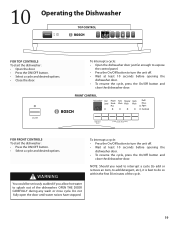
... you need to interrupt a cycle (to add or remove an item, to add detergent, etc.), it is best to turn the unit off . • Wait at least 10 seconds before opening the dishwasher door. • To resume the cycle, press the On/Off button and close the dishwasher door. Do not fully open the door until water noises have stopped. 10 Operating the Dishwasher TOP CONTROL For Top Controls To start...
... you need to interrupt a cycle (to add or remove an item, to add detergent, etc.), it is best to turn the unit off . • Wait at least 10 seconds before opening the dishwasher door. • To resume the cycle, press the On/Off button and close the dishwasher door. Do not fully open the door until water noises have stopped. 10 Operating the Dishwasher TOP CONTROL For Top Controls To start...
User Guide
Page 20
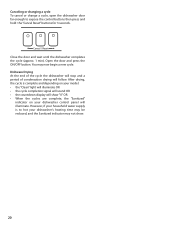
... "Clean" light will illuminate OR • the cycle completion signal will sound OR • the countdown display will follow. Open the door and press the ON/OFF button. You may not show. 20 However, if your household water supply is complete and depending on your dishwasher's heating time may be reduced, and the Sanitized indicator may now begin a new cycle. Cancel / Reset...
... "Clean" light will illuminate OR • the cycle completion signal will sound OR • the countdown display will follow. Open the door and press the ON/OFF button. You may not show. 20 However, if your household water supply is complete and depending on your dishwasher's heating time may be reduced, and the Sanitized indicator may now begin a new cycle. Cancel / Reset...
User Guide
Page 21
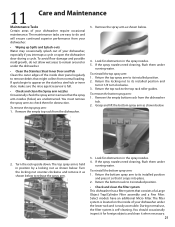
... rack to its installed position and turn it so that consists of your dishwasher require occasional maintenance. If the spray nozzles need cleaning, flush them for obstruction in position by a locking nut as shown below to check them under running water. The filter system is located on the stainless steel tub or inner door, make sure the rinse agent reservoir is self-cleaning. Return the...
... rack to its installed position and turn it so that consists of your dishwasher require occasional maintenance. If the spray nozzles need cleaning, flush them for obstruction in position by a locking nut as shown below to check them under running water. The filter system is located on the stainless steel tub or inner door, make sure the rinse agent reservoir is self-cleaning. Return the...
User Guide
Page 22
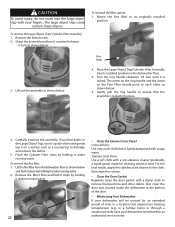
... and remove the debris. 5. Carefully examine the assembly. Also clean the door seal, located inside the dishwasher at the bottom of the door. • Winterizing Your Dishwasher If your dishwasher winterized by holding it under running water. 2. To reinstall the filter system: 1. Grasp the assembly and turn it counterclockwise - ¼ turn until it under running water. 22 • Clean the Exterior Door Panel Colored Doors Use only a soft cloth that...
... and remove the debris. 5. Carefully examine the assembly. Also clean the door seal, located inside the dishwasher at the bottom of the door. • Winterizing Your Dishwasher If your dishwasher winterized by holding it under running water. 2. To reinstall the filter system: 1. Grasp the assembly and turn it counterclockwise - ¼ turn until it under running water. 22 • Clean the Exterior Door Panel Colored Doors Use only a soft cloth that...
User Guide
Page 23
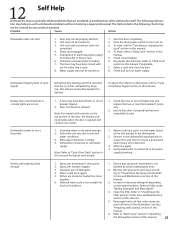
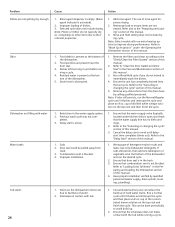
... reset, refer to "Wash Cycle" section in this manual. 23 Check circuit breaker. 6. Deactivate the child lock. Check and turn unit on the water hardness. Door not closed or latched. Note: For models with - Check the fuse or circuit breaker box and replace the fuse or reset the breaker if necessary. 2. Cycle time can vary due to the dishwasher. 2. Before starting a cycle, run a long time 1. Dishes aren't getting clean enough 1. Filters could be turned on water supply...
... reset, refer to "Wash Cycle" section in this manual. 23 Check circuit breaker. 6. Deactivate the child lock. Check and turn unit on the water hardness. Door not closed or latched. Note: For models with - Check the fuse or circuit breaker box and replace the fuse or reset the breaker if necessary. 2. Cycle time can vary due to the dishwasher. 2. Before starting a cycle, run a long time 1. Dishes aren't getting clean enough 1. Filters could be turned on water supply...
User Guide
Page 24
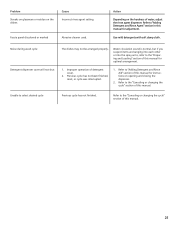
... top rack and finish the cycle. Run a normal cycle until delaystart time completes (times out). Dishes left too long in suds and leaks. Ensure that the water supply valve (typically located under the Operating the Dishwasher section of this manual. 3. Door seal could be done periodically to hardness of this manual. 1. Rearrange load to improve drying performance. Wrong type of hard water stains. Have proper installation verified by calling qualified...
... top rack and finish the cycle. Run a normal cycle until delaystart time completes (times out). Dishes left too long in suds and leaks. Ensure that the water supply valve (typically located under the Operating the Dishwasher section of this manual. 3. Door seal could be done periodically to hardness of this manual. 1. Rearrange load to improve drying performance. Wrong type of hard water stains. Have proper installation verified by calling qualified...
User Guide
Page 25
... "Preparing and Loading" section of water, adjust the rinse agent dispenser. Use mild detergents with soft damp cloth. Improper operation of this manual. Water circulation sound is normal, but if you suspect items are banging into each other or into the spray arms, refer to the "Canceling or changing the cycle" section of detergent cover. 2. Action Depending on the hardness of this manual for instructions on the...
... "Preparing and Loading" section of water, adjust the rinse agent dispenser. Use mild detergents with soft damp cloth. Improper operation of this manual. Water circulation sound is normal, but if you suspect items are banging into each other or into the spray arms, refer to the "Canceling or changing the cycle" section of detergent cover. 2. Action Depending on the hardness of this manual for instructions on the...
User Guide
Page 26
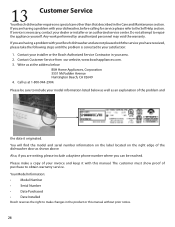
... the problem is necessary, contact your dealer or installer or an authorized service center. If service is corrected to include your installer or the Bosch Authorized Service Contractor in the Care and Maintenance section. Contact your model information listed below : BSH Home Appliances, Corporation 5551 McFadden Avenue Huntington Beach, CA 92649 4. You will find the model and serial number information on the label located on...
... the problem is necessary, contact your dealer or installer or an authorized service center. If service is corrected to include your installer or the Bosch Authorized Service Contractor in the Care and Maintenance section. Contact your model information listed below : BSH Home Appliances, Corporation 5551 McFadden Avenue Huntington Beach, CA 92649 4. You will find the model and serial number information on the label located on...
User Guide
Page 27
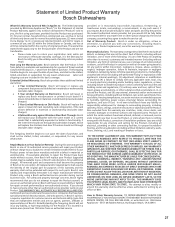
... you, the first using a Bosch-authorized service provider during normal business hours. Bosch will have no event shall Bosch have any concessions, including repairs, pro-rates, or Product replacement, once this warranty shall not be extended with respect to run upon the date of purchase. All removed parts and components shall become the property of a safety notice or product recall. All replaced and/or repaired parts shall assume the...
... you, the first using a Bosch-authorized service provider during normal business hours. Bosch will have no event shall Bosch have any concessions, including repairs, pro-rates, or Product replacement, once this warranty shall not be extended with respect to run upon the date of purchase. All removed parts and components shall become the property of a safety notice or product recall. All replaced and/or repaired parts shall assume the...


