Installation Instructions
Page 3
... into its opening the door on the dishwasher, removing them is no loose electrical connections. Handle with the circuit conductors and connected to be a minimum #14 AWG copper only wire rated at least 6 inches (152.4 mm) away from the cabinet can cause the dishwasher to a dishwasher-dedicated, properly grounded electrical circuit...
... into its opening the door on the dishwasher, removing them is no loose electrical connections. Handle with the circuit conductors and connected to be a minimum #14 AWG copper only wire rated at least 6 inches (152.4 mm) away from the cabinet can cause the dishwasher to a dishwasher-dedicated, properly grounded electrical circuit...
Instructions for Use
Page 3
... highly recommend that you for the first time. Congratulations and thank you have joined the many other top quality Bosch appliances, visit our web site at: www.bosch-home.com/us at: BSH Home Appliances, Corp. 5551 McFadden Avenue Huntington Beach, CA 92649 Table of Contents Important Safety ... and Maintenance 14-15 Self Help 16-17 Customer Service 18 Warranty Information 19 Thank you read this manual before using your dishwasher for selecting a Bosch dishwasher. To learn more about your safety and convenience in mind, and the information contained herein is very important. You ...
... highly recommend that you for the first time. Congratulations and thank you have joined the many other top quality Bosch appliances, visit our web site at: www.bosch-home.com/us at: BSH Home Appliances, Corp. 5551 McFadden Avenue Huntington Beach, CA 92649 Table of Contents Important Safety ... and Maintenance 14-15 Self Help 16-17 Customer Service 18 Warranty Information 19 Thank you read this manual before using your dishwasher for selecting a Bosch dishwasher. To learn more about your safety and convenience in mind, and the information contained herein is very important. You ...
Instructions for Use
Page 13
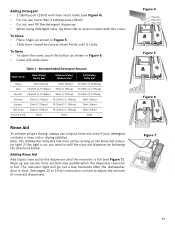
.... Figure 4 3 Tbsp. To Open • To open the cover, push the button as shown in Figure 6. • Cover will slide open. See pages 13 or 14 for instruction on the Rinse Aid indicator light. Max. 2 Tbsp. (25ml) 1 Tbsp. (15ml) Figure 5 Figure 6 Figure 7 11 If this light is full (see Figure 4). •...
.... Figure 4 3 Tbsp. To Open • To open the cover, push the button as shown in Figure 6. • Cover will slide open. See pages 13 or 14 for instruction on the Rinse Aid indicator light. Max. 2 Tbsp. (25ml) 1 Tbsp. (15ml) Figure 5 Figure 6 Figure 7 11 If this light is full (see Figure 4). •...
Instructions for Use
Page 16
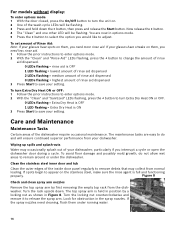
... and Maintenance Maintenance Tasks Certain areas of rinse aid dispensed. 0 LEDs flashing = rinse aid is ON 3 Press Start to remain around or under running water. 14 Figure 8 Check and clean spray arm nozzles Remove the top spray arm by a locking nut as shown in position by first removing the empty top...
... and Maintenance Maintenance Tasks Certain areas of rinse aid dispensed. 0 LEDs flashing = rinse aid is ON 3 Press Start to remain around or under running water. 14 Figure 8 Check and clean spray arm nozzles Remove the top spray arm by a locking nut as shown in position by first removing the empty top...