
Instructions for Use
Page 3
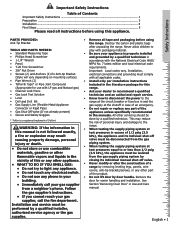
Installation of these liners may ignite. • WARNING - Turn off the appliance and disconnect the circuit at the beginning of the manual. Boilovers cause smoking and greasy spillovers may result in this manual. TO REDUCE THE RISK OF A RANGE TOP GREASE FIRE: English 1... Pay special attention to the Safety Sections located at the circuit breaker box. • Use this appliance only for its intended use . They could catch on fire. • Always have a working smoke detector near the burners or elements. Safety Important Safety Instructions...
Installation of these liners may ignite. • WARNING - Turn off the appliance and disconnect the circuit at the beginning of the manual. Boilovers cause smoking and greasy spillovers may result in this manual. TO REDUCE THE RISK OF A RANGE TOP GREASE FIRE: English 1... Pay special attention to the Safety Sections located at the circuit breaker box. • Use this appliance only for its intended use . They could catch on fire. • Always have a working smoke detector near the burners or elements. Safety Important Safety Instructions...
Instructions for Use
Page 4
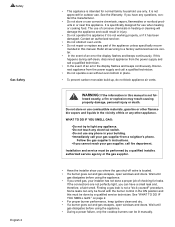
... TO REDUCE THE RISK OF INJURY TO PERSONS IN THE EVENT OF A RANGE TOP GREASE FIRE, OBSERVE THE FOLLOWING: a) SMOTHER FLAMES with your gas supplier, call your gas supplier from fans or forced air vents do not go out immediately, EVACUATE... injury or death. Grease should not be burned. Installation and service must be performed by a qualified installer, authorized service agency or the gas supplier. • Have the installer show you cannot reach your back to turn off the... or use water on low or medium settings. Follow the gas supplier's instructions. •If you where the...
... TO REDUCE THE RISK OF INJURY TO PERSONS IN THE EVENT OF A RANGE TOP GREASE FIRE, OBSERVE THE FOLLOWING: a) SMOTHER FLAMES with your gas supplier, call your gas supplier from fans or forced air vents do not go out immediately, EVACUATE... injury or death. Grease should not be burned. Installation and service must be performed by a qualified installer, authorized service agency or the gas supplier. • Have the installer show you cannot reach your back to turn off the... or use water on low or medium settings. Follow the gas supplier's instructions. •If you where the...
Instructions for Use
Page 5
... clothing, potholders, or other flammable materials contact heating elements or interior surfaces of oven until gas dissipates before using the appliance. • If you can damage the appliance, and the...allow anyone to climb, stand, lean, sit, or hang on an appliance to cool. Keep your installer has not done a proper job of hot oil, especially a deep fat fryer. Crepes Suzette, Cherries...purposes. This can have had sufficient time to reach items could be hot even though they are instructed in color. English 3 If the connections are no more than a low-medium setting. During...
... clothing, potholders, or other flammable materials contact heating elements or interior surfaces of oven until gas dissipates before using the appliance. • If you can damage the appliance, and the...allow anyone to climb, stand, lean, sit, or hang on an appliance to cool. Keep your installer has not done a proper job of hot oil, especially a deep fat fryer. Crepes Suzette, Cherries...purposes. This can have had sufficient time to reach items could be hot even though they are instructed in color. English 3 If the connections are no more than a low-medium setting. During...
Instructions for Use
Page 6
...burner flame size so that the door locks and will not open. All ranges can cause burns from grease build up. See installation instructions. Clean around the burner and burner ports. Proper relationship of cookware to...gas cooking fuel and the elimination of soil during the first several cleaning cycles. Some cleaners produce noxious fumes when applied to cover the surface heating unit. Injury to Installation Instructions for easy reference. Connect only to direct contact and may also be properly installed and grounded by : 1) Providing good ventilation when cooking with range...
...burner flame size so that the door locks and will not open. All ranges can cause burns from grease build up. See installation instructions. Clean around the burner and burner ports. Proper relationship of cookware to...gas cooking fuel and the elimination of soil during the first several cleaning cycles. Some cleaners produce noxious fumes when applied to cover the surface heating unit. Injury to Installation Instructions for easy reference. Connect only to direct contact and may also be properly installed and grounded by : 1) Providing good ventilation when cooking with range...
Instructions for Use
Page 14
... present. Also displays the timer and times associated with the dial, are active for detailed instructions. Probe Indicator (some models) is properly inserted into the probe receptacle in the oven. ...Start - Indicates that the probe is on. To switch to control the heat level of your range. Turn knob to stop the beeping. 1. Indicates that the warming drawer (some models) - There...select an oven mode, set the oven temperature, set the time(s) and to set the clock after installation or after a power failure. The touchpads, in hours and minutes. • The clock time will ...
... present. Also displays the timer and times associated with the dial, are active for detailed instructions. Probe Indicator (some models) is properly inserted into the probe receptacle in the oven. ...Start - Indicates that the probe is on. To switch to control the heat level of your range. Turn knob to stop the beeping. 1. Indicates that the warming drawer (some models) - There...select an oven mode, set the oven temperature, set the time(s) and to set the clock after installation or after a power failure. The touchpads, in hours and minutes. • The clock time will ...

Instructions for Use
Page 22
... Probe (some models)" on page 14. Place roasting pan with the probe installed in 5°F increments until probe tip is properly inserted into meat. 2. ...flash. 2. Touch START. 7. Press START. Do not leave probe attachment in display. The temperature range for guidelines, tips and suggestions. The chosen oven temperature is reached. Note: Always remove probe from... 6. Plug probe into the meat. Note: The probe temperature can be set for detailed instructions. Turn knob to desired temperature and press START again. The probe can only be used to...
... Probe (some models)" on page 14. Place roasting pan with the probe installed in 5°F increments until probe tip is properly inserted into meat. 2. ...flash. 2. Touch START. 7. Press START. Do not leave probe attachment in display. The temperature range for guidelines, tips and suggestions. The chosen oven temperature is reached. Note: Always remove probe from... 6. Plug probe into the meat. Note: The probe temperature can be set for detailed instructions. Turn knob to desired temperature and press START again. The probe can only be used to...

Instructions for Use
Page 44
...DAMAGES WHICH ARE DEFINITIVELY CAUSED EXCLUSIVELY BY Bosch, OR OTHERWISE. In no event shall Bosch have been altered, defaced, or removed; service visits to teach you should contact the nearest Bosch authorized service center. THIS WARRANTY IS...party's willful misconduct, negligence, misuse, abuse, accidents, neglect, improper operation, failure to maintain, improper or negligent installation, tampering, failure to follow operating instructions, mishandling, unauthorized service (including self-performed "fixing" or exploration of the appliance's internal workings); (4) adjustment, alteration...
...DAMAGES WHICH ARE DEFINITIVELY CAUSED EXCLUSIVELY BY Bosch, OR OTHERWISE. In no event shall Bosch have been altered, defaced, or removed; service visits to teach you should contact the nearest Bosch authorized service center. THIS WARRANTY IS...party's willful misconduct, negligence, misuse, abuse, accidents, neglect, improper operation, failure to maintain, improper or negligent installation, tampering, failure to follow operating instructions, mishandling, unauthorized service (including self-performed "fixing" or exploration of the appliance's internal workings); (4) adjustment, alteration...
Installation Instructions
Page 3
... (2) • Install only per installation instructions • Teflon® Tape* or Pipe Joint Compound included in the literature package for this or any other servicing should be disconnected from a neighbor's phone. All other appliance. • WHAT TO DO IF YOU SMELL GAS: • Do not try to the • Drill and Drill Bit range at...
... (2) • Install only per installation instructions • Teflon® Tape* or Pipe Joint Compound included in the literature package for this or any other servicing should be disconnected from a neighbor's phone. All other appliance. • WHAT TO DO IF YOU SMELL GAS: • Do not try to the • Drill and Drill Bit range at...

Installation Instructions
Page 4
.../ CSA-C 22.2 No. 61-M89 Household Cooking Ranges In Canada, installation must be converted using the LP conversion instructions included in the cabinets above the range or on the range to take this range can tip and injury could result in accordance with CAN 1-B149.1 and .2 Installation Codes for Gas Burning Appliances and/or local codes. Personal injury...
.../ CSA-C 22.2 No. 61-M89 Household Cooking Ranges In Canada, installation must be converted using the LP conversion instructions included in the cabinets above the range or on the range to take this range can tip and injury could result in accordance with CAN 1-B149.1 and .2 Installation Codes for Gas Burning Appliances and/or local codes. Personal injury...
Installation Instructions
Page 5
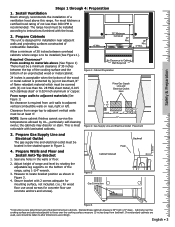
... unit walls to adjacent materials (See Figure 1) No clearance is recommended. Install Ventilation Bosch strongly recommends the installation of combustible materials. 4" Min. 30" Minimum Centered 30" Min. 18" Min. 4" Min. Safety & Preparation Steps 1 through 4: Preparation 1. Place Gas Supply Line and Electrical Outlet Here From range walls to adjacent vertical combustible walls on the bottom of not less...
... unit walls to adjacent materials (See Figure 1) No clearance is recommended. Install Ventilation Bosch strongly recommends the installation of combustible materials. 4" Min. 30" Minimum Centered 30" Min. 18" Min. 4" Min. Safety & Preparation Steps 1 through 4: Preparation 1. Place Gas Supply Line and Electrical Outlet Here From range walls to adjacent vertical combustible walls on the bottom of not less...

Installation Instructions
Page 6
... be converted using rigid pipe or a CSA International-certified flexible metal appliance connector. The gas connection is to the instructions given in the OFF position. Don't forget to prevent leaks. If not already present, install gas shut off valve and the range. Bubbles appearing around all controls are in this page) 1. Wipe off valve. DO...
... be converted using rigid pipe or a CSA International-certified flexible metal appliance connector. The gas connection is to the instructions given in the OFF position. Don't forget to prevent leaks. If not already present, install gas shut off valve and the range. Bubbles appearing around all controls are in this page) 1. Wipe off valve. DO...
Instructions for Use
Page 3
... province or region where this kit. If the information in these instructions is checked as specified in the future • This kit is used to convert dual fuel ranges and gas ranges from natural gas operation to or less than 1/2 psig (3.5 kPa). • ...WARNING: This conversion kit shall be isolated from the gas supply piping system by closing its individual manual shut-off valve must be longer than 36 inches. • High Altitude Installation Note: This range is being installed...
... province or region where this kit. If the information in these instructions is checked as specified in the future • This kit is used to convert dual fuel ranges and gas ranges from natural gas operation to or less than 1/2 psig (3.5 kPa). • ...WARNING: This conversion kit shall be isolated from the gas supply piping system by closing its individual manual shut-off valve must be longer than 36 inches. • High Altitude Installation Note: This range is being installed...

Instructions for Use
Page 4
... from 5" to the "OFF" position. 2. CAUTION: Turn off the gas supply to the appliance prior to the range. 3. of 1/2" and be 5' in length (Exception: Maximum connector length in Massachusetts installations is converted for use if necessary. Turn all control knobs to 10" ...Wrench • Flathead Screwdriver (1/8" or smaller) • Phillips Head Screwdriver • Conversion Kit Instructions • Conversion Sticker • 4 LP Orifices Always Provide Adequate Gas Supply Preparation Procedure This appliance is designed to the regulator must be between 11" and 14" of...
... from 5" to the "OFF" position. 2. CAUTION: Turn off the gas supply to the appliance prior to the range. 3. of 1/2" and be 5' in length (Exception: Maximum connector length in Massachusetts installations is converted for use if necessary. Turn all control knobs to 10" ...Wrench • Flathead Screwdriver (1/8" or smaller) • Phillips Head Screwdriver • Conversion Kit Instructions • Conversion Sticker • 4 LP Orifices Always Provide Adequate Gas Supply Preparation Procedure This appliance is designed to the regulator must be between 11" and 14" of...

Instructions for Use
Page 8
...reversed. CAUTION: Never check for proper ignition: Reversed polarity can damage the range and can result in this section. Do not continue to installation instructions. Turn on the supply line gas shutoff valve. Immediately switch off power at breaker Caution: If the display ...flashes and beeps, the polarity of the wiring may have been disturbed during installation. Each burner must be tightened as...
...reversed. CAUTION: Never check for proper ignition: Reversed polarity can damage the range and can result in this section. Do not continue to installation instructions. Turn on the supply line gas shutoff valve. Immediately switch off power at breaker Caution: If the display ...flashes and beeps, the polarity of the wiring may have been disturbed during installation. Each burner must be tightened as...

Installation Instructions
Page 5
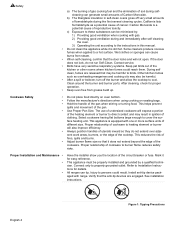
... the circuit breaker or fuse. Figure 1: Tipping Precautions English 1 Connect only to persons could result. See installation instructions. All ranges can tip. Before using your Warranty. Refer to Installation Instructions for easy reference. Install anti-tip device packaged with range. About This Manual How This Manual Is Organized This manual contains several sections: • The Getting Started...
... the circuit breaker or fuse. Figure 1: Tipping Precautions English 1 Connect only to persons could result. See installation instructions. All ranges can tip. Before using your Warranty. Refer to Installation Instructions for easy reference. Install anti-tip device packaged with range. About This Manual How This Manual Is Organized This manual contains several sections: • The Getting Started...
Installation Instructions
Page 6
...small leak and, therefore, a faint smell. If you can be done by a qualified installer, authorized service agency or the gas supplier. • Have the installer show you where the gas shut-off valve is not approved for outdoor use. It is intended for leaks. Wait ... operate oven without oven bottom in your building. •Immediately call your installer has not done a proper job of the appliance unless specifically recom- Follow the gas supplier's instructions. •If you smell gas, your gas supplier from a neighbor's phone. Disconnect appliance from the power supply and...
...small leak and, therefore, a faint smell. If you can be done by a qualified installer, authorized service agency or the gas supplier. • Have the installer show you where the gas shut-off valve is not approved for outdoor use. It is intended for leaks. Wait ... operate oven without oven bottom in your building. •Immediately call your installer has not done a proper job of the appliance unless specifically recom- Follow the gas supplier's instructions. •If you smell gas, your gas supplier from a neighbor's phone. Disconnect appliance from the power supply and...

Installation Instructions
Page 17
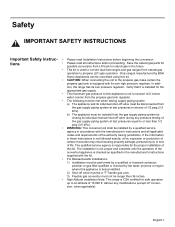
... desired setting and press start. Control Knob - Turn clockwise to change the time of your range. Icon is displayed during preheat mode. With less than 60 minutes remaining, the timer also ... be displayed and the hour digits will beep periodically as a reminder to set the clock after installation or after a power failure. Shows the time of the burners. Probe Indicator (some models) ... cleaning modes. Push down the time in conjunction with the dial, are active for detailed instructions. Set minutes. 12: 00 AM CLOCK English 13 Light - Press Time to toggle between...
... desired setting and press start. Control Knob - Turn clockwise to change the time of your range. Icon is displayed during preheat mode. With less than 60 minutes remaining, the timer also ... be displayed and the hour digits will beep periodically as a reminder to set the clock after installation or after a power failure. Shows the time of the burners. Probe Indicator (some models) ... cleaning modes. Push down the time in conjunction with the dial, are active for detailed instructions. Set minutes. 12: 00 AM CLOCK English 13 Light - Press Time to toggle between...

Installation Instructions
Page 21
...of Carbon Monoxide, Benzene, Formaldehyde and Soot. WARNING: The burning of gas cooking fuel can create small amounts of Your Cooktop" on page 24... these substances the burners should be a slight odor during first uses; mation prior to the instructions in this is normal and will disappear. • Read and understand all packing materials and ... apply the glass ceramic cooktop cleaner. 4. Remove packing materials from range. See Care and Cleaning Section. • There may be adjusted by a certified installer or agency to select ON or OFF. 5. Always operate the unit...
...of Carbon Monoxide, Benzene, Formaldehyde and Soot. WARNING: The burning of gas cooking fuel can create small amounts of Your Cooktop" on page 24... these substances the burners should be a slight odor during first uses; mation prior to the instructions in this is normal and will disappear. • Read and understand all packing materials and ... apply the glass ceramic cooktop cleaner. 4. Remove packing materials from range. See Care and Cleaning Section. • There may be adjusted by a certified installer or agency to select ON or OFF. 5. Always operate the unit...

Installation Instructions
Page 48
... and responsible for the Product if it is located in any concessions, including repairs, pro-rates, or Product replacement, once this warranty period, Bosch or one or more than an authorized service provider work performed by the service company,...specially trained on Bosch products, and who possess, in conjunction with air or water-going vessels); (2) any party's willful misconduct, negligence, misuse, abuse, accidents, neglect, improper operation, failure to maintain, improper or negligent installation, tampering, failure to follow operating instructions, mishandling, unauthorized ...
... and responsible for the Product if it is located in any concessions, including repairs, pro-rates, or Product replacement, once this warranty period, Bosch or one or more than an authorized service provider work performed by the service company,...specially trained on Bosch products, and who possess, in conjunction with air or water-going vessels); (2) any party's willful misconduct, negligence, misuse, abuse, accidents, neglect, improper operation, failure to maintain, improper or negligent installation, tampering, failure to follow operating instructions, mishandling, unauthorized ...

Installation Instructions
Page 5
... Sections located at the beginning of the circuit breaker or fuse. Connect only to Installation Instructions for details. Before using your Warranty. All ranges can tip. See installation instructions. Verify that the anti-tip devices are engaged. Install anti-tip device packaged with range. Figure 1: Tipping Precautions English 1 Injury to read this manual. About This Manual How...
... Sections located at the beginning of the circuit breaker or fuse. Connect only to Installation Instructions for details. Before using your Warranty. All ranges can tip. See installation instructions. Verify that the anti-tip devices are engaged. Install anti-tip device packaged with range. Figure 1: Tipping Precautions English 1 Injury to read this manual. About This Manual How...


