
Installation Instructions
Page 1
... Below Cooking Top and at Rear of the floor. 2. Refer to your serial plate for proper electrical and gas supply, and the stability of Range. 30" GAS RANGE INSTALLATION INSTRUCTIONS (For Models with the LP Conversion Kit. IMPORTANT: SAVE FOR LOCAL ELECTRICAL INSPECTOR'S USE. FOR YOUR SAFETY: - Do not store or use any ...
... Below Cooking Top and at Rear of the floor. 2. Refer to your serial plate for proper electrical and gas supply, and the stability of Range. 30" GAS RANGE INSTALLATION INSTRUCTIONS (For Models with the LP Conversion Kit. IMPORTANT: SAVE FOR LOCAL ELECTRICAL INSPECTOR'S USE. FOR YOUR SAFETY: - Do not store or use any ...
Installation Instructions
Page 2
...contained in serious injuries and 4. Wipe up excess spillage. by a qualified installer or service technician. • Unlike the standard gas range, THIS COOKTOP IS • This range must not exceed 3 feet (36 inches) in length. accordance with local codes or, in their absence, with your...Note to the Consumer • Do not store items of interest to remove the cooktop. See Grounding Instructions on the doors 3. 30" GAS RANGE INSTALLATION INSTRUCTIONS (For Models with Sealed Top Burners) Important Notes to reach over DO NOT MAKE ANY ATTEMPT TO carpeting unless you should...
...contained in serious injuries and 4. Wipe up excess spillage. by a qualified installer or service technician. • Unlike the standard gas range, THIS COOKTOP IS • This range must not exceed 3 feet (36 inches) in length. accordance with local codes or, in their absence, with your...Note to the Consumer • Do not store items of interest to remove the cooktop. See Grounding Instructions on the doors 3. 30" GAS RANGE INSTALLATION INSTRUCTIONS (For Models with Sealed Top Burners) Important Notes to reach over DO NOT MAKE ANY ATTEMPT TO carpeting unless you should...
Installation Instructions
Page 3
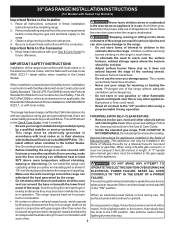
... installed to the wall, make sure that screws completely penetrate dry wall and are secured in wall. 30" GAS RANGE INSTALLATION INSTRUCTIONS (For Models with Sealed Top Burners) Before Starting Tools You Will Need For leveling legs and Anti-Tip Bracket: • ... floor. Anti-Tip Bracket Installation Instructions Important Safety Warning To reduce the risk of tipping of LP/Propane gas • A new flexible metal appliance conduit (1/2" NPT x 3/4" or 1/2" I .D.) supplied with the range. Failure to install the anti-tip bracket will allow the bracket to the wall, drill pilot hole at...
... installed to the wall, make sure that screws completely penetrate dry wall and are secured in wall. 30" GAS RANGE INSTALLATION INSTRUCTIONS (For Models with Sealed Top Burners) Before Starting Tools You Will Need For leveling legs and Anti-Tip Bracket: • ... floor. Anti-Tip Bracket Installation Instructions Important Safety Warning To reduce the risk of tipping of LP/Propane gas • A new flexible metal appliance conduit (1/2" NPT x 3/4" or 1/2" I .D.) supplied with the range. Failure to install the anti-tip bracket will allow the bracket to the wall, drill pilot hole at...

Installation Instructions
Page 4
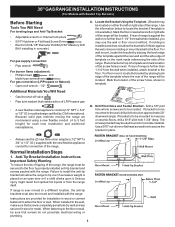
... secured by the Anti-Tip Bracket by adjusting the (4) leveling legs with Sealed Top Burners) C. Connect the range to the manifold and MUST be connected in series with the gas supply line. CL CCeenntteerrlilninee ooffrarannggee 11-1/2" Fig. 4a 23" *15" 7" 2" 10-1/2" Recommended area for ...the back side of range not to the instructions in the floor under the range after gas supply line is pre-set for LP/Propane gas 10 inch manifold pressure, inlet pressure must be no more than regulator manifold pressure. Fig. 4b Fig. 4c 4 30" GAS RANGE INSTALLATION INSTRUCTIONS (For Models...
... secured by the Anti-Tip Bracket by adjusting the (4) leveling legs with Sealed Top Burners) C. Connect the range to the manifold and MUST be connected in series with the gas supply line. CL CCeenntteerrlilninee ooffrarannggee 11-1/2" Fig. 4a 23" *15" 7" 2" 10-1/2" Recommended area for ...the back side of range not to the instructions in the floor under the range after gas supply line is pre-set for LP/Propane gas 10 inch manifold pressure, inlet pressure must be no more than regulator manifold pressure. Fig. 4b Fig. 4c 4 30" GAS RANGE INSTALLATION INSTRUCTIONS (For Models...
Installation Instructions
Page 5
... valve. Using a rubber hose with inside diameter of torque.Be sure to stabilize 5 Turn the gas supply on . Turn burner valve on to the range and use flame to pressure regulator using NO MORE THAN 15ft./lbs. 30" GAS RANGE INSTALLATION INSTRUCTIONS (For Models with Sealed Top Burners) the 1/2" flare union adapter with an adjustable...
... valve. Using a rubber hose with inside diameter of torque.Be sure to stabilize 5 Turn the gas supply on . Turn burner valve on to the range and use flame to pressure regulator using NO MORE THAN 15ft./lbs. 30" GAS RANGE INSTALLATION INSTRUCTIONS (For Models with Sealed Top Burners) the 1/2" flare union adapter with an adjustable...
Installation Instructions
Page 6
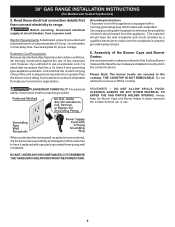
... of the cord in the correct locations. Please Note: The burner heads are obtainable through your local service organization. 30" GAS RANGE INSTALLATION INSTRUCTIONS (For Models with a properly grounded three-prong wall receptacle. Electric Requirements: A dedicated, properly grounded and... polarized branch circuit protected by a qualified electrician to range. Read these electrical connection details first then connect electricity to make sure the receptacle is absolutely necessary that the ...
... of the cord in the correct locations. Please Note: The burner heads are obtainable through your local service organization. 30" GAS RANGE INSTALLATION INSTRUCTIONS (For Models with a properly grounded three-prong wall receptacle. Electric Requirements: A dedicated, properly grounded and... polarized branch circuit protected by a qualified electrician to range. Read these electrical connection details first then connect electricity to make sure the receptacle is absolutely necessary that the ...
Installation Instructions
Page 7
...instructions. d) Within 60 seconds the broil burner should be checked after air has been purged from the oven: a) Set oven to BAKE at 300ºF. a. You will "glow" similar to a light bulb. These control systems require no adjustment. b) Within 60 seconds the oven burner ...of electric igniters should ignite. Flame size can quickly turn control to LITE until all packing materials and literature from supply lines. 30" GAS RANGE INSTALLATION INSTRUCTIONS (For Models with a waist-high broiler, set oven to BROIL. d. If your model is equipped with the ...
...instructions. d) Within 60 seconds the broil burner should be checked after air has been purged from the oven: a) Set oven to BAKE at 300ºF. a. You will "glow" similar to a light bulb. These control systems require no adjustment. b) Within 60 seconds the oven burner ...of electric igniters should ignite. Flame size can quickly turn control to LITE until all packing materials and literature from supply lines. 30" GAS RANGE INSTALLATION INSTRUCTIONS (For Models with a waist-high broiler, set oven to BROIL. d. If your model is equipped with the ...

Installation Instructions
Page 8
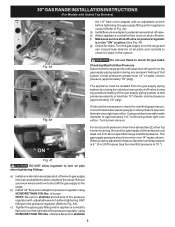
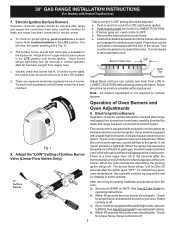
...or the lower panel area. If the flame is yellow in color, increase air shutter opening size. Care, Cleaning and Maintenance Refer to bake at 300°F. To adjust loosen lock screw (see "3" in illustration above ), reposition air shutter, and tighten lock screw. 8 Air Shutter-Broil Burner The ... hold down screws at the front and pull out away from oven front frame, and pull the oven bottom out of oven bottom. 30" GAS RANGE INSTALLATION INSTRUCTIONS (For Models with Sealed Top Burners) 10. After installation is inaccessible, lift the unit slightly at rear of the oven. If...
...or the lower panel area. If the flame is yellow in color, increase air shutter opening size. Care, Cleaning and Maintenance Refer to bake at 300°F. To adjust loosen lock screw (see "3" in illustration above ), reposition air shutter, and tighten lock screw. 8 Air Shutter-Broil Burner The ... hold down screws at the front and pull out away from oven front frame, and pull the oven bottom out of oven bottom. 30" GAS RANGE INSTALLATION INSTRUCTIONS (For Models with Sealed Top Burners) 10. After installation is inaccessible, lift the unit slightly at rear of the oven. If...

Instructions for Use
Page 5
...Important Safety Instructions READ AND SAVE THESE INSTRUCTIONS WARNING: When properly used for , your appliance is intended for details.. WARNING: • All ranges can tip. • Injury to persons could result in this appliance. Contact an authorized servicer. Do not repair or replace any questions,... in heating or cleaning will damage the appliance and could result. • Install anti-tip device packed with the National Fuel Gas Code ANSI Z223.- If this appliance if it for outdoor or other purposes. These precautions will reduce the risk of corrosive chemicals...
...Important Safety Instructions READ AND SAVE THESE INSTRUCTIONS WARNING: When properly used for , your appliance is intended for details.. WARNING: • All ranges can tip. • Injury to persons could result in this appliance. Contact an authorized servicer. Do not repair or replace any questions,... in heating or cleaning will damage the appliance and could result. • Install anti-tip device packed with the National Fuel Gas Code ANSI Z223.- If this appliance if it for outdoor or other purposes. These precautions will reduce the risk of corrosive chemicals...
Instructions for Use
Page 6
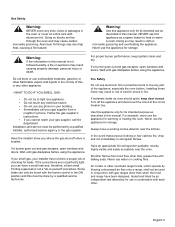
...this or any other . Air curtain or other overhead range hoods, which operate by blowing a downward air flow onto a range, shall not be found with the burner control in conjunction with gas ranges other than when the hood and range have been designed, tested and listed by a qualified service... technician. Warning: Use this appliance only for storage. Wait until gas dissipates before using the appliance. Never use the ...
...this or any other . Air curtain or other overhead range hoods, which operate by blowing a downward air flow onto a range, shall not be found with the burner control in conjunction with gas ranges other than when the hood and range have been designed, tested and listed by a qualified service... technician. Warning: Use this appliance only for storage. Wait until gas dissipates before using the appliance. Never use the ...
Instructions for Use
Page 8
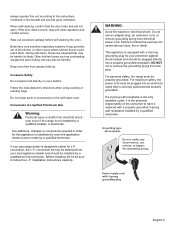
...correctly polarized and properly grounded. Do not use an adapter plug, an extension cord, or remove grounding prong from your gas range model is the personal responsibility of the consumer to have very sensitive respiratory systems. Keep pet birds out of the kitchen...oven bottom. Wipe out excessive spillage before self-cleaning the oven. WARNING: Avoid fire hazard or electrical shock. For personal safety, the range must be installed by a qualified installer or electrician. Any additions, changes or conversions required in order for your protection against shock hazard and...
...correctly polarized and properly grounded. Do not use an adapter plug, an extension cord, or remove grounding prong from your gas range model is the personal responsibility of the consumer to have very sensitive respiratory systems. Keep pet birds out of the kitchen...oven bottom. Wipe out excessive spillage before self-cleaning the oven. WARNING: Avoid fire hazard or electrical shock. For personal safety, the range must be installed by a qualified installer or electrician. Any additions, changes or conversions required in order for your protection against shock hazard and...
Instructions for Use
Page 19
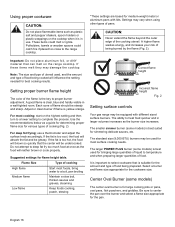
...flame wastes energy, and increases your risk of the flame is yellow-orange. start on the range cooktop. The standard size (9,000 BTU) burners may damage the cooktop. Be sure to the range cooktop. *These settings are based for best cooking results. Correct flame height Setting proper burner...slow boil, thicken sauces and gravies, steaming Low flame Keep foods cooking, poach, stewing Incorrect flame height Fig. 2 Setting surface controls Your gas range may vary when using other types of food being cooked will be equipped with lids. English 16 A good flame is clear, blue and ...
...flame wastes energy, and increases your risk of the flame is yellow-orange. start on the range cooktop. The standard size (9,000 BTU) burners may damage the cooktop. Be sure to the range cooktop. *These settings are based for best cooking results. Correct flame height Setting proper burner...slow boil, thicken sauces and gravies, steaming Low flame Keep foods cooking, poach, stewing Incorrect flame height Fig. 2 Setting surface controls Your gas range may vary when using other types of food being cooked will be equipped with lids. English 16 A good flame is clear, blue and ...


