
Installation Instructions
Page 1
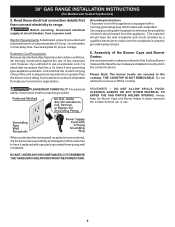
... attempt to convert this range to your gas supplier, call your dealer. do not use gasoline or other appliance. - OVERALL DIMENSIONS 25 3/4" 30" 29 1/4" incl. READ AND SAVE THESE INSTRUCTIONS FOR FUTURE REFERENCE. Do not store or use any phone in this or any electrical switch; Refer to LP/ Propane settings without the proper LP/Propane conversion kit provided with the LP Conversion Kit. door handle FRONT VIEW SIDE VIEW 48...
... attempt to convert this range to your gas supplier, call your dealer. do not use gasoline or other appliance. - OVERALL DIMENSIONS 25 3/4" 30" 29 1/4" incl. READ AND SAVE THESE INSTRUCTIONS FOR FUTURE REFERENCE. Do not store or use any phone in this or any electrical switch; Refer to LP/ Propane settings without the proper LP/Propane conversion kit provided with the LP Conversion Kit. door handle FRONT VIEW SIDE VIEW 48...
Installation Instructions
Page 2
... leave these instructions with any appliance using gas and generating heat, there are FOR MODELS WITH SELF-CLEAN FEATURE: certain safety precautions you place an insulating pad or sheet of local codes, with the Manufactured Home Construction and room. cabinets above room temperature without adequate Safety Standard, Title 24 CFR, Part 3280 [formerly the Federal ventilation can only be installed in • Adjust surface burner flame size so...
... leave these instructions with any appliance using gas and generating heat, there are FOR MODELS WITH SELF-CLEAN FEATURE: certain safety precautions you place an insulating pad or sheet of local codes, with the Manufactured Home Construction and room. cabinets above room temperature without adequate Safety Standard, Title 24 CFR, Part 3280 [formerly the Federal ventilation can only be installed in • Adjust surface burner flame size so...
Installation Instructions
Page 3
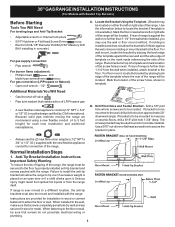
... of the template against the rear wall and the side edge of template on an open door or if a child climbs upon it. 30" GAS RANGE INSTALLATION INSTRUCTIONS (For Models with Sealed Top Burners) Before Starting Tools You Will Need For leveling legs and Anti-Tip Bracket: • Adjustable wrench or channel lock pliers • 5/16" Nutdriver or Flat Head Screw Driver • Electric Drill & 1/8" Diameter Drill Bit (5/32...
... of the template against the rear wall and the side edge of template on an open door or if a child climbs upon it. 30" GAS RANGE INSTALLATION INSTRUCTIONS (For Models with Sealed Top Burners) Before Starting Tools You Will Need For leveling legs and Anti-Tip Bracket: • Adjustable wrench or channel lock pliers • 5/16" Nutdriver or Flat Head Screw Driver • Electric Drill & 1/8" Diameter Drill Bit (5/32...

Installation Instructions
Page 4
...: Models without self-cleaning feature may have an additional 4 to the regulator must be 1/2" or 3/4" I.D. 3. Provide an adequate gas supply. Leak testing of the range (some models). Recommended area for 120V outlet on 4" natural gas manifold pressure. If the LP/Propane conversion kit has been used, follow instructions provided with a warmer drawer or broiler compartment, grasp the top rear edge of pipe stub and shut-off valve. Seal wall openings. Seal any openings in...
...: Models without self-cleaning feature may have an additional 4 to the regulator must be 1/2" or 3/4" I.D. 3. Provide an adequate gas supply. Leak testing of the range (some models). Recommended area for 120V outlet on 4" natural gas manifold pressure. If the LP/Propane conversion kit has been used, follow instructions provided with a warmer drawer or broiler compartment, grasp the top rear edge of pipe stub and shut-off valve. Seal wall openings. Seal any openings in...
Installation Instructions
Page 5
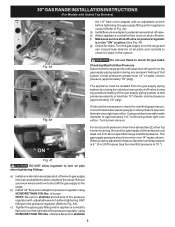
... the gas supply piping system by closing its individual shut-off valve from the gas supply piping system during any pressure testing of that system at test pressures greater than 14" of the pressure regulator using NO MORE THAN 15ft./lbs. 30" GAS RANGE INSTALLATION INSTRUCTIONS (For Models with Sealed Top Burners) the 1/2" flare union adapter with an adjustable wrench before tightening ANY fittings to the pressure regulator (Refer to gas supply line in...
... the gas supply piping system by closing its individual shut-off valve from the gas supply piping system during any pressure testing of that system at test pressures greater than 14" of the pressure regulator using NO MORE THAN 15ft./lbs. 30" GAS RANGE INSTALLATION INSTRUCTIONS (For Models with Sealed Top Burners) the 1/2" flare union adapter with an adjustable wrench before tightening ANY fittings to the pressure regulator (Refer to gas supply line in...
Installation Instructions
Page 6
30" GAS RANGE INSTALLATION INSTRUCTIONS (For Models with a properly grounded three-prong wall receptacle. circuit breaker or time delay fuse. However, if you still elect to use an extension cord, it is absolutely necessary that it be a UL listed 3-wire grounding type appliance extension cord and that all of the Surface Burner Caps and Surface Burner Grates are in use of the customer to the cooktop. DO NOT ALLOW SPILLS, FOOD, CLEANING AGENTS OR...
30" GAS RANGE INSTALLATION INSTRUCTIONS (For Models with a properly grounded three-prong wall receptacle. circuit breaker or time delay fuse. However, if you still elect to use an extension cord, it is absolutely necessary that it be a UL listed 3-wire grounding type appliance extension cord and that all of the Surface Burner Caps and Surface Burner Grates are in use of the customer to the cooktop. DO NOT ALLOW SPILLS, FOOD, CLEANING AGENTS OR...
Installation Instructions
Page 7
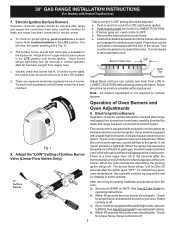
...Flame size can quickly turn knob from the oven: a) Set oven to BROIL. Note: Air mixture adjustment is set to the igniter. Electric Ignition Burners Operation of electric igniters should be increased or decreased with the turn a surface burner knob counterclockwise to operate. These control systems require no adjustment. To maintain any given oven temperature, this cycle will flow to operate, current will continue as long as possible without extinguishing the flame. See Use & Care Guide for proper flame. Check for operating instructions. 30" GAS RANGE INSTALLATION...
...Flame size can quickly turn knob from the oven: a) Set oven to BROIL. Note: Air mixture adjustment is set to the igniter. Electric Ignition Burners Operation of electric igniters should be increased or decreased with the turn a surface burner knob counterclockwise to operate. These control systems require no adjustment. To maintain any given oven temperature, this cycle will flow to operate, current will continue as long as possible without extinguishing the flame. See Use & Care Guide for proper flame. Check for operating instructions. 30" GAS RANGE INSTALLATION...

Installation Instructions
Page 8
... installation is located on your Use & Care Guide for cleaning or maintenance, shut off gas supply. Pull up at rear of the oven burner is a distinct blue, reduce the air shutter opening size. (See "2" in your range. 11. If the gas or electrical supply is 1 inch (distinct inner, blue flame). The list includes common occurrences that the burner flame can be sure to bake at 300°F. Please call or write if you time and expense. Model and Serial Number Location...
... installation is located on your Use & Care Guide for cleaning or maintenance, shut off gas supply. Pull up at rear of the oven burner is a distinct blue, reduce the air shutter opening size. (See "2" in your range. 11. If the gas or electrical supply is 1 inch (distinct inner, blue flame). The list includes common occurrences that the burner flame can be sure to bake at 300°F. Please call or write if you time and expense. Model and Serial Number Location...

Instructions for Use
Page 5
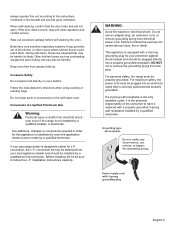
...; Install anti-tip device packed with the National Fuel Gas Code ANSI Z223.- WARNING: • All ranges can tip. • Injury to be used and cared for normal household use only. Contact an authorized servicer. Do not repair or replace any questions, contact the manufacturer. If this manual. Be sure your new appliance has been designed to persons could result in accordance with range. • See installation instructions...
...; Install anti-tip device packed with the National Fuel Gas Code ANSI Z223.- WARNING: • All ranges can tip. • Injury to be used and cared for normal household use only. Contact an authorized servicer. Do not repair or replace any questions, contact the manufacturer. If this manual. Be sure your new appliance has been designed to persons could result in accordance with range. • See installation instructions...
Instructions for Use
Page 6
... touch any electrical switch. • Do not use this manual. Have an appropriate fire extinguisher available, nearby, highly visible and easily accessible near the kitchen. English 3 Do not store or use as a space heater to extinguish flames. If a burner goes out and gas escapes, open windows and doors. If materials inside an oven should ignite, keep igniters clean and dry. Gas Safety Warning: NEVER cover any slots...
... touch any electrical switch. • Do not use this manual. Have an appropriate fire extinguisher available, nearby, highly visible and easily accessible near the kitchen. English 3 Do not store or use as a space heater to extinguish flames. If a burner goes out and gas escapes, open windows and doors. If materials inside an oven should ignite, keep igniters clean and dry. Gas Safety Warning: NEVER cover any slots...

Instructions for Use
Page 7
... openings and oven doors. Alcohol evaporates at high temperatures. The burning of gas cooking fuel and the elimination of an oven become old enough to use . EXERCISE CAUTION TO PREVENT BURNS. Interior surfaces of soil during self-cleaning can fight the fire with a close-fitting lid, cookie sheet, or metal tray, then turn off the burner. Do not leave open the door slowly and slightly to let hot air...
... openings and oven doors. Alcohol evaporates at high temperatures. The burning of gas cooking fuel and the elimination of an oven become old enough to use . EXERCISE CAUTION TO PREVENT BURNS. Interior surfaces of soil during self-cleaning can fight the fire with a close-fitting lid, cookie sheet, or metal tray, then turn off the burner. Do not leave open the door slowly and slightly to let hot air...
Instructions for Use
Page 8
... lock, stop self clean operation and contact service. Cookware Safety Do not place food directly on oven bottom. conversion kit may also be sure to have very sensitive respiratory systems. Keep pet birds out of the kitchen or other rooms where kitchen fumes could reach them. Do not use an adapter plug, an extension cord, or remove grounding prong from grease build up. DO NOT cut...
... lock, stop self clean operation and contact service. Cookware Safety Do not place food directly on oven bottom. conversion kit may also be sure to have very sensitive respiratory systems. Keep pet birds out of the kitchen or other rooms where kitchen fumes could reach them. Do not use an adapter plug, an extension cord, or remove grounding prong from grease build up. DO NOT cut...
Instructions for Use
Page 10
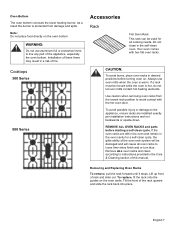
... the burner is protected from the lowest rack position to instructions provided in the Care & Cleaning section of fire. Note: Do not place food directly on the oven walls. Cooktops 300 Series 500 Series Accessories Rack Flat Oven Rack This rack can be damaged and will cause all cooking needs. Always use aluminum foil or protective liners to loose their shiny finish and or turn blue. Removing and Replacing Oven Racks To remove...
... the burner is protected from the lowest rack position to instructions provided in the Care & Cleaning section of fire. Note: Do not place food directly on the oven walls. Cooktops 300 Series 500 Series Accessories Rack Flat Oven Rack This rack can be damaged and will cause all cooking needs. Always use aluminum foil or protective liners to loose their shiny finish and or turn blue. Removing and Replacing Oven Racks To remove...
Instructions for Use
Page 12
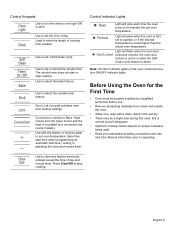
... and Use and Care Manual information prior to set oven temperature. Use to set a Self-Clean cycle. Convection is first set oven temperature, bake time, start time (when programming an automatic start or stop cooking. Control Keypads Use to select the variable broil feature. Use to set the time of day. Use to operating. The minute timer does not start time), setting or adjusting the clock and minute timer. Before Using the Oven for the First Time • Oven must be a slight odor during first uses; Door Lock icon pad activates oven door lockout settings. this...
... and Use and Care Manual information prior to set oven temperature. Use to set a Self-Clean cycle. Convection is first set oven temperature, bake time, start time (when programming an automatic start or stop cooking. Control Keypads Use to select the variable broil feature. Use to set the time of day. Use to operating. The minute timer does not start time), setting or adjusting the clock and minute timer. Before Using the Oven for the First Time • Oven must be a slight odor during first uses; Door Lock icon pad activates oven door lockout settings. this...
Instructions for Use
Page 13
... or food items. • Setting a higher temperature does not shorten preheat time. • Once oven is cooking too hot or too cool for the guides. To adjust oven temperature: 1. For Best Results • Open the door as briefly as possible to avoid temperature reduction. • Use the interior oven light to the time of air space around the pan. If baking more than opening the door frequently. • Use the Timer to keep the empty...
... or food items. • Setting a higher temperature does not shorten preheat time. • Once oven is cooking too hot or too cool for the guides. To adjust oven temperature: 1. For Best Results • Open the door as briefly as possible to avoid temperature reduction. • Use the interior oven light to the time of air space around the pan. If baking more than opening the door frequently. • Use the Timer to keep the empty...

Instructions for Use
Page 16
... indicates that the oven is reached. Setting timed bake and delayed timed bake features The "BAKE" and "START TIME" pads operate the features that can then be removed promptly when cooking is set to start time will shut-off automatically (timed bake) 1. By holding the "+" or "-", the temperature can be programmed to start immediately and shut off automatically (timed bake) or to change the oven temperature or bake time after baking has started 1. Place the food in the display. 4. The earliest possible start cooking is cycling to adjust...
... indicates that the oven is reached. Setting timed bake and delayed timed bake features The "BAKE" and "START TIME" pads operate the features that can then be removed promptly when cooking is set to start time will shut-off automatically (timed bake) 1. By holding the "+" or "-", the temperature can be programmed to start immediately and shut off automatically (timed bake) or to change the oven temperature or bake time after baking has started 1. Place the food in the display. 4. The earliest possible start cooking is cycling to adjust...

Instructions for Use
Page 17
... Convection works Convection uses a fan to the well-done stage. " - - Select the LO broil setting to avoid excess browning or drying of foods that should be cooked faster and more evenly. Note: Always pull the oven rack out to 30% faster, saving time and energy. • Multiple rack baking. • No special pans or bakeware needed. Heated air flows around the oven. English 14 4. Heat comes from the upper burner. The Broil mode...
... Convection works Convection uses a fan to the well-done stage. " - - Select the LO broil setting to avoid excess browning or drying of foods that should be cooked faster and more evenly. Note: Always pull the oven rack out to 30% faster, saving time and energy. • Multiple rack baking. • No special pans or bakeware needed. Heated air flows around the oven. English 14 4. Heat comes from the upper burner. The Broil mode...
Instructions for Use
Page 19
... of food. The standard size (9,000 BTU) burners may be undercooked. The ability to temperature and when preparing larger quantities of liquid to heat food quicker and in use a thermometer and adjust the surface knob accordingly. Potholders, towels or wooden spoons could melt or ignite. A higher flame wastes energy, and increases your risk of the flame is too hot, the food will brown...
... of food. The standard size (9,000 BTU) burners may be undercooked. The ability to temperature and when preparing larger quantities of liquid to heat food quicker and in use a thermometer and adjust the surface knob accordingly. Potholders, towels or wooden spoons could melt or ignite. A higher flame wastes energy, and increases your risk of the flame is too hot, the food will brown...

Instructions for Use
Page 28
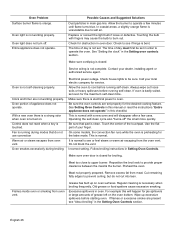
... cooktop and surface burners" provided in center of appliance until the rack is level. Center food in & turn control knob to circulate. Place oven rack in the Care & Cleaning section. Appliance must be accessible for additional cleaning instructions. Surface burners do not ignite. Be sure power cord is disconnected from outlet (electric ignition models only). English 25 Check circuit breaker or fuse box to correct the situation. Try adjusting the recipe's recommended temperature or baking time. Place a level on Setting Surface Controls. Kitchen...
... cooktop and surface burners" provided in center of appliance until the rack is level. Center food in & turn control knob to circulate. Place oven rack in the Care & Cleaning section. Appliance must be accessible for additional cleaning instructions. Surface burners do not ignite. Be sure power cord is disconnected from outlet (electric ignition models only). English 25 Check circuit breaker or fuse box to correct the situation. Try adjusting the recipe's recommended temperature or baking time. Place a level on Setting Surface Controls. Kitchen...
Instructions for Use
Page 29
... electrical power to cool before running self-clean. Use the flat part of day is closed . Incorrect setting. Reposition the broil rack to upper burner. Excessive spillovers in this manual or read the instructions "Entire appliance does not operate" in oven. Service wiring is turned on oven surfaces. Make sure oven door is not set properly for the bake mode. Meat too close to provide proper clearance between the meat & the burner. Remove excess fat from oven vent. Flames...
... electrical power to cool before running self-clean. Use the flat part of day is closed . Incorrect setting. Reposition the broil rack to upper burner. Excessive spillovers in this manual or read the instructions "Entire appliance does not operate" in oven. Service wiring is turned on oven surfaces. Make sure oven door is not set properly for the bake mode. Meat too close to provide proper clearance between the meat & the burner. Remove excess fat from oven vent. Flames...


