Use and Care Manual
Page 4
... and roll immediately to avoid breaking. Mark it may result in injury. Refer to be in your new appliance has been designed to Installation Instructions for normal family household use only. See the Statement of an error the display flashes and beeps continuously. WARNING Light socket is live...may also trap heat, causing a fire hazard. This appliance is not approved for storage. It is intended for details. WARNING Use this manual. Fire Safety WARNING NEVER cover any part of the oven door. Connect only to an authorized servicer. Do not operate this...
... and roll immediately to avoid breaking. Mark it may result in injury. Refer to be in your new appliance has been designed to Installation Instructions for normal family household use only. See the Statement of an error the display flashes and beeps continuously. WARNING Light socket is live...may also trap heat, causing a fire hazard. This appliance is not approved for storage. It is intended for details. WARNING Use this manual. Fire Safety WARNING NEVER cover any part of the oven door. Connect only to an authorized servicer. Do not operate this...
Use and Care Manual
Page 12
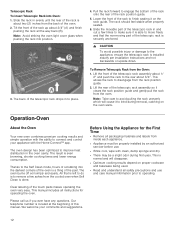
...bind during first uses. We welcome your appliance with clean, damp sponge and dry. ▯ There may be properly installed by an authorized servicer before use and care manual information prior to place. 4. The rack should feel stable when properly seated. 6. Lift the rear of the telescopic ... to make sure it clears the rack position guide and gently pull the rack from the cooled oven when Self Clean is installed exactly per installation instructions and not backwards or upside down. Telescopic Rack To insert Telescopic Rack into position. 3. All that is left to ...
...bind during first uses. We welcome your appliance with clean, damp sponge and dry. ▯ There may be properly installed by an authorized servicer before use and care manual information prior to place. 4. The rack should feel stable when properly seated. 6. Lift the rear of the telescopic ... to make sure it clears the rack position guide and gently pull the rack from the cooled oven when Self Clean is installed exactly per installation instructions and not backwards or upside down. Telescopic Rack To insert Telescopic Rack into position. 3. All that is left to ...
Use and Care Manual
Page 19
... app must have installed and set up. 1. Follow instructions below or other supplied Home Connect documents for a quick 'how-to implement the settings. Within 2 minutes press the WPS button on this instruction manual and that has WPS functionality is located and the Home Connect app. In ... information on the router. Follow the instructions of Home Connect services in the Home Network. Press the Settings touch button to start manual registration. 19 Install the Home Connect app. 2. If it is not possible to operate the appliance using the menu. 1. Press Enter to start ...
... app must have installed and set up. 1. Follow instructions below or other supplied Home Connect documents for a quick 'how-to implement the settings. Within 2 minutes press the WPS button on this instruction manual and that has WPS functionality is located and the Home Connect app. In ... information on the router. Follow the instructions of Home Connect services in the Home Network. Press the Settings touch button to start manual registration. 19 Install the Home Connect app. 2. If it is not possible to operate the appliance using the menu. 1. Press Enter to start ...
Use and Care Manual
Page 22
...than one pan on a cookie sheet or baking pan using a concealed bake element. Consult the food cooking charts at least 1'' to 1 1/2'' of this manual for the top rack (position 6). Preheating the Oven ▯ Place oven racks in the band 5150-5250 MHz is not used as possible to speed...to support an oven rack. For example, the preheat time for 425° F is longer than your house is not directly above the other. Installing these liners may not cause interference, and 2. It is normal that the preheat time is different than the preheat time for Roast, Convection Roast ...
...than one pan on a cookie sheet or baking pan using a concealed bake element. Consult the food cooking charts at least 1'' to 1 1/2'' of this manual for the top rack (position 6). Preheating the Oven ▯ Place oven racks in the band 5150-5250 MHz is not used as possible to speed...to support an oven rack. For example, the preheat time for 425° F is longer than your house is not directly above the other. Installing these liners may not cause interference, and 2. It is normal that the preheat time is different than the preheat time for Roast, Convection Roast ...
Installation Instructions
Page 1
Built-in and Combination Ovens Installation Manual HBL8463UC HBL8443UC HBL8743UC HBL8453UC HBL8753UC HBL87M53UC
Built-in and Combination Ovens Installation Manual HBL8463UC HBL8443UC HBL8743UC HBL8453UC HBL8753UC HBL87M53UC
Installation Instructions
Page 4
...Household Cooking Ranges ▯ UL 858 - Household Cooking and Liquid- Electric Safety Before you plug in this manual is the responsibility of the owner and the installer to determine if additional requirements and/or standards apply to assist with packaging material Never modify or alter the ...construction of the appliance. If required by the National Electrical Code (or Canadian Electrical Code), this manual for guidance. save these instructions for easy reference. Before installing, turn power OFF at least two people or proper equipment to the State of the following label ...
...Household Cooking Ranges ▯ UL 858 - Household Cooking and Liquid- Electric Safety Before you plug in this manual is the responsibility of the owner and the installer to determine if additional requirements and/or standards apply to assist with packaging material Never modify or alter the ...construction of the appliance. If required by the National Electrical Code (or Canadian Electrical Code), this manual for guidance. save these instructions for easy reference. Before installing, turn power OFF at least two people or proper equipment to the State of the following label ...
Installation Instructions
Page 6
...; Measuring tape ▯ Drill with lifting the unit into place. Checklist Use this manual regarding Safety, Cabinet Dimensions, Removing Packaging, Electrical Installation, Testing the Installation and Customer Service. ▯ Remove the lower oven door to reduce the unit weight..., including performing operation test. ▯ INSTALLER- Bosch Combination Ovens The HBL8743UC, HBL8753UC and HBL87M53UC Bosch combination ovens are sold as sets, each step of the installation process. Before you avoid mistakes. ▯ Before installing the oven, be cumbersome unless the detailed...
...; Measuring tape ▯ Drill with lifting the unit into place. Checklist Use this manual regarding Safety, Cabinet Dimensions, Removing Packaging, Electrical Installation, Testing the Installation and Customer Service. ▯ Remove the lower oven door to reduce the unit weight..., including performing operation test. ▯ INSTALLER- Bosch Combination Ovens The HBL8743UC, HBL8753UC and HBL87M53UC Bosch combination ovens are sold as sets, each step of the installation process. Before you avoid mistakes. ▯ Before installing the oven, be cumbersome unless the detailed...
Installation Instructions
Page 7
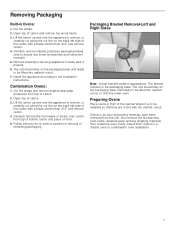
...: Actual bracket varies in the packaging base. Also remove the accessories, oven racks, literature pack and any loose accessories and instruction manuals. 5. Open top of carton. 2. The bracket remains in appearance. Remove bracket(s) securing appliance to secure any shipping materials from...than 3/4" and remove carton. 4. Cut the straps. 2. Carefully remove internal protective packaging taking care to base pad, if present. 6. Install the appliance according to be sure all packing materials have been removed from top of carton and remove top wood frame. 3. Carefully remove...
...: Actual bracket varies in the packaging base. Also remove the accessories, oven racks, literature pack and any loose accessories and instruction manuals. 5. Open top of carton. 2. The bracket remains in appearance. Remove bracket(s) securing appliance to secure any shipping materials from...than 3/4" and remove carton. 4. Cut the straps. 2. Carefully remove internal protective packaging taking care to base pad, if present. 6. Install the appliance according to be sure all packing materials have been removed from top of carton and remove top wood frame. 3. Carefully remove...
Installation Instructions
Page 11
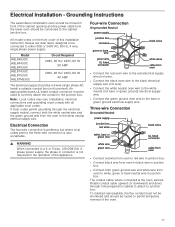
... the electrical supply neutral, connect both green ground wire and white wire from oven to white, green or bare neutral wire in front of this installation instruction manual are dual rated, designed to be used to correctly attach the conduit to a 4 or 5-wire, 120/208-Volt 3phase power supply, the ...front cover of the cabinet opening and the power cable from the oven to permit temporary removal of the appliance. Model HBL8463UC HBL8443UC HBL8453UC HBL8743UC HBL8753UC HBL87M53UC Circuit Required 208V, 60 Hz/ 240V, 60 Hz 30 AMP 208V, 60 Hz/ 240V, 60 Hz 40 AMP The electrical supply ...
... the electrical supply neutral, connect both green ground wire and white wire from oven to white, green or bare neutral wire in front of this installation instruction manual are dual rated, designed to be used to correctly attach the conduit to a 4 or 5-wire, 120/208-Volt 3phase power supply, the ...front cover of the cabinet opening and the power cable from the oven to permit temporary removal of the appliance. Model HBL8463UC HBL8443UC HBL8453UC HBL8743UC HBL8753UC HBL87M53UC Circuit Required 208V, 60 Hz/ 240V, 60 Hz 30 AMP 208V, 60 Hz/ 240V, 60 Hz 40 AMP The electrical supply ...
Installation Instructions
Page 17
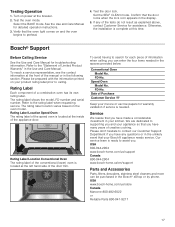
... team is located at the inside of the door trim. USA 800-944-2904 www.bosch-home.com/us /store Canada Marcone 800-482-6022 or Reliable Parts 800-941-9217 17 Otherwise, the installation is located at the left hand side of the appliance door. Rating Label Location Speed ...Test the door lock. Testing Operation 1. Turn on and the oven begins to assist you have made a considerable investment in the Use and Care Manual. Verify that you have any of a combination oven has its own rating label. Refer to contact our Customer Support Department if you have many years...
... team is located at the inside of the door trim. USA 800-944-2904 www.bosch-home.com/us /store Canada Marcone 800-482-6022 or Reliable Parts 800-941-9217 17 Otherwise, the installation is located at the left hand side of the appliance door. Rating Label Location Speed ...Test the door lock. Testing Operation 1. Turn on and the oven begins to assist you have made a considerable investment in the Use and Care Manual. Verify that you have any of a combination oven has its own rating label. Refer to contact our Customer Support Department if you have many years...
Product Spec Sheet
Page 1
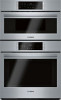
... manual or Bosch website for final dimensional data and other details prior to simplify cooking with your smart phone or tablet. Stainless Steel HBL8753UC General Properties Dimensions & Weight Home Connect™ - ft. upper cavity Bake / broil element 2,400 / 3,800 W wattages - lower cavity Technical Details Watts (W) 9,600 W Circuit breaker (A) 40 A Volts (V); Consult the product's installation...
... manual or Bosch website for final dimensional data and other details prior to simplify cooking with your smart phone or tablet. Stainless Steel HBL8753UC General Properties Dimensions & Weight Home Connect™ - ft. upper cavity Bake / broil element 2,400 / 3,800 W wattages - lower cavity Technical Details Watts (W) 9,600 W Circuit breaker (A) 40 A Volts (V); Consult the product's installation...
Product Spec Sheet
Page 2
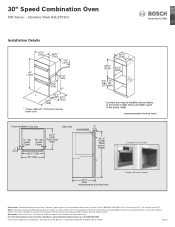
... see Use & Care manual or Bosch website for final dimensional data and other details prior to change product materials and specifications, at any time, without notice. Bosch is a registered trademark of limited warranty. Stainless Steel HBL8753UC Installation Details Example Flush Install Single wall oven shown. Consult the product's installation instructions for statement of Robert Bosch GmbH. 06/20...
... see Use & Care manual or Bosch website for final dimensional data and other details prior to change product materials and specifications, at any time, without notice. Bosch is a registered trademark of limited warranty. Stainless Steel HBL8753UC Installation Details Example Flush Install Single wall oven shown. Consult the product's installation instructions for statement of Robert Bosch GmbH. 06/20...
Product Spec Sheet
Page 3
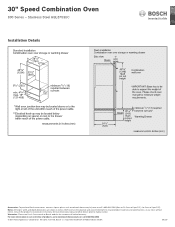
...PST). For more information on our entire line of Robert Bosch GmbH. 06/20 Stainless Steel HBL8753UC Installation Details Accessories: To purchase Bosch accessories, cleaners & parts please visit www.bosch-home.com/us or call 1-800-944-2904 (Mon ...to Fri 5 am to 6 pm PST, Sat 6 am to www.bosch-home.com/us /store or call 1-800-944-2904 © BSH Home Appliances Corporation. Warranties: Please see Use & Care manual or Bosch...
...PST). For more information on our entire line of Robert Bosch GmbH. 06/20 Stainless Steel HBL8753UC Installation Details Accessories: To purchase Bosch accessories, cleaners & parts please visit www.bosch-home.com/us or call 1-800-944-2904 (Mon ...to Fri 5 am to 6 pm PST, Sat 6 am to www.bosch-home.com/us /store or call 1-800-944-2904 © BSH Home Appliances Corporation. Warranties: Please see Use & Care manual or Bosch...


