
Installation Instructions
Page 5
...the opening. English 3 Dimensions for 27" Wall-Mounted Units 24" (610mm) 251/2" (648mm) 263/4" (680mm) 2413/16" (630mm) 281/4" (718mm) 291/16" (738mm) 27" (686mm) min. 43/4" (121mm) max. 313/8" (797mm) 237/8" (606mm) 22" (559mm) Single Oven 27" It is good practice, when oven is required between the side of the ... cabinet base must be properly grounded in accordance with the bottom and the side of at least 1/4" space between the back wall and the right rear of the oven and the wall/door. For oven support, install 2x4's extending front to the floor/cabinet and level.
...the opening. English 3 Dimensions for 27" Wall-Mounted Units 24" (610mm) 251/2" (648mm) 263/4" (680mm) 2413/16" (630mm) 281/4" (718mm) 291/16" (738mm) 27" (686mm) min. 43/4" (121mm) max. 313/8" (797mm) 237/8" (606mm) 22" (559mm) Single Oven 27" It is good practice, when oven is required between the side of the ... cabinet base must be properly grounded in accordance with the bottom and the side of at least 1/4" space between the back wall and the right rear of the oven and the wall/door. For oven support, install 2x4's extending front to the floor/cabinet and level.

Installation Instructions
Page 8
...) 237/8" (606mm) 22" (559mm) Single Oven 30" It is good practice, when oven is installed at the end of a cabinet run , adjacent to a perpendicular wall or cabinet door, to allow at least 1/4" space between the side of the oven and the wall/door. Double Oven 30" It is good practice, when oven is required between the back wall and the right rear...
...) 237/8" (606mm) 22" (559mm) Single Oven 30" It is good practice, when oven is installed at the end of a cabinet run , adjacent to a perpendicular wall or cabinet door, to allow at least 1/4" space between the side of the oven and the wall/door. Double Oven 30" It is good practice, when oven is required between the back wall and the right rear...

Installation Instructions
Page 12
... 60 Hz, 4 wire, single-phase power supply. English 10 Installation Electrical Installation All model ovens on the front cover are dual rated, designed to be used to correctly attach the conduit to the junction box. If local codes permit grounding through the electrical supply neutral, connect both the...208V, 60 Hz 240V, 60 Hz HBN33, HBL33 25 AMP 30 AMP HBN34, HBL34, HBN54, HBL54 HBL85 30 AMP 30 AMP HBN35, HBL35, HBN56, HBL56, HBL57, HBL8650, HBL8750 40 or 50 Amp circuit. Refer to the white neutral electrical supply wire. The electrical supply should be a 4-wire single-phase AC.
... 60 Hz, 4 wire, single-phase power supply. English 10 Installation Electrical Installation All model ovens on the front cover are dual rated, designed to be used to correctly attach the conduit to the junction box. If local codes permit grounding through the electrical supply neutral, connect both the...208V, 60 Hz 240V, 60 Hz HBN33, HBL33 25 AMP 30 AMP HBN34, HBL34, HBN54, HBL54 HBL85 30 AMP 30 AMP HBN35, HBL35, HBN56, HBL56, HBL57, HBL8650, HBL8750 40 or 50 Amp circuit. Refer to the white neutral electrical supply wire. The electrical supply should be a 4-wire single-phase AC.

Installation Instructions
Page 15
... crooked. 3. For 240 V installation, the reading between oven and cabinet back wall. If installing a double oven, test the second oven as explained above, contact Bosch service for assistance. Installing the Oven 1. Lift or slide unit into cabinet cutout. Do not lift appliance by door handle. 2. Push straight in trim. (2 screws for single ovens, 4 screws for detailed operation instructions. 4. The...
... crooked. 3. For 240 V installation, the reading between oven and cabinet back wall. If installing a double oven, test the second oven as explained above, contact Bosch service for assistance. Installing the Oven 1. Lift or slide unit into cabinet cutout. Do not lift appliance by door handle. 2. Push straight in trim. (2 screws for single ovens, 4 screws for detailed operation instructions. 4. The...
Use & Care Manual (all languages)
Page 14
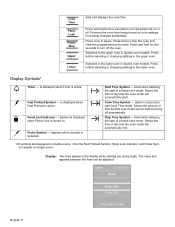
... lines appear in double oven models. Press before turning off . Display Symbols* a Timer - Stop Time Symbol - Press before selecting or changing settings in conjunction with Cook Time mode. Cook Time Panel Lock Pause Stop Upper Lower Sets and displays the cook time. Is displayed when Timer is turned on single ovens. Shows the time...
... lines appear in double oven models. Press before turning off . Display Symbols* a Timer - Stop Time Symbol - Press before selecting or changing settings in conjunction with Cook Time mode. Cook Time Panel Lock Pause Stop Upper Lower Sets and displays the cook time. Is displayed when Timer is turned on single ovens. Shows the time...
Use & Care Manual (all languages)
Page 32
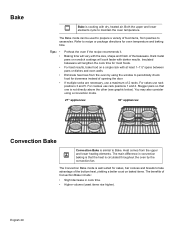
... is similar to take advantage of the bottom heat, yielding a better crust on a single rack with darker results. The main difference in cook time. • Higher volume (.... You may also consider using a convection mode. 27" appliances: 30" appliances: Convection Bake Convection Bake is circulated throughout the oven by using the window to recipe or package directions for doneness instead.... Baking time will cook faster with at least 1-1½" space between pans or dishes and oven walls. Bake t Bake is cooking with the size, shape and finish of the bakeware. For ...
... is similar to take advantage of the bottom heat, yielding a better crust on a single rack with darker results. The main difference in cook time. • Higher volume (.... You may also consider using a convection mode. 27" appliances: 30" appliances: Convection Bake Convection Bake is circulated throughout the oven by using the window to recipe or package directions for doneness instead.... Baking time will cook faster with at least 1-1½" space between pans or dishes and oven walls. Bake t Bake is cooking with the size, shape and finish of the bakeware. For ...


