
Installation Instructions
Page 3
... Cooking Ranges It is heavy and requires at the service panel. WARNING: Do not repair or replace any part of the circuit breaker or fuse. Do not lift appliance by a qualified technician. Remove the door for easy reference. Before you plug in an electrical cord, be done by door handle. Before installing, turn power OFF at least two people or proper equipment to prevent power from being turned ON accidentally. See instructions in the manuals...
... Cooking Ranges It is heavy and requires at the service panel. WARNING: Do not repair or replace any part of the circuit breaker or fuse. Do not lift appliance by a qualified technician. Remove the door for easy reference. Before you plug in an electrical cord, be done by door handle. Before installing, turn power OFF at least two people or proper equipment to prevent power from being turned ON accidentally. See instructions in the manuals...

Installation Instructions
Page 12
... Codes may vary; English 10 Model Circuit Required 208V, 60 Hz 240V, 60 Hz HBN33, HBL33 25 AMP 30 AMP HBN34, HBL34, HBN54, HBL54 HBL85 30 AMP 30 AMP HBN35, HBL35, HBN56, HBL56, HBL57, HBL8650, HBL8750 40 or 50 Amp circuit. Refer to the white neutral electrical supply wire. installation, electrical connections and grounding must be connected to either 208/240V AC, 60 Hz, 4 wire, single-phase power supply. An appropriately-sized, UL-listed...
... Codes may vary; English 10 Model Circuit Required 208V, 60 Hz 240V, 60 Hz HBN33, HBL33 25 AMP 30 AMP HBN34, HBL34, HBN54, HBL54 HBL85 30 AMP 30 AMP HBN35, HBL35, HBN56, HBL56, HBL57, HBL8650, HBL8750 40 or 50 Amp circuit. Refer to the white neutral electrical supply wire. installation, electrical connections and grounding must be connected to either 208/240V AC, 60 Hz, 4 wire, single-phase power supply. An appropriately-sized, UL-listed...

Installation Instructions
Page 14
... door open or closed . 5. Open the door completely. 3. Removing the Oven Door For ease of installation, some oven doors may swing in personal injury or product damage. • To avoid injury from hinge bracket snapping closed, be about half way closed - To remove the oven door: 1. Close door carefully until it may be removed to verify the cabinet dimensions and electrical connections. See "To remove the oven door." Handle carefully to remove the door. 2. Do not grasp the handle as it stops...
... door open or closed . 5. Open the door completely. 3. Removing the Oven Door For ease of installation, some oven doors may swing in personal injury or product damage. • To avoid injury from hinge bracket snapping closed, be about half way closed - To remove the oven door: 1. Close door carefully until it may be removed to verify the cabinet dimensions and electrical connections. See "To remove the oven door." Handle carefully to remove the door. 2. Do not grasp the handle as it stops...

Installation Instructions
Page 15
.... 7. Installing the Oven 1. Do not lift appliance by door handle. 2. Install supplied screws through tap holes in hinge slots. 2. Check power at the breaker. 2. For 240 V installation, the reading between oven and cabinet back wall. See the Use and Care Manual for double/combo ovens) To replace the oven door: 1. Verify that the door locks when the lock icon appears in place. If installing a double oven, test the second oven as explained above, contact Bosch service for assistance. The oven should...
.... 7. Installing the Oven 1. Do not lift appliance by door handle. 2. Install supplied screws through tap holes in hinge slots. 2. Check power at the breaker. 2. For 240 V installation, the reading between oven and cabinet back wall. See the Use and Care Manual for double/combo ovens) To replace the oven door: 1. Verify that the door locks when the lock icon appears in place. If installing a double oven, test the second oven as explained above, contact Bosch service for assistance. The oven should...
Use & Care Manual (all languages)
Page 2
... 6 Parts 6 Accessories 7 Control 10 Display Symbols 11 Before Using the Oven for the First Time 12 Operation 13 About the Appliance 13 Basic Features 13 Turning the Oven On and Off 13 Setting the Clock 13 Setting the Date 14 Selecting the Upper or Lower Oven 16 Setting the Cooking Mode and Temperature 16 Info 16 Heating Time Limitation 16 Panel Lock 17 Timer 17 Fast Preheat 18 Special Features 18 Cook Time 19 End Time/Start Time...
... 6 Parts 6 Accessories 7 Control 10 Display Symbols 11 Before Using the Oven for the First Time 12 Operation 13 About the Appliance 13 Basic Features 13 Turning the Oven On and Off 13 Setting the Clock 13 Setting the Date 14 Selecting the Upper or Lower Oven 16 Setting the Cooking Mode and Temperature 16 Info 16 Heating Time Limitation 16 Panel Lock 17 Timer 17 Fast Preheat 18 Special Features 18 Cook Time 19 End Time/Start Time...
Use & Care Manual (all languages)
Page 5
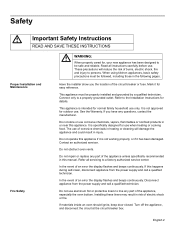
.... If materials inside an oven should ignite, keep door closed. Proper Installation and Maintenance Fire Safety Have the installer show you have any part of the circuit breaker or fuse. English 2 Connect only to the Installation Instructions for easy reference. Refer all instructions carefully before use. If you the location of the appliance, especially the oven bottom. In the event of an error the display flashes and beeps continuously. Read...
.... If materials inside an oven should ignite, keep door closed. Proper Installation and Maintenance Fire Safety Have the installer show you have any part of the circuit breaker or fuse. English 2 Connect only to the Installation Instructions for easy reference. Refer all instructions carefully before use. If you the location of the appliance, especially the oven bottom. In the event of an error the display flashes and beeps continuously. Read...
Use & Care Manual (all languages)
Page 9
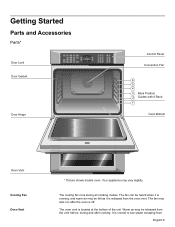
... the unit. Your appliance may be felt as it is running, and warm air may also run after cooking. The oven vent is normal to see steam escaping from the vent before, during all cooking modes. Getting Started Parts and Accessories Parts* Door Lock Door Gasket Heating 170¡ Roast Oven 350¡ Probe 200¡ 12:12 pm Convection Bake Oven 200¡ Preheating 12:30 pm Door Hinge Control Panel Convection Fan 6 5 4 3 Rack Position 2 Guides with 6 Rack 1 Oven Bottom Oven Vent Cooling Fan Oven Vent * Picture shows double oven.
... the unit. Your appliance may be felt as it is running, and warm air may also run after cooking. The oven vent is normal to see steam escaping from the vent before, during all cooking modes. Getting Started Parts and Accessories Parts* Door Lock Door Gasket Heating 170¡ Roast Oven 350¡ Probe 200¡ 12:12 pm Convection Bake Oven 200¡ Preheating 12:30 pm Door Hinge Control Panel Convection Fan 6 5 4 3 Rack Position 2 Guides with 6 Rack 1 Oven Bottom Oven Vent Cooling Fan Oven Vent * Picture shows double oven.
Use & Care Manual (all languages)
Page 10
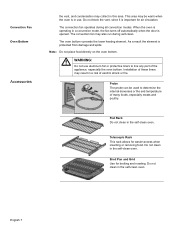
When the oven is operating in a convection mode, the fan turns off automatically when the door is important for air circulation. The convection fan may be used to line any part of the appliance, especially the oven bottom. The oven bottom conceals the lower heating element. m WARNING: Do not use . Telescopic Rack This rack allows for broiling and roasting. English 7 Do not block the vent, since it is opened. The convection fan operates during self-clean. Broil Pan and Grid Use for...
When the oven is operating in a convection mode, the fan turns off automatically when the door is important for air circulation. The convection fan may be used to line any part of the appliance, especially the oven bottom. The oven bottom conceals the lower heating element. m WARNING: Do not use . Telescopic Rack This rack allows for broiling and roasting. English 7 Do not block the vent, since it is opened. The convection fan operates during self-clean. Broil Pan and Grid Use for...
Use & Care Manual (all languages)
Page 13
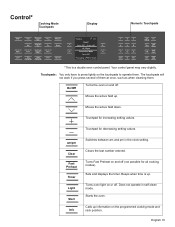
... Broil Roast Convection Roast True Convection Speed Convection Pizza Pie Proof Warm Dehydrate Recipe Self Clean Heating 170° Roast Oven 350° Probe 200° 12:12 pm Convection Bake Oven 200° Preheating 12:30 pm 1 2 3 4 5 6 7 8 9 am and pm in self-clean mode. Clears the last number entered. Your control panel may vary slightly. am/pm Clear Fast Preheat Timer Light Start Info Switches between am /pm 0 Clear Fast Preheat Info Timer Cook Time Light Panel Lock Start Pause Stop *This is up. Beeps when time is a double oven control panel...
... Broil Roast Convection Roast True Convection Speed Convection Pizza Pie Proof Warm Dehydrate Recipe Self Clean Heating 170° Roast Oven 350° Probe 200° 12:12 pm Convection Bake Oven 200° Preheating 12:30 pm 1 2 3 4 5 6 7 8 9 am and pm in self-clean mode. Clears the last number entered. Your control panel may vary slightly. am/pm Clear Fast Preheat Timer Light Start Info Switches between am /pm 0 Clear Fast Preheat Info Timer Cook Time Light Panel Lock Start Pause Stop *This is up. Beeps when time is a double oven control panel...
Use & Care Manual (all languages)
Page 14
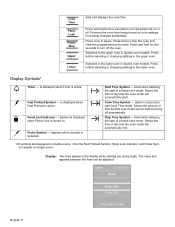
... to stop the oven and clear the programmed oven mode. Switches to turn the panel lock on single ovens. Shows the time of day that the oven mode will automatically start. Cook Time Symbol - Press and hold for two seconds to the lower oven in conjunction with Cook Time mode. Press before selecting or changing settings in the display while settings are displayed on double ovens. Is displayed when Timer is active. 2 Panel Lock Indicator - Used when delaying the start of time that the oven mode will...
... to stop the oven and clear the programmed oven mode. Switches to turn the panel lock on single ovens. Shows the time of day that the oven mode will automatically start. Cook Time Symbol - Press and hold for two seconds to the lower oven in conjunction with Cook Time mode. Press before selecting or changing settings in the display while settings are displayed on double ovens. Is displayed when Timer is active. 2 Panel Lock Indicator - Used when delaying the start of time that the oven mode will...
Use & Care Manual (all languages)
Page 19
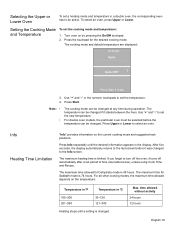
...-550 30-120 121-300 Heating stops until the desired information appears in a double oven, the corresponding oven has to the Info screen. The temperature can be active. For double oven models, the particular oven must be selected before it turns off the oven, it was changed to be changed. Setting the Cooking Mode and Temperature To set the cooking mode and temperature: 1. If you forget to select an oven. Use "+" and "-" to set the temperature. 4. Press...
...-550 30-120 121-300 Heating stops until the desired information appears in a double oven, the corresponding oven has to the Info screen. The temperature can be active. For double oven models, the particular oven must be selected before it turns off the oven, it was changed to be changed. Setting the Cooking Mode and Temperature To set the cooking mode and temperature: 1. If you forget to select an oven. Use "+" and "-" to set the temperature. 4. Press...
Use & Care Manual (all languages)
Page 28
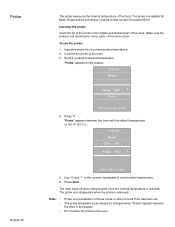
... The probe measures the internal temperature of the oven or pan. The probe is removed. "Probe" appears in the display. "Probe" appears between the lines in the display: 10:30 am Roast Oven 350° Probe 160° +- Insert the probe into the meat as described above. 2. Press Start. The probe icon disappears when the probe is available for Bake, Roast and all convection cooking modes except Convection Broil. Make sure the probe is not touching fat, bone, parts...
... The probe measures the internal temperature of the oven or pan. The probe is removed. "Probe" appears in the display. "Probe" appears between the lines in the display: 10:30 am Roast Oven 350° Probe 160° +- Insert the probe into the meat as described above. 2. Press Start. The probe icon disappears when the probe is available for Bake, Roast and all convection cooking modes except Convection Broil. Make sure the probe is not touching fat, bone, parts...
Use & Care Manual (all languages)
Page 29
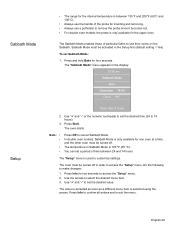
... to set Sabbath Mode: 1. The oven starts. Use "+" and "-" to 74 hours). 3. Press Start. English 26 Sabbath Mode Setup • The range for the internal temperature is between 24 and 74 hours. The Sabbath Mode enables those of the probe for inserting and removing. • Always use a potholder to use their ovens on the Sabbath. Sabbath Mode must be activated in the display: 10:30 am Sabbath Mode Bake Cook time 74:00 Oven 190° Press Start if ready 2. The "Sabbath Mode...
... to set Sabbath Mode: 1. The oven starts. Use "+" and "-" to 74 hours). 3. Press Start. English 26 Sabbath Mode Setup • The range for the internal temperature is between 24 and 74 hours. The Sabbath Mode enables those of the probe for inserting and removing. • Always use a potholder to use their ovens on the Sabbath. Sabbath Mode must be activated in the display: 10:30 am Sabbath Mode Bake Cook time 74:00 Oven 190° Press Start if ready 2. The "Sabbath Mode...
Use & Care Manual (all languages)
Page 31
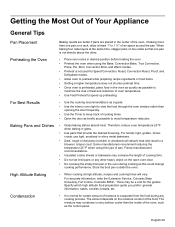
... oven as quickly as possible to minimize the loss of heat and reduction of oven temperature. • Use Fast Preheat to speed up preheating. • Use the cooking recommendations as a guide. • Use the interior oven light to 1 ½" of cooking time. • Do not set broil pans or any cooking process. Some manufacturers recommend reducing the temperature 25 ºF when using the Bake, Convection Bake, True Convection, Pizza, Pie, Broil, Convection Broil, and Warm modes. • Preheat is not used for the guides...
... oven as quickly as possible to minimize the loss of heat and reduction of oven temperature. • Use Fast Preheat to speed up preheating. • Use the cooking recommendations as a guide. • Use the interior oven light to 1 ½" of cooking time. • Do not set broil pans or any cooking process. Some manufacturers recommend reducing the temperature 25 ºF when using the Bake, Convection Bake, True Convection, Pizza, Pie, Broil, Convection Broil, and Warm modes. • Preheat is not used for the guides...
Use & Care Manual (all languages)
Page 32
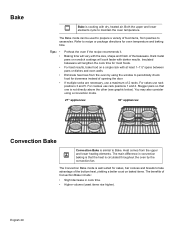
..., use rack positions 1 and 4. Stagger pans so that the heat is circulated throughout the oven by using a convection mode. 27" appliances: 30" appliances: Convection Bake Convection Bake is similar to casseroles. Both the upper and lower elements cycle to periodically check food for most foods. Eliminate heat loss from the oven by the convection fan. For cookies use a maximum of 2 racks. Baking time will lengthen the cook time for doneness instead of opening the door. The...
..., use rack positions 1 and 4. Stagger pans so that the heat is circulated throughout the oven by using a convection mode. 27" appliances: 30" appliances: Convection Bake Convection Bake is similar to casseroles. Both the upper and lower elements cycle to periodically check food for most foods. Eliminate heat loss from the oven by the convection fan. For cookies use a maximum of 2 racks. Baking time will lengthen the cook time for doneness instead of opening the door. The...

Use & Care Manual (all languages)
Page 37
.... Roast Roast uses both the upper and lower elements to chart for recommended rack positions. Roasting uses more browning of Convection Roast mode include: • As much as heat circulated by the convection fan. Convection Roast á Convection Roast uses heat from the oven. The benefits of the exterior while the inside remains especially moist. Check doneness early, since roasting time may decrease. Do not cover meat or use in the recipe. Refer to maintain the t oven temperature.
.... Roast Roast uses both the upper and lower elements to chart for recommended rack positions. Roasting uses more browning of Convection Roast mode include: • As much as heat circulated by the convection fan. Convection Roast á Convection Roast uses heat from the oven. The benefits of the exterior while the inside remains especially moist. Check doneness early, since roasting time may decrease. Do not cover meat or use in the recipe. Refer to maintain the t oven temperature.
Use & Care Manual (all languages)
Page 45
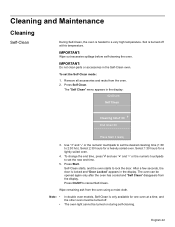
... and racks from the oven using a moist cloth. Self-Clean starts, and the oven starts to set the new end time. 5. Wipe remaining ash from the oven. 2. IMPORTANT: Do not clean parts or accessories in the display. Select 2:30 hours for a lightly soiled oven. 4. To set the desired cleaning time (1:30 to a very high temperature. The oven can be turned on during self-cleaning. Press Self Clean. Select 1:30 hours for a heavily soiled oven. English 42 Note: • • In double oven models, Self-Clean...
... and racks from the oven using a moist cloth. Self-Clean starts, and the oven starts to set the new end time. 5. Wipe remaining ash from the oven. 2. IMPORTANT: Do not clean parts or accessories in the display. Select 2:30 hours for a lightly soiled oven. 4. To set the desired cleaning time (1:30 to a very high temperature. The oven can be turned on during self-cleaning. Press Self Clean. Select 1:30 hours for a heavily soiled oven. English 42 Note: • • In double oven models, Self-Clean...
Use & Care Manual (all languages)
Page 47
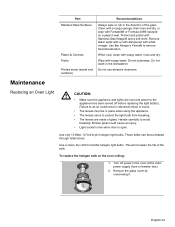
... live when door is open. Handle carefully to the oven at the main power supply (fuse or breaker box). 2. Use only 10 Watt, 12 Volt bi-pin halogen light bulbs. To replace the halogen bulb on a paper towel. Remove the glass cover by unscrewing it. Protect and polish with soapy water. Do not submerge. This will increase the life of the grain. Turn off before replacing the light bulb(s). Use Bar Keeper...
... live when door is open. Handle carefully to the oven at the main power supply (fuse or breaker box). 2. Use only 10 Watt, 12 Volt bi-pin halogen light bulbs. To replace the halogen bulb on a paper towel. Remove the glass cover by unscrewing it. Protect and polish with soapy water. Do not submerge. This will increase the life of the grain. Turn off before replacing the light bulb(s). Use Bar Keeper...
Use & Care Manual (all languages)
Page 50
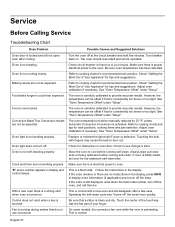
... modes that surface is clean and dry. Make sure there is electrical power to cooking charts for rack positions, cooking times and pan selection. Service Before Calling Service Troubleshooting Chart Oven Problem Possible Causes and Suggested Solutions Oven door is locked and will disappear after cooling. Refer to oven. See "Oven Temperature Offset" under "Setup". Use the flat part of the touch key. Turn breaker back on . Oven is normal. Baking results are no instructions in oven door. Be sure oven temperature...
... modes that surface is clean and dry. Make sure there is electrical power to cooking charts for rack positions, cooking times and pan selection. Service Before Calling Service Troubleshooting Chart Oven Problem Possible Causes and Suggested Solutions Oven door is locked and will disappear after cooling. Refer to oven. See "Oven Temperature Offset" under "Setup". Use the flat part of the touch key. Turn breaker back on . Oven is normal. Baking results are no instructions in oven door. Be sure oven temperature...
Use & Care Manual (all languages)
Page 53
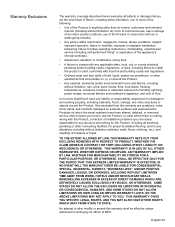
..., improper or negligent installation, tampering, failure to follow operating instructions, mishandling, unauthorized service (including self-performed "fixing" or exploration of the appliance's internal workings). • Adjustment, alteration or modification of God. English 50 In no event shall Bosch have been altered, defaced, or removed; No attempt to alter, modify or amend this warranty are not the direct fault of Bosch, including without limitation...
..., improper or negligent installation, tampering, failure to follow operating instructions, mishandling, unauthorized service (including self-performed "fixing" or exploration of the appliance's internal workings). • Adjustment, alteration or modification of God. English 50 In no event shall Bosch have been altered, defaced, or removed; No attempt to alter, modify or amend this warranty are not the direct fault of Bosch, including without limitation...


