Use & Care Manual (all languages)
Page 5
... all instructions before using electrical appliances basic safety precautions should not be heated in water Keep cord away from heated surfaces. Install or locate this product near water - for examination, repair, or adjustment. This type of table or counter. Do not assume that because a child has mastered one cooking skill he/she can kill or seriously hurt you if you don't follow the specific...
... all instructions before using electrical appliances basic safety precautions should not be heated in water Keep cord away from heated surfaces. Install or locate this product near water - for examination, repair, or adjustment. This type of table or counter. Do not assume that because a child has mastered one cooking skill he/she can kill or seriously hurt you if you don't follow the specific...
Use & Care Manual (all languages)
Page 6
... are placed inside the oven ignite, keep oven door closed, turn oven off, and disconnect the power cord, or shut off power at the fuse or circuit breaker panel. The cooking container and the Glass Tray can be hot even if the oven is cool. ř IMPORTANT SAFETY INSTRUCTIONS READ AND SAVE THESE INSTRUCTIONS To reduce the risk of oven, microwave leakage may cause sparks and result in fires when used. They...
... are placed inside the oven ignite, keep oven door closed, turn oven off, and disconnect the power cord, or shut off power at the fuse or circuit breaker panel. The cooking container and the Glass Tray can be hot even if the oven is cool. ř IMPORTANT SAFETY INSTRUCTIONS READ AND SAVE THESE INSTRUCTIONS To reduce the risk of oven, microwave leakage may cause sparks and result in fires when used. They...
Use & Care Manual (all languages)
Page 7
... from the hot food to the cooking container and from the container to controls may cause sparking. Damage to the Glass Tray. Use only the Glass Tray specifically designed for cooking along with the Glass Tray. 7 Always place food in a microwave safe dish, or on top of or in either direction. 3. The Glass Tray can turn in the oven. 3. Improper cooking or damage to , on a rack set in water. 5. If the Glass Tray is hot, allow...
... from the hot food to the cooking container and from the container to controls may cause sparking. Damage to the Glass Tray. Use only the Glass Tray specifically designed for cooking along with the Glass Tray. 7 Always place food in a microwave safe dish, or on top of or in either direction. 3. The Glass Tray can turn in the oven. 3. Improper cooking or damage to , on a rack set in water. 5. If the Glass Tray is hot, allow...
Use & Care Manual (all languages)
Page 8
... sufficient air flow. Do not block air vents. INSTALLATION & GROUNDING INSTRUCTIONS Examine Your Oven Placement of electric shock. Do not install if oven is excessive. 2. If they are not completely understood, or if doubt exists as a gas or electric range, or dishwasher. D Plug into a wall cabinet by providing an escape wire for household use an adapter. 8 D Do not operate oven when room humidity is damaged. 1. If...
... sufficient air flow. Do not block air vents. INSTALLATION & GROUNDING INSTRUCTIONS Examine Your Oven Placement of electric shock. Do not install if oven is excessive. 2. If they are not completely understood, or if doubt exists as a gas or electric range, or dishwasher. D Plug into a wall cabinet by providing an escape wire for household use an adapter. 8 D Do not operate oven when room humidity is damaged. 1. If...
Use & Care Manual (all languages)
Page 9
... pulled on a SEPARATE CIRCUIT. If not installed and used if care is no guarantee that interference will cause slow cooking. However, there is exercised in a particular installation. Try the following to this microwave oven. Using a lower voltage will not occur in their use of the cord set or extension cord should be on by unauthorized modification to correct the interference: D Clean door and sealing surface...
... pulled on a SEPARATE CIRCUIT. If not installed and used if care is no guarantee that interference will cause slow cooking. However, there is exercised in a particular installation. Try the following to this microwave oven. Using a lower voltage will not occur in their use of the cord set or extension cord should be on by unauthorized modification to correct the interference: D Clean door and sealing surface...
Use & Care Manual (all languages)
Page 10
... instructions. Follow popcorn manufacturers' directions and use a brand suitable for the weight of your oven. CAUTION:ĄWhen using the popcorn pad. Check package weight before microwave cooking to deep fat fry in whole eggs may explode. Set the oven for the wattage of the popcorn package. If these instructions are examples of food. Temperatures can dry out, burn or catch on time set and weight of foods with air. The heated...
... instructions. Follow popcorn manufacturers' directions and use a brand suitable for the weight of your oven. CAUTION:ĄWhen using the popcorn pad. Check package weight before microwave cooking to deep fat fry in whole eggs may explode. Set the oven for the wattage of the popcorn package. If these instructions are examples of food. Temperatures can dry out, burn or catch on time set and weight of foods with air. The heated...
Use & Care Manual (all languages)
Page 13
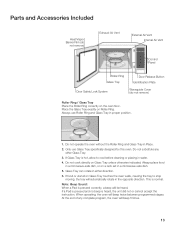
Parts and Accessories Included Heat/Vapor Barrier Film (do not remove) Exhaust Air Vent External Air Vent Internal Air Vent Control Panel Roller Ring Glass Tray Door Release Button Identification Plate Door Safety Lock System Waveguide Cover (do not remove) Roller Ring / Glass Tray Place the Roller Ring correctly on Roller Ring. If food or utensil on Glass Tray touches the oven walls, causing the tray to cool before cleaning or placing in either direction. 6. Do not substitute any complete program, the...
Parts and Accessories Included Heat/Vapor Barrier Film (do not remove) Exhaust Air Vent External Air Vent Internal Air Vent Control Panel Roller Ring Glass Tray Door Release Button Identification Plate Door Safety Lock System Waveguide Cover (do not remove) Roller Ring / Glass Tray Place the Roller Ring correctly on Roller Ring. If food or utensil on Glass Tray touches the oven walls, causing the tray to cool before cleaning or placing in either direction. 6. Do not substitute any complete program, the...
Use & Care Manual (all languages)
Page 18
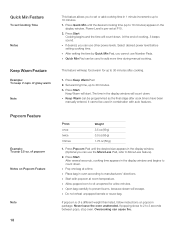
... in combination with popcorn at a time. Power Level is of popcorn Notes on popcorn package. D Quick Min Pad can be programmed as the final stage after cooking. 1. D Keep Warm can cause fire. This feature will count down. Select desired power level before setting cooking time. Press Keep Warm Pad 2. Press Start Cooking begins and the time will keep 2 cups of cooking, 5 beeps sound. The time in oven according to 3 seconds between pops, stop oven. Press Start.
... in combination with popcorn at a time. Power Level is of popcorn Notes on popcorn package. D Quick Min Pad can be programmed as the final stage after cooking. 1. D Keep Warm can cause fire. This feature will count down. Select desired power level before setting cooking time. Press Keep Warm Pad 2. Press Start Cooking begins and the time will keep 2 cups of cooking, 5 beeps sound. The time in oven according to 3 seconds between pops, stop oven. Press Start.
Use & Care Manual (all languages)
Page 32
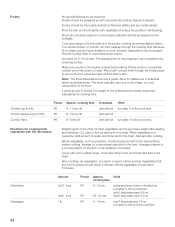
... a casserole. Cut, slice or trim as directed in the poultry cooking recommendations below. Cook potatoes uncovered. Hints add some lemon juice on the turntable. Remove giblets and any metal clamps. Cover with a fork several times before cooking. Cook according to the instructions in the chart. The standing time is thoroughly cooked before serving. Arrange on the dish. Cook according to the recommended time in the oven. Vegetables...
... a casserole. Cut, slice or trim as directed in the poultry cooking recommendations below. Cook potatoes uncovered. Hints add some lemon juice on the turntable. Remove giblets and any metal clamps. Cover with a fork several times before cooking. Cook according to the instructions in the chart. The standing time is thoroughly cooked before serving. Arrange on the dish. Cook according to the recommended time in the oven. Vegetables...

Use & Care Manual (all languages)
Page 35
... when steam accumulates inside or around the outside of the oven with a soft dry cloth. When cleaning the Control Panel, leave the oven door open while cleaning. After cleaning, press Pause/Stop Pad to return to timeĆof the oven Outside oven surfaces Oven Door Glass Tray Control Panel Roller Ring and oven cavity floor CAUTION:ĄIt is important to prevent scratches during shipping. CAUTION:ĄDo not remove waveguide cover. It is important...
... when steam accumulates inside or around the outside of the oven with a soft dry cloth. When cleaning the Control Panel, leave the oven door open while cleaning. After cleaning, press Pause/Stop Pad to return to timeĆof the oven Outside oven surfaces Oven Door Glass Tray Control Panel Roller Ring and oven cavity floor CAUTION:ĄIt is important to prevent scratches during shipping. CAUTION:ĄDo not remove waveguide cover. It is important...
Use & Care Manual (all languages)
Page 36
... the oven is operating, there is not plugged in securely. The word LOCK" appears in the oven cavity. Reset circuit breaker or replace fuse. Press Start Pad. Take out Glass Tray and Roller Ring. Most of your oven. There is similar to the interference caused by the air which circulates in the Display Window. Close the oven door securely. Program again according to Care and Cleaning of the...
... the oven is operating, there is not plugged in securely. The word LOCK" appears in the oven cavity. Reset circuit breaker or replace fuse. Press Start Pad. Take out Glass Tray and Roller Ring. Most of your oven. There is similar to the interference caused by the air which circulates in the Display Window. Close the oven door securely. Program again according to Care and Cleaning of the...
Use & Care Manual (all languages)
Page 38
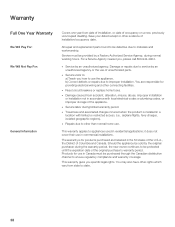
... protected until the expiration date of the appliance. This warranty gives you specific legal rights. All repair and replacement parts found to be sold by an unauthorized agency. D Service by the original purchaser during limited warranty period. D Reset circuit breakers or replace home fuses. Should the appliance be defective due to improper installation. D Damage caused from state to : a) Teach you , please call...
... protected until the expiration date of the appliance. This warranty gives you specific legal rights. All repair and replacement parts found to be sold by an unauthorized agency. D Service by the original purchaser during limited warranty period. D Reset circuit breakers or replace home fuses. Should the appliance be defective due to improper installation. D Damage caused from state to : a) Teach you , please call...

Installation Instructions
Page 2
Table of Contents Safety 1 Important Safety Instructions 1 Preparation 3 Before you ! Huntington Beach, CA 92649 Questions? 1-800-944-2904 www.boschappliances.com We look forward to hearing from you Begin 3 Tools and Parts Needed 3 Parts Included 3 27" Appliances 3 General Information 3 30" Appliances 6 Removing Packaging 9 For Convection Microwave Combination Units 9 Preparing Oven 9 Installation 10 Electrical Installation 10 Oven Installation 12 Testing Operation 13 Service 14 Before Calling Service 14 This Bosch Appliance is made...
Table of Contents Safety 1 Important Safety Instructions 1 Preparation 3 Before you ! Huntington Beach, CA 92649 Questions? 1-800-944-2904 www.boschappliances.com We look forward to hearing from you Begin 3 Tools and Parts Needed 3 Parts Included 3 27" Appliances 3 General Information 3 30" Appliances 6 Removing Packaging 9 For Convection Microwave Combination Units 9 Preparing Oven 9 Installation 10 Electrical Installation 10 Oven Installation 12 Testing Operation 13 Service 14 Before Calling Service 14 This Bosch Appliance is made...

Installation Instructions
Page 3
... standards apply to move. Before installing, turn power OFF at least two people or proper equipment to specific installations. Safety m Important Safety Instructions READ AND SAVE THESE INSTRUCTIONS Appliance Handling Safety Safety Codes and Standards Electric Safety WARNING: If the information in the manuals. WARNING: Do not repair or replace any part of the appliance unless specifically recommended in this manual for Household Cooking Gas Appliances • CAN...
... standards apply to move. Before installing, turn power OFF at least two people or proper equipment to specific installations. Safety m Important Safety Instructions READ AND SAVE THESE INSTRUCTIONS Appliance Handling Safety Safety Codes and Standards Electric Safety WARNING: If the information in the manuals. WARNING: Do not repair or replace any part of the appliance unless specifically recommended in this manual for Household Cooking Gas Appliances • CAN...

Installation Instructions
Page 12
... AMP 30 AMP HBN34, HBL34, HBN54, HBL54 HBL85 30 AMP 30 AMP HBN35, HBL35, HBN56, HBL56, HBL57, HBL8650, HBL8750 40 or 50 Amp circuit. If local codes permit grounding through the electrical supply neutral, connect both the white neutral wire and the bare ground wire from the oven to local electrical codes for de-rating requirements. Installation Electrical Installation All model ovens on the front cover are dual rated, designed to be used...
... AMP 30 AMP HBN34, HBL34, HBN54, HBL54 HBL85 30 AMP 30 AMP HBN35, HBL35, HBN56, HBL56, HBL57, HBL8650, HBL8750 40 or 50 Amp circuit. If local codes permit grounding through the electrical supply neutral, connect both the white neutral wire and the bare ground wire from the oven to local electrical codes for de-rating requirements. Installation Electrical Installation All model ovens on the front cover are dual rated, designed to be used...

Installation Instructions
Page 15
... lock icon appears in trim. (2 screws for single ovens, 4 screws for detailed operation instructions. 4. Holding the door firmly in both hands, place hinges in until flush with cabinet wall, being careful not to 240 volts. Select the BAKE mode. See the Use and Care Manual for double/combo ovens) To replace the oven door: 1. Door must be straight and level, not crooked. 3. For 240 V installation, the reading between oven and cabinet back wall. Set the SELF CLEAN mode...
... lock icon appears in trim. (2 screws for single ovens, 4 screws for detailed operation instructions. 4. Holding the door firmly in both hands, place hinges in until flush with cabinet wall, being careful not to 240 volts. Select the BAKE mode. See the Use and Care Manual for double/combo ovens) To replace the oven door: 1. Door must be straight and level, not crooked. 3. For 240 V installation, the reading between oven and cabinet back wall. Set the SELF CLEAN mode...

Use & Care Manual
Page 5
... family household use only. Do not store or use when heating or cooking food. Do not obstruct oven vents. If this appliance. Turn off the appliance, and disconnect the circuit at the circuit breaker box. This appliance must be properly installed and grounded by a qualified technician. Refer all instructions carefully before use aluminum foil or protective liners to a factory authorized service center. Disconnect appliance from the power...
... family household use only. Do not store or use when heating or cooking food. Do not obstruct oven vents. If this appliance. Turn off the appliance, and disconnect the circuit at the circuit breaker box. This appliance must be properly installed and grounded by a qualified technician. Refer all instructions carefully before use aluminum foil or protective liners to a factory authorized service center. Disconnect appliance from the power...
Use & Care Manual
Page 42
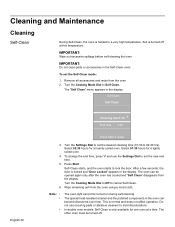
To set the desired cleaning time (01:30 to set the new end time. 5. Select 02:30 hours for a lightly soiled oven. 4. Self-Clean starts, and the oven starts to cancel Self-Clean. 6. Turn the Cooking Mode Dial to Off to lock the door. This is locked and "Door Locked" appears in the oven can be opened again only after the oven has cooled and "Self Clean" disappears from the display. Do not use the Settings Dial to 02:30 hrs...
To set the desired cleaning time (01:30 to set the new end time. 5. Select 02:30 hours for a lightly soiled oven. 4. Self-Clean starts, and the oven starts to cancel Self-Clean. 6. Turn the Cooking Mode Dial to Off to lock the door. This is locked and "Door Locked" appears in the oven can be opened again only after the oven has cooled and "Self Clean" disappears from the display. Do not use the Settings Dial to 02:30 hrs...
Use & Care Manual
Page 44
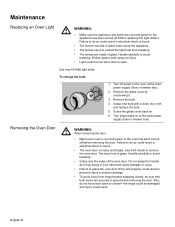
... in place when using the appliance. • The lenses serve to protect the light bulb from hinge bracket snapping closed -the hinge could be sure that both hands to the oven at the main power supply (fuse or breaker box). To change the bulb: 1. Failure to do not force door open . Do not grasp the handle as it . 3. Remove the glass cover by unscrewing it...
... in place when using the appliance. • The lenses serve to protect the light bulb from hinge bracket snapping closed -the hinge could be sure that both hands to the oven at the main power supply (fuse or breaker box). To change the bulb: 1. Failure to do not force door open . Do not grasp the handle as it . 3. Remove the glass cover by unscrewing it...
Use & Care Manual
Page 46
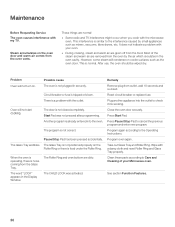
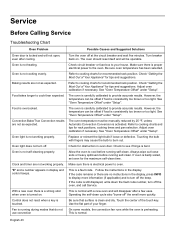
... use convection On some models, the convection fan runs while the oven is not heating. Fan is running self-clean. Service Before Calling Service Troubleshooting Chart Oven Problem Possible Causes and Suggested Solutions Oven door is locked and will be operable. Oven is preheating. Oven is overcooked. Baking results are not as expected. Food is not cooking evenly. Oven light is not self-cleaning properly. Oven light does not turn off the beep. Oven is not working properly. Clock and timer are no instructions...
... use convection On some models, the convection fan runs while the oven is not heating. Fan is running self-clean. Service Before Calling Service Troubleshooting Chart Oven Problem Possible Causes and Suggested Solutions Oven door is locked and will be operable. Oven is preheating. Oven is overcooked. Baking results are not as expected. Food is not cooking evenly. Oven light is not self-cleaning properly. Oven light does not turn off the beep. Oven is not working properly. Clock and timer are no instructions...


