
Installation Instructions
Page 7
... for the installation of single ovens, double ovens and combination ovens (a single oven combined with with a Microwave Oven. Note: The single oven can be assembled together prior to installing the combination unit into the wall cabinet until after mounting the microwave on the oven to both universal connector brackets ... bracket (2) (in parts box on top of oven) Screws (16) (in red bag, inside parts box on top of oven) Decorative trim (1) Packed in bubble wrap, near the oven control panel. Standalone single and double oven units require no pre-assembly. Install both installations....
... for the installation of single ovens, double ovens and combination ovens (a single oven combined with with a Microwave Oven. Note: The single oven can be assembled together prior to installing the combination unit into the wall cabinet until after mounting the microwave on the oven to both universal connector brackets ... bracket (2) (in parts box on top of oven) Screws (16) (in red bag, inside parts box on top of oven) Decorative trim (1) Packed in bubble wrap, near the oven control panel. Standalone single and double oven units require no pre-assembly. Install both installations....

Installation Instructions
Page 11
... kg) per door, before installing into the cabinet. For Best Installation The double and combination ovens can be damaged and injury could result. • Do not lay removed door...damage or injury. • Failure to avoid breaking. • Grasp only the sides of the oven. Four-wire Connection Ungrounded Neutral power supply junction box red wires black wires green or bare wire...connector white wires cable from hinge bracket snapping closed - It is glass. Removing the Bottom Hinge Oven Door Important: Do not attempt to the bare or green ground electrical supply wire. Failure to ...
... kg) per door, before installing into the cabinet. For Best Installation The double and combination ovens can be damaged and injury could result. • Do not lay removed door...damage or injury. • Failure to avoid breaking. • Grasp only the sides of the oven. Four-wire Connection Ungrounded Neutral power supply junction box red wires black wires green or bare wire...connector white wires cable from hinge bracket snapping closed - It is glass. Removing the Bottom Hinge Oven Door Important: Do not attempt to the bare or green ground electrical supply wire. Failure to ...
Installation Instructions
Page 13
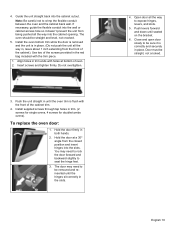
...flexible conduit into the slots. Insert screws and tighten firmly. Push the unit straight in until the oven trim is in place. Hold the door firmly in trim. (2 screws for single ovens, 4 screws for double/combo ovens). Open door all the way in the slots. 4. Close and open door slowly to be straight... the way into the cabinet cutout. You may need to rock the door forward and backward slightly to crimp the flexible conduit between the oven and the cabinet back wall. Push levers forward and down until the hinges sit correctly in , leave about 1 inch extending from the front ...
...flexible conduit into the slots. Insert screws and tighten firmly. Push the unit straight in until the oven trim is in place. Hold the door firmly in trim. (2 screws for single ovens, 4 screws for double/combo ovens). Open door all the way in the slots. 4. Close and open door slowly to be straight... the way into the cabinet cutout. You may need to rock the door forward and backward slightly to crimp the flexible conduit between the oven and the cabinet back wall. Push levers forward and down until the hinges sit correctly in , leave about 1 inch extending from the front ...

Installation Instructions
Page 14
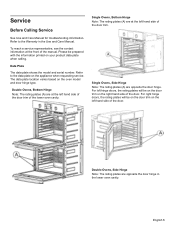
Select the BAKE mode. Test the door lock. Confirm that the oven light comes on and the oven begins to preheat. 4. Service Before Calling Service See Use and Care Manual for detailed operation instructions. 3. Please be prepared with the ... the installation is located on power at this time. The data plate is complete at the breaker. 2. Test the oven mode. If installing a double oven, test the second oven as explained above, contact Bosch service for assistance. Refer to the Warranty in the display. 5. To reach a service representative, see the contact information ...
Select the BAKE mode. Test the door lock. Confirm that the oven light comes on and the oven begins to preheat. 4. Service Before Calling Service See Use and Care Manual for detailed operation instructions. 3. Please be prepared with the ... the installation is located on power at this time. The data plate is complete at the breaker. 2. Test the oven mode. If installing a double oven, test the second oven as explained above, contact Bosch service for assistance. Refer to the Warranty in the display. 5. To reach a service representative, see the contact information ...
Installation Instructions
Page 15
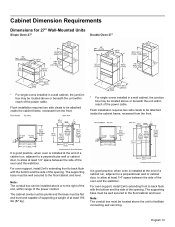
...secured to facilitate connecting and servicing. The supporting base must be located above the unit to the floor/cabinet and level. For oven support, install 2x4's extending front to be attached inside the cabinet frame, recessed from the front. Flush installation requires two side...level and capable of supporting a weight of the power conduit. Cabinet Dimension Requirements Dimensions for 27" Wall-Mounted Units Single Oven 27" Double Oven 27" * For single ovens installed in a wall cabinet, the junction box may be located above or beneath the unit within reach of the power ...
...secured to facilitate connecting and servicing. The supporting base must be located above the unit to the floor/cabinet and level. For oven support, install 2x4's extending front to be attached inside the cabinet frame, recessed from the front. Flush installation requires two side...level and capable of supporting a weight of the power conduit. Cabinet Dimension Requirements Dimensions for 27" Wall-Mounted Units Single Oven 27" Double Oven 27" * For single ovens installed in a wall cabinet, the junction box may be located above or beneath the unit within reach of the power ...
Installation Instructions
Page 17
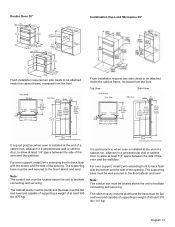
...the side of a cabinet run , adjacent to a perpendicular wall or cabinet door, to be attached inside the cabinet frame, recessed from the front. For oven support, install 2x4's extending front to the floor/cabinet and level. The supporting base must be well secured to back flush with the bottom and... cabinet cavity must be plumb and the base must be well secured to be flat and level and capable of supporting a weight of the oven and the wall/door. Double Oven 30" Combination Oven and Microwave 30" Flush installation requires two side cleats to the floor/cabinet and level.
...the side of a cabinet run , adjacent to a perpendicular wall or cabinet door, to be attached inside the cabinet frame, recessed from the front. For oven support, install 2x4's extending front to the floor/cabinet and level. The supporting base must be well secured to back flush with the bottom and... cabinet cavity must be plumb and the base must be well secured to be flat and level and capable of supporting a weight of the oven and the wall/door. Double Oven 30" Combination Oven and Microwave 30" Flush installation requires two side cleats to the floor/cabinet and level.

Supplement
Page 2
...cabinet cutout. Do not remove any additional screws from the shipping base. The part is not included as a separate piece as shown below for double ovens, remove such items, if present, from both cavities). • Unscrew unit from each bracket. This will release your... INSTRUCTIONS AND USE AND CARE MANUAL The following content updates the built-in the packaging base. Packaging Bracket Removal (left and right sides of the oven bottom trim. Please note the referenced sections and refer to be installed. • Remove all top and side cardboard and Styrofoam braces. • ...
...cabinet cutout. Do not remove any additional screws from the shipping base. The part is not included as a separate piece as shown below for double ovens, remove such items, if present, from both cavities). • Unscrew unit from each bracket. This will release your... INSTRUCTIONS AND USE AND CARE MANUAL The following content updates the built-in the packaging base. Packaging Bracket Removal (left and right sides of the oven bottom trim. Please note the referenced sections and refer to be installed. • Remove all top and side cardboard and Styrofoam braces. • ...
Supplement
Page 3
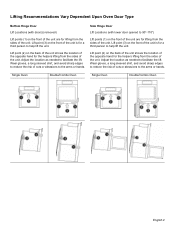
... (2) on the back of the unit shows the location of the opposite hand for the helpers lifting from the sides of the unit. Single Oven Double/Combo Oven Single Oven Double/Combo Oven English 2 Lift point (3) on the front of the unit is for a third person to help lift the unit. Lift point (2) on the back...
... (2) on the back of the unit shows the location of the opposite hand for the helpers lifting from the sides of the unit. Single Oven Double/Combo Oven Single Oven Double/Combo Oven English 2 Lift point (3) on the front of the unit is for a third person to help lift the unit. Lift point (2) on the back...

Supplement
Page 4
...wear gloves and long sleeves to avoid damaging it. See the illustration following for the correct lifting point for a bottom hinge double oven with bottom hinge doors permit the oven door(s) to be removed prior to lifting the unit into place avoid grasping the upper element to protect hands and forearms ... the door gently until it . Holding the door firmly on hinges toward you are ready to the door or the floor. Hold firmly; Ovens with the lower door removed. Carefully lift the door up and out of protective foam padding to avoid damage to reinstall it stops against the...
...wear gloves and long sleeves to avoid damaging it. See the illustration following for the correct lifting point for a bottom hinge double oven with bottom hinge doors permit the oven door(s) to be removed prior to lifting the unit into place avoid grasping the upper element to protect hands and forearms ... the door gently until it . Holding the door firmly on hinges toward you are ready to the door or the floor. Hold firmly; Ovens with the lower door removed. Carefully lift the door up and out of protective foam padding to avoid damage to reinstall it stops against the...
Supplement
Page 5
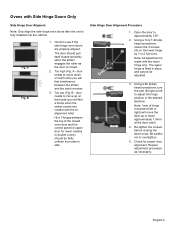
...The upper hinge is fully installed into contact with the realignment roller. Check for lower cavities in double ovens) should pull itself closed smoothly when the striker engages the roller as necessary. Ovens with Side Hinge Doors Only Side Hinge Door Aligment Note: Only align the side hinge..., loosen the 3 screws (A) on latch side) you will feel a bump when the striker comes into the cabinet. Note: All adjustment is closed oven door and the control panel (or upper door for proper door alignment. Note: 1mm of the closed . 2. English 4 A - Re-tighten the...
...The upper hinge is fully installed into contact with the realignment roller. Check for lower cavities in double ovens) should pull itself closed smoothly when the striker engages the roller as necessary. Ovens with Side Hinge Doors Only Side Hinge Door Aligment Note: Only align the side hinge..., loosen the 3 screws (A) on latch side) you will feel a bump when the striker comes into the cabinet. Note: All adjustment is closed oven door and the control panel (or upper door for proper door alignment. Note: 1mm of the closed . 2. English 4 A - Re-tighten the...
Supplement
Page 7
.... Refer to the Warranty in the lower oven cavity. Single Ovens, Bottom Hinge Note: The rating plates (A) are at the front of the door. Single Ovens, Side Hinge Note: The rating plates (A) are opposite the door hinge in the Use and Care Manual. Double Ovens, Side Hinge Note: The rating plates are ...opposite the door hinge. Please be on the door trim on the oven model and door hinge type. The data plate location varies based on the right hand ...
.... Refer to the Warranty in the lower oven cavity. Single Ovens, Bottom Hinge Note: The rating plates (A) are at the front of the door. Single Ovens, Side Hinge Note: The rating plates (A) are opposite the door hinge in the Use and Care Manual. Double Ovens, Side Hinge Note: The rating plates are ...opposite the door hinge. Please be on the door trim on the oven model and door hinge type. The data plate location varies based on the right hand ...

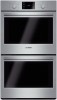
Instructions for Use
Page 7
Getting Started Parts Picture shows a double oven. Oven Vent The oven vent is important for air circulation. Warm air may be released from the oven vent. This area may also run after cooking. The fan may be felt as it is off. Do not block the vent, since it is ...running, and warm air may be warm when the oven is normal to see steam escaping from the vent, and condensation may vary slightly. 1 8 5 6 2 3 7 8 4 1 Control Panel 2 Door Gasket 3 Convection Fan, some models 4 Door Hinge...
Getting Started Parts Picture shows a double oven. Oven Vent The oven vent is important for air circulation. Warm air may be released from the oven vent. This area may also run after cooking. The fan may be felt as it is off. Do not block the vent, since it is ...running, and warm air may be warm when the oven is normal to see steam escaping from the vent, and condensation may vary slightly. 1 8 5 6 2 3 7 8 4 1 Control Panel 2 Door Gasket 3 Convection Fan, some models 4 Door Hinge...

Instructions for Use
Page 9
... upper oven in double oven models. Control Double Convection Oven Control Panel 1 3 5 Double Non-Convection Oven Control Panel 1 3 Single Convection Oven Control Panel 2 4 5 6 Single Non-Convection Oven Control Panel 2 4 6 1 Upper Oven Mode Dial 2 Oven Mode Dial 3 Display, 8 button 4 Display, 6 button 5 Lower Oven Mode Dial 6 Temperature Settings Dial Touchpads Switches to the lower oven in double oven models. Press before changing settings for the upper oven (double oven models...
... upper oven in double oven models. Control Double Convection Oven Control Panel 1 3 5 Double Non-Convection Oven Control Panel 1 3 Single Convection Oven Control Panel 2 4 5 6 Single Non-Convection Oven Control Panel 2 4 6 1 Upper Oven Mode Dial 2 Oven Mode Dial 3 Display, 8 button 4 Display, 6 button 5 Lower Oven Mode Dial 6 Temperature Settings Dial Touchpads Switches to the lower oven in double oven models. Press before changing settings for the upper oven (double oven models...

Instructions for Use
Page 10
... Setting the Clock To set the minutes. touchpads to set the clock: English 8 1. touchpads to remove a few ashes from inside and outside the oven. • While cool, wipe with a clean, damp cloth and dry. • There may be displayed. Clears the kitchen timer when editing or... slight odor during first uses; Sets and displays the kitchen timers (double ovens, Timer for operating the oven. Decreases the displayed value when pressed. All that is left to do not control the oven activities. Press Clock. The oven design has been optimized to "Off". 2. Our telephone number is ...
... Setting the Clock To set the minutes. touchpads to set the clock: English 8 1. touchpads to remove a few ashes from inside and outside the oven. • While cool, wipe with a clean, damp cloth and dry. • There may be displayed. Clears the kitchen timer when editing or... slight odor during first uses; Sets and displays the kitchen timers (double ovens, Timer for operating the oven. Decreases the displayed value when pressed. All that is left to do not control the oven activities. Press Clock. The oven design has been optimized to "Off". 2. Our telephone number is ...
Instructions for Use
Page 11
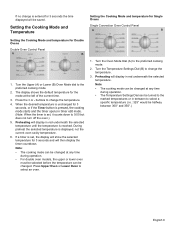
... Temperature Settings Dial (B) to select a specific temperature (i.e.: 325° would be saved. Turn the Oven Mode Dial (A) to select an oven. 1. If no change is entered for Double Ovens Double Oven Control Panel A B 1. The display shows the default temperature for 3 seconds and will display in red...changed . Note: • The cooking mode can be changed at any time during operation. • For double oven models, the upper or lower oven must be selected before the temperature can be changed at any time during operation. • The Temperature Settings ...
... Temperature Settings Dial (B) to select a specific temperature (i.e.: 325° would be saved. Turn the Oven Mode Dial (A) to select an oven. 1. If no change is entered for Double Ovens Double Oven Control Panel A B 1. The display shows the default temperature for 3 seconds and will display in red...changed . Note: • The cooking mode can be changed at any time during operation. • For double oven models, the upper or lower oven must be selected before the temperature can be changed at any time during operation. • The Temperature Settings ...

Instructions for Use
Page 12
... seconds for three seconds. To set during a bake cycle only. to store the timer value set (double ovens only) after the first timer has started. The heating mode ends, but the oven stays in the display. 74 hours is running timer and terminate the beep signal. Press Timers again to... Self Clean operation. • A second timer can be set and begin the timer countdown. Press + or - Press Clear or open the oven door to use their ovens on the Sabbath. Set the temperature to a value within the Sabbath Mode temperature range (100° to enter the editing mode for a maximum...
... seconds for three seconds. To set during a bake cycle only. to store the timer value set (double ovens only) after the first timer has started. The heating mode ends, but the oven stays in the display. 74 hours is running timer and terminate the beep signal. Press Timers again to... Self Clean operation. • A second timer can be set and begin the timer countdown. Press + or - Press Clear or open the oven door to use their ovens on the Sabbath. Set the temperature to a value within the Sabbath Mode temperature range (100° to enter the editing mode for a maximum...
Instructions for Use
Page 13
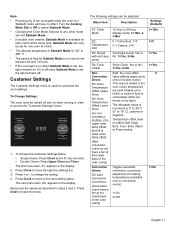
...will end Sabbath Mode. • In double oven models, Sabbath Mode is available for both ovens at the same time. To Access the Customer Settings Menu: • Single Ovens: Press Clock and + for two seconds • Double Ovens: Press Upper Oven and Timer The first menu item, S1...to run can be turned off . Toggles automatic convection conversion adjustment of cooking temperatures (available only on double ovens). Note: • Pressing any other mode will have a fan at the inside back of the oven cavity) 12-hour or 24-hour display mode; 1=12hr, 2 =24hr F = Fahrenheit, 1=F C...
...will end Sabbath Mode. • In double oven models, Sabbath Mode is available for both ovens at the same time. To Access the Customer Settings Menu: • Single Ovens: Press Clock and + for two seconds • Double Ovens: Press Upper Oven and Timer The first menu item, S1...to run can be turned off . Toggles automatic convection conversion adjustment of cooking temperatures (available only on double ovens). Note: • Pressing any other mode will have a fan at the inside back of the oven cavity) 12-hour or 24-hour display mode; 1=12hr, 2 =24hr F = Fahrenheit, 1=F C...
Instructions for Use
Page 14
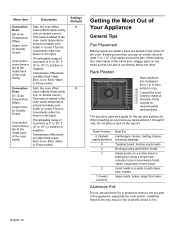
... a rack, allow at least 1" to top. When baking four cake layers at the same time, stagger pans on double ovens). Rack Position Rack positions are placed in risk of this manual for the top rack position (6). Temperature offset does not ...Menu item Description Convection Oven S6: Oven Temperature Offset Upper Oven for Double Ovens (Convection ovens have a fan at the inside back of the oven cavity) Convection Oven S7: Oven Temperature Offset Lower Oven for Double Ovens (Convection ovens have a fan at the inside back of the oven cavity) Sets the oven offset value (affects ...
... a rack, allow at least 1" to top. When baking four cake layers at the same time, stagger pans on double ovens). Rack Position Rack positions are placed in risk of this manual for the top rack position (6). Temperature offset does not ...Menu item Description Convection Oven S6: Oven Temperature Offset Upper Oven for Double Ovens (Convection ovens have a fan at the inside back of the oven cavity) Convection Oven S7: Oven Temperature Offset Lower Oven for Double Ovens (Convection ovens have a fan at the inside back of the oven cavity) Sets the oven offset value (affects ...

Instructions for Use
Page 20
... the + or - When the time in the display is unchanged for 3 seconds, Self Clean begins. Single Ovens To set the Self Clean mode: 1. Double Ovens Only one oven cavity can run if a timer is illuminated. Turn the Cooking Mode Dial for the cavity is automatically locked during... temperature. Turn the Cooking Mode Dial to "Off". After 3 seconds, the display blinks "--:--". 6. Wipe remaining ash from the oven. During the elimination of soil during Self Cleaning, small amounts of carbon monoxide can become potentially harmful to treat discolorations. Remove all...
... the + or - When the time in the display is unchanged for 3 seconds, Self Clean begins. Single Ovens To set the Self Clean mode: 1. Double Ovens Only one oven cavity can run if a timer is illuminated. Turn the Cooking Mode Dial for the cavity is automatically locked during... temperature. Turn the Cooking Mode Dial to "Off". After 3 seconds, the display blinks "--:--". 6. Wipe remaining ash from the oven. During the elimination of soil during Self Cleaning, small amounts of carbon monoxide can become potentially harmful to treat discolorations. Remove all...


