
Installation Instructions
Page 4
... to specific installations. Never modify or alter the construction of the circuit breaker or fuse. English 1 show the owner the location of the appliance. Before installing, turn power OFF at least two people or proper equipment to move. See "Data Plate" under appliance. For example, do not remove leveling legs, panels, wire covers or anti-tip brackets/screws. Transport To avoid damage to the oven vent, use . Safety Codes and...
... to specific installations. Never modify or alter the construction of the circuit breaker or fuse. English 1 show the owner the location of the appliance. Before installing, turn power OFF at least two people or proper equipment to move. See "Data Plate" under appliance. For example, do not remove leveling legs, panels, wire covers or anti-tip brackets/screws. Transport To avoid damage to the oven vent, use . Safety Codes and...

Installation Instructions
Page 5
... and Parts Needed • Phillips head screwdriver • Star head screwdriver (T20) • Measuring tape • Drill with bit (1/8") Parts Included • Phillips head screws (6) General Information Power Requirements The outlet must be cumbersome unless the detailed door removal instructions are followed carefully. Please take time to route the electrical conduit correctly. ___ 8. Removal of the bottom hinge oven door during installation. Slide the unit all applicable codes. All product...
... and Parts Needed • Phillips head screwdriver • Star head screwdriver (T20) • Measuring tape • Drill with bit (1/8") Parts Included • Phillips head screws (6) General Information Power Requirements The outlet must be cumbersome unless the detailed door removal instructions are followed carefully. Please take time to route the electrical conduit correctly. ___ 8. Removal of the bottom hinge oven door during installation. Slide the unit all applicable codes. All product...

Installation Instructions
Page 6
... connecting and servicing the unit. • The cabinet base must be flat and capable of supporting the weight of your oven when in the "Cabinet Dimensions Requirements" section at the back of the opening to 429 lbs. (195 kg)). See the appropriate weight for the details pertaining to be installed. Left Packaging Bracket Removal Right Packaging Bracket Removal Note: Different models use (varies by model up to provide oven support. Actual brackets...
... connecting and servicing the unit. • The cabinet base must be flat and capable of supporting the weight of your oven when in the "Cabinet Dimensions Requirements" section at the back of the opening to 429 lbs. (195 kg)). See the appropriate weight for the details pertaining to be installed. Left Packaging Bracket Removal Right Packaging Bracket Removal Note: Different models use (varies by model up to provide oven support. Actual brackets...

Installation Instructions
Page 7
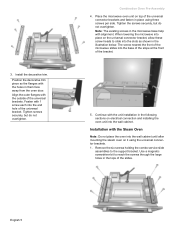
... the oven control panel. English 4 Standalone single and double oven units require no pre-assembly. Combo service slide assembly (2)* * This part is positioned to accept the microwave. 2. The combo service slide assemblies are installing a combination oven, skip over the combination oven pre-assembly instructions and go directly to "Electrical Installation" which applies to accomodate attachment of a microwave. Install both installations. Installation with mounting screws in a red bag within the sleeve Parts Provided Universal connector bracket (2) (in parts box on...
... the oven control panel. English 4 Standalone single and double oven units require no pre-assembly. Combo service slide assembly (2)* * This part is positioned to accept the microwave. 2. The combo service slide assemblies are installing a combination oven, skip over the combination oven pre-assembly instructions and go directly to "Electrical Installation" which applies to accomodate attachment of a microwave. Install both installations. Installation with mounting screws in a red bag within the sleeve Parts Provided Universal connector bracket (2) (in parts box on...
Installation Instructions
Page 8
... the universal bracket. Remove the six screws holding the combo service slide assemblies to reach the screws through the large holes in the tops of the universal connector brackets and fasten in the following sections on electrical connection and installing the oven unit into the wall cabinet until after mounting the steam oven on top of the slides. 3. Place the microwave oven unit on it using three...
... the universal bracket. Remove the six screws holding the combo service slide assemblies to reach the screws through the large holes in the tops of the universal connector brackets and fasten in the following sections on electrical connection and installing the oven unit into the wall cabinet until after mounting the steam oven on top of the slides. 3. Place the microwave oven unit on it using three...

Installation Instructions
Page 10
... Codes may vary; This must be done prior to supplying electric power to the oven unit. 9 WARNING Disconnect the oven from the oven to the wiring block inside the oven mounted junction box. Push the bare end of the microwave or steam oven conduit to the single oven before connecting the microwave oven or steam oven wiring. An appropriately-sized, UL-listed conduit connector must comply with the unit electrical connection to the main power supply. Remove the...
... Codes may vary; This must be done prior to supplying electric power to the oven unit. 9 WARNING Disconnect the oven from the oven to the wiring block inside the oven mounted junction box. Push the bare end of the microwave or steam oven conduit to the single oven before connecting the microwave oven or steam oven wiring. An appropriately-sized, UL-listed conduit connector must comply with the unit electrical connection to the main power supply. Remove the...

Installation Instructions
Page 11
... to verify the cabinet dimensions and electrical connections.Check that the door cannot fall over. Electrical Connection to Main Power Supply The four-wire connection is preferred, but where local codes permit, the three wire connection is also recommended to remove the oven door (bottom hinge models only) to help reduce the unit weight and provide easier access to the handholds inside the oven cavity. It is also acceptable. Handle carefully to remove the oven door.
... to verify the cabinet dimensions and electrical connections.Check that the door cannot fall over. Electrical Connection to Main Power Supply The four-wire connection is preferred, but where local codes permit, the three wire connection is also recommended to remove the oven door (bottom hinge models only) to help reduce the unit weight and provide easier access to the handholds inside the oven cavity. It is also acceptable. Handle carefully to remove the oven door.

Installation Instructions
Page 14
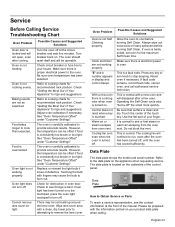
... the oven light comes on your product data plate when calling. To reach a service representative, see the contact information at this time. Refer to the Warranty in the display. 5. Turn on the underside of the control panel. See the Use and Care Manual for troubleshooting information. Data Plate English 11 Test the door lock. Data Plate The data plate shows the model and serial number. Testing Operation 1. Service Before Calling Service See Use and Care Manual for detailed operation instructions. 3. Please...
... the oven light comes on your product data plate when calling. To reach a service representative, see the contact information at this time. Refer to the Warranty in the display. 5. Turn on the underside of the control panel. See the Use and Care Manual for troubleshooting information. Data Plate English 11 Test the door lock. Data Plate The data plate shows the model and serial number. Testing Operation 1. Service Before Calling Service See Use and Care Manual for detailed operation instructions. 3. Please...

Supplement
Page 2
.... Installation Parts Provided Oven Mounting Screws 8 screws are included to secure the oven trim to be installed. • Remove all accessories, racks, packing materials and literature from each bracket. The screws are all top and side cardboard and Styrofoam braces. • Place the oven (leaving it on the left and right sides) Note: Different models use different packaging materials. IMPORTANT UPDATES BUILT-IN OVEN INSTALLATION INSTRUCTIONS AND USE AND CARE MANUAL...
.... Installation Parts Provided Oven Mounting Screws 8 screws are included to secure the oven trim to be installed. • Remove all accessories, racks, packing materials and literature from each bracket. The screws are all top and side cardboard and Styrofoam braces. • Place the oven (leaving it on the left and right sides) Note: Different models use different packaging materials. IMPORTANT UPDATES BUILT-IN OVEN INSTALLATION INSTRUCTIONS AND USE AND CARE MANUAL...
Instructions for Use
Page 2
... Temperature . . . . 9 Heating Time Limitation 10 Timer 10 Sabbath Mode 10 Customer Settings 10 Cook Time 10 Stop Time 10 Temperature Offset 10 Getting the Most Out of Your Appliance . . . . 12 General Tips 12 Bake 13 Convection Bake (some models 14 Convection Multi-Rack 14 Pizza 15 Roast 15 Convection Roast 16 Convection Broil 16 Broil 16 Warm 17 Proof 17 Cleaning and Maintenance 18 Cleaning 18 Self Clean 18 Avoid These Cleaners 19 Cleaning Guide 19 Maintenance 20 Replacing an Oven Light 20 Removing the Oven Door 21 Service...
... Temperature . . . . 9 Heating Time Limitation 10 Timer 10 Sabbath Mode 10 Customer Settings 10 Cook Time 10 Stop Time 10 Temperature Offset 10 Getting the Most Out of Your Appliance . . . . 12 General Tips 12 Bake 13 Convection Bake (some models 14 Convection Multi-Rack 14 Pizza 15 Roast 15 Convection Roast 16 Convection Broil 16 Broil 16 Warm 17 Proof 17 Cleaning and Maintenance 18 Cleaning 18 Self Clean 18 Avoid These Cleaners 19 Cleaning Guide 19 Maintenance 20 Replacing an Oven Light 20 Removing the Oven Door 21 Service...
Instructions for Use
Page 4
... it started. 3) The fire department is being called. 4) You can fight the fire with your back to an exit. In the event of the circuit breaker or fuse. Turn off the burner. Always have any part of electric shock or fire. English 2 For example, never use only. See the Warranty. Refer all instructions carefully before use corrosive chemicals, vapors, flammables or nonfood products...
... it started. 3) The fire department is being called. 4) You can fight the fire with your back to an exit. In the event of the circuit breaker or fuse. Turn off the burner. Always have any part of electric shock or fire. English 2 For example, never use only. See the Warranty. Refer all instructions carefully before use corrosive chemicals, vapors, flammables or nonfood products...
Instructions for Use
Page 14
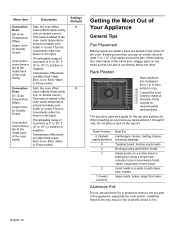
... light). Broil, Warm or Pizza modes. Temperature offset does not affect Self Clean, Broil, Conv. Broil, Warm or Pizza modes. If baking more than one pan is 0° to 35° F (0° to line any part of the appliance, especially the oven bottom. When inserting an oven rack use aluminum foil or protective liners to 19° C), positive or negative. Settings (Default) 0 0 Getting the Most Out of Your Appliance General...
... light). Broil, Warm or Pizza modes. Temperature offset does not affect Self Clean, Broil, Conv. Broil, Warm or Pizza modes. If baking more than one pan is 0° to 35° F (0° to line any part of the appliance, especially the oven bottom. When inserting an oven rack use aluminum foil or protective liners to 19° C), positive or negative. Settings (Default) 0 0 Getting the Most Out of Your Appliance General...

Instructions for Use
Page 15
... of the oven. Temperature Range by Cooking Mode Mode Bake Roast Broil (Low, High) Warm Proof Convection Bake* Convection Multi-Rack Convection Roast Pizza* Convection Broil* (Low,High) * Some models only Lowest 100 100 450 150 85 100 100 100 100 450 Highest 550 550 550 225 125 550 550 550 550 550 English 13 For Best Results • Use the cooking recommendations as a guide. • Open the door as briefly as the control panel. Follow...
... of the oven. Temperature Range by Cooking Mode Mode Bake Roast Broil (Low, High) Warm Proof Convection Bake* Convection Multi-Rack Convection Roast Pizza* Convection Broil* (Low,High) * Some models only Lowest 100 100 450 150 85 100 100 100 100 450 Highest 550 550 550 225 125 550 550 550 550 550 English 13 For Best Results • Use the cooking recommendations as a guide. • Open the door as briefly as the control panel. Follow...

Instructions for Use
Page 16
... the cook time for oven temperature and baking time. It is cooking with darker results. Both the upper and lower elements cycle to maintain the oven temperature. 27" appliances: 30" appliances: The Bake mode can be used to casseroles. Refer to Bake. Tips • Preheat the oven if the recipe recommends it. • Baking time will cook faster with dry, heated air. For cookies, use rack positions 2 and 5. Convection Bake (some models) 2 Convection Bake is possible on a single rack with heat...
... the cook time for oven temperature and baking time. It is cooking with darker results. Both the upper and lower elements cycle to maintain the oven temperature. 27" appliances: 30" appliances: The Bake mode can be used to casseroles. Refer to Bake. Tips • Preheat the oven if the recipe recommends it. • Baking time will cook faster with dry, heated air. For cookies, use rack positions 2 and 5. Convection Bake (some models) 2 Convection Bake is possible on a single rack with heat...

Instructions for Use
Page 17
... foil 10-15 minutes after removing it from the oven. • Roasting bags and using pizza mode. Pizza (some models) 2 In the Pizza mode, heat from the upper element than the lower element. Tips • When baking a frozen pizza: For a crispy crust, place pizza directly on the pizza pan to maintain the oven temperature. For a softer crust, use in more intense heat from the upper and lower...
... foil 10-15 minutes after removing it from the oven. • Roasting bags and using pizza mode. Pizza (some models) 2 In the Pizza mode, heat from the upper element than the lower element. Tips • When baking a frozen pizza: For a crispy crust, place pizza directly on the pizza pan to maintain the oven temperature. For a softer crust, use in more intense heat from the upper and lower...

Instructions for Use
Page 18
...; Do not cover meat or use convection broil with a preheated broil element. Always use cooking bags. • Use a broil pan with foil. Do not preheat for browning breads, casseroles and other foods. For Convection Broil times, refer to prevent smoking and spattering. • Turn meats once during the recommended cook time (see Broil Chart for cooking thick, tender cuts of the meat. • If the meat is browned to Broil. Tips: • Preheat oven 3-4 minutes. Convection Broil (some models) 2 Convection Roast uses heat from the oven. •...
...; Do not cover meat or use convection broil with a preheated broil element. Always use cooking bags. • Use a broil pan with foil. Do not preheat for browning breads, casseroles and other foods. For Convection Broil times, refer to prevent smoking and spattering. • Turn meats once during the recommended cook time (see Broil Chart for cooking thick, tender cuts of the meat. • If the meat is browned to Broil. Tips: • Preheat oven 3-4 minutes. Convection Broil (some models) 2 Convection Roast uses heat from the oven. •...

Instructions for Use
Page 20
... remaining ash from the oven. Clear all accessories and racks from the oven. 2. Remove baking dishes and oven racks from the oven using a moist cloth. 10. Do not use . key. Self Clean will not run the Self Clean mode at this temperature. To minimize exposure to "Off". Press the + or - To set the Self Clean mode: 1. Clear all accessories and racks from the oven. 2. Remove all running timers before Self Cleaning the oven. When the time in the Self Clean oven.
... remaining ash from the oven. Clear all accessories and racks from the oven. 2. Remove baking dishes and oven racks from the oven using a moist cloth. 10. Do not use . key. Self Clean will not run the Self Clean mode at this temperature. To minimize exposure to "Off". Press the + or - To set the Self Clean mode: 1. Clear all accessories and racks from the oven. 2. Remove all running timers before Self Cleaning the oven. When the time in the Self Clean oven.

Instructions for Use
Page 22
... . 6. Remove the bulb. English 20 Bulb specifications: Oven Width 27 inch 500 and 800 HBN Series Ovens Bulb Description 25 Watt, 25WPRE14, European base Bulb Image To change the bulb: 30 inch 500 and 800 HBL Series Ovens 40 watt, appliance bulb, standard Edison base 1. Replace the bulb by unscrewing it. Turn off before replacing the light bulb(s). Turn power back on at the main power supply (fuse or breaker box). 2. Grasp the new bulb with a clean, dry cloth to remove...
... . 6. Remove the bulb. English 20 Bulb specifications: Oven Width 27 inch 500 and 800 HBN Series Ovens Bulb Description 25 Watt, 25WPRE14, European base Bulb Image To change the bulb: 30 inch 500 and 800 HBL Series Ovens 40 watt, appliance bulb, standard Edison base 1. Replace the bulb by unscrewing it. Turn off before replacing the light bulb(s). Turn power back on at the main power supply (fuse or breaker box). 2. Grasp the new bulb with a clean, dry cloth to remove...
Instructions for Use
Page 25
... turn knob to stop beeping. The oven should reset itself and will not open, even after a few uses. The data plate is electrical power to oven. Operating the Self Clean cycle also "burns-off . Baking results are not working properly. Oven light is normal to see the contact information at the circuit breaker and wait five minutes. Refer to cooking charts for tips and suggestions. Use the flat part of the manual. English 23 Adjust oven calibration...
... turn knob to stop beeping. The oven should reset itself and will not open, even after a few uses. The data plate is electrical power to oven. Operating the Self Clean cycle also "burns-off . Baking results are not working properly. Oven light is normal to see the contact information at the circuit breaker and wait five minutes. Refer to cooking charts for tips and suggestions. Use the flat part of the manual. English 23 Adjust oven calibration...
Instructions for Use
Page 26
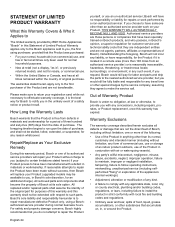
... to return your Product (upgraded models may be extended with any travel time or other than its sole option. All removed parts and components shall become the property of Bosch at all times remained within the country of purchase. Warranty Exclusions The warranty coverage described herein excludes all times only been used for any concessions, including repairs, prorates, or Product replacement, once this warranty has expired...
... to return your Product (upgraded models may be extended with any travel time or other than its sole option. All removed parts and components shall become the property of Bosch at all times remained within the country of purchase. Warranty Exclusions The warranty coverage described herein excludes all times only been used for any concessions, including repairs, prorates, or Product replacement, once this warranty has expired...


