
Installation Instructions
Page 11
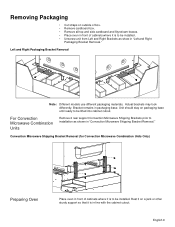
...is in "Left and Right Packaging Bracket Removal." Convection Microwave Shipping Bracket Removal (for Convection Microwave Combination Units Only) Preparing Oven Place oven in front of cabinets where it is to be installed. • Unscrew unit from Left and Right Brackets as shown in... packaging base. English 9 Left and Right Packaging Bracket Removal Note: Different models use different packaging materials. Bracket remains in "Convection Microwave Shipping...
...is in "Left and Right Packaging Bracket Removal." Convection Microwave Shipping Bracket Removal (for Convection Microwave Combination Units Only) Preparing Oven Place oven in front of cabinets where it is to be installed. • Unscrew unit from Left and Right Brackets as shown in... packaging base. English 9 Left and Right Packaging Bracket Removal Note: Different models use different packaging materials. Bracket remains in "Convection Microwave Shipping...

Installation Instructions
Page 12
... bare ground wire from the oven to local electrical codes for de-rating requirements. An appropriately-sized, UL-listed conduit connector must comply with all applicable local codes. Model Circuit Required 208V, 60 Hz 240V, 60 Hz HBN33, HBL33 25 AMP 30 AMP HBN34, HBL34, HBN54, HBL54 HBL85 30 AMP 30 AMP HBN35, HBL35, HBN56...
... bare ground wire from the oven to local electrical codes for de-rating requirements. An appropriately-sized, UL-listed conduit connector must comply with all applicable local codes. Model Circuit Required 208V, 60 Hz 240V, 60 Hz HBN33, HBL33 25 AMP 30 AMP HBN34, HBL34, HBN54, HBL54 HBL85 30 AMP 30 AMP HBN35, HBL35, HBN56...
Installation Instructions
Page 16
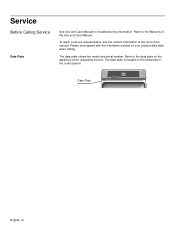
The data plate shows the model and serial number. Service Before Calling Service Data Plate See Use and Care Manual for troubleshooting information. Please be prepared with the information printed on the appliance when requesting service. Refer to the Warranty in the Use and Care Manual. To reach a service representative, see the contact information at the front of the control panel: Data Plate English 14 The data plate is located on the underside of the manual. Refer to the data plate on your product data plate when calling.
The data plate shows the model and serial number. Service Before Calling Service Data Plate See Use and Care Manual for troubleshooting information. Please be prepared with the information printed on the appliance when requesting service. Refer to the Warranty in the Use and Care Manual. To reach a service representative, see the contact information at the front of the control panel: Data Plate English 14 The data plate is located on the underside of the manual. Refer to the data plate on your product data plate when calling.
Use & Care Manual
Page 1
Use and Care Manual Built-In Ovens Models: HBL54, HBN54, HBL56, HBN56, HBL57
Use and Care Manual Built-In Ovens Models: HBL54, HBN54, HBL56, HBN56, HBL57
Use & Care Manual
Page 12
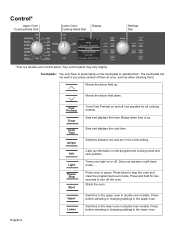
.... Moves the active field up . Switches to the upper oven in the lower oven. Press and hold for all cooking modes). Does not operate in double oven models. Beeps when time is a double oven control panel. Switches to the lower oven in self-clean mode. Press before selecting or changing settings ...Warm Proof Warm Pie Self Clean Lower Off Roast Heating 170° Bake Roast Oven 350° Probe 200° 12:12 pm Broil Convection Bake Oven 200° Preheating 12:30 pm Settings Dial Fast Preheat Timer Cook Time am/pm Settings Info Upper Light ...
.... Moves the active field up . Switches to the upper oven in the lower oven. Press and hold for all cooking modes). Does not operate in double oven models. Beeps when time is a double oven control panel. Switches to the lower oven in self-clean mode. Press before selecting or changing settings ...Warm Proof Warm Pie Self Clean Lower Off Roast Heating 170° Bake Roast Oven 350° Probe 200° 12:12 pm Broil Convection Bake Oven 200° Preheating 12:30 pm Settings Dial Fast Preheat Timer Cook Time am/pm Settings Info Upper Light ...
Use & Care Manual
Page 17
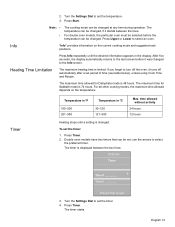
Press Info repeatedly until a setting is changed at any time during operation. The maximum time for Dehydrate mode is 74 hours. Double oven models have two timers that can be set: use the arrows to select the preferred timer. Note: • • The cooking mode ...Time Limitation The maximum heating time is displayed between the lines. The timer starts. Press Start. For double oven models, the particular oven must be selected before it stands between the two lines: 10:30 am Timer Timer1 __:__:__ +- The timer is limited. Press Timer. For all other cooking modes...
Press Info repeatedly until a setting is changed at any time during operation. The maximum time for Dehydrate mode is 74 hours. Double oven models have two timers that can be set: use the arrows to select the preferred timer. Note: • • The cooking mode ...Time Limitation The maximum heating time is displayed between the lines. The timer starts. Press Start. For double oven models, the particular oven must be selected before it stands between the two lines: 10:30 am Timer Timer1 __:__:__ +- The timer is limited. Press Timer. For all other cooking modes...
Use & Care Manual
Page 18
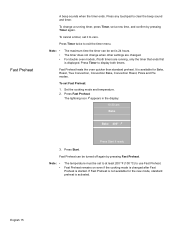
... both timers are changed after Fast Preheat is 24 hours. To set is started. English 15 Fast Preheat heats the oven quicker than standard preheat. Press Fast Preheat. Press Timer twice to zero. Note: • • The temperature ... available for the new mode, standard preheat is displayed. The lightning icon ã appears in the display: 10:30 am Bake Bake 400° ã Press Start if ready 3. If Fast Preheat is changed . Note The ... modes. Fast Preheat can be turned off again by pressing Timer again. For double oven models, if both timers.
... both timers are changed after Fast Preheat is 24 hours. To set is started. English 15 Fast Preheat heats the oven quicker than standard preheat. Press Fast Preheat. Press Timer twice to zero. Note: • • The temperature ... available for the new mode, standard preheat is displayed. The lightning icon ã appears in the display: 10:30 am Bake Bake 400° ã Press Start if ready 3. If Fast Preheat is changed . Note The ... modes. Fast Preheat can be turned off again by pressing Timer again. For double oven models, if both timers.
Use & Care Manual
Page 25
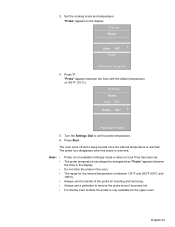
... sounds once the internal temperature is removed. Do not store the probe in the display: 10:30 am Roast Oven 350° Probe 160° +- English 22 "Probe" appears in the oven. Press ). Press Start. For double oven models: the probe is only available for inserting and removing. 3. Press Start if ready 5. The ...: • • • • • • • Probe is between the lines with the default temperature of the probe for the upper oven. The probe icon disappears when the probe is reached. Always use the handle of 160 ºF (70 ºC): 10...
... sounds once the internal temperature is removed. Do not store the probe in the display: 10:30 am Roast Oven 350° Probe 160° +- English 22 "Probe" appears in the oven. Press ). Press Start. For double oven models: the probe is only available for inserting and removing. 3. Press Start if ready 5. The ...: • • • • • • • Probe is between the lines with the default temperature of the probe for the upper oven. The probe icon disappears when the probe is reached. Always use the handle of 160 ºF (70 ºC): 10...
Use & Care Manual
Page 26
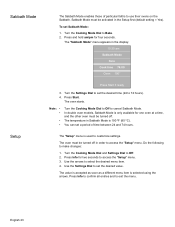
...be activated in the display: 10:30 am /pm for four seconds. The "Sabbath Mode" menu appears in the Setup first (default setting = Yes). Press Start. Do the following to set the desired time (24 to Off. 2. Use the Settings Dial to make changes: 1. In double oven models, Sabbath Mode is used to exit... enables those of time between 24 and 74 hours. Note: • • • • Turn the Cooking Mode Dial to Off to use their ovens on the Sabbath. Turn the Cooking Mode Dial and Settings Dial to 74 hours). 4. Press and hold am Sabbath Mode Bake Cook time 74:00...
...be activated in the display: 10:30 am /pm for four seconds. The "Sabbath Mode" menu appears in the Setup first (default setting = Yes). Press Start. Do the following to set the desired time (24 to Off. 2. Use the Settings Dial to make changes: 1. In double oven models, Sabbath Mode is used to exit... enables those of time between 24 and 74 hours. Note: • • • • Turn the Cooking Mode Dial to Off to use their ovens on the Sabbath. Turn the Cooking Mode Dial and Settings Dial to 74 hours). 4. Press and hold am Sabbath Mode Bake Cook time 74:00...
Use & Care Manual
Page 42
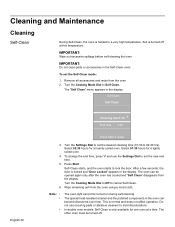
..." appears in the display: 02:00 pm Self Clean English 39 Cleaning time1:30 +End time 3:30 Press Start if ready 3. This is heated to a very high temperature. In double oven models: Self Clean is burned off . Select 02:30 hours for a lightly soiled oven. 4. To change the end time, press ) and use scouring pads or abrasive...
..." appears in the display: 02:00 pm Self Clean English 39 Cleaning time1:30 +End time 3:30 Press Start if ready 3. This is heated to a very high temperature. In double oven models: Self Clean is burned off . Select 02:30 hours for a lightly soiled oven. 4. To change the end time, press ) and use scouring pads or abrasive...
Use & Care Manual
Page 46
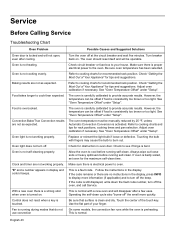
.... Replace or reinsert the light bulb if loose or defective. Touching the bulb with a new oven and will disappear after cooling. Check to provide accurate results. Allow the oven to oven. If oven is electrical power to cool before running during modes that surface is normal. Make sure there is...) and to turn off at the circuit breaker and wait five minutes. Be sure that do not use convection On some models, the convection fan runs while the oven is not heating. Use the flat part of Your Appliance" for the maximum self-clean time. This is clean and dry...
.... Replace or reinsert the light bulb if loose or defective. Touching the bulb with a new oven and will disappear after cooling. Check to provide accurate results. Allow the oven to oven. If oven is electrical power to cool before running during modes that surface is normal. Make sure there is...) and to turn off at the circuit breaker and wait five minutes. Be sure that do not use convection On some models, the convection fan runs while the oven is not heating. Use the flat part of Your Appliance" for the maximum self-clean time. This is clean and dry...
Use & Care Manual
Page 47
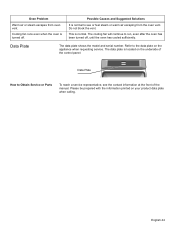
... the front of the manual. Data Plate The data plate shows the model and serial number. The data plate is normal to run, even after the oven has been turned off . English 44 This is turned off , until the oven has cooled sufficiently. Do not block the vent. Cooling fan runs even... when the oven is normal. Oven Problem Warm air or steam escapes from the oven vent. Please be prepared with the information printed on the underside of the ...
... the front of the manual. Data Plate The data plate shows the model and serial number. The data plate is normal to run, even after the oven has been turned off . English 44 This is turned off , until the oven has cooled sufficiently. Do not block the vent. Cooling fan runs even... when the oven is normal. Oven Problem Warm air or steam escapes from the oven vent. Please be prepared with the information printed on the underside of the ...
Use & Care Manual
Page 48
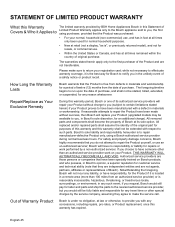
... parts and components shall become the property of Bosch at law or otherwise, to effectuate warranty coverage, it is ", or previously returned model), and not for an additional charge). Notwithstanding the foregoing, Bosch will not incur any reason whatsoever. while not... necessary to provide you , the first using a Bosch-authorized service provider during normal business hours. Repair...
... parts and components shall become the property of Bosch at law or otherwise, to effectuate warranty coverage, it is ", or previously returned model), and not for an additional charge). Notwithstanding the foregoing, Bosch will not incur any reason whatsoever. while not... necessary to provide you , the first using a Bosch-authorized service provider during normal business hours. Repair...


