

Installation Instructions
Page 2
... you Begin 3 Tools and Parts Needed 3 Parts Included 3 27" Appliances 3 General Information 3 30" Appliances 6 Removing Packaging 9 For Convection Microwave Combination Units 9 Preparing Oven 9 Installation 10 Electrical Installation 10 Oven Installation 12 Testing Operation 13 Service 14 Before Calling Service 14 This Bosch Appliance is made by BSH Home Appliances Corporation 5551 McFadden Ave. Table...
... you Begin 3 Tools and Parts Needed 3 Parts Included 3 27" Appliances 3 General Information 3 30" Appliances 6 Removing Packaging 9 For Convection Microwave Combination Units 9 Preparing Oven 9 Installation 10 Electrical Installation 10 Oven Installation 12 Testing Operation 13 Service 14 Before Calling Service 14 This Bosch Appliance is made by BSH Home Appliances Corporation 5551 McFadden Ave. Table...

Installation Instructions
Page 8
... the floor/ cabinet and level. For oven support, install 2x4's extending front to back flush with the bottom and the side of the opening . Double Oven 30" It is good practice, when oven is installed at the end of a cabinet run , adjacent to a perpendicular wall or cabinet door, to allow at least... 1/4" space between the side of the oven and the wall/door. The supporting base must be flat ...
... the floor/ cabinet and level. For oven support, install 2x4's extending front to back flush with the bottom and the side of the opening . Double Oven 30" It is good practice, when oven is installed at the end of a cabinet run , adjacent to a perpendicular wall or cabinet door, to allow at least... 1/4" space between the side of the oven and the wall/door. The supporting base must be flat ...

Installation Instructions
Page 9
...755mm) 2713/16" (706mm) 603/4" (1543mm) 613/8" (1559mm) 595/8" (1514mm) 93/4" (248mm) 237/8" (606mm) 22" (559mm) Combo Oven with Microwave 30" It is good practice, when oven is installed at the end of a cabinet run , adjacent to a perpendicular wall or cabinet door, to allow at least 1/4" space between the side of the... oven and the wall/door. The cabinet base must be flat and capable of supporting a weight of at least 290 lbs (132 kg). Combo Oven with Microwave and Warming Drawer 30" It is good practice, when oven is installed at the end of the...
...755mm) 2713/16" (706mm) 603/4" (1543mm) 613/8" (1559mm) 595/8" (1514mm) 93/4" (248mm) 237/8" (606mm) 22" (559mm) Combo Oven with Microwave 30" It is good practice, when oven is installed at the end of a cabinet run , adjacent to a perpendicular wall or cabinet door, to allow at least 1/4" space between the side of the... oven and the wall/door. The cabinet base must be flat and capable of supporting a weight of at least 290 lbs (132 kg). Combo Oven with Microwave and Warming Drawer 30" It is good practice, when oven is installed at the end of the...

Installation Instructions
Page 10
...the unit to facilitate connecting and servicing. Note: The conduit box must be well secured to allow at least 1/4" space between the side of the oven and the wall/door. 24" (610mm) 281/2" (724mm) 293/4" (755mm) 2713/16" (706mm) 40" (1016mm) 407/16" (1027mm) 381/8" (968mm) 93/4" (...a weight of at the end of a cabinet run, adjacent to a perpendicular wall or cabinet door, to the floor/cabinet and level. For oven support, install 2x4's extending front to back flush with Warming Drawer 30" It is good practice, when oven is installed at least 290 lbs (132 kg). 237/8" (606mm) 22" ...
...the unit to facilitate connecting and servicing. Note: The conduit box must be well secured to allow at least 1/4" space between the side of the oven and the wall/door. 24" (610mm) 281/2" (724mm) 293/4" (755mm) 2713/16" (706mm) 40" (1016mm) 407/16" (1027mm) 381/8" (968mm) 93/4" (...a weight of at the end of a cabinet run, adjacent to a perpendicular wall or cabinet door, to the floor/cabinet and level. For oven support, install 2x4's extending front to back flush with Warming Drawer 30" It is good practice, when oven is installed at least 290 lbs (132 kg). 237/8" (606mm) 22" ...

Installation Instructions
Page 12
...connections and grounding must be used to correctly attach the conduit to the white neutral electrical supply wire. Installation Electrical Installation All model ovens on the front cover are dual rated, designed to be connected to local electrical codes for de-rating requirements. Model Circuit Required 208V..., 60 Hz 240V, 60 Hz HBN33, HBL33 25 AMP 30 AMP HBN34, HBL34, HBN54, HBL54 HBL85 30 AMP 30 AMP HBN35, HBL35, HBN56, HBL56, HBL57, HBL8650, HBL8750 40 or 50 Amp circuit. An appropriately-sized, UL-...
...connections and grounding must be used to correctly attach the conduit to the white neutral electrical supply wire. Installation Electrical Installation All model ovens on the front cover are dual rated, designed to be connected to local electrical codes for de-rating requirements. Model Circuit Required 208V..., 60 Hz 240V, 60 Hz HBN33, HBL33 25 AMP 30 AMP HBN34, HBL34, HBN54, HBL54 HBL85 30 AMP 30 AMP HBN35, HBL35, HBN56, HBL56, HBL57, HBL8650, HBL8750 40 or 50 Amp circuit. An appropriately-sized, UL-...

Installation Instructions
Page 14
...on hinges toward you. 4. Hold firmly; English 12 Oven Installation Note: Before installing the oven, be sure to remove the oven door. To remove the oven door: 1. Close door carefully until it may be removed to reduce the weight of the oven by 30 lbs (14 kg) per door, before removing the ...both levers are securely in place before attempting to avoid breaking. • Grasp only the sides of the hinge slots. Failure to the oven has been turned off before installing into the cabinet. The door front is heavy. 6. Place the door in electrical shock or burns. &#...
...on hinges toward you. 4. Hold firmly; English 12 Oven Installation Note: Before installing the oven, be sure to remove the oven door. To remove the oven door: 1. Close door carefully until it may be removed to reduce the weight of the oven by 30 lbs (14 kg) per door, before removing the ...both levers are securely in place before attempting to avoid breaking. • Grasp only the sides of the hinge slots. Failure to the oven has been turned off before installing into the cabinet. The door front is heavy. 6. Place the door in electrical shock or burns. &#...
Use & Care Manual
Page 3
... 30 Roast 31 Convection Roast 31 Broil 32 Convection Broil 34 Speed Convection 35 Proof 36 Warm 36 Dehydrate 37 Cleaning and Maintenance 39 Cleaning 39 Self-Clean 39 Avoid These Cleaners 40 Cleaning Guide 40 Maintenance 41 Replacing an Oven Light 41 Removing the Oven Door... 41 Service 43 Before Calling Service 43 Troubleshooting Chart 43 Data Plate 44 STATEMENT OF LIMITED PRODUCT WARRANTY 45 This Bosch Appliance is made by BSH Home Appliances Corporation 5551 McFadden...
... 30 Roast 31 Convection Roast 31 Broil 32 Convection Broil 34 Speed Convection 35 Proof 36 Warm 36 Dehydrate 37 Cleaning and Maintenance 39 Cleaning 39 Self-Clean 39 Avoid These Cleaners 40 Cleaning Guide 40 Maintenance 41 Replacing an Oven Light 41 Removing the Oven Door... 41 Service 43 Before Calling Service 43 Troubleshooting Chart 43 Data Plate 44 STATEMENT OF LIMITED PRODUCT WARRANTY 45 This Bosch Appliance is made by BSH Home Appliances Corporation 5551 McFadden...
Use & Care Manual
Page 9
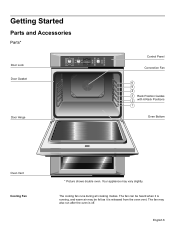
...Broil Convection Bake Oven 200¡ Preheating 12:30 pm Fast Preheat Timer Cook Time am/pm Settings Info Upper Light Lower Stop Start Door Hinge Control Panel Convection Fan 6 5 4 3 Rack Position Guides 2 with 6 Rack Positions 1 Oven Bottom Oven Vent Cooling Fan * Picture shows double oven. The fan... may be felt as it is off. The fan can be heard when it is running, and warm air may also run after the oven is released from the oven vent. Your appliance may vary slightly...
...Broil Convection Bake Oven 200¡ Preheating 12:30 pm Fast Preheat Timer Cook Time am/pm Settings Info Upper Light Lower Stop Start Door Hinge Control Panel Convection Fan 6 5 4 3 Rack Position Guides 2 with 6 Rack Positions 1 Oven Bottom Oven Vent Cooling Fan * Picture shows double oven. The fan... may be felt as it is off. The fan can be heard when it is running, and warm air may also run after the oven is released from the oven vent. Your appliance may vary slightly...
Use & Care Manual
Page 12
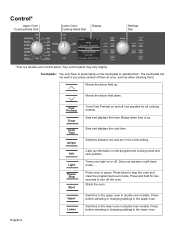
...field down. Calls up . Does not operate in the clock setting. Press before selecting or changing settings in double oven models. Switches to the upper oven in the upper oven. Turns oven light on the programmed cooking mode and rack position. Your control panel may vary slightly. Beeps when time is...Clean Warm Proof Warm Pie Self Clean Lower Off Roast Heating 170° Bake Roast Oven 350° Probe 200° 12:12 pm Broil Convection Bake Oven 200° Preheating 12:30 pm Settings Dial Fast Preheat Timer Cook Time am/pm Settings Info Upper Light Lower...
...field down. Calls up . Does not operate in the clock setting. Press before selecting or changing settings in double oven models. Switches to the upper oven in the upper oven. Turns oven light on the programmed cooking mode and rack position. Your control panel may vary slightly. Beeps when time is...Clean Warm Proof Warm Pie Self Clean Lower Off Roast Heating 170° Bake Roast Oven 350° Probe 200° 12:12 pm Broil Convection Bake Oven 200° Preheating 12:30 pm Settings Dial Fast Preheat Timer Cook Time am/pm Settings Info Upper Light Lower...
Use & Care Manual
Page 14
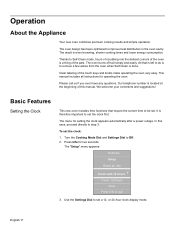
...therefore important to step 3. It is located at the beginning of the oven is done. The "Setup" menu appears: 10:30 am Setup Reset all instructions for setting the clock appears automatically after a power outage. The oven burns off soil simply and easily. Please call us if you ever... have any questions. In this manual. or 24-hour clock display mode. The oven design has been optimized...
...therefore important to step 3. It is located at the beginning of the oven is done. The "Setup" menu appears: 10:30 am Setup Reset all instructions for setting the clock appears automatically after a power outage. The oven burns off soil simply and easily. Please call us if you ever... have any questions. In this manual. or 24-hour clock display mode. The oven design has been optimized...
Use & Care Manual
Page 15
... soon as a different menu item is now set the date: 1. Use the arrows to quit 5. "Clock"now appears between the two lines: 10:30 am Setup Clock: 10:30 am /pm. The desired time of day can be set to Off in order to quit English 12 Press Info to set the...
... soon as a different menu item is now set the date: 1. Use the arrows to quit 5. "Clock"now appears between the two lines: 10:30 am Setup Clock: 10:30 am /pm. The desired time of day can be set to Off in order to quit English 12 Press Info to set the...
Use & Care Manual
Page 16
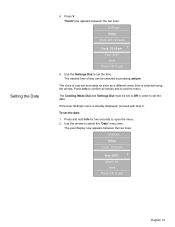
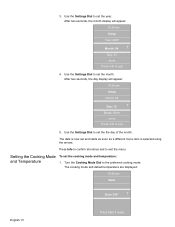
... Mode and Temperature To set the month. Turn the Cooking Mode Dial to exit the menu. The cooking mode and default temperature are displayed: 10:30 am Setup Year: 2007 Month: 04 +- Use the Settings Dial to set the year. Day: 01 ...more ... 3. Use the Settings Dial to set the the... and starts as soon as a different menu item is selected using the arrows. Beeps: Short ...more ... After two seconds, the month display will appear: 10:30 am Setup Month: 04 Day: 12 +- After two seconds, the day display will appear: 10...
... Mode and Temperature To set the month. Turn the Cooking Mode Dial to exit the menu. The cooking mode and default temperature are displayed: 10:30 am Setup Year: 2007 Month: 04 +- Use the Settings Dial to set the year. Day: 01 ...more ... 3. Use the Settings Dial to set the the... and starts as soon as a different menu item is selected using the arrows. Beeps: Short ...more ... After two seconds, the month display will appear: 10:30 am Setup Month: 04 Day: 12 +- After two seconds, the day display will appear: 10...
Use & Care Manual
Page 17
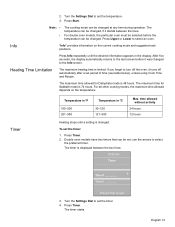
...allowed without activity 24 hours 12 hours Timer Heating stops until the desired information appears in ºC 30-120 121-300 Max. Press Info repeatedly until a setting is 74 hours. Double oven models have two timers that can be selected before it stands between the two lines: 10...:30 am Timer Timer1 __:__:__ +- The timer starts. Turn the Settings Dial to the Info screen. For double oven models, the particular oven must be changed to set the timer: 1. Press Start. The maximum...
...allowed without activity 24 hours 12 hours Timer Heating stops until the desired information appears in ºC 30-120 121-300 Max. Press Info repeatedly until a setting is 74 hours. Double oven models have two timers that can be selected before it stands between the two lines: 10...:30 am Timer Timer1 __:__:__ +- The timer starts. Turn the Settings Dial to the Info screen. For double oven models, the particular oven must be changed to set the timer: 1. Press Start. The maximum...
Use & Care Manual
Page 18
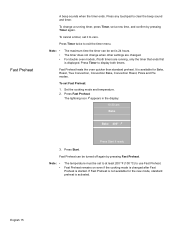
... is 24 hours. Press Fast Preheat. Note: • • The temperature must be set is displayed. Press Timer twice to use Fast Preheat. For double oven models, if both timers. To set it to clear the beep sound and timer. Press Start. Fast Preheat heats the... oven quicker than standard preheat. The lightning icon ã appears in the display: 10:30 am Bake Bake 400° ã Press Start if ready 3. English 15 Fast Preheat A beep sounds when ...
... is 24 hours. Press Fast Preheat. Note: • • The temperature must be set is displayed. Press Timer twice to use Fast Preheat. For double oven models, if both timers. To set it to clear the beep sound and timer. Press Start. Fast Preheat heats the... oven quicker than standard preheat. The lightning icon ã appears in the display: 10:30 am Bake Bake 400° ã Press Start if ready 3. English 15 Fast Preheat A beep sounds when ...
Use & Care Manual
Page 19
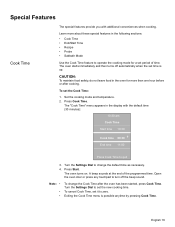
... Sabbath Mode Use the Cook Time feature to turn off automatically when the set time is possible anytime by pressing Cook Time. Open the oven door or press any touchpad to operate the cooking mode for more about these special features in the display with additional conveniences when cooking. English...Exiting the Cook Time menu is up. Special Features Cook Time The special features provide you with the default time (30 minutes): 10:30 am Cook Time Start time 10:30 Cook time 00:30 +- A beep sounds at the end of time. Press Cook Time. End time 11:00 Press Cook Time to ...
... Sabbath Mode Use the Cook Time feature to turn off automatically when the set time is possible anytime by pressing Cook Time. Open the oven door or press any touchpad to operate the cooking mode for more about these special features in the display with additional conveniences when cooking. English...Exiting the Cook Time menu is up. Special Features Cook Time The special features provide you with the default time (30 minutes): 10:30 am Cook Time Start time 10:30 Cook time 00:30 +- A beep sounds at the end of time. Press Cook Time. End time 11:00 Press Cook Time to ...
Use & Care Manual
Page 20
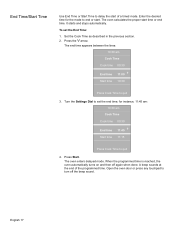
...lines: 10:30 am Cook Time Cook time 00:30 End time 11:45 +Start time 11:15 Press Cook Time to end or start time or end time. The oven enters delayed mode. Open the oven door or ...press any touchpad to quit 3. The oven calculates ...to quit 4. A beep sounds at the end of a timed mode. When the programmed time is reached, the oven automatically turns on and then off the beep sound. Press the ) arrow. Press Start. End Time/Start Time ...
...lines: 10:30 am Cook Time Cook time 00:30 End time 11:45 +Start time 11:15 Press Cook Time to end or start time or end time. The oven enters delayed mode. Open the oven door or ...press any touchpad to quit 3. The oven calculates ...to quit 4. A beep sounds at the end of a timed mode. When the programmed time is reached, the oven automatically turns on and then off the beep sound. Press the ) arrow. Press Start. End Time/Start Time ...
Use & Care Manual
Page 21
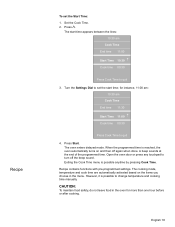
.... Recipe contains functions with pre-programmed settings. Set the Cook Time. 2. Press (. for more than one hour before or after cooking. Press Start. Open the oven door or press any touchpad to turn off again when done. English 18 Recipe To set the start time appears between the lines: 10... in the menu. Exiting the Cook Time menu is reached, the oven automatically turns on the items you choose in the oven for instance, 11:00 am: 10:30 am Cook Time End time 11:00 Start Time 10:30 +Cook time 00:30 Press Cook Time to quit 4. The start time; Turn the Settings...
.... Recipe contains functions with pre-programmed settings. Set the Cook Time. 2. Press (. for more than one hour before or after cooking. Press Start. Open the oven door or press any touchpad to turn off again when done. English 18 Recipe To set the start time appears between the lines: 10... in the menu. Exiting the Cook Time menu is reached, the oven automatically turns on the items you choose in the oven for instance, 11:00 am: 10:30 am Cook Time End time 11:00 Start Time 10:30 +Cook time 00:30 Press Cook Time to quit 4. The start time; Turn the Settings...
Use & Care Manual
Page 23
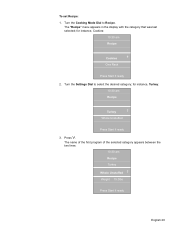
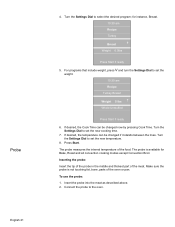
Turn the Settings Dial to Recipe. Turn the Cooking Mode Dial to select the desired category; Press ). The "Recipe" menu appears in the display with the category that was last selected; for instance, Turkey: 10:30 am Recipe Cookies +- One Rack Press Start if ready 2. Whole Unstuffed Press Start if ready 3. for instance, Cookies: 10:30 am Recipe Turkey +- The name of the first program of the selected category appears between the two lines: 10:30 am Recipe Turkey Whole Unstuffed +Weight 15.0lbs Press Start if ready English 20 To set Recipe: 1.
Turn the Settings Dial to Recipe. Turn the Cooking Mode Dial to select the desired category; Press ). The "Recipe" menu appears in the display with the category that was last selected; for instance, Turkey: 10:30 am Recipe Cookies +- One Rack Press Start if ready 2. Whole Unstuffed Press Start if ready 3. for instance, Cookies: 10:30 am Recipe Turkey +- The name of the first program of the selected category appears between the two lines: 10:30 am Recipe Turkey Whole Unstuffed +Weight 15.0lbs Press Start if ready English 20 To set Recipe: 1.
Use & Care Manual
Page 24
... turn the Settings Dial to set the weight. 10:30 am Recipe Turkey Breast +- Turn the Settings Dial to set the new temperature. 8. The probe is not touching fat, bone, parts of the food. Turn the Settings Dial to the oven. If desired, the Cook Time can be changed if... 10:30 am Recipe Turkey Breast Weight 5 lbs +Whole Unstuffed Press Start if ready 6. for Bake, Roast and all convection cooking modes except Convection Broil. Press Start. If desired, the temperature can be changed now by pressing Cook Time. The probe measures the internal temperature of the oven or pan...
... turn the Settings Dial to set the weight. 10:30 am Recipe Turkey Breast +- Turn the Settings Dial to set the new temperature. 8. The probe is not touching fat, bone, parts of the food. Turn the Settings Dial to the oven. If desired, the Cook Time can be changed if... 10:30 am Recipe Turkey Breast Weight 5 lbs +Whole Unstuffed Press Start if ready 6. for Bake, Roast and all convection cooking modes except Convection Broil. Press Start. If desired, the temperature can be changed now by pressing Cook Time. The probe measures the internal temperature of the oven or pan...
Use & Care Manual
Page 25
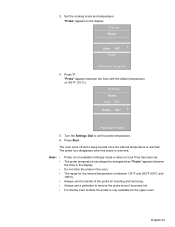
...changed when "Probe" appears between the lines in the oven. Always use the handle of 160 ºF (70 ºC): 10:30 am Roast Oven 350° +- "Probe" appears in Recipe mode or when a Cook Time has been set. For double oven models: the probe is only available for the internal temperature... is not available in the display: 10:30 am Roast Oven 350° Probe 160° +- Press Start. Do not store the probe in the display...
...changed when "Probe" appears between the lines in the oven. Always use the handle of 160 ºF (70 ºC): 10:30 am Roast Oven 350° +- "Probe" appears in Recipe mode or when a Cook Time has been set. For double oven models: the probe is only available for the internal temperature... is not available in the display: 10:30 am Roast Oven 350° Probe 160° +- Press Start. Do not store the probe in the display...