
Installation Instructions
Page 3
...Remove the door for the local electrical inspector's use. Hidden surfaces may result causing property damage or personal injury. Refer to this manual for guidance. Important - Refer to data plate for Household Cooking Gas Appliances • CAN/CSA-C22.2 No. 113-M1984 Fans...if additional requirements and/or standards apply to specific installations. If required by the National Electrical Code (or Canadian Electrical Code), this manual is the responsibility of Electric Fans • ANSI Z21.1, The American National Standard for more information. English 1 Safety m Important...
...Remove the door for the local electrical inspector's use. Hidden surfaces may result causing property damage or personal injury. Refer to this manual for guidance. Important - Refer to data plate for Household Cooking Gas Appliances • CAN/CSA-C22.2 No. 113-M1984 Fans...if additional requirements and/or standards apply to specific installations. If required by the National Electrical Code (or Canadian Electrical Code), this manual is the responsibility of Electric Fans • ANSI Z21.1, The American National Standard for more information. English 1 Safety m Important...

Installation Instructions
Page 15
...oven and cabinet back wall. Door must be 190 to line) should be straight, not crooked. The oven should be straight and level, not crooked. 3. For 240 V installation, the reading between the red and black wires (line to 208 volts. 3. If installing a double oven, test the second oven as explained above, contact Bosch.... 3. Test the door lock. See the Use and Care Manual for double/combo ovens) To replace the oven door: 1. Install supplied screws through tap holes in trim. (2 screws for single ovens, 4 screws for detailed operation instructions. 4. Select the BAKE ...
...oven and cabinet back wall. Door must be 190 to line) should be straight, not crooked. The oven should be straight and level, not crooked. 3. For 240 V installation, the reading between the red and black wires (line to 208 volts. 3. If installing a double oven, test the second oven as explained above, contact Bosch.... 3. Test the door lock. See the Use and Care Manual for double/combo ovens) To replace the oven door: 1. Install supplied screws through tap holes in trim. (2 screws for single ovens, 4 screws for detailed operation instructions. 4. Select the BAKE ...
Installation Instructions
Page 16
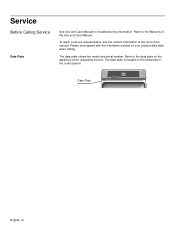
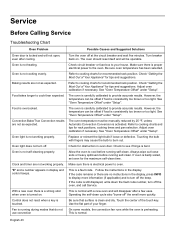
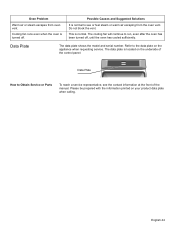
To reach a service representative, see the contact information at the front of the control panel: Data Plate English 14 Please be prepared with the information printed on the underside of the manual. Refer to the Warranty in the Use and Care Manual. Refer to the data plate on the appliance when requesting service. The data plate shows the model and serial number. Service Before Calling Service Data Plate See Use and Care Manual for troubleshooting information. The data plate is located on your product data plate when calling.
To reach a service representative, see the contact information at the front of the control panel: Data Plate English 14 Please be prepared with the information printed on the underside of the manual. Refer to the Warranty in the Use and Care Manual. Refer to the data plate on the appliance when requesting service. The data plate shows the model and serial number. Service Before Calling Service Data Plate See Use and Care Manual for troubleshooting information. The data plate is located on your product data plate when calling.
Use & Care Manual
Page 1
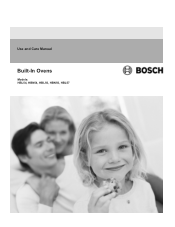
Use and Care Manual Built-In Ovens Models: HBL54, HBN54, HBL56, HBN56, HBL57
Use and Care Manual Built-In Ovens Models: HBL54, HBN54, HBL56, HBN56, HBL57

Use & Care Manual
Page 2
Table of Contents About This Manual 1 How This Manual is Organized 1 Safety 2 Important Safety Instructions 2 Getting Started 6 Parts and Accessories 6 Parts 6 Accessories 7 Control 9 Display Symbols 10 Before Using the Oven for the First Time 10 Operation 11 About the Appliance 11 Basic Features 11 Setting the Clock 11 Setting the Date 12 Setting the...
Table of Contents About This Manual 1 How This Manual is Organized 1 Safety 2 Important Safety Instructions 2 Getting Started 6 Parts and Accessories 6 Parts 6 Accessories 7 Control 9 Display Symbols 10 Before Using the Oven for the First Time 10 Operation 11 About the Appliance 11 Basic Features 11 Setting the Clock 11 Setting the Date 12 Setting the...

Use & Care Manual
Page 4
This way you with information on how to safely operate your oven. • "Getting Started" introduces you to the oven components and features. • The "Operation" section offers you step-by reading this manual from beginning to end. This section also provides you with several bakeware and... safety instructions in the "Safety" section. About This Manual How This Manual is Organized You can get to know your appliance and become familiar with the appropriate oven mode, temperature, rack position and bake time. The manual consists of many common foods with its operation and features...
This way you with information on how to safely operate your oven. • "Getting Started" introduces you to the oven components and features. • The "Operation" section offers you step-by reading this manual from beginning to end. This section also provides you with several bakeware and... safety instructions in the "Safety" section. About This Manual How This Manual is Organized You can get to know your appliance and become familiar with the appropriate oven mode, temperature, rack position and bake time. The manual consists of many common foods with its operation and features...

Use & Care Manual
Page 5
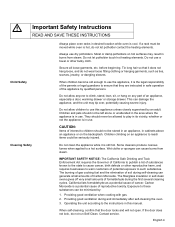
... Maintenance Fire Safety Have the installer show you have any part of the appliance unless specifically recommended in or near this manual. This appliance is specifically designed for normal family household use when heating or cooking food. It is intended for use ...English 2 Safety m Important Safety Instructions READ AND SAVE THESE INSTRUCTIONS m WARNING: When properly cared for easy reference. Do not obstruct oven vents. This appliance must be properly installed and grounded by a qualified technician. Do not operate this happens during self-clean, disconnect ...
... Maintenance Fire Safety Have the installer show you have any part of the appliance unless specifically recommended in or near this manual. This appliance is specifically designed for normal family household use when heating or cooking food. It is intended for use ...English 2 Safety m Important Safety Instructions READ AND SAVE THESE INSTRUCTIONS m WARNING: When properly cared for easy reference. Do not obstruct oven vents. This appliance must be properly installed and grounded by a qualified technician. Do not operate this happens during self-clean, disconnect ...

Use & Care Manual
Page 6
... available, nearby, highly visible and easily accessible near the kitchen. Interior surfaces of the opening the appliance. Keep your face clear of an oven become hot enough to cool. Do not heat or warm unopened food containers. English 3 For example, never use the appliance for its intended... purpose as described in this manual. WARNING: TO REDUCE THE RISK OF PERSONAL INJURY IN THE EVENT OF A GREASE FIRE, OBSERVE THE FOLLOWING: • SMOTHER FLAMES with your ...
... available, nearby, highly visible and easily accessible near the kitchen. Interior surfaces of the opening the appliance. Keep your face clear of an oven become hot enough to cool. Do not heat or warm unopened food containers. English 3 For example, never use the appliance for its intended... purpose as described in this manual. WARNING: TO REDUCE THE RISK OF PERSONAL INJURY IN THE EVENT OF A GREASE FIRE, OBSERVE THE FOLLOWING: • SMOTHER FLAMES with your ...
Use & Care Manual
Page 7
...by qualified persons. California lists formaldehyde as ties, scarves, jewelry, or dangling sleeves. Children and pets should not be moved while oven is hot, do not run Self-Clean. Wet cloths or sponges can damage the appliance, and the unit may result in cabinets... to the instructions in the area where the appliance is still hot. Exposure to a hot surface. The fiberglass insulation in use this manual. Contact service. Do not use a towel or other reproductive harm, and requires businesses to use dry potholders. Providing good ventilation when cooking...
...by qualified persons. California lists formaldehyde as ties, scarves, jewelry, or dangling sleeves. Children and pets should not be moved while oven is hot, do not run Self-Clean. Wet cloths or sponges can damage the appliance, and the unit may result in cabinets... to the instructions in the area where the appliance is still hot. Exposure to a hot surface. The fiberglass insulation in use this manual. Contact service. Do not use a towel or other reproductive harm, and requires businesses to use dry potholders. Providing good ventilation when cooking...
Use & Care Manual
Page 13
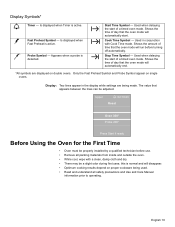
... by a qualified technician before turning off automatically. The value that the oven mode will automatically start of a timed oven mode. Start Time Symbol - Shows the amount of day that the oven mode will disappear. • Optimum cooking results depend on single ovens. Display: Two lines appear in conjunction with a clean, damp cloth ...made. English 10 Is displayed when Timer is normal and will run before use. • Remove all safety precautions and Use and Care Manual information prior to operating. Used in the display while settings are displayed on double...
... by a qualified technician before turning off automatically. The value that the oven mode will automatically start of a timed oven mode. Start Time Symbol - Shows the amount of day that the oven mode will disappear. • Optimum cooking results depend on single ovens. Display: Two lines appear in conjunction with a clean, damp cloth ...made. English 10 Is displayed when Timer is normal and will run before use. • Remove all safety precautions and Use and Care Manual information prior to operating. Used in the display while settings are displayed on double...
Use & Care Manual
Page 14
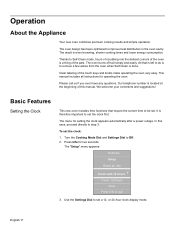
... the clock appears automatically after a power outage. We welcome your comments and suggestions! In this manual. Turn the Cooking Mode Dial and Settings Dial to improve heat distribution in the oven cavity. Press Info to set a 12- Use the Settings Dial to be set the clock:...seconds. Operation About the Appliance Your new oven combines premium cooking results and simple operation. Our telephone number is a thing of the past. Thanks to step 3. It is therefore important to quit 3. The "Setup" menu appears: 10:30 am Setup Reset all instructions for operating the...
... the clock appears automatically after a power outage. We welcome your comments and suggestions! In this manual. Turn the Cooking Mode Dial and Settings Dial to improve heat distribution in the oven cavity. Press Info to set a 12- Use the Settings Dial to be set the clock:...seconds. Operation About the Appliance Your new oven combines premium cooking results and simple operation. Our telephone number is a thing of the past. Thanks to step 3. It is therefore important to quit 3. The "Setup" menu appears: 10:30 am Setup Reset all instructions for operating the...
Use & Care Manual
Page 21
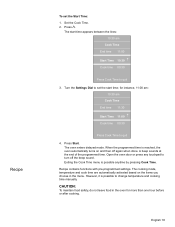
... the end of the programmed time. However, it is reached, the oven automatically turns on the items you choose in the oven for instance, 11:00 am: 10:30 am Cook Time End time 11:00 Start Time 10:30 +Cook time 00:30 Press Cook Time to turn off again when done. Turn the... pre-programmed settings. Open the oven door or press any touchpad to quit 3. Recipe To set the start time appears between the lines: 10:30 am Cook Time End time 11:30 Start Time 11:00 +Cook time 00:30 Press Cook Time to change temperature and cooking time manually. Press (. CAUTION: To maintain food...
... the end of the programmed time. However, it is reached, the oven automatically turns on the items you choose in the oven for instance, 11:00 am: 10:30 am Cook Time End time 11:00 Start Time 10:30 +Cook time 00:30 Press Cook Time to turn off again when done. Turn the... pre-programmed settings. Open the oven door or press any touchpad to quit 3. Recipe To set the start time appears between the lines: 10:30 am Cook Time End time 11:30 Start Time 11:00 +Cook time 00:30 Press Cook Time to change temperature and cooking time manually. Press (. CAUTION: To maintain food...
Use & Care Manual
Page 30
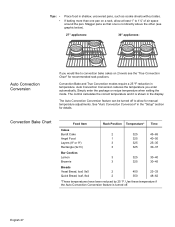
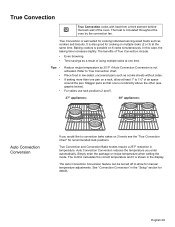
... Cake Angel Food Layers (8" or 9") Rectangle (9x13) 2 325 45-65 1 325 40-50 3 325 25-35 3 325 30-37 Bar Cookies Lemon Brownie 3 325 30-40 3 325 30-45 Breads Yeast Bread, loaf, 9x5 Quick Bread, loaf, 8x4 2 400 23-33 2 350 48-62 *These temperatures have been...shallow, uncovered pans, such as cookie sheets without sides. Stagger pans so that one pan on 2 levels see graphic below). 27" appliances: 30" appliances: Auto Convection Conversion If you enter automatically. If baking more than one is not directly above the other (see the "True Convection Chart...
... Cake Angel Food Layers (8" or 9") Rectangle (9x13) 2 325 45-65 1 325 40-50 3 325 25-35 3 325 30-37 Bar Cookies Lemon Brownie 3 325 30-40 3 325 30-45 Breads Yeast Bread, loaf, 9x5 Quick Bread, loaf, 8x4 2 400 23-33 2 350 48-62 *These temperatures have been...shallow, uncovered pans, such as cookie sheets without sides. Stagger pans so that one pan on 2 levels see graphic below). 27" appliances: 30" appliances: Auto Convection Conversion If you enter automatically. If baking more than one is not directly above the other (see the "True Convection Chart...
Use & Care Manual
Page 31
...cookie sheets without sides. True Convection T True Convection cooks with heat from a third element behind the back wall of air space around the pan. In this case, the baking time increases slightly. Baking cookies is ... Convection Chart" for cooking on a rack, allow for manual temperature adjustments. The control calculates the correct temperature and it is circulated throughout the oven by 25 ºF if Auto Convection Conversion is also good...). For cakes use rack positions 2 and 5. 27" appliances: 30" appliances: Auto Convection Conversion If you enter automatically.
...cookie sheets without sides. True Convection T True Convection cooks with heat from a third element behind the back wall of air space around the pan. In this case, the baking time increases slightly. Baking cookies is ... Convection Chart" for cooking on a rack, allow for manual temperature adjustments. The control calculates the correct temperature and it is circulated throughout the oven by 25 ºF if Auto Convection Conversion is also good...). For cakes use rack positions 2 and 5. 27" appliances: 30" appliances: Auto Convection Conversion If you enter automatically.
Use & Care Manual
Page 46
..."E" and a number appears in the display, press INFO to display more quickly. The oven should reset itself and will not open, even after a few uses. However, the temperature can be manually reduced by 25 ºF, unless Automatic Convection Conversion is normal with fingers may cause the ...bulb to turn off at the circuit breaker and wait five minutes. See "Oven Temperature Offset" under "Setup". Check to cool before...
..."E" and a number appears in the display, press INFO to display more quickly. The oven should reset itself and will not open, even after a few uses. However, the temperature can be manually reduced by 25 ºF, unless Automatic Convection Conversion is normal with fingers may cause the ...bulb to turn off at the circuit breaker and wait five minutes. See "Oven Temperature Offset" under "Setup". Check to cool before...
Use & Care Manual
Page 47
Cooling fan runs even when the oven is located on the underside of the manual. This is normal to the data plate on your product data plate when calling. The data plate is turned off , until the oven has cooled sufficiently. The cooling fan will continue to Obtain Service or Parts To reach a service...
Cooling fan runs even when the oven is located on the underside of the manual. This is normal to the data plate on your product data plate when calling. The data plate is turned off , until the oven has cooled sufficiently. The cooling fan will continue to Obtain Service or Parts To reach a service...


