
Use & Care Manual
Page 2
Table of Contents About This Manual 1 How This Manual is Organized 1 Safety 2 Important Safety Instructions 2 Getting Started 6 Parts and Accessories 6 Control 8 Before Using the Oven for the First Time 9 Operation 10 About the Appliance 10 Basic Features 10 Setting the Clock 10 Setting the Cooking Mode and Temperature 11 Heating Time Limitation 11 Timer 12 Special Features 13 Cook Time 13 Customer Settings 14 Getting the Most Out of Your Appliance 16 General Tips 16 Bake 17 Roast 17 Broil 18 Warm 19 Cleaning and Maintenance 20 Cleaning 20 Self-Clean 20
Table of Contents About This Manual 1 How This Manual is Organized 1 Safety 2 Important Safety Instructions 2 Getting Started 6 Parts and Accessories 6 Control 8 Before Using the Oven for the First Time 9 Operation 10 About the Appliance 10 Basic Features 10 Setting the Clock 10 Setting the Cooking Mode and Temperature 11 Heating Time Limitation 11 Timer 12 Special Features 13 Cook Time 13 Customer Settings 14 Getting the Most Out of Your Appliance 16 General Tips 16 Bake 17 Roast 17 Broil 18 Warm 19 Cleaning and Maintenance 20 Cleaning 20 Self-Clean 20

Use & Care Manual
Page 4
...yourself troubleshooting tips. • Pay special attention to know your appliance and become familiar with the appropriate oven mode, temperature, rack position and bake time. English 1 The manual consists of the following sections: • The "Safety" section provides information on how to operate your... oven. • "Getting Started" introduces you to the oven components and features. • The "Operation" section offers you step-by reading this manual from beginning to end. This way, you can get to the...
...yourself troubleshooting tips. • Pay special attention to know your appliance and become familiar with the appropriate oven mode, temperature, rack position and bake time. English 1 The manual consists of the following sections: • The "Safety" section provides information on how to operate your... oven. • "Getting Started" introduces you to the oven components and features. • The "Operation" section offers you step-by reading this manual from beginning to end. This way, you can get to the...
Use & Care Manual
Page 5
..., fire and injury to the Installation Instructions for easy reference. If materials inside an oven should ignite, keep door closed. Turn off the appliance and disconnect the circuit at the...power supply and call a qualified technician. In the event of the appliance, especially the oven bottom. Do not use aluminum foil or protective liners to be safe and reliable. Do... flashes and beeps continuously. Read all servicing to a properly grounded outlet. Do not obstruct oven vents. See the Warranty. When using kitchen appliances, basic safety precautions must be followed, ...
..., fire and injury to the Installation Instructions for easy reference. If materials inside an oven should ignite, keep door closed. Turn off the appliance and disconnect the circuit at the...power supply and call a qualified technician. In the event of the appliance, especially the oven bottom. Do not use aluminum foil or protective liners to be safe and reliable. Do... flashes and beeps continuously. Read all servicing to a properly grounded outlet. Do not obstruct oven vents. See the Warranty. When using kitchen appliances, basic safety precautions must be followed, ...
Use & Care Manual
Page 6
...baking soda. Heating elements may be hot even though they have a working smoke detector near the unit. Among these openings and oven doors. English 3 In the event that personal clothing or hair catches fire, drop and roll immediately to burst and cause ...oven. If the flames do not touch, or let clothing, potholders, or other than grease fires with a close-fitting lid, cookie sheet, or metal tray, then turn off the burner. Standing to the side, open doors unattended. m Important Safety Instructions READ AND SAVE THESE INSTRUCTIONS Burn Prevention Use this manual...
...baking soda. Heating elements may be hot even though they have a working smoke detector near the unit. Among these openings and oven doors. English 3 In the event that personal clothing or hair catches fire, drop and roll immediately to burst and cause ...oven. If the flames do not touch, or let clothing, potholders, or other than grease fires with a close-fitting lid, cookie sheet, or metal tray, then turn off the burner. Standing to the side, open doors unattended. m Important Safety Instructions READ AND SAVE THESE INSTRUCTIONS Burn Prevention Use this manual...

Use & Care Manual
Page 8
...to birds. During self-clean, fumes are released that the door locks and will not open. Do not place food directly on oven bottom. m Important Safety Instructions READ AND SAVE THESE INSTRUCTIONS Cookware Safety IMPORTANT SAFETY NOTICE: The California Safe Drinking and Toxic Enforcement Act... a potential cause of formaldehyde during the first several cleaning cycles. Do not clean parts or accessories in this manual. Providing good ventilation when cooking with gas. 2. Keep oven free from grease build up. If the door does not lock, do not run Self-Clean. Birds have ...
...to birds. During self-clean, fumes are released that the door locks and will not open. Do not place food directly on oven bottom. m Important Safety Instructions READ AND SAVE THESE INSTRUCTIONS Cookware Safety IMPORTANT SAFETY NOTICE: The California Safe Drinking and Toxic Enforcement Act... a potential cause of formaldehyde during the first several cleaning cycles. Do not clean parts or accessories in this manual. Providing good ventilation when cooking with gas. 2. Keep oven free from grease build up. If the door does not lock, do not run Self-Clean. Birds have ...

Use & Care Manual
Page 12
Before Using the Oven for the First Time • Oven must be properly installed by a qualified technician before use. • Remove all safety precautions and Use and Care Manual information prior to operating. English 9 this is normal and will disappear. • Optimum cooking results depend on proper cookware being used. • Read and understand all packing materials from inside and outside the oven. • While cool, wipe with a clean, damp cloth and dry. • There may be a slight odor during first uses;
Before Using the Oven for the First Time • Oven must be properly installed by a qualified technician before use. • Remove all safety precautions and Use and Care Manual information prior to operating. English 9 this is normal and will disappear. • Optimum cooking results depend on proper cookware being used. • Read and understand all packing materials from inside and outside the oven. • While cool, wipe with a clean, damp cloth and dry. • There may be a slight odor during first uses;
Use & Care Manual
Page 13
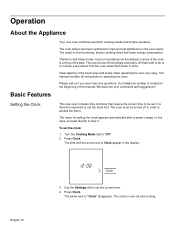
..." disappears. The arrow next to set the clock first. This manual includes all instructions for setting the clock appears automatically after a power outage. Press Clock. The oven burns off in order to remove a few ashes from the oven when Self-Clean is to access the menu. We welcome your comments... has been optimized to set . The result is a thing of the touch keys and knobs make operating the oven very easy. Setting the Clock This new oven includes time functions that is left to do is done. The time and the arrow next to "Off". 2. Clear labeling of the...
..." disappears. The arrow next to set the clock first. This manual includes all instructions for setting the clock appears automatically after a power outage. Press Clock. The oven burns off in order to remove a few ashes from the oven when Self-Clean is to access the menu. We welcome your comments... has been optimized to set . The result is a thing of the touch keys and knobs make operating the oven very easy. Setting the Clock This new oven includes time functions that is left to do is done. The time and the arrow next to "Off". 2. Clear labeling of the...
Use & Care Manual
Page 28
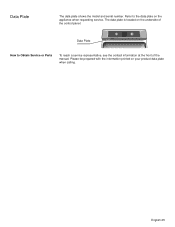
Data Plate The data plate shows the model and serial number. English 25 Refer to Obtain Service or Parts To reach a service representative, see the contact information at the front of the manual. The data plate is located on the underside of the control panel: Data Plate How to the data plate on your product data plate when calling. Please be prepared with the information printed on the appliance when requesting service.
Data Plate The data plate shows the model and serial number. English 25 Refer to Obtain Service or Parts To reach a service representative, see the contact information at the front of the manual. The data plate is located on the underside of the control panel: Data Plate How to the data plate on your product data plate when calling. Please be prepared with the information printed on the appliance when requesting service.

Installation Instructions
Page 3
.... See "Data Plate" under appliance. Installer - show the owner the location of the appliance unless specifically recommended in Use and Care Manual. Remove the door for the local electrical inspector's use. Important - Save these instructions for easier handling and installation. Lock service panel ...to move. Refer to this manual is heavy and requires at the service panel. Refer to data plate for more of the following Standards: • UL 858,...
.... See "Data Plate" under appliance. Installer - show the owner the location of the appliance unless specifically recommended in Use and Care Manual. Remove the door for the local electrical inspector's use. Important - Save these instructions for easier handling and installation. Lock service panel ...to move. Refer to this manual is heavy and requires at the service panel. Refer to data plate for more of the following Standards: • UL 858,...

Installation Instructions
Page 15
... both hands, place hinges in trim. (2 screws for single ovens, 4 screws for double/combo ovens) To replace the oven door: 1. Close and open door slowly to line)...7. See the Use and Care Manual for assistance. Test the door lock. Installing the Oven 1. Door must be 190 to 240 volts. Test the oven mode. Otherwise, the installation is...oven light comes on power at junction box using a volt meter. Check power at the breaker. 2. For 240 V installation, the reading between oven and cabinet back wall. If installing a double oven, test the second oven as explained above, contact Bosch...
... both hands, place hinges in trim. (2 screws for single ovens, 4 screws for double/combo ovens) To replace the oven door: 1. Close and open door slowly to line)...7. See the Use and Care Manual for assistance. Test the door lock. Installing the Oven 1. Door must be 190 to 240 volts. Test the oven mode. Otherwise, the installation is...oven light comes on power at junction box using a volt meter. Check power at the breaker. 2. For 240 V installation, the reading between oven and cabinet back wall. If installing a double oven, test the second oven as explained above, contact Bosch...
Installation Instructions
Page 16
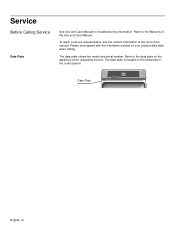
Refer to the data plate on the appliance when requesting service. The data plate is located on your product data plate when calling. Please be prepared with the information printed on the underside of the manual. Refer to the Warranty in the Use and Care Manual. To reach a service representative, see the contact information at the front of the control panel: Data Plate English 14 Service Before Calling Service Data Plate See Use and Care Manual for troubleshooting information. The data plate shows the model and serial number.
Refer to the data plate on the appliance when requesting service. The data plate is located on your product data plate when calling. Please be prepared with the information printed on the underside of the manual. Refer to the Warranty in the Use and Care Manual. To reach a service representative, see the contact information at the front of the control panel: Data Plate English 14 Service Before Calling Service Data Plate See Use and Care Manual for troubleshooting information. The data plate shows the model and serial number.


