Installation Instructions
Page 3
... appliance in the cavity ...18 13. Preparing the installation cavity ...13 6. Attaching stainless steel front panel to the appliance 19 14. Attaching the covers ...21 18. Removing the packaging ...12 4. Attaching...20 16. Checking the installation cavity ...11 2. Attaching an alternative anti-tip device 14 7. Removing stainless steel front panel from specialist outlets 10 Tools ...10 Other ...10 Installation instructions ...11 1. Attaching the toe kick panel ...19 15. Pushing the appliance into the installation cavity 16 10. Adjusting the door opening angle (refrigerator...
... appliance in the cavity ...18 13. Preparing the installation cavity ...13 6. Attaching stainless steel front panel to the appliance 19 14. Attaching the covers ...21 18. Removing the packaging ...12 4. Attaching...20 16. Checking the installation cavity ...11 2. Attaching an alternative anti-tip device 14 7. Removing stainless steel front panel from specialist outlets 10 Tools ...10 Other ...10 Installation instructions ...11 1. Attaching the toe kick panel ...19 15. Pushing the appliance into the installation cavity 16 10. Adjusting the door opening angle (refrigerator...

Installation Instructions
Page 5
... 1. 2. - See the section on "Optional accessories". - Individual unit At the end of the kitchen units If one side of the side panel are opened at the same time. - Installation options The different installation options are limited only by -Side Heating kit if the gap between the ...appliances is visible, a side panel must be used. Minimum thickness of the furniture fronts to the wall, the floor and overhead furniture/fixtures before the appliance is square and...
... 1. 2. - See the section on "Optional accessories". - Individual unit At the end of the kitchen units If one side of the side panel are opened at the same time. - Installation options The different installation options are limited only by -Side Heating kit if the gap between the ...appliances is visible, a side panel must be used. Minimum thickness of the furniture fronts to the wall, the floor and overhead furniture/fixtures before the appliance is square and...
Installation Instructions
Page 6
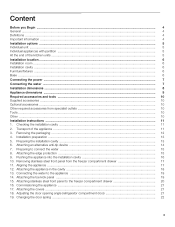
... - A thickness of the furniture front. For this reason it is essential that the cavity is required. On account of the heavy weight of toe kick panel must be 1/2" (13 mm). for the loadbearing capacity at risk of frost. The minimum thickness of the room. Installation location m WARNING m Do not install the...
... - A thickness of the furniture front. For this reason it is essential that the cavity is required. On account of the heavy weight of toe kick panel must be 1/2" (13 mm). for the loadbearing capacity at risk of frost. The minimum thickness of the room. Installation location m WARNING m Do not install the...

Installation Instructions
Page 9
d) This dimension may vary. b) Dimensions may vary depending on installation, panel thickness and kitchen hardware. Appliance dimensions Legend: a) Adjustment in levelling legs +13/8" (35 mm) / -1/2" (13 mm). e) Unit dimensions f) Wooden door panel dimensions 9
d) This dimension may vary. b) Dimensions may vary depending on installation, panel thickness and kitchen hardware. Appliance dimensions Legend: a) Adjustment in levelling legs +13/8" (35 mm) / -1/2" (13 mm). e) Unit dimensions f) Wooden door panel dimensions 9

Installation Instructions
Page 11
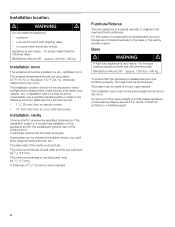
... the adjacent furniture/fixtures. Also follow the instructions in an upright position due to the following table: Erection via appliance rear Erection via appliance side panel 86" / 2185 mm Never put the appliance up via its side! 11 Before starting the installation, check that the installation cavity complies with all requirements...
... the adjacent furniture/fixtures. Also follow the instructions in an upright position due to the following table: Erection via appliance rear Erection via appliance side panel 86" / 2185 mm Never put the appliance up via its side! 11 Before starting the installation, check that the installation cavity complies with all requirements...

Installation Instructions
Page 14
... the cavity. „ Mark the installation height (lower edge of the beam) on the rear panel of the cavity. „ Select screws according to the subsurface: „ Locate wall studs near the rear panel of the cavity. 14 Do not use in the beam or „ Fasten suitable dowel into the rear...; Attach the wooden beam to cure. If the installation cavity is deeper than the appliance, select a beam which has not had time to the rear panel of the cavity and mark drill holes in light-weight masonry material such as block or brick. Risk of the wooden beam: length = min. 2.5 x beam...
... the cavity. „ Mark the installation height (lower edge of the beam) on the rear panel of the cavity. „ Select screws according to the subsurface: „ Locate wall studs near the rear panel of the cavity. 14 Do not use in the beam or „ Fasten suitable dowel into the rear...; Attach the wooden beam to cure. If the installation cavity is deeper than the appliance, select a beam which has not had time to the rear panel of the cavity and mark drill holes in light-weight masonry material such as block or brick. Risk of the wooden beam: length = min. 2.5 x beam...
Installation Instructions
Page 16
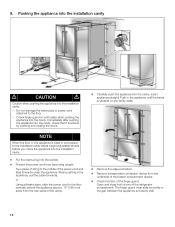
NOTE When the floor or the appliance is tilted in the appliance until the frame is situated on both doors of the refrigerator compartment. or Using adhesive tape, stick the power cord to the middle of the finger guard. When pushing in the gap between the appliance...appliance into the installation cavity. - Tie a piece of string to the floor centrally behind the appliance approx. 15" (380 mm) away from the rear panel of the cavity. „ Remove the edge protection. „ Remove transportation protection device from becoming caught. The finger guard must slide smoothly in the ...
NOTE When the floor or the appliance is tilted in the appliance until the frame is situated on both doors of the refrigerator compartment. or Using adhesive tape, stick the power cord to the middle of the finger guard. When pushing in the gap between the appliance...appliance into the installation cavity. - Tie a piece of string to the floor centrally behind the appliance approx. 15" (380 mm) away from the rear panel of the cavity. „ Remove the edge protection. „ Remove transportation protection device from becoming caught. The finger guard must slide smoothly in the ...

Installation Instructions
Page 17
... proceed gradually: Always alternate between left and right, left and right fixing brackets. Do not unscrew the screws! 11. Removing stainless steel front panel from the door to the appliance. The adjustment of 11/4" (32 mm) above the floor. 17 When adjusting the height, align this installation ...manual, rotate the appliance all be aligned. „ Do not loosen the screws on the top of the stainless steel front panel away from the freezer compartment drawer „ Loosen and unscrew nuts on the left and right, etc.. - Risk of damage to remove ...
... proceed gradually: Always alternate between left and right, left and right fixing brackets. Do not unscrew the screws! 11. Removing stainless steel front panel from the door to the appliance. The adjustment of 11/4" (32 mm) above the floor. 17 When adjusting the height, align this installation ...manual, rotate the appliance all be aligned. „ Do not loosen the screws on the top of the stainless steel front panel away from the freezer compartment drawer „ Loosen and unscrew nuts on the left and right, etc.. - Risk of damage to remove ...
Installation Instructions
Page 19
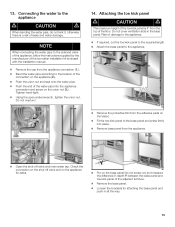
... from the appliance connection (1.). „ Bend the water pipe according to the location of the floor. NOTE When connecting the water pipe to the base panel and press firmly into the appliance connection and screw on the appliance (2.). „ Push the union nut and seal onto the water pipe. „ ...ventilation slots in all the way. 19 13. Risk of damage to the appliance. „ If required, cut the toe kick panel to the required length. „ Attach the base panel to the appliance. „ Remove the protective film from the adhesive pads on the Velcro. „ Fit the toe kick...
... from the appliance connection (1.). „ Bend the water pipe according to the location of the floor. NOTE When connecting the water pipe to the base panel and press firmly into the appliance connection and screw on the appliance (2.). „ Push the union nut and seal onto the water pipe. „ ...ventilation slots in all the way. 19 13. Risk of damage to the appliance. „ If required, cut the toe kick panel to the required length. „ Attach the base panel to the appliance. „ Remove the protective film from the adhesive pads on the Velcro. „ Fit the toe kick...

Installation Instructions
Page 20
...on top of the stainless steel front panel. Attaching stainless steel front panel to the freezer compartment drawer „... steel front panel over the threaded bolts. „ Lift bottom of stainless steel front panel and push the... fixing brackets down over the screws. „ When the freezer compartment door is closed, check the depth of the stainless steel front panel with respect to the base panel. NOTE If required, the toe kick panel... can be screwed to the adjacent furniture front panels...
...on top of the stainless steel front panel. Attaching stainless steel front panel to the freezer compartment drawer „... steel front panel over the threaded bolts. „ Lift bottom of stainless steel front panel and push the... fixing brackets down over the screws. „ When the freezer compartment door is closed, check the depth of the stainless steel front panel with respect to the base panel. NOTE If required, the toe kick panel... can be screwed to the adjacent furniture front panels...

Instructions for Use
Page 3
... the appliance 9 Functions 10 Variable interior design 10 Control panel 12 Setting the temperature 13 Super function 13 Setup mode 14 Settings which can be changed in setup mode 15 Vacation Mode 16 Sabbath Mode 16 Refrigerating 16 Freezing and storing 17 IceMaker 18 Operating noises 18... How to save energy 19 Defrosting 19 Cleaning the appliance 19 Odors 19 Warning messages via the display 20 Appliance selfĆtest 20 Resetting factory settings 21 Water filter ...
... the appliance 9 Functions 10 Variable interior design 10 Control panel 12 Setting the temperature 13 Super function 13 Setup mode 14 Settings which can be changed in setup mode 15 Vacation Mode 16 Sabbath Mode 16 Refrigerating 16 Freezing and storing 17 IceMaker 18 Operating noises 18... How to save energy 19 Defrosting 19 Cleaning the appliance 19 Odors 19 Warning messages via the display 20 Appliance selfĆtest 20 Resetting factory settings 21 Water filter ...

Instructions for Use
Page 6
... new appliance 2Ćdoor model These operating instructions refer to several models. Refrigerator compartment 1 Control panel 2 Butter and cheese compartment for storage of various, condiments, bottles and jars 3 Motorized shelf 4 Button for Motorized shelf 5 Door storage bins 6 Glass shelves in refrigerator for storing cooked food, dairy products, meat products 7 Gallon door bin 8 Vegetable...
... new appliance 2Ćdoor model These operating instructions refer to several models. Refrigerator compartment 1 Control panel 2 Butter and cheese compartment for storage of various, condiments, bottles and jars 3 Motorized shelf 4 Button for Motorized shelf 5 Door storage bins 6 Glass shelves in refrigerator for storing cooked food, dairy products, meat products 7 Gallon door bin 8 Vegetable...

Instructions for Use
Page 7
Diagrams may vary. Refrigerator compartment 1 Control panel 2 Butter and cheese compartment for storage of various, condiments, bottles and jars 3 Motorized shelf 4 Button for motorized shelf 5 Door storage bins 6 Glass shelves in refrigerator for storing cooked food, dairy products, meat products 7 Gallon door bin 8 Vegetable container 9 CoolĆfresh" drawer Freezer compartment 10 Ice Maker...
Diagrams may vary. Refrigerator compartment 1 Control panel 2 Butter and cheese compartment for storage of various, condiments, bottles and jars 3 Motorized shelf 4 Button for motorized shelf 5 Door storage bins 6 Glass shelves in refrigerator for storing cooked food, dairy products, meat products 7 Gallon door bin 8 Vegetable container 9 CoolĆfresh" drawer Freezer compartment 10 Ice Maker...
Instructions for Use
Page 12
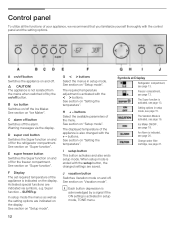
...Setting options in setup mode. The Vacation Mode is activated, see page 13. Ice Maker ON/OFF, see page 20. An Alarm is indicated on Vacation mode". Control panel To utilize all the functions of your appliance, we recommend that you familiarize yourself thoroughly with the < > buttons. ... displayed temperature of the menu. When setup mode is also changed with the setup button, the changed settings are indicated on /off for the refrigerator compartment. B ice button Switches on the display. Super function ć SUPER $ In setup mode the menus as well as the setting options...
...Setting options in setup mode. The Vacation Mode is activated, see page 13. Ice Maker ON/OFF, see page 20. An Alarm is indicated on Vacation mode". Control panel To utilize all the functions of your appliance, we recommend that you familiarize yourself thoroughly with the < > buttons. ... displayed temperature of the menu. When setup mode is also changed with the setup button, the changed settings are indicated on /off for the refrigerator compartment. B ice button Switches on the display. Super function ć SUPER $ In setup mode the menus as well as the setting options...

Instructions for Use
Page 19
... avoid electrical shock which may warp. Do not let the water used for cleaning drip onto the control panel or light. The parts may damage the surfaces of the frozen food will refrigerate the food in the appliance. - q Clean the appliance with the on/off button. Switch on /...off button. Odors If the appliance is defrosted automatically. q Thoroughly clean all food out of odors. q Stack food in the refrigerator. If required, use abrasive or acidic cleaning agents or solvents which can cause severe personal injury or death, disconnect power to appliance before placing...
... avoid electrical shock which may warp. Do not let the water used for cleaning drip onto the control panel or light. The parts may damage the surfaces of the frozen food will refrigerate the food in the appliance. - q Clean the appliance with the on/off button. Switch on /...off button. Odors If the appliance is defrosted automatically. q Thoroughly clean all food out of odors. q Stack food in the refrigerator. If required, use abrasive or acidic cleaning agents or solvents which can cause severe personal injury or death, disconnect power to appliance before placing...
Instructions for Use
Page 21
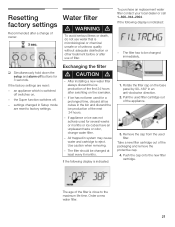
... age of the next 24 hours. - If ice has not been used filter. The filter has to eject. Rotate the filter cap on the base panel by 90-180° in system may cause water and cartridge to be changed immediately. 1. Push the cap onto the new filter cartridge.
... age of the next 24 hours. - If ice has not been used filter. The filter has to eject. Rotate the filter cap on the base panel by 90-180° in system may cause water and cartridge to be changed immediately. 1. Push the cap onto the new filter cartridge.

Instructions for Use
Page 22
... filter, reset the filter display. i The appliance might be used without a water filter. Resetting the filter display i If the filter display is in the base panel. 6. To purchase a water filter substitute cartridge contact your local dealer or call 1-800-944-2904. To deactivate the filter display: q Simultaneously hold down the setup...
... filter, reset the filter display. i The appliance might be used without a water filter. Resetting the filter display i If the filter display is in the base panel. 6. To purchase a water filter substitute cartridge contact your local dealer or call 1-800-944-2904. To deactivate the filter display: q Simultaneously hold down the setup...


