Installation Instructions
Page 3
.... Connecting the water to the freezer compartment drawer 20 16. Attaching the toe kick panel ...19 15. Adjusting the door opening angle (refrigerator compartment door 21 19. Preparing the installation cavity ...13 6. Removing stainless steel front panel from specialist outlets 10 Tools ...10 Other ...10 Installation instructions ...11 1. Aligning the appliance ...17 12. Checking the installation cavity ...11 2. Attaching stainless steel front panel to the appliance 19 14. Attaching the covers...
.... Connecting the water to the freezer compartment drawer 20 16. Attaching the toe kick panel ...19 15. Adjusting the door opening angle (refrigerator compartment door 21 19. Preparing the installation cavity ...13 6. Removing stainless steel front panel from specialist outlets 10 Tools ...10 Other ...10 Installation instructions ...11 1. Aligning the appliance ...17 12. Checking the installation cavity ...11 2. Attaching stainless steel front panel to the appliance 19 14. Attaching the covers...
Installation Instructions
Page 4
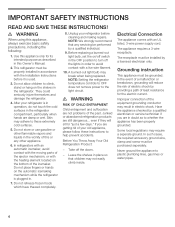
... use . Be sure to reduce the risk of tipping forward. latest edition/State and Municipal codes and/or local codes. - Important information The importance of the installer. Repairs should be simple, trouble-free and, most importantly, safe. 4 Proper installation is completely installed and secured per installation instructions. Keep these instructions completely and carefully. In Canada, in this appliance, and to leave these instructions for water, electrical power...
... use . Be sure to reduce the risk of tipping forward. latest edition/State and Municipal codes and/or local codes. - Important information The importance of the installer. Repairs should be simple, trouble-free and, most importantly, safe. 4 Proper installation is completely installed and secured per installation instructions. Keep these instructions completely and carefully. In Canada, in this appliance, and to leave these instructions for water, electrical power...
Installation Instructions
Page 7
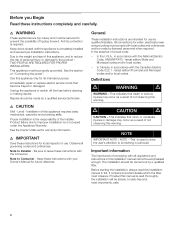
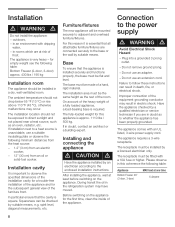
... use an adapter. - The appliance requires a 3-wire receptacle. For the installation position of the water pipe (without fittings): 13/32" (10 mm). Have the appliance checked by providing a path of the automatic ice maker. The installation must be fused with a 3-wire power supply cord, UL listed in the pictures. The shut-off valve for the pipe. Maximum outer diameter of the receptacle see "Installation dimensions...
... use an adapter. - The appliance requires a 3-wire receptacle. For the installation position of the water pipe (without fittings): 13/32" (10 mm). Have the appliance checked by providing a path of the automatic ice maker. The installation must be fused with a 3-wire power supply cord, UL listed in the pictures. The shut-off valve for the pipe. Maximum outer diameter of the receptacle see "Installation dimensions...

Installation Instructions
Page 21
... smoothly forwards and backwards when the refrigerator compartment doors open and close. Adjusting the door opening angle (refrigerator compartment door) Depending on the installation situation, it may be operated. „ Open the appliance door. „ Press the POWER button. In particular check - Attaching the covers „ Insert the cover plate on the freezer compartment drawer into the gap between stainless steel front and drawer. 21 Only for appliances with a hammer...
... smoothly forwards and backwards when the refrigerator compartment doors open and close. Adjusting the door opening angle (refrigerator compartment door) Depending on the installation situation, it may be operated. „ Open the appliance door. „ Press the POWER button. In particular check - Attaching the covers „ Insert the cover plate on the freezer compartment drawer into the gap between stainless steel front and drawer. 21 Only for appliances with a hammer...

Instructions for Use
Page 3
... 10 Control panel 12 Setting the temperature 13 Super function 13 Setup mode 14 Settings which can be changed in setup mode 15 Vacation Mode 16 Sabbath Mode 16 Refrigerating 16 Freezing and storing 17 IceMaker 18 Operating noises 18 How to save energy 19 Defrosting 19 Cleaning the appliance 19 Odors 19 Warning messages via the display 20 Appliance selfĆtest 20 Resetting factory settings 21 Water filter 21 Troubleshooting 24 Changing the bulb 26 Changing the odor filter 27 Service 27 Warranty...
... 10 Control panel 12 Setting the temperature 13 Super function 13 Setup mode 14 Settings which can be changed in setup mode 15 Vacation Mode 16 Sabbath Mode 16 Refrigerating 16 Freezing and storing 17 IceMaker 18 Operating noises 18 How to save energy 19 Defrosting 19 Cleaning the appliance 19 Odors 19 Warning messages via the display 20 Appliance selfĆtest 20 Resetting factory settings 21 Water filter 21 Troubleshooting 24 Changing the bulb 26 Changing the odor filter 27 Service 27 Warranty...
Instructions for Use
Page 4
... with an UL listed, 3Ćwire power supply cord. Do not allow children to climb, stand or hang on /off switch in order to turn off the doors. - Before replacing a burnedĆout light bulb, set the on the shelves in the vicinity of the ejector mechanism, or with the Installation Instructions before cleaning and making repairs. A burnedĆout light bulb may adhere to these instructions to whether the...
... with an UL listed, 3Ćwire power supply cord. Do not allow children to climb, stand or hang on /off switch in order to turn off the doors. - Before replacing a burnedĆout light bulb, set the on the shelves in the vicinity of the ejector mechanism, or with the Installation Instructions before cleaning and making repairs. A burnedĆout light bulb may adhere to these instructions to whether the...

Instructions for Use
Page 5
... concerning installation and connection of the appliance ć please do not hesitate to contact our customer service, see section Service". Definitions d WARNING d DANGER - making ice. Note to fines and imprisonment under provisions of environmental legislation. i This symbol is distinguished by a qualified servicer. Your bottom freezer is used to draw the user's attention to ensure that used CFC's (chlorofluorocarbons). freezing food, - Please read these instructions...
... concerning installation and connection of the appliance ć please do not hesitate to contact our customer service, see section Service". Definitions d WARNING d DANGER - making ice. Note to fines and imprisonment under provisions of environmental legislation. i This symbol is distinguished by a qualified servicer. Your bottom freezer is used to draw the user's attention to ensure that used CFC's (chlorofluorocarbons). freezing food, - Please read these instructions...

Instructions for Use
Page 6
... 1 Control panel 2 Butter and cheese compartment for storage of various, condiments, bottles and jars 3 Motorized shelf 4 Button for Motorized shelf 5 Door storage bins 6 Glass shelves in refrigerator for storing cooked food, dairy products, meat products 7 Gallon door bin 8 Vegetable container 9 CoolĆfresh" drawer Freezer compartment 10 Ice Maker * 11 Ice cube container Capacity max. 5.5 lbs / 2.5 kg 12 Internal freezer drawer 13 Freezer door drawer 14 Water filter * not visible 6 Diagrams may vary. Your new appliance 2Ćdoor model These operating instructions refer...
... 1 Control panel 2 Butter and cheese compartment for storage of various, condiments, bottles and jars 3 Motorized shelf 4 Button for Motorized shelf 5 Door storage bins 6 Glass shelves in refrigerator for storing cooked food, dairy products, meat products 7 Gallon door bin 8 Vegetable container 9 CoolĆfresh" drawer Freezer compartment 10 Ice Maker * 11 Ice cube container Capacity max. 5.5 lbs / 2.5 kg 12 Internal freezer drawer 13 Freezer door drawer 14 Water filter * not visible 6 Diagrams may vary. Your new appliance 2Ćdoor model These operating instructions refer...

Instructions for Use
Page 7
... compartment 1 Control panel 2 Butter and cheese compartment for storage of various, condiments, bottles and jars 3 Motorized shelf 4 Button for motorized shelf 5 Door storage bins 6 Glass shelves in refrigerator for storing cooked food, dairy products, meat products 7 Gallon door bin 8 Vegetable container 9 CoolĆfresh" drawer Freezer compartment 10 Ice Maker * 11 Ice cube container Capacity max. 11 lbs / 5 kg 12 Internal freezer drawer 13 Freezer door drawer 14 Water filter * not visible 7 Your new appliance 3Ćdoor model (French door) These operating instructions refer...
... compartment 1 Control panel 2 Butter and cheese compartment for storage of various, condiments, bottles and jars 3 Motorized shelf 4 Button for motorized shelf 5 Door storage bins 6 Glass shelves in refrigerator for storing cooked food, dairy products, meat products 7 Gallon door bin 8 Vegetable container 9 CoolĆfresh" drawer Freezer compartment 10 Ice Maker * 11 Ice cube container Capacity max. 11 lbs / 5 kg 12 Internal freezer drawer 13 Freezer door drawer 14 Water filter * not visible 7 Your new appliance 3Ćdoor model (French door) These operating instructions refer...
Instructions for Use
Page 8
... lbs / 500 kg. Connection to the enclosed installation instructions. Failure to the base or the wall by an electrician according to the power supply d WARNING d Avoid Electrical Shock Hazard - The appliance comes with dripping water, - in a dry, well ventilated room. The ambient temperature should not be installed in an environment with an UL listed, 3Ćwire power supply cord. If in electric shock. Have the...
... lbs / 500 kg. Connection to the enclosed installation instructions. Failure to the base or the wall by an electrician according to the power supply d WARNING d Avoid Electrical Shock Hazard - The appliance comes with dripping water, - in a dry, well ventilated room. The ambient temperature should not be installed in an environment with an UL listed, 3Ćwire power supply cord. If in electric shock. Have the...

Instructions for Use
Page 9
... the doors open , the interior lights come on /off button. A separate shutĆoff valve must not be between 25 and 120 p.s.i. (1.72ć8.25 bar). When the doors are reached after switching on the appliance again, install a new filter (see "Exchanging the filter"). To change the preset temperatures ć> see Cleaning the appliance"). i If switching off the appliance for operation of the automatic ice maker. q Empty the ice cube container...
... the doors open , the interior lights come on /off button. A separate shutĆoff valve must not be between 25 and 120 p.s.i. (1.72ć8.25 bar). When the doors are reached after switching on the appliance again, install a new filter (see "Exchanging the filter"). To change the preset temperatures ć> see Cleaning the appliance"). i If switching off the appliance for operation of the automatic ice maker. q Empty the ice cube container...
Instructions for Use
Page 12
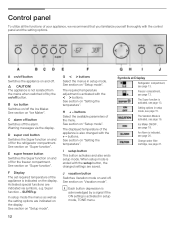
... 21. Change water filter cartridge, see page 18. A on/off button Switches the appliance on /off . B ice button Switches on and off the Ice Maker. Warning messages via symbols, e.g. The required temperature adjustment is activated, see page 13. See section on and off for the freezer compartment. I setup button This button activates and also ends setup mode. J vacation button Switches Vacation mode on Setup mode". Setting options in setup mode, TONE menu. 12 Symbols at Display Refrigerator compartment, see...
... 21. Change water filter cartridge, see page 18. A on/off button Switches the appliance on /off . B ice button Switches on and off the Ice Maker. Warning messages via symbols, e.g. The required temperature adjustment is activated, see page 13. See section on and off for the freezer compartment. I setup button This button activates and also ends setup mode. J vacation button Switches Vacation mode on Setup mode". Setting options in setup mode, TONE menu. 12 Symbols at Display Refrigerator compartment, see...

Instructions for Use
Page 18
... aid of a spirit level. Use the heightĆadjustable feet or place something underneath. Receptacles are no longer used. Cold air is flowing through the tubes. Switching off the ice maker i The water supply line must be checked. Ice is full, the ice maker switches off the ice maker: q Press the ice button. Other means of Ćdate food. Check the contents of the freezer for spoilt or outĆof preventing odors: - In some models. - Drawers...
... aid of a spirit level. Use the heightĆadjustable feet or place something underneath. Receptacles are no longer used. Cold air is flowing through the tubes. Switching off the ice maker i The water supply line must be checked. Ice is full, the ice maker switches off the ice maker: q Press the ice button. Other means of Ćdate food. Check the contents of the freezer for spoilt or outĆof preventing odors: - In some models. - Drawers...

Instructions for Use
Page 19
... water used for cleaning drip onto the light or control panel. - Switch on the appliance with the on /off button. q Change the odor filter. Defrost frozen food by placing it in airtight containers to prevent the build up of the appliance. - Cleaning the appliance d WARNING d To avoid electrical shock which may warp. Do not let the water used for appliance surfaces. Pull out the mains plug or switch...
... water used for cleaning drip onto the light or control panel. - Switch on the appliance with the on /off button. q Change the odor filter. Defrost frozen food by placing it in airtight containers to prevent the build up of the appliance. - Cleaning the appliance d WARNING d To avoid electrical shock which may warp. Do not let the water used for appliance surfaces. Pull out the mains plug or switch...
Instructions for Use
Page 21
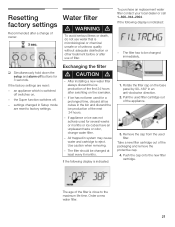
.... settings changed immediately. 1. d CAUTION d - If ice has not been used filter cartridge out of the first 24 hours after swichting on the icemaker. - If the following display is indicated: - Order a new water filter. 21 an appliance which is switched off , - Pull the used for 3 seconds. q Simultaneously hold down the setup and alarm off buttons for a prolonged time, discard all ice cubes in an antiĆclockwise direction. 2. After installing a new water filter...
.... settings changed immediately. 1. d CAUTION d - If ice has not been used filter cartridge out of the first 24 hours after swichting on the icemaker. - If the following display is indicated: - Order a new water filter. 21 an appliance which is switched off , - Pull the used for 3 seconds. q Simultaneously hold down the setup and alarm off buttons for a prolonged time, discard all ice cubes in an antiĆclockwise direction. 2. After installing a new water filter...

Instructions for Use
Page 22
... choose this option replace the water filter by a water filter substitute cartridge. In this option replace the water filter by a water filter substitute cartridge. To deactivate the filter display: q Simultaneously hold down the setup and ice buttons for 3 seconds simultaneously. i After changing the filter, reset the filter display. To purchase a water filter substitute cartridge contact your local dealer or call 1-800-944-2904. i ReĆactivate the filter display by the display. Rotate the filter cartridge by 90°-180...
... choose this option replace the water filter by a water filter substitute cartridge. In this option replace the water filter by a water filter substitute cartridge. To deactivate the filter display: q Simultaneously hold down the setup and ice buttons for 3 seconds simultaneously. i After changing the filter, reset the filter display. To purchase a water filter substitute cartridge contact your local dealer or call 1-800-944-2904. i ReĆactivate the filter display by the display. Rotate the filter cartridge by 90°-180...
Instructions for Use
Page 24
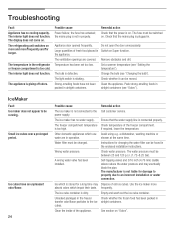
.../flavor particles to the power supply. Ensure that the mains plug is stored for changing the water filter can be running. Avoid using e.g. Pack strongĆsmelling foods in packed in the refrigerator or freezer compartment is on Super function. Clean the inside of fresh food placed in Switch on . Remedial action Check that the power is too cold. Do not open the door unnecessarily. Unsealed packages...
.../flavor particles to the power supply. Ensure that the mains plug is stored for changing the water filter can be running. Avoid using e.g. Pack strongĆsmelling foods in packed in the refrigerator or freezer compartment is on Super function. Clean the inside of fresh food placed in Switch on . Remedial action Check that the power is too cold. Do not open the door unnecessarily. Unsealed packages...

Instructions for Use
Page 25
... section Variable interior design"). SelfĆtapping valves and 3/16 inch (4.76 mm) saddle valves reduce the water pressure and may eventually block the pipe. If required, lower the temperature. Ice is not liable for changing the water filter can be between 25 and 120 p.s.i. (1.72ć8.25 bar). Instructions for damage to property due to the ice maker. Call customer service immediately. The...
... section Variable interior design"). SelfĆtapping valves and 3/16 inch (4.76 mm) saddle valves reduce the water pressure and may eventually block the pipe. If required, lower the temperature. Ice is not liable for changing the water filter can be between 25 and 120 p.s.i. (1.72ć8.25 bar). Instructions for damage to property due to the ice maker. Call customer service immediately. The...
Instructions for Use
Page 27
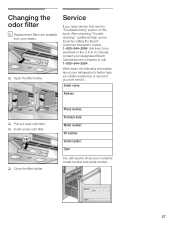
... number: Purchase date: Model number: FD number: Serial number: Type: You will need to better help can be found by calling the Bosch Customer Interaction Center, 1-800-944-2904 (tollĆfree), from your designated Bosch Canada service company or call 1-800-944-2904 . Service If you ever need service, first see the "Troubleshooting" section of this book. Dealer name: Address: q Pull out used odor filter. After checking "TroubleĆ shooting...
... number: Purchase date: Model number: FD number: Serial number: Type: You will need to better help can be found by calling the Bosch Customer Interaction Center, 1-800-944-2904 (tollĆfree), from your designated Bosch Canada service company or call 1-800-944-2904 . Service If you ever need service, first see the "Troubleshooting" section of this book. Dealer name: Address: q Pull out used odor filter. After checking "TroubleĆ shooting...
Instructions for Use
Page 28
... Bosch Fridge-Freezer ("Product") sold to install the product in materials or workmanship. If you with any concessions, including repairs, prorates, or Product replacement, once this warranty has expired. z Lifetime Warranty against Stainless Steel Rust Thrugh: Bosch will repair or replace any applicable state, local, city, or county electrical, plumbing and/or building codes, regulations, or laws, including failure to you, the first using a Bosch-authorized service...
... Bosch Fridge-Freezer ("Product") sold to install the product in materials or workmanship. If you with any concessions, including repairs, prorates, or Product replacement, once this warranty has expired. z Lifetime Warranty against Stainless Steel Rust Thrugh: Bosch will repair or replace any applicable state, local, city, or county electrical, plumbing and/or building codes, regulations, or laws, including failure to you, the first using a Bosch-authorized service...


