Bosch B18ID80NRP Support Question
Bosch B18ID80NRP Support Question
Find answers below for this question about Bosch B18ID80NRP.Need a Bosch B18ID80NRP manual? We have 3 online manuals for this item!
Question posted by Candace on May 8th, 2011
Custom Panel Ordering
I need to know exactly how to order a custom panel for B18id80nrp. Thank you.
Current Answers
Related Bosch B18ID80NRP Manual Pages
Installation Instructions - Page 4
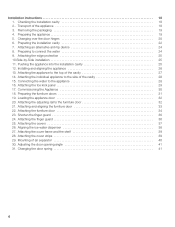
... 30. Shorten the finger guard 36 24. Preparing the appliance 19 5. Attaching the appliance to the top of the appliance 18 3. Attaching the toe kick panel 29 17. Attaching the edge protection 25 10.SideĆbyĆSide installation 25 11. Pushing the appliance into the installation cavity 25 12...
Installation Instructions - Page 6
...2. At the end of the kitchen units
If one side of the appliance is square and the exact size.
6 The dimensions of the furniture fronts to prevent damage if the doors are opened at ... is placed in the cavity.
i Note
-
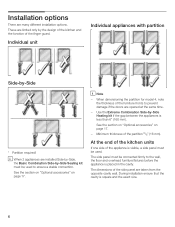
These are many different installation options.
The side panel must be connected firmly to ensure a stable connection. SideĆby the design of the kitchen...
Installation Instructions - Page 7

... 110 °F (43 °C), otherwise malfunctions may occur. The minimum thickness of toe kick panel must be made of a hard, rigid material.
Base
d
WARNING
d
A fullyĆload ... ensure that the appliance is unavoidable, use a suitable insulating plate or observe the following table:
Refrigerator 24" Refrigerator 30"
approx. 310 lbs / 140 kg approx. 350 lbs / 158 kg
Freezer 18" ...
Installation Instructions - Page 12

... hardware.
12
e) Unit dimensions
Note: One design of the wooden panel displayed. For further information about the different styles check the DESIGN GUIDE. b) Dimensions may vary. Appliance dimensions7.
1. 18" Appliance (Freezer/Freezer with Ice and Water dispenser)
e)
e)
Front view (without door panel)
Legend: a) Adjustment in levelling legs +13/8" (35 mm) / -1/2" (13 mm...
Installation Instructions - Page 14
...e) Unit dimensions
14
Note:
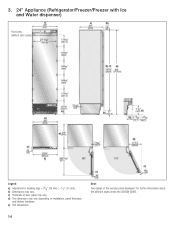
One design of door panel may vary. 3. 24" Appliance (Refrigerator/Freezer/Freezer with Ice and Water dispenser)
e)
e)
Front view (without door panel)
Legend: a) Adjustment in levelling legs +13/8" (35 mm) / -1/2" (13 mm). d) This dimension may vary. b) Dimensions may vary depending on installation, panel thickness
and kitchen hardware. c) Thickness of the...
Installation Instructions - Page 16
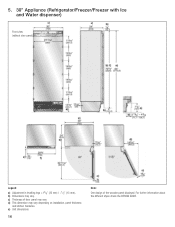
...c) Thickness of the wooden panel displayed. 5. 30" Appliance (Refrigerator/Freezer/Freezer with Ice and Water dispenser)
e)
e)
Front view (without door panel)
Legend: a) Adjustment in levelling legs +13/8" (35 mm) / -1/2" (13 mm). e) Unit dimensions
16
Note:
One design of door panel may vary. d) This dimension may vary depending on installation, panel thickness
and kitchen hardware. For...
Installation Instructions - Page 17
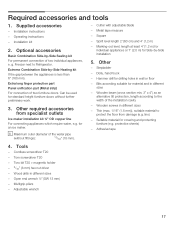
... end wrench ½" (SW 13 mm) - Optional accessories8.
Extra long finger protection part Panel unification part (Metal strip)
For connection of two individual appliances, e. i Maximum outer diameter of... section min. 3" x 4") as an alternative tilt protection, length according to Refrigerator. Adhesive tape
4. Torx screwdriver T20 - Wood drills in different sizes
- Adjustable...
Installation Instructions - Page 18
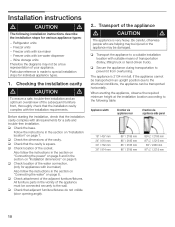
...Installation instructions
d
CAUTION
d
The following table:
Appliance width
Erection via appliance rear
Erection via appliance side panel
18" / 457 mm 24" / 610 mm 30" / 762 mm 36" / 914 mm
...appliance, observe the required minimum height at the installation location according to the wall. Refrigerator units - q Check that the installation cavity complies with ice maker - q Transport ...
Installation Instructions - Page 24
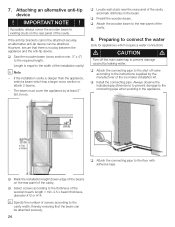
...by leaking water.
q Mark the installation height (lower edge of the beam) on the rear panel of the installation cavity! i Specify the number of screws according to the width of the cavity...to the connecting pipe when pushing in the beam.
i Note
-
q Locate wall studs near the rear panel of the ice maker installation kit.
q Saw the wooden beam (cross section min. 3" x 4") ...
Installation Instructions - Page 26

... fronts which are to the floor centrally behind the appliance approx. 15" (380 mm) away from becoming caught. q Prevent the power cord from the rear panel of the power cord and feed forwards under the appliance.
Installation Instructions - Page 29

... the connection on the shutĆoff valve and main water tap.
q Fit the toe kick panel to the appliance.
Do not overturn! q Remove the protective film from the adhesive pads on the...union nut 3. Risk of the water pipe into place.
29
q Push the end of damage to the base panel and press firmly into the appliance connection and screw on the Velcro. q Using the openĆended wrench, ...
Installation Instructions - Page 30

...the overall kitchen front later on ) and measure the difference in depth Y between the base panel and toe kick panel of damage caused by the measured amount Y. q Open the appliance door.
q Screw the brackets...holes in all the way.
In order to the
base panel.
Only for attaching the base panel and push in the base panel near the Velcro. q Put on the base panel (do not screw on , the ...
Installation Instructions - Page 32

... doors, it is recommended to load the door storage compartments in the appliance with weights in order to ensure that the gap width is as precise as an optional accessory, see the section ...33 lbs / 15 kg
30" Appliance 44 lbs / 20 kg
q Unscrew the installation support part from customer service as possible. Never screw into the best loadĆbearing material of the furniture door. i If...
Installation Instructions - Page 38

....
This allows the dispenser to be aligned inside the cutout of the iceĆwater dispenser can be aligned parallel to the furniture door in order to obtain an optimum overall appearance. SideĆbyĆSide installation only:
q Insert the cover strip into the space between the appliance and the...
Use & Care Manual - Page 4

...must be properly installed in accordance with the heating element located on the shelves in order to avoid contact with an UL listed, 3Ćwire power supply cord. Before ... that used .
3. e WARNING
When using this Owner's Manual.
2. Junked or abandoned refrigeration products are believed to ensure that children may adhere to these instructions to whether the appliance ...
Use & Care Manual - Page 17
...the ice cube container rotates in the appliance.
- Solenoid valve on
the dispenser key panel for 3 seconds again.
Drawers, baskets or storage areas wobble or stick
Check the removable... are falling into the ice cube container. Operating noises
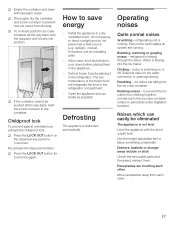
Quite normal noises
Grumbling ć refrigerating unit is not level
Level the appliance with lukewarm water.
ReĆactivate the dispenser ...
Use & Care Manual - Page 20
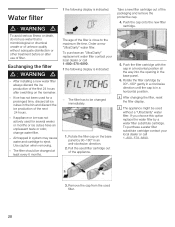
... not actively used without adequate disinfection or other treatment before or after swichting on the base panel by a water filter substitute cartridge. Pull the used filter cartridge out of the next 24... into the opening in system may cause water and cartridge to the maximum life time.
Order a new "UltraClarity" water filter. If the following display is in a clockwise direction ...
Use & Care Manual - Page 23
... is too high. The bulb is connected properly.
dispensing of the freezer compartment. Call customer service. Change the bulb (see Odors").
Ensure that the power is too cold. ... bar).
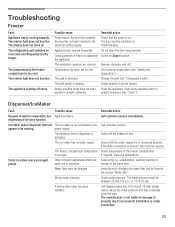
Set a warmer temperature (see Setting the temperature"). The refrigerating unit switches on more and more frequently and for longer. Troubleshooting
Freezer
Fault Appliance has no...
Use & Care Manual - Page 26

... down the following information about your freezer to know your designated Bosch Canada service company or call ...need service, first see the "Troubleshooting" section of the freezer compartment.
26 Touch the halogen bulb with a soft cloth only. Dealer name: Address:
Phone number: Purchase date: Model number: FD number: Serial number: Type:
You can be found by calling the Bosch Customer...
Use & Care Manual - Page 27
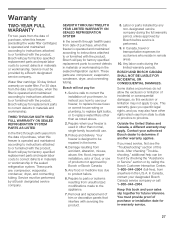
.... Removal and replacement of trim or decorative panels that interfere with the product, Bosch will ... freezer is operated and maintained according to instructions attached to instruct you need service, first see the "Troubleshooting" section of your designated Bosch Canada...customers who reside in Ćwarranty service.
27
THIRD THROUGH SIXTH YEAR FULL WARRANTY ON SEALED REFRIGERATION ...
Similar Questions

Bosch B36it71sns Refrigerator Parts Needed
Hi, I bought a Bosch Integra Series (new) Floor modelrefrigerator . The Model is B36IT71SNS. I need ...
Hi, I bought a Bosch Integra Series (new) Floor modelrefrigerator . The Model is B36IT71SNS. I need ...
(Posted by stuffisale 9 years ago)

Bosch Refrigerator Needs A Water Filter Substitute Cartridge
B22CS80SNS I can't find a water filter substitute cartridge anywhere to buy. I tried calling the pho...
B22CS80SNS I can't find a water filter substitute cartridge anywhere to buy. I tried calling the pho...
(Posted by mlp31 9 years ago)

Temperature Setting For Refrigerator And Freezer Need To Be Coldest?
(Posted by Wfghottie 11 years ago)
Can The Stainless Steel Panels Be Replaced With Wood Cabinet Panels?
(Posted by h123149 12 years ago)

No Control Panel Power / Freezer Light Works
(Posted by drkpoole 14 years ago)