Installation Instructions
Page 5
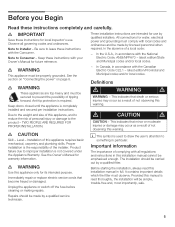
...Save these instructions with the Consumer. In the absence of tipping forward. AntiĆtip protection is completely installed and secured per installation instructions. Keep doors closed until the appliance is required. See the Owner's Manual for future reference. Immediately...ć Be sure to reduce the risk of this appliance only for use . Definitions d WARNING d WARNING - Repairs should be secured to improper installation is read this installation manual cannot be emphasised enough. Before you Begin Read these instructions with your Owner's Manual for ...
...Save these instructions with the Consumer. In the absence of tipping forward. AntiĆtip protection is completely installed and secured per installation instructions. Keep doors closed until the appliance is required. See the Owner's Manual for future reference. Immediately...ć Be sure to reduce the risk of this appliance only for use . Definitions d WARNING d WARNING - Repairs should be secured to improper installation is read this installation manual cannot be emphasised enough. Before you Begin Read these instructions with your Owner's Manual for ...

Installation Instructions
Page 7
... material. If in an environment with dripping water, - Installation location1. Appliance is installed securely and functions properly, the base must be installed in rooms which are connected securely to adjacent and overhead furniture/fixtures. The ambient temperature should be made of frost. If... Dispenser) To ensure that the cavity is required. Squareness can be 5/8" (16 mm). Furniture/fixtures The new appliance is screwed securely to the base or the wall by suitable means, e.g. The base must be exposed to observe the specified dimensions of the installation...
... material. If in an environment with dripping water, - Installation location1. Appliance is installed securely and functions properly, the base must be installed in rooms which are connected securely to adjacent and overhead furniture/fixtures. The ambient temperature should be made of frost. If... Dispenser) To ensure that the cavity is required. Squareness can be 5/8" (16 mm). Furniture/fixtures The new appliance is screwed securely to the base or the wall by suitable means, e.g. The base must be exposed to observe the specified dimensions of the installation...
Installation Instructions
Page 18
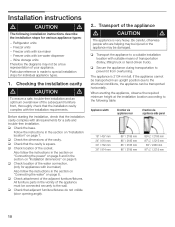
... 871/4" / 2215 mm 89" / 2260 mm 911/4" / 2315 mm 18 Wine storage units Therefore the diagrams may be connected securely to the following installation instructions describe the installation steps for appliances with suitable means of the subsequent furniture front, thoroughly check that the ... cavity complies with iceĆwater dispenser - q Check location of the water connection. (only for various appliance types: - q Secure the appliance during transportation to the structural conditions, the appliance can be a true representation of the appliance must be damaged. If the...
... 871/4" / 2215 mm 89" / 2260 mm 911/4" / 2315 mm 18 Wine storage units Therefore the diagrams may be connected securely to the following installation instructions describe the installation steps for appliances with suitable means of the subsequent furniture front, thoroughly check that the ... cavity complies with iceĆwater dispenser - q Check location of the water connection. (only for various appliance types: - q Secure the appliance during transportation to the structural conditions, the appliance can be a true representation of the appliance must be damaged. If the...
Installation Instructions
Page 19
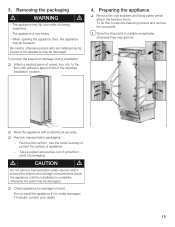
... tip over while it is very heavy. - If in transit. d CAUTION d Do not remove transportation safety devices which attach the furniture fronts. Use the cutter securely to the floor with a hand truck...
... tip over while it is very heavy. - If in transit. d CAUTION d Do not remove transportation safety devices which attach the furniture fronts. Use the cutter securely to the floor with a hand truck...
Installation Instructions
Page 22
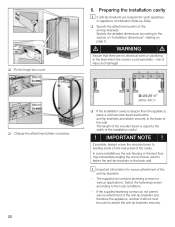
... to existing studs on page 9. If possible, always screw the wooden beam to the back wall. If the supplied fastening screws do not permit secure attachment of the cavity. q Change the attachment plates crosswise. 22 (609,6-647,7) q If the installation cavity is equal to attach the anti&#.... The length of the wooden beam is deeper than the appliance, place a solid wooden beam behind the antiĆtipĆbrackets and attach securely to the local conditions. - Select the fastening screws according to the base or the wall. Preparing the installation cavity i 2 antiĆtip...
... to existing studs on page 9. If possible, always screw the wooden beam to the back wall. If the supplied fastening screws do not permit secure attachment of the cavity. q Change the attachment plates crosswise. 22 (609,6-647,7) q If the installation cavity is equal to attach the anti&#.... The length of the wooden beam is deeper than the appliance, place a solid wooden beam behind the antiĆtipĆbrackets and attach securely to the local conditions. - Select the fastening screws according to the base or the wall. Preparing the installation cavity i 2 antiĆtip...
Installation Instructions
Page 24
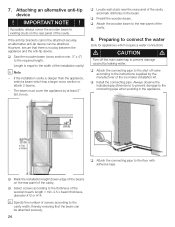
... length. q Install the connecting pipe. q Select screws according to the thickness of the cavity. If the antiĆtip brackets cannot be attached securely, an alternative antiĆtip device can be attached. i Note - Preparing to connect the water (only for appliances which has a larger cross...at least 2" (50.8 mm). 7. Attaching an alternative antiĆtip device ! IMPORTANT NOTE ! However, ensure that the beam can be attached securely. 24 Length is no play between the appliance and the antiĆtip device. If the installation cavity is deeper than the appliance, select a...
... length. q Install the connecting pipe. q Select screws according to the thickness of the cavity. If the antiĆtip brackets cannot be attached securely, an alternative antiĆtip device can be attached. i Note - Preparing to connect the water (only for appliances which has a larger cross...at least 2" (50.8 mm). 7. Attaching an alternative antiĆtip device ! IMPORTANT NOTE ! However, ensure that the beam can be attached securely. 24 Length is no play between the appliance and the antiĆtip device. If the installation cavity is deeper than the appliance, select a...

Installation Instructions
Page 31
... prevent damage, protect surfaces of the furniture door. - These fitting parts allow the furniture door to be adjusted precisely and attached securely to prevent lateral movement. 31 Side brackets: for securing the furniture front to the appliance door by means of the furniture front. 3. IMPORTANT NOTE ! Never screw into the best load... vertical adjustment of different parts: 1. Select a screw length which is always shorter than the thickness of the furniture front. - Nuts on the adjusting rail: for securing the furniture front to the appliance.
... prevent damage, protect surfaces of the furniture door. - These fitting parts allow the furniture door to be adjusted precisely and attached securely to prevent lateral movement. 31 Side brackets: for securing the furniture front to the appliance door by means of the furniture front. 3. IMPORTANT NOTE ! Never screw into the best load... vertical adjustment of different parts: 1. Select a screw length which is always shorter than the thickness of the furniture front. - Nuts on the adjusting rail: for securing the furniture front to the appliance.
Use & Care Manual
Page 7
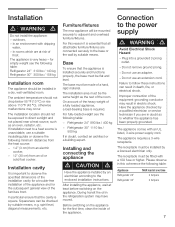
...ć for the subsequent general view of the room. In particular ensure that all attachable furniture/fixtures are connected securely to follow these instructions can be mounted securely to the power supply d WARNING d Avoid Electrical Shock Hazard - Furniture/fixtures The new appliance will be checked ... on the appliance for the first time, clean the inside of a fully loaded appliance, a loadĆbearing base is installed securely and functions properly, the base must be installed in the refrigeration system may result in doubt, contact an architect or a building expert...
...ć for the subsequent general view of the room. In particular ensure that all attachable furniture/fixtures are connected securely to follow these instructions can be mounted securely to the power supply d WARNING d Avoid Electrical Shock Hazard - Furniture/fixtures The new appliance will be checked ... on the appliance for the first time, clean the inside of a fully loaded appliance, a loadĆbearing base is installed securely and functions properly, the base must be installed in the refrigeration system may result in doubt, contact an architect or a building expert...