
Installation Instructions
Page 3
... connection 11 Appliance dimensions 12 1. 18" Appliance (Freezer/Freezer with Ice and Water dispenser 12 2. 18" Appliance (Wine unit 13 3. 24" Appliance (Refrigerator/Freezer/Freezer with Ice and Water dispenser 14 4. 24" Appliance (Wine unit 15 5. 30" Appliance (Refrigerator/Freezer/Freezer with Ice and Water dispenser 16 Required accessories and tools 17...
... connection 11 Appliance dimensions 12 1. 18" Appliance (Freezer/Freezer with Ice and Water dispenser 12 2. 18" Appliance (Wine unit 13 3. 24" Appliance (Refrigerator/Freezer/Freezer with Ice and Water dispenser 14 4. 24" Appliance (Wine unit 15 5. 30" Appliance (Refrigerator/Freezer/Freezer with Ice and Water dispenser 16 Required accessories and tools 17...
Installation Instructions
Page 4
Preparing the installation cavity 22 7. Attaching an alternative antiĆtip device 24 8. Connecting the water to connect the water 24 9. Attaching the toe kick panel 29 17. Removing the packaging 19 4. Attaching the individual appliance to the side of the cavity 27 ...12. Installing and aligning the appliance 26 13. Attaching the covers 37 26. Preparing the furniture doors 31 19. Shorten the finger guard 36 24. Attaching the cover strips 39 29. Attaching the cover frame and the shelf 39 28. Changing over the door hinges 20 6. Attaching the...
Preparing the installation cavity 22 7. Attaching an alternative antiĆtip device 24 8. Connecting the water to connect the water 24 9. Attaching the toe kick panel 29 17. Removing the packaging 19 4. Attaching the individual appliance to the side of the cavity 27 ...12. Installing and aligning the appliance 26 13. Attaching the covers 37 26. Preparing the furniture doors 31 19. Shorten the finger guard 36 24. Attaching the cover strips 39 29. Attaching the cover frame and the shelf 39 28. Changing over the door hinges 20 6. Attaching the...

Installation Instructions
Page 7
... 30" approx. 255 lbs / 115 kg* approx. 300 lbs / 135 kg* approx. 335 lbs / 150 kg* Wine unit 18" Wine unit 24" approx. 300 lbs / 135 kg approx. 360 lbs / 160 kg (* without Water Dispenser) To ensure that the cavity is very heavy ć for the load&#... 30" approx. 560 lbs / 250 kg* approx. 780 lbs / 350 kg* approx. 950 lbs / 425 kg* Wine unit 18" Wine unit 24" approx. 550 lbs / 245 kg approx. 694 lbs / 310 kg (* without Water Dispenser) Installation room The appliance should not drop below 55 °F (13 °C) ...
... 30" approx. 255 lbs / 115 kg* approx. 300 lbs / 135 kg* approx. 335 lbs / 150 kg* Wine unit 18" Wine unit 24" approx. 300 lbs / 135 kg approx. 360 lbs / 160 kg (* without Water Dispenser) To ensure that the cavity is very heavy ć for the load&#... 30" approx. 560 lbs / 250 kg* approx. 780 lbs / 350 kg* approx. 950 lbs / 425 kg* Wine unit 18" Wine unit 24" approx. 550 lbs / 245 kg approx. 694 lbs / 310 kg (* without Water Dispenser) Installation room The appliance should not drop below 55 °F (13 °C) ...
Installation Instructions
Page 8
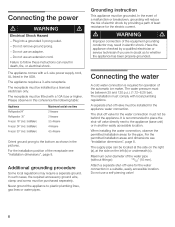
Do not remove ground prong. - The appliance requires a 3Ćwire receptacle. IceMaker) Freezer 24" (incl. IceMaker) Maximum load at the side on the right (a), at one time 2 Ampere 2 Ampere 3.5 Ampere 4 Ampere 4.5 Ampere Orient ground prong to the bottom as ...
Do not remove ground prong. - The appliance requires a 3Ćwire receptacle. IceMaker) Freezer 24" (incl. IceMaker) Maximum load at the side on the right (a), at one time 2 Ampere 2 Ampere 3.5 Ampere 4 Ampere 4.5 Ampere Orient ground prong to the bottom as ...
Installation Instructions
Page 9
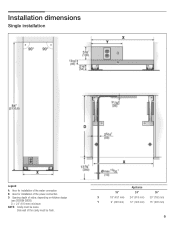
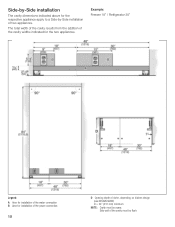
Single installation6. Appliance 18" 24" 30" X 18" (457 mm) 24 (610 mm) 30" (762 mm) Y 9" (229 mm) 12" (305 mm) 15" (381 mm) 9 Legend: A Area for installation of the water connection B Area for installation of the power connection D Opening depth of the cavity must be flush. Installation dimensions5. Side wall of niche, depending on kitchen design (see DESIGN GUIDE) D = 24" (610 mm) minimum NOTE: Cavity must be suare.
Single installation6. Appliance 18" 24" 30" X 18" (457 mm) 24 (610 mm) 30" (762 mm) Y 9" (229 mm) 12" (305 mm) 15" (381 mm) 9 Legend: A Area for installation of the water connection B Area for installation of the power connection D Opening depth of the cavity must be flush. Installation dimensions5. Side wall of niche, depending on kitchen design (see DESIGN GUIDE) D = 24" (610 mm) minimum NOTE: Cavity must be suare.
Installation Instructions
Page 10
... 30" Legend: A Area for installation of the water connection B Area for the two appliances. Side wall of niche, depending on kitchen design (see DESIGN GUIDE) D = 24" (610 mm) minimum NOTE: Cavity must be suare.
... 30" Legend: A Area for installation of the water connection B Area for the two appliances. Side wall of niche, depending on kitchen design (see DESIGN GUIDE) D = 24" (610 mm) minimum NOTE: Cavity must be suare.
Installation Instructions
Page 14
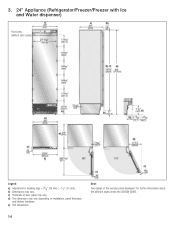
b) Dimensions may vary depending on installation, panel thickness and kitchen hardware. d) This dimension may vary. e) Unit dimensions 14 Note: One design of door panel may vary. For further information about the different styles check the DESIGN GUIDE. 3. 24" Appliance (Refrigerator/Freezer/Freezer with Ice and Water dispenser) e) e) Front view (without door panel) Legend: a) Adjustment in levelling legs +13/8" (35 mm) / -1/2" (13 mm). c) Thickness of the wooden panel displayed.
b) Dimensions may vary depending on installation, panel thickness and kitchen hardware. d) This dimension may vary. e) Unit dimensions 14 Note: One design of door panel may vary. For further information about the different styles check the DESIGN GUIDE. 3. 24" Appliance (Refrigerator/Freezer/Freezer with Ice and Water dispenser) e) e) Front view (without door panel) Legend: a) Adjustment in levelling legs +13/8" (35 mm) / -1/2" (13 mm). c) Thickness of the wooden panel displayed.

Installation Instructions
Page 15
b) Dimensions may vary. c) Thickness of the wooden panel displayed. For further information about the different styles check the DESIGN GUIDE. 15 4. 24" Appliance (Wine unit) e) e) Front view (without door panel) Legend: a) Adjustment in levelling legs +13/8" (35 mm) / -1/2" (13 mm). d) This dimension may vary depending on installation, panel thickness and kitchen hardware. e) Unit dimensions Note: One design of door panel may vary.
b) Dimensions may vary. c) Thickness of the wooden panel displayed. For further information about the different styles check the DESIGN GUIDE. 15 4. 24" Appliance (Wine unit) e) e) Front view (without door panel) Legend: a) Adjustment in levelling legs +13/8" (35 mm) / -1/2" (13 mm). d) This dimension may vary depending on installation, panel thickness and kitchen hardware. e) Unit dimensions Note: One design of door panel may vary.
Installation Instructions
Page 18
Installation instructions d CAUTION d The following table: Appliance width Erection via appliance rear Erection via appliance side panel 18" / 457 mm 24" / 610 mm 30" / 762 mm 36" / 914 mm 86" / 2185 mm 86" / 2185 mm 86" / 2185 mm 86" / 2185 mm 853/4" / 2180 mm 871/4" / 2215 ...
Installation instructions d CAUTION d The following table: Appliance width Erection via appliance rear Erection via appliance side panel 18" / 457 mm 24" / 610 mm 30" / 762 mm 36" / 914 mm 86" / 2185 mm 86" / 2185 mm 86" / 2185 mm 86" / 2185 mm 853/4" / 2180 mm 871/4" / 2215 ...
Installation Instructions
Page 24
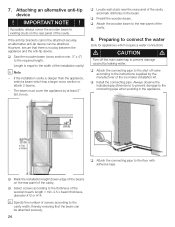
... - q Predrill the wooden beam. q Install the connecting pipe. q Attach the connecting pipe to the required length. However, ensure that the beam can be attached securely. 24 q Saw the wooden beam (cross section min. 3" x 4") to the floor with adhesive tape. Preparing to connect the water (only for appliances which has a larger cross...
... - q Predrill the wooden beam. q Install the connecting pipe. q Attach the connecting pipe to the required length. However, ensure that the beam can be attached securely. 24 q Saw the wooden beam (cross section min. 3" x 4") to the floor with adhesive tape. Preparing to connect the water (only for appliances which has a larger cross...

Installation Instructions
Page 31
..., decorative strips or similar. - Nuts on the appliance. Double threaded bolt on the furniture doors, always observe the following values: 18" 37 lbs / 17 kg 24" 50 lbs / 23 kg 30" 64 lbs / 29 kg The furniture fronts are attached to the appliance.
..., decorative strips or similar. - Nuts on the appliance. Double threaded bolt on the furniture doors, always observe the following values: 18" 37 lbs / 17 kg 24" 50 lbs / 23 kg 30" 64 lbs / 29 kg The furniture fronts are attached to the appliance.

Installation Instructions
Page 32
... means of the furniture door parallel. When attaching the metal strip to a metal strip on page 17. 20. Recommendations: 18" Appliance 22 lbs / 10 kg 24" Appliance 33 lbs / 15 kg 30" Appliance 44 lbs / 20 kg q Unscrew the installation support part from customer service as possible. Loading the appliance door...
... means of the furniture door parallel. When attaching the metal strip to a metal strip on page 17. 20. Recommendations: 18" Appliance 22 lbs / 10 kg 24" Appliance 33 lbs / 15 kg 30" Appliance 44 lbs / 20 kg q Unscrew the installation support part from customer service as possible. Loading the appliance door...

Installation Instructions
Page 36
... the finger guard into the gap between the appliance and adjacent furniture (1.). IMPORTANT NOTE ! i The recesses on the width and the design of the brackets! 24.
... the finger guard into the gap between the appliance and adjacent furniture (1.). IMPORTANT NOTE ! i The recesses on the width and the design of the brackets! 24.

Installation Instructions
Page 37
i The side piece of the cover strip is shorter on the side on the door. Attaching the covers q Place the cover strips on which the finger guard has been attached. i The cover for 24", 30" and 36" appliances can be screwed to the door. 37 Slide the cover on the finger guard. q Put the vertical cover strip on the angle. 25. q Attach the finger guard under the lower hinge with the angle. q Attach the light switch cover.
i The side piece of the cover strip is shorter on the side on the door. Attaching the covers q Place the cover strips on which the finger guard has been attached. i The cover for 24", 30" and 36" appliances can be screwed to the door. 37 Slide the cover on the finger guard. q Put the vertical cover strip on the angle. 25. q Attach the finger guard under the lower hinge with the angle. q Attach the light switch cover.
Use & Care Manual
Page 7
...not be mounted securely to whether the appliance has been properly grounded. The base must be fitted with a 10A fuse or higher. Refrigerator 24" 890 lbs / 400 kg - Installing and connecting the appliance d CAUTION d Have the appliance installed by a qualified electrician or service..., etc. The installation location should be installed by suitable means, e.g. For fullyĆloaded weight see the following table: Appliance Refrigerator 24" Refrigerator 30" MAX load at least before switching on the appliance for the first time, clean the inside of a hard, rigid material...
...not be mounted securely to whether the appliance has been properly grounded. The base must be fitted with a 10A fuse or higher. Refrigerator 24" 890 lbs / 400 kg - Installing and connecting the appliance d CAUTION d Have the appliance installed by a qualified electrician or service..., etc. The installation location should be installed by suitable means, e.g. For fullyĆloaded weight see the following table: Appliance Refrigerator 24" Refrigerator 30" MAX load at least before switching on the appliance for the first time, clean the inside of a hard, rigid material...
Use & Care Manual
Page 15
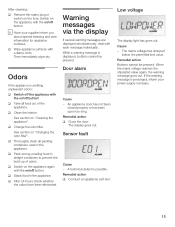
... off the appliance with the on the fuse. q Pack strongĆsmelling food in airtight containers to prevent the build up of the appliance. q After 24 hours check whether the odors have been eliminated. Low voltage The display light has gone out. An appliance door has not been closed properly or...
... off the appliance with the on the fuse. q Pack strongĆsmelling food in airtight containers to prevent the build up of the appliance. q After 24 hours check whether the odors have been eliminated. Low voltage The display light has gone out. An appliance door has not been closed properly or...