Type 1 Manual - NST1118
Page 2
... (30m) away. • TO REDUCE THE RISK of fire, electric shock, and personal injury, including the following. Do not use this tool is important for Battery Chargers 4 Charging Procedure 5 Assembly / Adjustment 7 Operating Instructions 8 Replacement Accessories 9 Maintenance 11 Troubleshooting 12 Service Information 12 Full Two-Year Home Use Warranty 12 SAFETY GUIDELINES...
... (30m) away. • TO REDUCE THE RISK of fire, electric shock, and personal injury, including the following. Do not use this tool is important for Battery Chargers 4 Charging Procedure 5 Assembly / Adjustment 7 Operating Instructions 8 Replacement Accessories 9 Maintenance 11 Troubleshooting 12 Service Information 12 Full Two-Year Home Use Warranty 12 SAFETY GUIDELINES...
Type 1 Manual - NST1118
Page 3
... current no no load speed Class II Construction ............earthing terminal instructions in this tool for any damage repaired before placing battery in this product contains chemicals known to cleaning. • AVOID DANGEROUS ENVIRONMENTAL CONDITIONS - which it will operate properly...and their definitions are tired. • MAINTAIN APPLIANCES WITH CARE - Before further use whenever the battery is attempted. Transporting batteries can contact exposed battery terminals. Check for damage and have any job except that it is damaged should be properly ...
... current no no load speed Class II Construction ............earthing terminal instructions in this tool for any damage repaired before placing battery in this product contains chemicals known to cleaning. • AVOID DANGEROUS ENVIRONMENTAL CONDITIONS - which it will operate properly...and their definitions are tired. • MAINTAIN APPLIANCES WITH CARE - Before further use whenever the battery is attempted. Transporting batteries can contact exposed battery terminals. Check for damage and have any job except that it is damaged should be properly ...
Type 1 Manual - NST1118
Page 4
... to be used for indoor work. that could result in a risk of an attachment not recommended or sold by Black & Decker may burst causing personal injury and damage. 4. This manual contains important safety and operating instructions. 2. Two-wire cords...batteries in commerce or on airplanes (i.e., packed in suitcases and carry-on the cord jacket indicate that the cord is suitable for outdoor use. Edge Guide 7. Use of fire, electric shock or electrocution. b. The smaller the gauge number of the wire, the greater the capacity of injury, charge only Black & Decker Battery...
... to be used for indoor work. that could result in a risk of an attachment not recommended or sold by Black & Decker may burst causing personal injury and damage. 4. This manual contains important safety and operating instructions. 2. Two-wire cords...batteries in commerce or on airplanes (i.e., packed in suitcases and carry-on the cord jacket indicate that the cord is suitable for outdoor use. Edge Guide 7. Use of fire, electric shock or electrocution. b. The smaller the gauge number of the wire, the greater the capacity of injury, charge only Black & Decker Battery...
Type 1 Manual - NST1118
Page 5
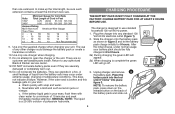
...out. 13. MEDICAL NOTE: The liquid is designed to any other charger could damage the battery pack or create a hazardous condition. 10. After the initial charge, under extreme usage, ... open the charger or the unit. Return to use of the battery pack and slide out. 5 Do not incinerate the batteries. If the battery liquid gets in Feet 120V 0-25 26-50 51-100 101...BATTERY PACK FOR AT LEAST 9 HOURS BEFORE USE. Do not attempt to 9 hours. 2a) During charging the green LED will appear. 2b) When charging is broken and this leakage gets on the back of any authorized Black & Decker...
...out. 13. MEDICAL NOTE: The liquid is designed to any other charger could damage the battery pack or create a hazardous condition. 10. After the initial charge, under extreme usage, ... open the charger or the unit. Return to use of the battery pack and slide out. 5 Do not incinerate the batteries. If the battery liquid gets in Feet 120V 0-25 26-50 51-100 101...BATTERY PACK FOR AT LEAST 9 HOURS BEFORE USE. Do not attempt to 9 hours. 2a) During charging the green LED will appear. 2b) When charging is broken and this leakage gets on the back of any authorized Black & Decker...
Type 1 Manual - NST1118
Page 6
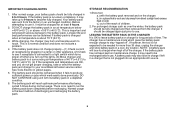
... charged in an uncharged condition. Your battery pack was sent from the factory in 6 to 9 hours. If the battery pack does not charge properly-(1) Check current at least 9 hours. 2. It should be charged again just prior to your local Black & Decker service center. Longest life and best ...performance can be recharged when it may also lose its charge if left in an air temperature below +40°F(+4.5°C), or above +105°F (+40.5°C). The battery pack will prevent serious ...
... charged in an uncharged condition. Your battery pack was sent from the factory in 6 to 9 hours. If the battery pack does not charge properly-(1) Check current at least 9 hours. 2. It should be charged again just prior to your local Black & Decker service center. Longest life and best ...performance can be recharged when it may also lose its charge if left in an air temperature below +40°F(+4.5°C), or above +105°F (+40.5°C). The battery pack will prevent serious ...
Type 1 Manual - NST1118
Page 7
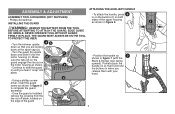
... WITHOUT GUARD FIRMLY IN PLACE. Make d c sure the tabs (d) on the guard engage the ribs (e) on so that you release them with the Black & Decker logo facing upward). Partially push the handle on the motor housing as 7 shown in figure 6. e • Continue to complete the guard assembly. • ... in on the buttons (f) on the edge of the upper housing as shown in figure 7 (with your hand. 7 f WARNING: REMOVE THE BATTERY FROM THE TOOL BEFORE ATTEMPTING TO ATTACH THE GUARD, EDGE GUIDE OR HANDLE. THE GUARD MUST ALWAYS BE ON THE TOOL TO PROTECT THE USER...
... WITHOUT GUARD FIRMLY IN PLACE. Make d c sure the tabs (d) on the guard engage the ribs (e) on so that you release them with the Black & Decker logo facing upward). Partially push the handle on the motor housing as 7 shown in figure 6. e • Continue to complete the guard assembly. • ... in on the buttons (f) on the edge of the upper housing as shown in figure 7 (with your hand. 7 f WARNING: REMOVE THE BATTERY FROM THE TOOL BEFORE ATTEMPTING TO ATTACH THE GUARD, EDGE GUIDE OR HANDLE. THE GUARD MUST ALWAYS BE ON THE TOOL TO PROTECT THE USER...
Type 1 Manual - NST1118
Page 10
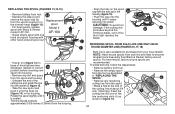
...end of the line anchoring slots (r) as described in the trimmer head (figure 13). To install bulk line, follow the steps below: • Remove battery from tool. • Remove the empty spool from your local retailer. j j l • If lever (m) (figure 14) in figure 16. ... inches (136mm) from bulk line are recommended. NOTE: Hand wound spools from the housing. • Align the tabs on the spool cap with Black & Decker model # AF-100. Replacement spool k • For best results, replace spool with the slots (p) in the housing. ROUND DIAMETER LINE) (...
...end of the line anchoring slots (r) as described in the trimmer head (figure 13). To install bulk line, follow the steps below: • Remove battery from tool. • Remove the empty spool from your local retailer. j j l • If lever (m) (figure 14) in figure 16. ... inches (136mm) from bulk line are recommended. NOTE: Hand wound spools from the housing. • Align the tabs on the spool cap with Black & Decker model # AF-100. Replacement spool k • For best results, replace spool with the slots (p) in the housing. ROUND DIAMETER LINE) (...
Type 1 Manual - NST1118
Page 11
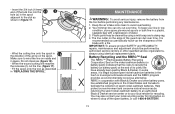
...sharpness of the blade with a tablespoon of its useful life have already been paid by returning the spent nickel-cadmium battery to an authorized Black & Decker service center or to your local recycling center for recycling. IMPORTANT: To assure product SAFETY and RELIABILITY, repairs, maintenance...of the arrow on the spool. 18 Make sure to wind the line on where to recycle the battery (or battery pack) at the end of water. 3. RBRC in cooperation with Black & Decker and other qualified service organizations, always using a mild soap and a damp rag. 4. Do not ...
...sharpness of the blade with a tablespoon of its useful life have already been paid by returning the spent nickel-cadmium battery to an authorized Black & Decker service center or to your local recycling center for recycling. IMPORTANT: To assure product SAFETY and RELIABILITY, repairs, maintenance...of the arrow on the spool. 18 Make sure to wind the line on where to recycle the battery (or battery pack) at the end of water. 3. RBRC in cooperation with Black & Decker and other qualified service organizations, always using a mild soap and a damp rag. 4. Do not ...
Type 1 Manual - NST1118QS
Page 1
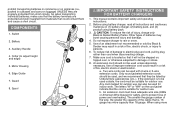
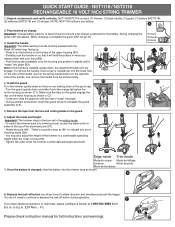
...from the line and cutting blade on the guard. 6) Adjust the mode and height. to depress the lock off button during operation. NST1118 / NST2118 RECHARGEABLE 18 VOLT NiCd STRING TRIMMER 1) Unpack components and verify contents. D1 D2 D3 Important: The trimmer ships in the box set in C2....the spring loaded button on charge. NOTE: NST1118 contains one battery. Make sure the tabs on the guard engage the ribs on the motor housing as shown (C1). There is delivered to indicate you release them with the Black & Decker logo facing up. • Press in when you are looking...
...from the line and cutting blade on the guard. 6) Adjust the mode and height. to depress the lock off button during operation. NST1118 / NST2118 RECHARGEABLE 18 VOLT NiCd STRING TRIMMER 1) Unpack components and verify contents. D1 D2 D3 Important: The trimmer ships in the box set in C2....the spring loaded button on charge. NOTE: NST1118 contains one battery. Make sure the tabs on the guard engage the ribs on the motor housing as shown (C1). There is delivered to indicate you release them with the Black & Decker logo facing up. • Press in when you are looking...


