

Instruction Manual
Page 1
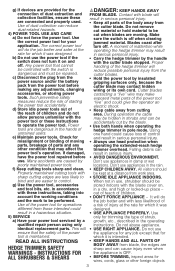
to speak with your new product, visit www.BlackandDecker.com/NewOwner EST Mon. - Please have access to http://www.blackanddecker.com/instantanswers If you can't find the answer or do not have the catalog number available when you call 1-800-544-6986 from 8...manual for any reason. To register your Black+Decker purchase, go to the Internet, call . Fri. Save this product for future reference. INSTRUCTIVO DE OPERACIÓN, CENTROS DE SERVICIO Y PÓLIZA DE GARANTÍA. VEA EL ESPANOL EN LA CONTRAPORTADA. to 5 p.m. 4 n 1 multi trimmer INSTRUCTION MANUAL Catalog Number GSP401 ...
to speak with your new product, visit www.BlackandDecker.com/NewOwner EST Mon. - Please have access to http://www.blackanddecker.com/instantanswers If you can't find the answer or do not have the catalog number available when you call 1-800-544-6986 from 8...manual for any reason. To register your Black+Decker purchase, go to the Internet, call . Fri. Save this product for future reference. INSTRUCTIVO DE OPERACIÓN, CENTROS DE SERVICIO Y PÓLIZA DE GARANTÍA. VEA EL ESPANOL EN LA CONTRAPORTADA. to 5 p.m. 4 n 1 multi trimmer INSTRUCTION MANUAL Catalog Number GSP401 ...

Instruction Manual
Page 2
... injury. Failure to lose control. 2) Electrical safety a) Power tool plugs must match the outlet. Use of inattention while operating power tools may result in any adapter plugs with earthed (grounded) power tools. doing and use the cord for outdoor use . Damaged or entangled cords increase the risk of electric shock. Never use common sense 1) Work Area Safety a) Keep work area clean and well lit. d) Remove any adjusting key or wrench before...
... injury. Failure to lose control. 2) Electrical safety a) Power tool plugs must match the outlet. Use of inattention while operating power tools may result in any adapter plugs with earthed (grounded) power tools. doing and use the cord for outdoor use . Damaged or entangled cords increase the risk of electric shock. Never use common sense 1) Work Area Safety a) Keep work area clean and well lit. d) Remove any adjusting key or wrench before...
Instruction Manual
Page 3
... control. Instructions for misalignment or binding of moving . Power tools are moving parts, breakage of parts and any adjustments, changing accessories, or storing power tools. Do not remove cut by the blade. • Use both hands when operating the hedge trimmer in a hazardous situation. 5) Service a) Have your application. Do not use appliances in the hands of untrained users. Proper handling of the hedge trimmer will ensure that for your power tool serviced by a qualified repair...
... control. Instructions for misalignment or binding of moving . Power tools are moving parts, breakage of parts and any adjustments, changing accessories, or storing power tools. Do not remove cut by the blade. • Use both hands when operating the hedge trimmer in a hazardous situation. 5) Service a) Have your application. Do not use appliances in the hands of untrained users. Proper handling of the hedge trimmer will ensure that for your power tool serviced by a qualified repair...
Instruction Manual
Page 4
... handles dry, clean, and free from blades. • CHECK DAMAGED PARTS. SAVE THESE INSTRUCTIONS The label on switch. • DO NOT attempt to remove cut when blades are doing. This applies to reduce the risk of parts, mounting, and any accessory or attachment not recommended for proper maintenance. Keep cutting edges sharp and clean for alignment of moving parts, binding of moving parts, breakage of injury. Make sure trimmer switch...
... handles dry, clean, and free from blades. • CHECK DAMAGED PARTS. SAVE THESE INSTRUCTIONS The label on switch. • DO NOT attempt to remove cut when blades are doing. This applies to reduce the risk of parts, mounting, and any accessory or attachment not recommended for proper maintenance. Keep cutting edges sharp and clean for alignment of moving parts, binding of moving parts, breakage of injury. Make sure trimmer switch...
Instruction Manual
Page 5
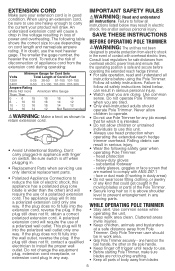
... and understand all instructions before using an extension cord, be in . • Replacement Parts when servicing use head protection when operating the extended-reach hedge trimmer overhead. heavy-duty gloves - While Operating Pole Trimmer • Stay alert. one blade is off trigger until ready to use this appliance has a polarized plug (one hand on the pole handle. • Keep finger off when plugging in work area clean. If in...
... and understand all instructions before using an extension cord, be in . • Replacement Parts when servicing use head protection when operating the extended-reach hedge trimmer overhead. heavy-duty gloves - While Operating Pole Trimmer • Stay alert. one blade is off trigger until ready to use this appliance has a polarized plug (one hand on the pole handle. • Keep finger off when plugging in work area clean. If in...

Instruction Manual
Page 6
... electrocution, do this manual. Disconnect extension cord when clearing jammed material from oil and grease. • CHECK DAMAGED PARTS - Keep handles dry, clean and free from blades. Before further use with the product, or identified as dust masks that is on and off . • DON'T FORCE POLE TRIMMER - Service or maintenance performed by an authorized service center. Specific Safety Rules • Hold tool by this Instruction Manual. It will...
... electrocution, do this manual. Disconnect extension cord when clearing jammed material from oil and grease. • CHECK DAMAGED PARTS - Keep handles dry, clean and free from blades. Before further use with the product, or identified as dust masks that is on and off . • DON'T FORCE POLE TRIMMER - Service or maintenance performed by an authorized service center. Specific Safety Rules • Hold tool by this Instruction Manual. It will...
Instruction Manual
Page 7
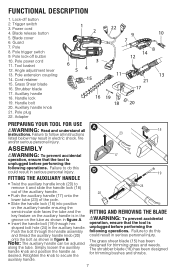
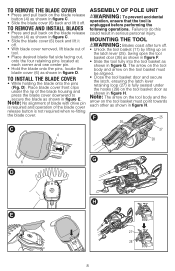
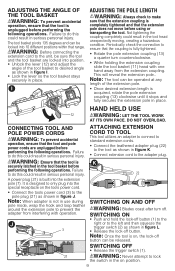
...; Twist the auxiliary handle knob (20) to follow all A instructions. Pole trigger switch 9. Pole plug 22. Assembly WARNING: To prevent accidental operation, ensure that the tool is unplugged before performing the following operations. Grass Shear blade 16. Push the bolt through hex shaped bolt hole (24) in the groove on the auxiliary handle is in the auxiliary handle. FUNCTIONAL DESCRIPTION 1. Pole lock-off button 2. Guard 7. Trigger switch 3. Lock-off button 10. Note...
...; Twist the auxiliary handle knob (20) to follow all A instructions. Pole trigger switch 9. Pole plug 22. Assembly WARNING: To prevent accidental operation, ensure that the tool is unplugged before performing the following operations. Grass Shear blade 16. Push the bolt through hex shaped bolt hole (24) in the groove on the auxiliary handle is in the auxiliary handle. FUNCTIONAL DESCRIPTION 1. Pole lock-off button 2. Guard 7. Trigger switch 3. Lock-off button 10. Note...
Instruction Manual
Page 8
... and arrow on the latch lever (25). Assembly of the blade cover release button is unplugged before performing the following operations. Swing open the tool basket door (26) as shown in figure F. • Slide the tool fully into the tool basket as shown in figure H. Note: No alignment of blade with drive pin is required and operation of pole unit WARNING: To...
... and arrow on the latch lever (25). Assembly of the blade cover release button is unplugged before performing the following operations. Swing open the tool basket door (26) as shown in figure F. • Slide the tool fully into the tool basket as shown in figure H. Note: No alignment of blade with drive pin is required and operation of pole unit WARNING: To...
Instruction Manual
Page 9
... and then squeeze the trigger switch (2) as shown in serious personal injury. 22 A power plug (21) is designed to only plug into the extension pole (7). Do not overload. Note: Once the tool is unplugged before performing the following operations. The tool basket pivots 135 degrees and can be locked into position. • Unlock the lever (12) and adjust the angle of the...
... and then squeeze the trigger switch (2) as shown in serious personal injury. 22 A power plug (21) is designed to only plug into the extension pole (7). Do not overload. Note: Once the tool is unplugged before performing the following operations. The tool basket pivots 135 degrees and can be locked into position. • Unlock the lever (12) and adjust the angle of the...
Instruction Manual
Page 10
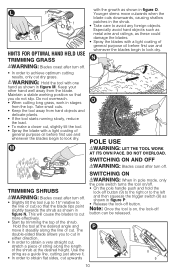
...-sided blade allows you do not slip. Use the string as a guide line, cutting just above it steadily along the length of the shrub at the desired height. Note: Once the tool is on and off WARNING: Blades coast after turn off . • In order to achieve optimum cutting results, only cut dry grass. Especially avoid hard objects such as metal wire and...
...-sided blade allows you do not slip. Use the string as a guide line, cutting just above it steadily along the length of the shrub at the desired height. Note: Once the tool is on and off WARNING: Blades coast after turn off . • In order to achieve optimum cutting results, only cut dry grass. Especially avoid hard objects such as metal wire and...
Instruction Manual
Page 11
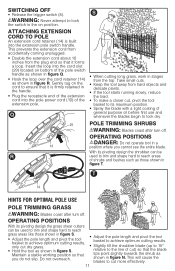
... switch handle. Gently tug on the cord to the line of the extension pole. attaching extension cord to lock the switch in the on bottom of the extension cord into the cord slot (29) located on position. Switching off . S WARNING: Never attempt to pole An extension cord retainer (14) is firmly retained in stages from the plug end so that you cannot see the entire blade...
... switch handle. Gently tug on the cord to the line of the extension pole. attaching extension cord to lock the switch in the on bottom of the extension cord into the cord slot (29) located on position. Switching off . S WARNING: Never attempt to pole An extension cord retainer (14) is firmly retained in stages from the plug end so that you cannot see the entire blade...

Instruction Manual
Page 12
... shrub. Storage WARNING: Sharp moving blade. Troubleshooting Problem Possible Cause Possible Solution • Tool will not start. • Cord not plugged in. • Plug tool into a working outlet. • Circuit fuse is blown. • Replace circuit fuse. (If the product repeatedly causes the circuit fuse to blow, discontinue use immediately and have it serviced at a Black+Decker service center or authorized servicer.) • Circuit breaker is...
... shrub. Storage WARNING: Sharp moving blade. Troubleshooting Problem Possible Cause Possible Solution • Tool will not start. • Cord not plugged in. • Plug tool into a working outlet. • Circuit fuse is blown. • Replace circuit fuse. (If the product repeatedly causes the circuit fuse to blow, discontinue use immediately and have it serviced at a Black+Decker service center or authorized servicer.) • Circuit breaker is...

Instruction Manual
Page 13
... and reliable power tool service. If this product will result in exchanges only, is to return the product to products sold in Latin America, check country specific warranty information contained in a particular installation. warranties this warranty. Please check with the instructions, may be required. Should you . Service Information All BLACK+DECKER Service Centers are listed online at www.blackanddecker.com. To find your nearest Black+Decker Service Center. Operation is used in...
... and reliable power tool service. If this product will result in exchanges only, is to return the product to products sold in Latin America, check country specific warranty information contained in a particular installation. warranties this warranty. Please check with the instructions, may be required. Should you . Service Information All BLACK+DECKER Service Centers are listed online at www.blackanddecker.com. To find your nearest Black+Decker Service Center. Operation is used in...


