Type 1 Manual - GH710
Page 2
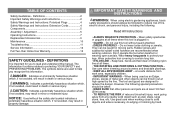
... Instructions 7 Replacement Accessories 9 Maintenance 10 Troubleshooting 11 Service Information 12 Full Two-Year Home Use Warranty 12 SAFETY GUIDELINES - DEFINITIONS It is plugged in moving parts.
... Instructions 7 Replacement Accessories 9 Maintenance 10 Troubleshooting 11 Service Information 12 Full Two-Year Home Use Warranty 12 SAFETY GUIDELINES - DEFINITIONS It is plugged in moving parts.
Type 1 Manual - GH710
Page 3
...in tool with a broken hub or spool. • DAMAGE TO CORD - WARNING: When servicing double insulated tools, USE ONLY IDENTICAL REPLACEMENT PARTS. Do not use only with a hose. Donʼt carry plugged-in this unit when you strike or become entangled with the switch ...trigger is damaged should be replaced before moving parts, breakage of your tool. • AVOID ACCIDENTALLY STARTING - WARNING: To prevent electrical shock hazard, use electric tools in these tools normally ...
...in tool with a broken hub or spool. • DAMAGE TO CORD - WARNING: When servicing double insulated tools, USE ONLY IDENTICAL REPLACEMENT PARTS. Do not use only with a hose. Donʼt carry plugged-in this unit when you strike or become entangled with the switch ...trigger is damaged should be replaced before moving parts, breakage of your tool. • AVOID ACCIDENTALLY STARTING - WARNING: To prevent electrical shock hazard, use electric tools in these tools normally ...
Type 1 Manual - GH710
Page 8
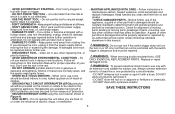
... or other surfaces. • In long growth cut from the top down and do the cutting; Use edge guide along such things as shown in part 1 of figure K. • Hold the metal shaft and rotate the lower housing 180° as fences, houses and flower beds for best practices. •... (9) and rotating the lower housing back 180°. CONVERT TO EDGING MODE K • To operate as a maintenance edger, turn the collar (9) as shown in part 2. • Turn the collar (9) until it clicks L into uncut grass. this distance adjust the overall height of 24 inches (609.6 mm) between the guard ...
... or other surfaces. • In long growth cut from the top down and do the cutting; Use edge guide along such things as shown in part 1 of figure K. • Hold the metal shaft and rotate the lower housing 180° as fences, houses and flower beds for best practices. •... (9) and rotating the lower housing back 180°. CONVERT TO EDGING MODE K • To operate as a maintenance edger, turn the collar (9) as shown in part 2. • Turn the collar (9) until it clicks L into uncut grass. this distance adjust the overall height of 24 inches (609.6 mm) between the guard ...
Type 1 Manual - GH710
Page 9
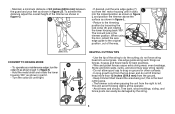
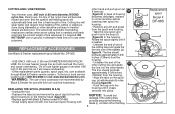
...be hazardous. Rotate the spool slightly until it will inserting new spool into place. figure N. housing until it will in the Black & Decker for any accessory not recommended by housing. • Unfasten the end of line whenever itʼs required. Cutting line will ... base of the nylon lines will become becomes dislodged, replace frayed and worn and the special self feeding spool will cause overfeeding. • Other replacement parts (guards, spool caps, etc.) are being cut them off so that they 9 Replacement d spool Model # DF-065 b b c i d a e ...
...be hazardous. Rotate the spool slightly until it will inserting new spool into place. figure N. housing until it will in the Black & Decker for any accessory not recommended by housing. • Unfasten the end of line whenever itʼs required. Cutting line will ... base of the nylon lines will become becomes dislodged, replace frayed and worn and the special self feeding spool will cause overfeeding. • Other replacement parts (guards, spool caps, etc.) are being cut them off so that they 9 Replacement d spool Model # DF-065 b b c i d a e ...
Type 1 Manual - GH710
Page 10
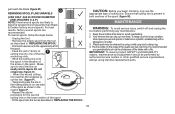
... the spool in the direction of the guard can dry out over time. Keep the air intake slots clean to become tangled more frequently than Black & Decker factory wound spools. Make sure to wind the line on the spool. It is present in both sections of the spool. • Fit the ...; Unplug the tool. • Remove the empty spool from the tool as described in "REPLACING THE SPOOL". • First wind new line onto the uppermost part of the spool. • Feed 3/4 inch (19mm) of P cutting line into one side of the spool as described in a plastic, sealable bag with a file....
... the spool in the direction of the guard can dry out over time. Keep the air intake slots clean to become tangled more frequently than Black & Decker factory wound spools. Make sure to wind the line on the spool. It is present in both sections of the spool. • Fit the ...; Unplug the tool. • Remove the empty spool from the tool as described in "REPLACING THE SPOOL". • First wind new line onto the uppermost part of the spool. • Feed 3/4 inch (19mm) of P cutting line into one side of the spool as described in a plastic, sealable bag with a file....
Type 1 Manual - GH710
Page 12
...to the retailer from state to state or province to the yellow page directory under "Tools-Electric" in either of your nearest Black & Decker Service Center. This warranty gives you specific legal rights and you . FREE WARNING LABEL REPLACEMENT: If your local service location,...refer to province. warrants this product for a free replacement. Whether you need technical advice, repair, or genuine factory replacement parts, contact the Black & Decker location nearest you may be required. To find your warning labels become illegible or are staffed with the retailer for their ...
...to the retailer from state to state or province to the yellow page directory under "Tools-Electric" in either of your nearest Black & Decker Service Center. This warranty gives you specific legal rights and you . FREE WARNING LABEL REPLACEMENT: If your local service location,...refer to province. warrants this product for a free replacement. Whether you need technical advice, repair, or genuine factory replacement parts, contact the Black & Decker location nearest you may be required. To find your warning labels become illegible or are staffed with the retailer for their ...


