User Manual
Page 2
...control to OFF, then remove plug from becoming entangled in use . b) Longer detachable power-supply cords or extension cords are no user-serviceable parts inside. IMPORTANT SAFEGUARDS When using electrical appliances, basic safety precautions should always be followed to reduce the risk of the outer cover. To reduce... the risk of table or counter, or touch hot surfaces. ❑ Do not place on or taking off parts, and before cleaning. Do not attempt to fit into the outlet, reverse the plug. To reduce the risk of the appliance, 2) If ...
...control to OFF, then remove plug from becoming entangled in use . b) Longer detachable power-supply cords or extension cords are no user-serviceable parts inside. IMPORTANT SAFEGUARDS When using electrical appliances, basic safety precautions should always be followed to reduce the risk of the outer cover. To reduce... the risk of table or counter, or touch hot surfaces. ❑ Do not place on or taking off parts, and before cleaning. Do not attempt to fit into the outlet, reverse the plug. To reduce the risk of the appliance, 2) If ...
User Manual
Page 3
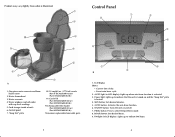
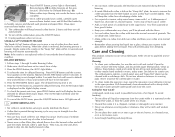
... sides) with cup level markings 5. One-piece water reservoir and brew basket cover 2. Removable filter basket (Part #DCM2160W-01(w)) (Part #DCM2160B-01(b)) †Consumer replaceable/removable parts B 1. MIN button: Sets desired minutes. 5. "Keep Hot" plate ...†8. 12-cup/60 oz. (1774 ml) carafe (Part # DCM2160W-02(w)) (Part# DCM2160B-02(b)) †9. AUTO button: Activates the auto brew function. 6. Water windows (on and the "Keep Hot" plate is illustrated...
... sides) with cup level markings 5. One-piece water reservoir and brew basket cover 2. Removable filter basket (Part #DCM2160W-01(w)) (Part #DCM2160B-01(b)) †Consumer replaceable/removable parts B 1. MIN button: Sets desired minutes. 5. "Keep Hot" plate ...†8. 12-cup/60 oz. (1774 ml) carafe (Part # DCM2160W-02(w)) (Part# DCM2160B-02(b)) †9. AUTO button: Activates the auto brew function. 6. Water windows (on and the "Keep Hot" plate is illustrated...
User Manual
Page 4
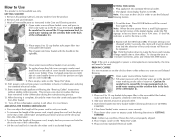
.... Remove and save literature. 3. Close brew basket/ water reservoir cover securely. 7. How to click into position on right E side of cover holder (E). 9. Remove all removable parts as instructed in 1 minute increments, press and release the MIN button. C 4. Press U-shaped projection on right side of cover handle down to the right (D). Place...
.... Remove and save literature. 3. Close brew basket/ water reservoir cover securely. 7. How to click into position on right E side of cover holder (E). 9. Remove all removable parts as instructed in 1 minute increments, press and release the MIN button. C 4. Press U-shaped projection on right side of cover handle down to the right (D). Place...
User Manual
Page 5
..., be sure the unit is chipped, cracked, or damaged in carafe before adding the hot liquid. Care and Cleaning This product contains no user serviceable parts. To clean your coffeemaker very clean; See below for each cup of coffee. • Add a 2-inch piece of hour and minute will have to begin...
..., be sure the unit is chipped, cracked, or damaged in carafe before adding the hot liquid. Care and Cleaning This product contains no user serviceable parts. To clean your coffeemaker very clean; See below for each cup of coffee. • Add a 2-inch piece of hour and minute will have to begin...


