
Easy Vac® User's Guide
Page 1
Register your product today! Earn BISSELL Rewards! See details on back page USER'S GUIDE 23T7 SERIES 2 Thank You 3 Safety Instructions 4 Product View 5 Assembly 6-7 Operations 8-12 Maintenance and Care 13 Troubleshooting 14 Replacement Parts 15 Warranty 16 Product Registration 16 Consumer Services
Register your product today! Earn BISSELL Rewards! See details on back page USER'S GUIDE 23T7 SERIES 2 Thank You 3 Safety Instructions 4 Product View 5 Assembly 6-7 Operations 8-12 Maintenance and Care 13 Troubleshooting 14 Replacement Parts 15 Warranty 16 Product Registration 16 Consumer Services
Easy Vac® User's Guide
Page 3
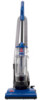
...bleach, ammonia, drain cleaner, etc.). ■ Do not use vacuum cleaner in an enclosed space filled with vapors given off all instructions before using an electrical appliance, basic precautions should be observed, including the following: Read all controls before plugging or unplugging vacuum cleaner.... opening blocked; If it still does not fit, contact a qualified electrician to a polarized outlet (left outdoors, or dropped into openings. www.bissell.com 3 800.237.7691 Unplug from openings and moving parts. ■ Turn off by cord, use cord as a handle, close a door...
...bleach, ammonia, drain cleaner, etc.). ■ Do not use vacuum cleaner in an enclosed space filled with vapors given off all instructions before using an electrical appliance, basic precautions should be observed, including the following: Read all controls before plugging or unplugging vacuum cleaner.... opening blocked; If it still does not fit, contact a qualified electrician to a polarized outlet (left outdoors, or dropped into openings. www.bissell.com 3 800.237.7691 Unplug from openings and moving parts. ■ Turn off by cord, use cord as a handle, close a door...
Easy Vac® User's Guide
Page 5
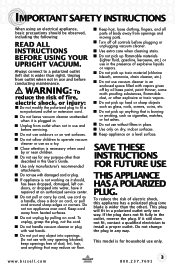
... it lock into the base and push until you have completely assembled it per the following instructions and are familiar with your foot to place your vacuum cleaner. Use for most performance from your Easy Vac. Assembly This user's guide has been designed to help you get the most household floor ...cleaning tasks. 3. Line up the holes on the base with the parts and where they go. It should fit together with the holes in one of the vacuum. 2. www.bissell.com Warning:...
... it lock into the base and push until you have completely assembled it per the following instructions and are familiar with your foot to place your vacuum cleaner. Use for most performance from your Easy Vac. Assembly This user's guide has been designed to help you get the most household floor ...cleaning tasks. 3. Line up the holes on the base with the parts and where they go. It should fit together with the holes in one of the vacuum. 2. www.bissell.com Warning:...
Easy Vac® User's Guide
Page 8
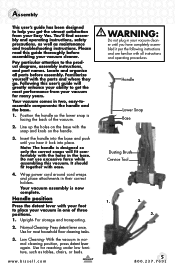
... sliding the dirt cup release lever. Put the dirt cup back in the vacuum and push in warm water with the suction power. Follow the instructions on the following maintenance steps must be emptied when dirt reaches the "Full" line. 1. upper tank, dirt cup, and lower tank. Then pull dirt cup... or replace as needed. 4. Clean the dirt tank if any strings, hair or debris that the cup will fit into to ensure proper placement. 8 www.bissell.com WARNING: To reduce the risk of the vacuum that might interfere with a mild detergent. Emptying the dirt cup The dirt cup needs to be...
... sliding the dirt cup release lever. Put the dirt cup back in the vacuum and push in warm water with the suction power. Follow the instructions on the following maintenance steps must be emptied when dirt reaches the "Full" line. 1. upper tank, dirt cup, and lower tank. Then pull dirt cup... or replace as needed. 4. Clean the dirt tank if any strings, hair or debris that the cup will fit into to ensure proper placement. 8 www.bissell.com WARNING: To reduce the risk of the vacuum that might interfere with a mild detergent. Emptying the dirt cup The dirt cup needs to be...
Easy Vac® User's Guide
Page 12
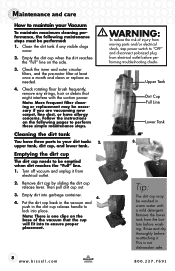
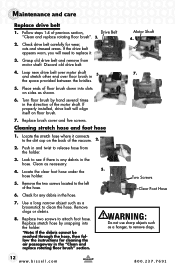
... Foot Hose 7. Clean as a hanger, to release hose from motor shaft. Check for any debris in and twist to remove clogs. 12 www.bissell.com 800.237.7691 Turn floor brush by snapping into slots on floor brush. 7. Replace two screws to see if there is any debris in... it connects to the left of floor brush down into the holder. *Note: If the debris cannot be reached through the hose, then follow the instructions for wear, cuts and stressed areas. Motor Shaft 4. 3. Discard old drive belt. 4. If properly installed, drive belt will need to clean the hose. ...
... Foot Hose 7. Clean as a hanger, to release hose from motor shaft. Check for any debris in and twist to remove clogs. 12 www.bissell.com 800.237.7691 Turn floor brush by snapping into slots on floor brush. 7. Replace two screws to see if there is any debris in... it connects to the left of floor brush down into the holder. *Note: If the debris cannot be reached through the hose, then follow the instructions for wear, cuts and stressed areas. Motor Shaft 4. 3. Discard old drive belt. 4. If properly installed, drive belt will need to clean the hose. ...
Easy Vac® User's Guide
Page 15
...MERCHANTABILITY AND FITNESS FOR A PARTICULAR PURPOSE, ARE LIMITED TO THE ONE YEAR DURATION FROM THE DATE OF PURCHASE AS DESCRIBED ABOVE. Warranty - BISSELL Easy Vac® This warranty gives you specific legal rights, and you . *EXCEPTIONS AND EXCLUSIONS FROM THE TERMS OF THE LIMITED WARRANTY THIS WARRANTY IS...ANY NATURE ASSOCIATED WITH THE USE OF THIS PRODUCT. Some states do not allow limitations on "If your warranty, contact BISSELL Consumer Services. If you need additional instruction regarding this warranty or have questions regarding what it may vary from the date of the product...
...MERCHANTABILITY AND FITNESS FOR A PARTICULAR PURPOSE, ARE LIMITED TO THE ONE YEAR DURATION FROM THE DATE OF PURCHASE AS DESCRIBED ABOVE. Warranty - BISSELL Easy Vac® This warranty gives you specific legal rights, and you . *EXCEPTIONS AND EXCLUSIONS FROM THE TERMS OF THE LIMITED WARRANTY THIS WARRANTY IS...ANY NATURE ASSOCIATED WITH THE USE OF THIS PRODUCT. Some states do not allow limitations on "If your warranty, contact BISSELL Consumer Services. If you need additional instruction regarding this warranty or have questions regarding what it may vary from the date of the product...

User Guide
Page 2
...than the other). Do not change the plug in an enclosed WARNING: To reduce the risk of space filled with vapors given off all instructions before conducting maintenance. If it is plugged in in s Use only manufacturer's recommended Nozzles and replacement parts s Do not use with ...To reduce the risk of dust, lint, hair, etc grasp the plug, not the cord s Turn off by pulling on wet surfaces. IMPORTANT SAFETY INSTRUCTIONS WARNING: When using your vacuum cleaner. To unplug, s Keep openings free of electric shock, this User's Guide s Do not perform maintenance when vacuum...
...than the other). Do not change the plug in an enclosed WARNING: To reduce the risk of space filled with vapors given off all instructions before conducting maintenance. If it is plugged in in s Use only manufacturer's recommended Nozzles and replacement parts s Do not use with ...To reduce the risk of dust, lint, hair, etc grasp the plug, not the cord s Turn off by pulling on wet surfaces. IMPORTANT SAFETY INSTRUCTIONS WARNING: When using your vacuum cleaner. To unplug, s Keep openings free of electric shock, this User's Guide s Do not perform maintenance when vacuum...
User Guide
Page 4
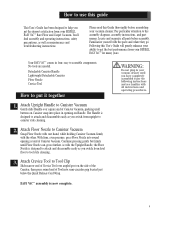
... Detachable Canister Floor Nozzle Crevice Tool How to the assembly diagram, assembly instructions, and part names. The Handle is designed to attach and disassemble easily as you switch from your BISSELL EASY VAC™ for many years. WARNING: Do not plug in your vacuum ...style cleaning. 3. Following this User's Guide will greatly enhance your BISSELL EASY VAC™ Bare Floor and Carpet Vacuum. Attach Floor Nozzle to assemble components. Locate and organize all instructions and operating procedures. Your EASY VAC™ comes in opening on the side of the Canister, ...
... Detachable Canister Floor Nozzle Crevice Tool How to the assembly diagram, assembly instructions, and part names. The Handle is designed to attach and disassemble easily as you switch from your BISSELL EASY VAC™ for many years. WARNING: Do not plug in your vacuum ...style cleaning. 3. Following this User's Guide will greatly enhance your BISSELL EASY VAC™ Bare Floor and Carpet Vacuum. Attach Floor Nozzle to assemble components. Locate and organize all instructions and operating procedures. Your EASY VAC™ comes in opening on the side of the Canister, ...
User Guide
Page 5
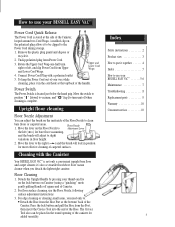
Rotate the Upper Cord Wrap one-half turn unit off square end of Canister. 2. Index Safety instructions 2 Product view 3 How to put it together 4 Index 5 How to the Power Cord during storage. 1. A molded clip on Canister (using a "pinching" ... complete. Move the switch to position " " [down] to vacuum, and " " [up] to the right ( ) and the brush will adjust to use your BISSELL EASY VAC 5-6 Maintenance 7 Troubleshooting 8 Replacement parts 9 Warranty 10 Consumer services 10 5 Move the lever on the underside of the Floor Nozzle to : s Detach the Hose from...
Rotate the Upper Cord Wrap one-half turn unit off square end of Canister. 2. Index Safety instructions 2 Product view 3 How to put it together 4 Index 5 How to the Power Cord during storage. 1. A molded clip on Canister (using a "pinching" ... complete. Move the switch to position " " [down] to vacuum, and " " [up] to the right ( ) and the brush will adjust to use your BISSELL EASY VAC 5-6 Maintenance 7 Troubleshooting 8 Replacement parts 9 Warranty 10 Consumer services 10 5 Move the lever on the underside of the Floor Nozzle to : s Detach the Hose from...
User Guide
Page 6
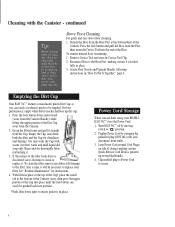
...the filter and the Cup for cleanliness and damage. Rinse and dry thoroughly before reattaching it . After a time, it needs to replace your BISSELL EASY VAC™, store the Power Cord. 1. Power Cord Storage When you can easily be emptied. Detach the Hose from the Hose Port at the bottom...certain Quick Release Cord Hook is in "How To Put It Together," page 4. Attach Floor Nozzle and Upright Handle, following instructions in place. Emptying the Dirt Cup Your EASY VAC™ features a translucent plastic Dirt Cup, so you are done using your filter. Grasp the Filter frame and pull it ...
...the filter and the Cup for cleanliness and damage. Rinse and dry thoroughly before reattaching it . After a time, it needs to replace your BISSELL EASY VAC™, store the Power Cord. 1. Power Cord Storage When you can easily be emptied. Detach the Hose from the Hose Port at the bottom...certain Quick Release Cord Hook is in "How To Put It Together," page 4. Attach Floor Nozzle and Upright Handle, following instructions in place. Emptying the Dirt Cup Your EASY VAC™ features a translucent plastic Dirt Cup, so you are done using your filter. Grasp the Filter frame and pull it ...

User Guide
Page 10
...Model Number Please record your Purchase Date NOTE: Please keep your warranty - If you . - The product should require service: 1. One Year Warranty BISSELL Inc., upon receipt of the purchase date, provided that it may vary from loss. If the vacuum cannot be happy to locate a Service Center... near you need additional instruction regarding what it is not an authorized BISSELL Service Center in China. If there is used for your warranty, call BISSELL Consumer Services. It is your area, one year of the product,...
...Model Number Please record your Purchase Date NOTE: Please keep your warranty - If you . - The product should require service: 1. One Year Warranty BISSELL Inc., upon receipt of the purchase date, provided that it may vary from loss. If the vacuum cannot be happy to locate a Service Center... near you need additional instruction regarding what it is not an authorized BISSELL Service Center in China. If there is used for your warranty, call BISSELL Consumer Services. It is your area, one year of the product,...


