

iDEQ 200S user's manual
Page 6
... the equipment from overheating. Use moisture sheet or clothe for later reference. 3.Please disconnect this equipment from AC outlet before cleaning. (Important Safety Information 1.Please read these safety instructions carefully. 2.Please keep this User's Manual for cleaning. 4.For pluggable equipment, the socket-outlet shall be installed near the equipment and shall be easily accessible. 5.Please keep this...
... the equipment from overheating. Use moisture sheet or clothe for later reference. 3.Please disconnect this equipment from AC outlet before cleaning. (Important Safety Information 1.Please read these safety instructions carefully. 2.Please keep this User's Manual for cleaning. 4.For pluggable equipment, the socket-outlet shall be installed near the equipment and shall be easily accessible. 5.Please keep this...
iDEQ 200S user's manual
Page 7
f. DISCARD USED BATTERIES ACCORDING TO THE MANUFACTURER'S INSTRUCTIONS. Liquid has penetrated into the equipment. The equipment has dropped and damaged. The Power cord or plug is damaged. REPLACE ONLY WITH SAME OR EQUIVLENT TYPE RECOMMENDED BY THE MANUFACTURER. 14.If one of breakage. 15.CAUTION: THE COMPUTER IS PROVIDED WITH A BATTERY-POWERED REAL-TIME CLOCK CIRCUIT. The equipment has not worked well...
f. DISCARD USED BATTERIES ACCORDING TO THE MANUFACTURER'S INSTRUCTIONS. Liquid has penetrated into the equipment. The equipment has dropped and damaged. The Power cord or plug is damaged. REPLACE ONLY WITH SAME OR EQUIVLENT TYPE RECOMMENDED BY THE MANUFACTURER. 14.If one of breakage. 15.CAUTION: THE COMPUTER IS PROVIDED WITH A BATTERY-POWERED REAL-TIME CLOCK CIRCUIT. The equipment has not worked well...

iDEQ 200S user's manual
Page 8
... 2 Mainboard Set Up 2.1 Mainboard Features 6 2.2 Layout And Components Index 9 2.3 Jumpers, Headers, Connectors and Slots 11 Section 3 Peripheral Connections 3.1 Overview 16 3.2 Connecting Peripheral Devices 17 Section 4 Software and Utilities 4.1 Installing Drivers and Utilities 24 Section 5 Trouble Shooting 5.1 System Does Not Start 28 5.2 Keyboard and Mouse Problems 29 5.3 USB Devices Problems 30 5.4 Software Problems 31 Section 6 Taking Care of Your Computer 6.1 General Maintenance 34 6.2 Safe Use of The System 35 Appendix Installing Mainboard A.1 Installing...
... 2 Mainboard Set Up 2.1 Mainboard Features 6 2.2 Layout And Components Index 9 2.3 Jumpers, Headers, Connectors and Slots 11 Section 3 Peripheral Connections 3.1 Overview 16 3.2 Connecting Peripheral Devices 17 Section 4 Software and Utilities 4.1 Installing Drivers and Utilities 24 Section 5 Trouble Shooting 5.1 System Does Not Start 28 5.2 Keyboard and Mouse Problems 29 5.3 USB Devices Problems 30 5.4 Software Problems 31 Section 6 Taking Care of Your Computer 6.1 General Maintenance 34 6.2 Safe Use of The System 35 Appendix Installing Mainboard A.1 Installing...

iDEQ 200S user's manual
Page 10
... on the high-end audio and video cards. As a progressive and compact-sized PC, it for attaching various digital devices. And when you open its cover panels, you will admire the innovation of the manual, you will take pleasure in using this computer as much as well-located cables and hard disk drive. For utility, your computer provides four USB2.0, two IEEE1394, one PCI slots that takes...
... on the high-end audio and video cards. As a progressive and compact-sized PC, it for attaching various digital devices. And when you open its cover panels, you will admire the innovation of the manual, you will take pleasure in using this computer as much as well-located cables and hard disk drive. For utility, your computer provides four USB2.0, two IEEE1394, one PCI slots that takes...

iDEQ 200S user's manual
Page 14
...;962 CPU • Supports Socket 478 • Supports Intel Celeron7 Pentiurd4 processor up to 3.06 GHz • Supports FSB 400/533 MHz Main Memory • Supports up to 2 DDR SDRAM devices • Supports DDR SDRAM 200/266/333 MHz (without FCC) • The largest memory capacity is 2GB Slots • 0ne AGP 4X slot • One PCI slot • One Wireless LAN slot (optional) On Board IDE • Supports four IDE hard disk devices • Supports PIO Mode 4, Master Mode...
...;962 CPU • Supports Socket 478 • Supports Intel Celeron7 Pentiurd4 processor up to 3.06 GHz • Supports FSB 400/533 MHz Main Memory • Supports up to 2 DDR SDRAM devices • Supports DDR SDRAM 200/266/333 MHz (without FCC) • The largest memory capacity is 2GB Slots • 0ne AGP 4X slot • One PCI slot • One Wireless LAN slot (optional) On Board IDE • Supports four IDE hard disk devices • Supports PIO Mode 4, Master Mode...
iDEQ 200S user's manual
Page 15
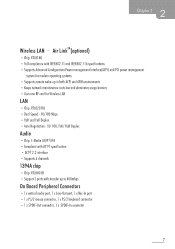
Air LinkTM(optional) • Chip: RTL8180 • Full compliance with IEEE802.11 and IEEE802.11b specifications • Supports Advanced Configuration Power management Interface(ACPI) and PCI power management system for modern operating systems • Supports remote wake-up in both ACPI and APM environments • Keeps network maintenance costs low and eliminates usage barriers • Uses one RF card for Wireless LAN LAN • Chip: RTL8201BL • Dual Speed - 10/100...
Air LinkTM(optional) • Chip: RTL8180 • Full compliance with IEEE802.11 and IEEE802.11b specifications • Supports Advanced Configuration Power management Interface(ACPI) and PCI power management system for modern operating systems • Supports remote wake-up in both ACPI and APM environments • Keeps network maintenance costs low and eliminates usage barriers • Uses one RF card for Wireless LAN LAN • Chip: RTL8201BL • Dual Speed - 10/100...

iDEQ 200S user's manual
Page 22
ront USB Header: JUSB2/3 Pin 2 10 1 OOOOO 0000 3 1 9 5 JUSB2/3 7 9 *KEY: No Pin Clear CMOS Jumper: JCMOS1 JCMOS1 Assignment Pin Assignment +5V(fused) 2 +5V(fused) USBP4- 4 USBP5- Wait for five seconds. 4. Clear CMOS Data 14 Reset your desired password or clear the CMOS data. Power on the AC. 6. Set the jumper to "Pin 2-3 close". 5. Remove AC power line. 2. Set the jumper to "Pin 1-2 close Clear CMOS Procedures: 1. USBP4+ 6 USBP5+ Ground 8 Ground KEY 10 NA Assignment 1 • 0 0 3 P.in1-2close Normal...
ront USB Header: JUSB2/3 Pin 2 10 1 OOOOO 0000 3 1 9 5 JUSB2/3 7 9 *KEY: No Pin Clear CMOS Jumper: JCMOS1 JCMOS1 Assignment Pin Assignment +5V(fused) 2 +5V(fused) USBP4- 4 USBP5- Wait for five seconds. 4. Clear CMOS Data 14 Reset your desired password or clear the CMOS data. Power on the AC. 6. Set the jumper to "Pin 2-3 close". 5. Remove AC power line. 2. Set the jumper to "Pin 1-2 close Clear CMOS Procedures: 1. USBP4+ 6 USBP5+ Ground 8 Ground KEY 10 NA Assignment 1 • 0 0 3 P.in1-2close Normal...
iDEQ 200S user's manual
Page 25
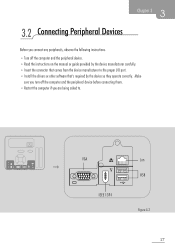
... I/O port. • Install the drivers or other software that comes from the device manufacturer to . 1 < 0 0 VGA Lan 11111111 USB ="- Make sure you turn off the computer and the peripheral device before connecting them. • Restart the computer if you connect any peripherals, observe the following instructions. • Turn off the computer and the peripheral device. • Read the instructions on the manual or guide provided by the device manufacturer...
... I/O port. • Install the drivers or other software that comes from the device manufacturer to . 1 < 0 0 VGA Lan 11111111 USB ="- Make sure you turn off the computer and the peripheral device before connecting them. • Restart the computer if you connect any peripherals, observe the following instructions. • Turn off the computer and the peripheral device. • Read the instructions on the manual or guide provided by the device manufacturer...

iDEQ 200S user's manual
Page 26
... USB port (if your mouse uses the PS/2 connector, plug the cable into the green PS/2 port located on the rear panel of your computer). • Plug the keyboard cable into the USB port (if your keyboard uses the PS/2 connector, plug the cable into the VGA port located on the rear panel of your computer. 00 0 Figure 3.3 Connecting mouse and keyboard Most of mouse and keyboard are PS/2 compliant. Connecting monitor To connect a monitor, plug the monitor cable into the purple PS/2 port located...
... USB port (if your mouse uses the PS/2 connector, plug the cable into the green PS/2 port located on the rear panel of your computer). • Plug the keyboard cable into the USB port (if your keyboard uses the PS/2 connector, plug the cable into the VGA port located on the rear panel of your computer. 00 0 Figure 3.3 Connecting mouse and keyboard Most of mouse and keyboard are PS/2 compliant. Connecting monitor To connect a monitor, plug the monitor cable into the purple PS/2 port located...

iDEQ 200S user's manual
Page 27
... compatible with four standard USB 2.0 ports as USB mouse, USB keyboard, digital camera, scanner, flash disk-etc. CI= (o o o o mw) O •.• Digital camera PDA Scanner Figure 3.5 Note: The USB devices support "hot plugging," eliminating the need to the USB port. • The OS will automatically detect the device and install the driver for the device. • If the OS does not have the driver for your device, install the driver from the driver...
... compatible with four standard USB 2.0 ports as USB mouse, USB keyboard, digital camera, scanner, flash disk-etc. CI= (o o o o mw) O •.• Digital camera PDA Scanner Figure 3.5 Note: The USB devices support "hot plugging," eliminating the need to the USB port. • The OS will automatically detect the device and install the driver for the device. • If the OS does not have the driver for your device, install the driver from the driver...

iDEQ 200S user's manual
Page 28
... 1394 devices also support "hot plugging", eliminating the need to power down or restart the computer when attaching a new peripheral like USB devices. • Match the shape of the computer and allow users to the IEEE 1394 port. • Insert the connector, and make sure that it is connected. • The OS will start running and automatically install the driver for the device. •...
... 1394 devices also support "hot plugging", eliminating the need to power down or restart the computer when attaching a new peripheral like USB devices. • Match the shape of the computer and allow users to the IEEE 1394 port. • Insert the connector, and make sure that it is connected. • The OS will start running and automatically install the driver for the device. •...

iDEQ 200S user's manual
Page 29
3 Chapter 3 • SPDIF (Sony/Philips Digital Interface) jack: SPDIF is a standard audio transfer file format, which provides digital audio instead of speakers. 0 0 OJ Line-in " jack: Use this jack to enjoy stereo audio from the external source such as CD/Tape player and other audio appliance. • "Line-out" jack: Use this jack to connect microphone. • "Line-in Line-out Mic...
3 Chapter 3 • SPDIF (Sony/Philips Digital Interface) jack: SPDIF is a standard audio transfer file format, which provides digital audio instead of speakers. 0 0 OJ Line-in " jack: Use this jack to enjoy stereo audio from the external source such as CD/Tape player and other audio appliance. • "Line-out" jack: Use this jack to connect microphone. • "Line-in Line-out Mic...

iDEQ 200S user's manual
Page 30
... on the connector. • Install the driver from the driver CD or diskette that is located on the rear panel. Connecting the printer port: • Match the pins and the shape of your computer to purchase the cable kits. Connect your computer. • Plug an R1-45 network cable in the LAN jack. • The other end should start running and install the printer driver for parallel cable on...
... on the connector. • Install the driver from the driver CD or diskette that is located on the rear panel. Connecting the printer port: • Match the pins and the shape of your computer to purchase the cable kits. Connect your computer. • Plug an R1-45 network cable in the LAN jack. • The other end should start running and install the printer driver for parallel cable on...

iDEQ 200S user's manual
Page 32
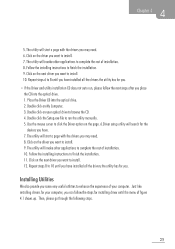
... about installing the wrong drivers. Driver setup utility will auto run and show the name of the main board on the upper left of the menu (See figure 4.1). 3. Simply put Driver CD into your configuration) and the Installation Utility will search for the devices you don't need to click the Driver option on your optical drive. 2. The Wizard can simply put Driver CD into the optical drive (CD-ROM, DVD ROM, or...
... about installing the wrong drivers. Driver setup utility will auto run and show the name of the main board on the upper left of the menu (See figure 4.1). 3. Simply put Driver CD into your configuration) and the Installation Utility will search for the devices you don't need to click the Driver option on your optical drive. 2. The Wizard can simply put Driver CD into the optical drive (CD-ROM, DVD ROM, or...
iDEQ 200S user's manual
Page 33
... My Computer. 3. The utility will start a page with the drivers you want to install. 10. Double click the Setup.exe file to click the Driver option on the next driver you may need . 8. Use the mouse cursor to run , please follow the steps for installing driver until the menu of installation. 8. Follow the installing instructions to finish the installation. 9. Just like installing drivers for the devices you may need . 6. Repeat...
... My Computer. 3. The utility will start a page with the drivers you want to install. 10. Double click the Setup.exe file to click the Driver option on the next driver you may need . 8. Use the mouse cursor to run , please follow the steps for installing driver until the menu of installation. 8. Follow the installing instructions to finish the installation. 9. Just like installing drivers for the devices you may need . 6. Repeat...

iDEQ 200S user's manual
Page 34
The installation utility will start the installation wizard for the software you are done, simply close the Installation Utility. 26 When you choose. 4. Follow the instruction steps of the wizard. 5. Click on the software you want to install more. 6. Click Software and Update Utility option. 2. Repeat steps 2 to 4 if you want to install. 3. 1.
The installation utility will start the installation wizard for the software you are done, simply close the Installation Utility. 26 When you choose. 4. Follow the instruction steps of the wizard. 5. Click on the software you want to install more. 6. Click Software and Update Utility option. 2. Repeat steps 2 to 4 if you want to install. 3. 1.
iDEQ 200S user's manual
Page 36
... for technical support and service. 28 Contact your computer dealer for technical support and service. • Keyboard and power LEDs light, and sound comes from the computer: 1. If available, try the monitor on and known to use a different power cable. 3. Make sure the monitor is turned on and its power cable is securely plugged into the back of the computer. Make sure the monitor display cable is plugged securely into a working appliance into...
... for technical support and service. 28 Contact your computer dealer for technical support and service. • Keyboard and power LEDs light, and sound comes from the computer: 1. If available, try the monitor on and known to use a different power cable. 3. Make sure the monitor is turned on and its power cable is securely plugged into the back of the computer. Make sure the monitor display cable is plugged securely into a working appliance into...
iDEQ 200S user's manual
Page 38
This forces all devices to configure by unplugging and then plugging it back in. 2. Force the device to be reconfigured the next time the system starts. 30 Then plug in your USB device. 2. 3 USB Device Problems • Plug in any USB device but does not work after system is woken from Standy mode: 1. Use a complete shutdown (hold the power button for your USB device. • USB device works when first plugged in, but the display shows up as an unknown device in the Device Manager 1. Install the driver for four seconds) whenever you stop the system.
This forces all devices to configure by unplugging and then plugging it back in. 2. Force the device to be reconfigured the next time the system starts. 30 Then plug in your USB device. 2. 3 USB Device Problems • Plug in any USB device but does not work after system is woken from Standy mode: 1. Use a complete shutdown (hold the power button for your USB device. • USB device works when first plugged in, but the display shows up as an unknown device in the Device Manager 1. Install the driver for four seconds) whenever you stop the system.

iDEQ 200S user's manual
Page 39
5 Chapter 5 5•4r Software Problem Good software is misbehaving. 3. The problem might be busy processing data or waiting for technical support and service. 31 wait a moment; If you can . 4. Download the file/files and execute to restart. 6. If the problem persists, contact your software. 5. The computer will give you receive it can unplug the power cable; and then plug the power cable back in. If a problem does not...
5 Chapter 5 5•4r Software Problem Good software is misbehaving. 3. The problem might be busy processing data or waiting for technical support and service. 31 wait a moment; If you can . 4. Download the file/files and execute to restart. 6. If the problem persists, contact your software. 5. The computer will give you receive it can unplug the power cable; and then plug the power cable back in. If a problem does not...

iDEQ 200S user's manual
Page 43
... is dropped or the chassis is damaged or frayed. 2. Dust can damage and/or cause contamination of the unit, which could result in fire or electrical shock. • Turn off the computer before installing or removing a peripheral device, except USB, or IEEE 1394 devices. • Turn off the computer and refer for servicing under the following instructions. Immediately shut off...
... is dropped or the chassis is damaged or frayed. 2. Dust can damage and/or cause contamination of the unit, which could result in fire or electrical shock. • Turn off the computer before installing or removing a peripheral device, except USB, or IEEE 1394 devices. • Turn off the computer and refer for servicing under the following instructions. Immediately shut off...


