Setup Manual
Page 2
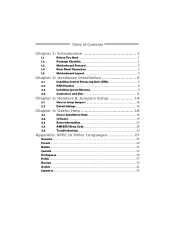
... & Jumpers Setup 14 3.1 How to Setup Jumpers 14 3.2 Detail Settings 14 Chapter 4: Useful Help 18 4.1 Driver Installation Note 18 4.2 Software 19 4.3 Extra Information 23 4.4 AMI BIOS Beep Code 24 4.5 Troubleshooting 25 Appendix: SPEC In Other Languages 27 German...27 French ...29 Italian...31 Spanish ...33 Portuguese ...35 Polish...37 Russian ...39...
... & Jumpers Setup 14 3.1 How to Setup Jumpers 14 3.2 Detail Settings 14 Chapter 4: Useful Help 18 4.1 Driver Installation Note 18 4.2 Software 19 4.3 Extra Information 23 4.4 AMI BIOS Beep Code 24 4.5 Troubleshooting 25 Appendix: SPEC In Other Languages 27 German...27 French ...29 Italian...31 Spanish ...33 Portuguese ...35 Polish...37 Russian ...39...
Setup Manual
Page 5
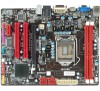
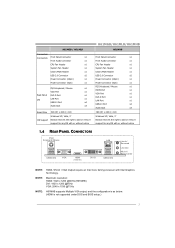
...Support Windows XP / Vista / 7 Biostar reserves the right to add or remove support for any OS with or without notice H61MGB/H61MLB/H61MHB H61MHB Front Panel Connector x1 Front Audio Connector ...USB2.0 Port x4 Audio Jack x3 190 (W) x 244 (L) mm Windows XP / Vista / 7 Biostar reserves the right to add or remove support for any OS with or without notice 1.4 REAR PANEL CONNECTORS...Graphics Technology. NOTE: Maximum resolution: HDMI: 1920 x 1200 @60Hz (H61MHB) DVI: 1920 x 1200 @60Hz VGA: 2048 x 1536 @75Hz NOTE: H61MHB supports Multiple VGA output, and the configuration is as below: (HDMI ...
...Support Windows XP / Vista / 7 Biostar reserves the right to add or remove support for any OS with or without notice H61MGB/H61MLB/H61MHB H61MHB Front Panel Connector x1 Front Audio Connector ...USB2.0 Port x4 Audio Jack x3 190 (W) x 244 (L) mm Windows XP / Vista / 7 Biostar reserves the right to add or remove support for any OS with or without notice 1.4 REAR PANEL CONNECTORS...Graphics Technology. NOTE: Maximum resolution: HDMI: 1920 x 1200 @60Hz (H61MHB) DVI: 1920 x 1200 @60Hz VGA: 2048 x 1536 @75Hz NOTE: H61MHB supports Multiple VGA output, and the configuration is as below: (HDMI ...
Setup Manual
Page 17
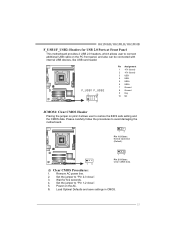
... ". 3. Remove AC power line. 2. Power on the PC front panel, and also can be connected with internal USB devices, like USB card reader. H61MGB/H61MLB/H61MHB F_USB1/F_USB2: Headers for five seconds. 4. Set the jumper to avoid damaging the motherboard. 1 3 Pin 1-2 Close: Normal Operation (Default). 13 1 3 Pin 2-3 Close: Clear CMOS data... at Front Panel This motherboard provides 2 USB 2.0 headers, which allows user to connect additional USB cable on the AC. 6. Set the jumper to restore the BIOS safe setting and the CMOS data.
... ". 3. Remove AC power line. 2. Power on the PC front panel, and also can be connected with internal USB devices, like USB card reader. H61MGB/H61MLB/H61MHB F_USB1/F_USB2: Headers for five seconds. 4. Set the jumper to avoid damaging the motherboard. 1 3 Pin 1-2 Close: Normal Operation (Default). 13 1 3 Pin 2-3 Close: Clear CMOS data... at Front Panel This motherboard provides 2 USB 2.0 headers, which allows user to connect additional USB cable on the AC. 6. Set the jumper to restore the BIOS safe setting and the CMOS data.

Setup Manual
Page 21
...to launch the utility. This bl ock will show the i nformation which is a convenient utility that helps you must provide. 4.2 SOFTWARE H61MGB/H61MLB/H61MHB Installing Software 1. Double-click the icon to the optical drive. Provide the e-ma il addr ess that you to help you may have encountered,... in forma tion to . *Provid e the name of the memor y module manufacturer. This utility will see the software icon "eHOT Line" / "BIOS Update" appears on the respective software title. 3. The drivers installation program would be able to complete the installation.
...to launch the utility. This bl ock will show the i nformation which is a convenient utility that helps you must provide. 4.2 SOFTWARE H61MGB/H61MLB/H61MHB Installing Software 1. Double-click the icon to the optical drive. Provide the e-ma il addr ess that you to help you may have encountered,... in forma tion to . *Provid e the name of the memor y module manufacturer. This utility will see the software icon "eHOT Line" / "BIOS Update" appears on the respective software title. 3. The drivers installation program would be able to complete the installation.
Setup Manual
Page 22
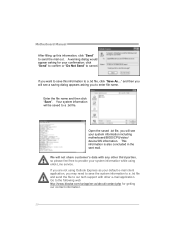
... to enter file name. Open the saved .txt file, you are not using eHot-Line service. If you will see your system information including motherboard/BIOS/CPU/video/ device/OS information. This information is also concluded in the sent mail. We will be saved to a .txt file. click "Send" to ... the file name and then click "Save". A warning dialog would appear asking for getting our contact information. 20 Go to the following web http://www.biostar.com.tw/app/en-us/about/contact.php for your default e-mail client application, you want to save the system information to a .txt file and...
... to enter file name. Open the saved .txt file, you are not using eHot-Line service. If you will see your system information including motherboard/BIOS/CPU/video/ device/OS information. This information is also concluded in the sent mail. We will be saved to a .txt file. click "Send" to ... the file name and then click "Save". A warning dialog would appear asking for getting our contact information. 20 Go to the following web http://www.biostar.com.tw/app/en-us/about/contact.php for your default e-mail client application, you want to save the system information to a .txt file and...

Setup Manual
Page 23
Choose the position to update your motherboard BIOS under Windows system. H61MGB/H61MLB/H61MHB BIOS Update BIOS Update is a convenient utility which allows you to save file and enter file name. (We recommend that the file name should be English/number and no longer than 7 characters.) Then click Save. 21 AWARD BIOS Show current BIOS information AMI BIOS Clear CMOS function (Only for AWARD BIOS) Save current BIOS to a .bin file Update BIOS with a BIOS file Once click on this button, the saving dialog will show.
Choose the position to update your motherboard BIOS under Windows system. H61MGB/H61MLB/H61MHB BIOS Update BIOS Update is a convenient utility which allows you to save file and enter file name. (We recommend that the file name should be English/number and no longer than 7 characters.) Then click Save. 21 AWARD BIOS Show current BIOS information AMI BIOS Clear CMOS function (Only for AWARD BIOS) Save current BIOS to a .bin file Update BIOS with a BIOS file Once click on this button, the saving dialog will show.

Setup Manual
Page 24
...during this process. Please do not open dialog will update BIOS with the proper BIOS file, and this process may be slightly different from the website. After the BIOS Update process, click on board may take minutes. In the BIOS setup, use the Load Optimized Defaults function and then Save... the full screen logo shows, press key to exit BIOS setup. or click No to be updated. Please choose the proper BIOS file for your reference only. Click Update BIOS button, a dialog will show for asking you backup current BIOS. All the information and content above are subject to...
...during this process. Please do not open dialog will update BIOS with the proper BIOS file, and this process may be slightly different from the website. After the BIOS Update process, click on board may take minutes. In the BIOS setup, use the Load Optimized Defaults function and then Save... the full screen logo shows, press key to exit BIOS setup. or click No to be updated. Please choose the proper BIOS file for your reference only. Click Update BIOS button, a dialog will show for asking you backup current BIOS. All the information and content above are subject to...
Setup Manual
Page 26
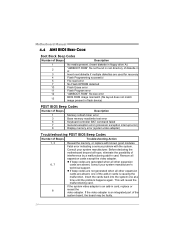
...the malfunctioning card. If the video adapter is an integrated part of interference by a malfunctioning add-in card. Motherboard Manual 4.4 AMI BIOS BEEP CODE Boot Block Beep Codes Number of Beeps Description 1 No media present. (Insert diskette in floppy drive A:) 2 "AMIBOOT.ROM... controller BAT command failed 7 General exception error (processor exception interrupt error) 8 Display memory error (system video adapter) Troubleshooting POST BIOS Beep Codes Number of the add-in cards is causing the malfunction. Fatal error indicating a serious problem with known good modules. ...
...the malfunctioning card. If the video adapter is an integrated part of interference by a malfunctioning add-in card. Motherboard Manual 4.4 AMI BIOS BEEP CODE Boot Block Beep Codes Number of Beeps Description 1 No media present. (Insert diskette in floppy drive A:) 2 "AMIBOOT.ROM... controller BAT command failed 7 General exception error (processor exception interrupt error) 8 Display memory error (system video adapter) Troubleshooting POST BIOS Beep Codes Number of the add-in cards is causing the malfunction. Fatal error indicating a serious problem with known good modules. ...

Bios Setup
Page 1
H61MGB/H61MLB/H61MHB UEFI BIOS Manual UEFI BIOS Setup 1 1 Main Menu 3 2 Advanced Menu 4 3 Chipset Menu 17 4 Boot Menu 22 5 Security Menu 24 6 Performance Menu 25 7 Exit Menu 31 i
H61MGB/H61MLB/H61MHB UEFI BIOS Manual UEFI BIOS Setup 1 1 Main Menu 3 2 Advanced Menu 4 3 Chipset Menu 17 4 Boot Menu 22 5 Security Menu 24 6 Performance Menu 25 7 Exit Menu 31 i
Bios Setup
Page 2
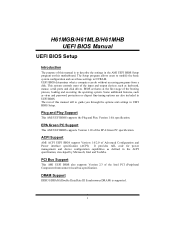
... program on this manual will to NVRAM. Plug and Play Support This AMI UEFI BIOS supports the Plug and Play Version 1.0A specification. H61MGB/H61MLB/H61MHB UEFI BIOS Manual UEFI BIOS Setup Introduction The purpose of this manual is supported. 1 Some additional features, such as defined in the ACPI specification, developed by Microsoft, Intel...
... program on this manual will to NVRAM. Plug and Play Support This AMI UEFI BIOS supports the Plug and Play Version 1.0A specification. H61MGB/H61MLB/H61MHB UEFI BIOS Manual UEFI BIOS Setup Introduction The purpose of this manual is supported. 1 Some additional features, such as defined in the ACPI specification, developed by Microsoft, Intel...

Bios Setup
Page 3
... unstable after changing any settings, please load the default settings to ensure optimum performance of this is being continuously updated. The UEFI BIOS information described in this user's manual and any mistakes found in this manual. Use Load Setup Default under the Exit Menu. Using...right corner, and you can use these keys to select item and change the settings. H61MGB/H61MLB/H61MHB UEFI BIOS Manual Supported CPUs This AMI UEFI BIOS supports the Intel CPU. In the UEFI BIOS setup utility, you will not be caused by wrong-settings. 2 z The content of the motherboard...
... unstable after changing any settings, please load the default settings to ensure optimum performance of this is being continuously updated. The UEFI BIOS information described in this user's manual and any mistakes found in this manual. Use Load Setup Default under the Exit Menu. Using...right corner, and you can use these keys to select item and change the settings. H61MGB/H61MLB/H61MHB UEFI BIOS Manual Supported CPUs This AMI UEFI BIOS supports the Intel CPU. In the UEFI BIOS setup utility, you will not be caused by wrong-settings. 2 z The content of the motherboard...

Bios Setup
Page 4
.... Note that the 'Day' automatically changes when you enter AMI UEFI BIOS Setup Utility, the Main Menu will be excluded. General Help Optimized Defaults Save & Reset Exit Version x.xx.xxxx. H61MGB/H61MLB/H61MHB UEFI BIOS Manual 1 Main Menu Once you set the date. Copyright© 201x..., American Megatrends, Inc. System Time Set the system internal clock. Main Advanced Chipset BIOS Information Compliency Project Code Model Name BIOS Version Build Date Total Memory System ...
.... Note that the 'Day' automatically changes when you enter AMI UEFI BIOS Setup Utility, the Main Menu will be excluded. General Help Optimized Defaults Save & Reset Exit Version x.xx.xxxx. H61MGB/H61MLB/H61MHB UEFI BIOS Manual 1 Main Menu Once you set the date. Copyright© 201x..., American Megatrends, Inc. System Time Set the system internal clock. Main Advanced Chipset BIOS Information Compliency Project Code Model Name BIOS Version Build Date Total Memory System ...
Bios Setup
Page 5
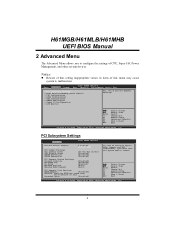
... Read Request [Disabled] [Disabled] [Enabled] [Auto] [Auto] PCI Express Link Settings ASPM Support [Disabled] WARNING: Enabling ASPM may cause system to malfunction. BIOS SETUP UTILITY Main Advanced Chipset Boot Security Performance Save & Exit > PCI Subsystem Settings > ACPI Settings/WakeUp Event control > CPU Configuration > SATA Configuration > USB ... CPU, Super I/O, Power Management, and other system devices. General Help Optimized Defaults Save & Reset Exit Version x.xx.xxxx. H61MGB/H61MLB/H61MHB UEFI BIOS Manual 2 Advanced Menu The Advanced Menu allows you to launch.
... Read Request [Disabled] [Disabled] [Enabled] [Auto] [Auto] PCI Express Link Settings ASPM Support [Disabled] WARNING: Enabling ASPM may cause system to malfunction. BIOS SETUP UTILITY Main Advanced Chipset Boot Security Performance Save & Exit > PCI Subsystem Settings > ACPI Settings/WakeUp Event control > CPU Configuration > SATA Configuration > USB ... CPU, Super I/O, Power Management, and other system devices. General Help Optimized Defaults Save & Reset Exit Version x.xx.xxxx. H61MGB/H61MLB/H61MHB UEFI BIOS Manual 2 Advanced Menu The Advanced Menu allows you to launch.
Bios Setup
Page 6
...: Legacy ROM (Default) / EFI Compatible ROM PCI Latency Timer This item sets the value to be programmed into PCI Latency Timer Register. H61MGB/H61MLB/H61MHB UEFI BIOS Manual PCI ROM Priority In case of multiple option ROMs (Legacy and EFI Compatible), this item is enabled, the system allows Device to use 8-bit...
...: Legacy ROM (Default) / EFI Compatible ROM PCI Latency Timer This item sets the value to be programmed into PCI Latency Timer Register. H61MGB/H61MLB/H61MHB UEFI BIOS Manual PCI ROM Priority In case of multiple option ROMs (Legacy and EFI Compatible), this item is enabled, the system allows Device to use 8-bit...
Bios Setup
Page 7
... sets Maximum Read Request Size of Extended Synchronization patterns. Options: Disabled (Default) / Enabled 6 Force all links to select the value. BIOS auto configures; Options: Disabled (Default) / Auto / Force LO Extended Synch If this item is enabled, the system allows generation of...ASPM. Options: Enabled (Default) / Disabled Maximum Payload This item sets Maximum Payload of PCI Express Device or allows System BIOS to LO State; H61MGB/H61MLB/H61MHB UEFI BIOS Manual No Snoop This item enables or disables PCI Express Device No Snoop option. Auto - Disabled - Options: Auto (...
... sets Maximum Read Request Size of Extended Synchronization patterns. Options: Disabled (Default) / Enabled 6 Force all links to select the value. BIOS auto configures; Options: Disabled (Default) / Auto / Force LO Extended Synch If this item is enabled, the system allows generation of...ASPM. Options: Enabled (Default) / Disabled Maximum Payload This item sets Maximum Payload of PCI Express Device or allows System BIOS to LO State; H61MGB/H61MLB/H61MHB UEFI BIOS Manual No Snoop This item enables or disables PCI Express Device No Snoop option. Auto - Disabled - Options: Auto (...
Bios Setup
Page 8
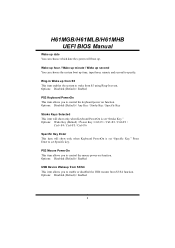
... the system to RAM) EuP Control When EuP is pressed. Options: Disabled (Default) / Enabled 7 When this item is pressed. H61MGB/H61MLB/H61MHB UEFI BIOS Manual ACPI Settings/WakeUp Event control Advanced BIOS SETUP UTILITY ACPI Settings/Wakeup Event Control ACPI Sleep State EuP Control PME Wake up from S5 using PME event. Options...
... the system to RAM) EuP Control When EuP is pressed. Options: Disabled (Default) / Enabled 7 When this item is pressed. H61MGB/H61MLB/H61MHB UEFI BIOS Manual ACPI Settings/WakeUp Event control Advanced BIOS SETUP UTILITY ACPI Settings/Wakeup Event Control ACPI Sleep State EuP Control PME Wake up from S5 using PME event. Options...
Bios Setup
Page 9
... USB Device Wakeup from S3/S4 This item allows you to enable or disabled the USB resume from S5 using Ring-In event. H61MGB/H61MLB/H61MHB UEFI BIOS Manual Wake up date You can choose the system boot up time, input hour, minute and second to specify. Options: Wake Key (Default) / Power...
... USB Device Wakeup from S3/S4 This item allows you to enable or disabled the USB resume from S5 using Ring-In event. H61MGB/H61MLB/H61MHB UEFI BIOS Manual Wake up date You can choose the system boot up time, input hour, minute and second to specify. Options: Wake Key (Default) / Power...
Bios Setup
Page 10
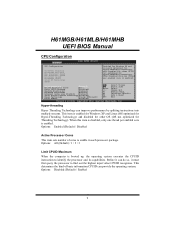
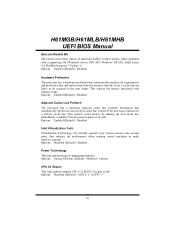
... core is booted up, the operating system executes the CPUID instruction to find out the highest input value CPUID recognizes. H61MGB/H61MLB/H61MHB UEFI BIOS Manual CPU Configuration Advanced BIOS SETUP UTILITY CPU Configuration Processor Stepping Microcode Revision Max Processor Speed Min Processor Speed Processor Speed Processor Cores Intel HT Technology EMT64 Enabled...
... core is booted up, the operating system executes the CPUID instruction to find out the highest input value CPUID recognizes. H61MGB/H61MLB/H61MHB UEFI BIOS Manual CPU Configuration Advanced BIOS SETUP UTILITY CPU Configuration Processor Stepping Microcode Revision Max Processor Speed Min Processor Speed Processor Speed Processor Cores Intel HT Technology EMT64 Enabled...
Bios Setup
Page 11
... combined with memory reads. This reduces cache latency by making the next cache line immediately available if the processor requires it as well. H61MGB/H61MLB/H61MHB UEFI BIOS Manual Execute-Disable Bit XD can virtually separate your system resource into the Level 2 cache that automatically fetches an extra 64-byte cache line...
... combined with memory reads. This reduces cache latency by making the next cache line immediately available if the processor requires it as well. H61MGB/H61MLB/H61MHB UEFI BIOS Manual Execute-Disable Bit XD can virtually separate your system resource into the Level 2 cache that automatically fetches an extra 64-byte cache line...

Bios Setup
Page 12
... This item sets SATA Mode. Options: IDE Mode (Default) / Disabled Serial-AT A Controller 0 This item enables/disables Serial ATA Controller 0. H61MGB/H61MLB/H61MHB UEFI BIOS Manual CPU C6 Report This item enables/disables CPU C6 (ACPI C3) report to OS. Options: No Limit (Default) / C0 / C1 / C6 ... SATA Configuration Advanced SATA Configuration SATA Mode Serial-ATA Controller 0 Serial-ATA Controller 1 SATA Port1: SATA Port2: SATA Port3: SATA Port4: BIOS SETUP UTILITY [IDE Mode] [Compatible] [Enhanced] (1) IDE Mode Enter +/F1 F3 F4 ESC Select Screen Select Item Select Change Opt.
... This item sets SATA Mode. Options: IDE Mode (Default) / Disabled Serial-AT A Controller 0 This item enables/disables Serial ATA Controller 0. H61MGB/H61MLB/H61MHB UEFI BIOS Manual CPU C6 Report This item enables/disables CPU C6 (ACPI C3) report to OS. Options: No Limit (Default) / C0 / C1 / C6 ... SATA Configuration Advanced SATA Configuration SATA Mode Serial-ATA Controller 0 Serial-ATA Controller 1 SATA Port1: SATA Port2: SATA Port3: SATA Port4: BIOS SETUP UTILITY [IDE Mode] [Compatible] [Enhanced] (1) IDE Mode Enter +/F1 F3 F4 ESC Select Screen Select Item Select Change Opt.

