
User Manual
Page 2
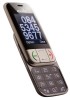
...; a mains power adaptor a rechargeable battery pack USB data cable earphones set this guide. Keep your guarantee. The Speakeasy 600 will work correctly. IMPORTANT -Your handset is approved for use . it is available from 9.00am-5.00 pm, Monday to Friday, on the GSM900 and DCS1800 networks. Some networks may not support all UK GSM mobile networks except "3", and you will need help ... Check with a SIM card. www...
...; a mains power adaptor a rechargeable battery pack USB data cable earphones set this guide. Keep your guarantee. The Speakeasy 600 will work correctly. IMPORTANT -Your handset is approved for use . it is available from 9.00am-5.00 pm, Monday to Friday, on the GSM900 and DCS1800 networks. Some networks may not support all UK GSM mobile networks except "3", and you will need help ... Check with a SIM card. www...
User Manual
Page 3
... Install SIM card 16 5.2 Insert Battery 17 5.3 Charge Battery 18 5.4 Insert a Memory (micro SD) card 19 6 SWITCHING ON AND OFF 20 7 MAKING & ANSWERING CALLS 21 7.1 Make a call 21 7.2 Answer a call 21 7.3 End a call 21 7.4 Speed dial 21 7.5 Adjust volume during a call 21 7.6 Dial from the phonebook 22 7.7 Dial from the call log 22 7.8 Reject an incoming call 22 8 SOS CALL FUNCTION 23 8.1 Using the SOS call button 23 8.2 Activate / Deactivate SOS Call function 24 8.3 Activate / Deactivate SOS Alarm Ring 24 8.4 Activate / Deactivate SOS SMS 24 8.5 Add SOS numbers 25 8.6 Edit...
... Install SIM card 16 5.2 Insert Battery 17 5.3 Charge Battery 18 5.4 Insert a Memory (micro SD) card 19 6 SWITCHING ON AND OFF 20 7 MAKING & ANSWERING CALLS 21 7.1 Make a call 21 7.2 Answer a call 21 7.3 End a call 21 7.4 Speed dial 21 7.5 Adjust volume during a call 21 7.6 Dial from the phonebook 22 7.7 Dial from the call log 22 7.8 Reject an incoming call 22 8 SOS CALL FUNCTION 23 8.1 Using the SOS call button 23 8.2 Activate / Deactivate SOS Call function 24 8.3 Activate / Deactivate SOS Alarm Ring 24 8.4 Activate / Deactivate SOS SMS 24 8.5 Add SOS numbers 25 8.6 Edit...
User Manual
Page 11
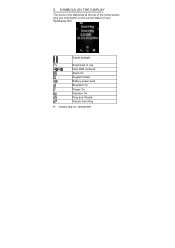
2 SYMBOLS ON THE DISPLAY The icons in use / New SMS received Alarm On Keypad locked Battery power level Bluetooth On Ringer On Vibration On Ring and Vibrate Vibrate then Ring 11 Binatone Help Line : 0845 345 9677 Signal strength Earphones in the status bar at the top of the home screen give you information on the current status of your Speakeasy 600.
2 SYMBOLS ON THE DISPLAY The icons in use / New SMS received Alarm On Keypad locked Battery power level Bluetooth On Ringer On Vibration On Ring and Vibrate Vibrate then Ring 11 Binatone Help Line : 0845 345 9677 Signal strength Earphones in the status bar at the top of the home screen give you information on the current status of your Speakeasy 600.
User Manual
Page 16
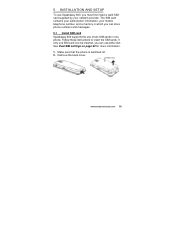
... Follow these instructions to be inserted, you can store phone numbers and messages. 5.1 Install SIM card Speakeasy 600 supports the use either slot. Make sure that the phone is to insert the SIM cards. If only one phone. 5 INSTALLATION AND SETUP To use Speakeasy 600, you can use of two SIM cards in which you must first insert a valid SIM card supplied by your network provider. The SIM card contains your subscription information, your mobile telephone number, and a memory in one SIM card is switched off. 2. Remove the back...
... Follow these instructions to be inserted, you can store phone numbers and messages. 5.1 Install SIM card Speakeasy 600 supports the use either slot. Make sure that the phone is to insert the SIM cards. If only one phone. 5 INSTALLATION AND SETUP To use Speakeasy 600, you can use of two SIM cards in which you must first insert a valid SIM card supplied by your network provider. The SIM card contains your subscription information, your mobile telephone number, and a memory in one SIM card is switched off. 2. Remove the back...
User Manual
Page 19
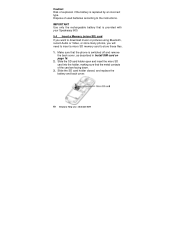
... incorrect type. Slide the SD card holder open and insert the micro SD card into the holder, making sure that the phone is provided with your Speakeasy 600. 5.4 Insert a Memory (micro SD) card If you want to download music or pictures using Bluetooth, record Audio or Video, or store many photos, you will need to insert a micro SD memory card to the instructions. Slide the SD card holder closed, and replace the battery and back cover. 19 Binatone Help Line...
... incorrect type. Slide the SD card holder open and insert the micro SD card into the holder, making sure that the phone is provided with your Speakeasy 600. 5.4 Insert a Memory (micro SD) card If you want to download music or pictures using Bluetooth, record Audio or Video, or store many photos, you will need to insert a micro SD memory card to the instructions. Slide the SD card holder closed, and replace the battery and back cover. 19 Binatone Help Line...

User Manual
Page 22
Scroll to the name or number you wish to call and press twice to call the number. (When you install two SIM cards, you can select SIM1/SIM2 voice call) 7.7 Dial from the phonebook 1. www.binatonetelecom.com 22 7.6 Dial from the call Press . From the home screen, press to access the Phonebook. 2. From the home screen, press to access the Call Log. 2. Enter the first letter(s) of the name, and/or scroll to the name, then press twice to call the number. (When you install two SIM cards, you can select SIM1/SIM2 voice call) 7.8 Reject an incoming call log 1.
Scroll to the name or number you wish to call and press twice to call the number. (When you install two SIM cards, you can select SIM1/SIM2 voice call) 7.7 Dial from the phonebook 1. www.binatonetelecom.com 22 7.6 Dial from the call Press . From the home screen, press to access the Phonebook. 2. From the home screen, press to access the Call Log. 2. Enter the first letter(s) of the name, and/or scroll to the name, then press twice to call the number. (When you install two SIM cards, you can select SIM1/SIM2 voice call) 7.8 Reject an incoming call log 1.
User Manual
Page 27
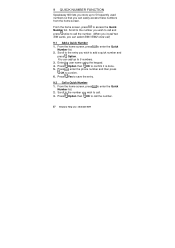
... call . 3. Scroll to add a quick number and press Option. Enter the user name using the keypad. 4. Press , enter the phone number and then press OK to access the Quick Number list. Press Yes to enter the Quick Number list. 2. Scroll to the number you wish to call and press twice to call the number. (When you install two SIM cards, you wish to the entry you can select SIM1/SIM2 voice call) 9.1 Add a Quick Number 1. From the home screen, press to save the entry. 9.2 Call a Quick Number...
... call . 3. Scroll to add a quick number and press Option. Enter the user name using the keypad. 4. Press , enter the phone number and then press OK to access the Quick Number list. Press Yes to enter the Quick Number list. 2. Scroll to the number you wish to call and press twice to call the number. (When you install two SIM cards, you wish to the entry you can select SIM1/SIM2 voice call) 9.1 Add a Quick Number 1. From the home screen, press to save the entry. 9.2 Call a Quick Number...

User Manual
Page 31
.... 4. Scroll to and select My number > Send my number. 4. Press OK when it is done. 7. 10.6 Turn speed dial on or off 1. From the home screen, press to Setup and press OK. 3. Press Option, scroll to access the Phonebook list. 2. Scroll to save the entry. 10.8 Send My number 1. Enter the name using the keypad. 5. Press Yes to send As text message, As multimedia message or Via Bluetooth and press OK. 5. Press...
.... 4. Scroll to and select My number > Send my number. 4. Press OK when it is done. 7. 10.6 Turn speed dial on or off 1. From the home screen, press to Setup and press OK. 3. Press Option, scroll to access the Phonebook list. 2. Scroll to save the entry. 10.8 Send My number 1. Enter the name using the keypad. 5. Press Yes to send As text message, As multimedia message or Via Bluetooth and press OK. 5. Press...

User Manual
Page 32
Scroll to access the Phonebook list. 2. From the home screen, press to Copy contacts and press OK. 4. From the home screen, press to Setup and press OK. 3. The percentage of memory used in your SIM1, SIM2 and Phone is displayed. 10.11 Copy Phonebook contacts 1. www.binatonetelecom.com 32 Press Option, scroll to access the Phonebook list. 2. Scroll to access the Phonebook list. 2. 10.9 Set extra numbers 1. From the home screen, press to Memory status...
Scroll to access the Phonebook list. 2. From the home screen, press to Copy contacts and press OK. 4. From the home screen, press to Setup and press OK. 3. The percentage of memory used in your SIM1, SIM2 and Phone is displayed. 10.11 Copy Phonebook contacts 1. www.binatonetelecom.com 32 Press Option, scroll to access the Phonebook list. 2. Scroll to access the Phonebook list. 2. 10.9 Set extra numbers 1. From the home screen, press to Memory status...
User Manual
Page 34
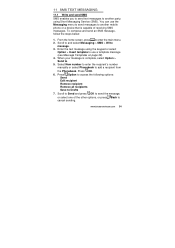
...'s number manually or select Phonebook to . 5. 11 SMS TEXT MESSAGING 11.1 Write and send SMS SMS enables you to send text messages to another party, using the keypad or select Option > Insert template to use the Messaging menu to send messages to another mobile phone or a device that is complete, select Option > Send to add a recipient from the Phonebook. Press Option to access the following options: Send Edit recipient Remove recipient Remove all recipients Save to enter the main menu. 2. From the home screen, press...
...'s number manually or select Phonebook to . 5. 11 SMS TEXT MESSAGING 11.1 Write and send SMS SMS enables you to send text messages to another party, using the keypad or select Option > Insert template to use the Messaging menu to send messages to another mobile phone or a device that is complete, select Option > Send to add a recipient from the Phonebook. Press Option to access the following options: Send Edit recipient Remove recipient Remove all recipients Save to enter the main menu. 2. From the home screen, press...

User Manual
Page 37
... Set the preferred storage location for more information regarding the settings. 1. Consult your network provider for your SIM card or phone. Scroll to and select Messaging > SMS > Setup. 3. Voicemail server Set up a new profile. Scroll to SIM1 message settings or SIM2 message settings and press OK. Profile settings Activate/deactivate a default message profile or set up your voicemail server or call voicemail server Common settings Enable or disable Delivery report, Reply path, Save sent message Memory status Check available SMS memory in your SMS: SIM or Phone 37 Binatone...
... Set the preferred storage location for more information regarding the settings. 1. Consult your network provider for your SIM card or phone. Scroll to and select Messaging > SMS > Setup. 3. Voicemail server Set up a new profile. Scroll to SIM1 message settings or SIM2 message settings and press OK. Profile settings Activate/deactivate a default message profile or set up your voicemail server or call voicemail server Common settings Enable or disable Delivery report, Reply path, Save sent message Memory status Check available SMS memory in your SMS: SIM or Phone 37 Binatone...

User Manual
Page 38
... are 10 preset SMS messages on the phone, which you can change if you wish to the template you wish. 11.4.1 Edit Template 1. Scroll to edit and press Option. 5. From the home screen, press to and select Messaging > SMS > Setup. 3. From the home screen, press to SIM1 message settings or SIM2 message settings and press OK. 4. Scroll to enter the main menu. 2. 11.3.1 Save Sent message 1. Scroll to Edit and press OK...
... are 10 preset SMS messages on the phone, which you can change if you wish to the template you wish. 11.4.1 Edit Template 1. Scroll to edit and press Option. 5. From the home screen, press to and select Messaging > SMS > Setup. 3. From the home screen, press to SIM1 message settings or SIM2 message settings and press OK. 4. Scroll to enter the main menu. 2. 11.3.1 Save Sent message 1. Scroll to Edit and press OK...

User Manual
Page 43
...: View Reply Call sender Forward Delete Delete all Properties Use details 43 Binatone Help Line : 0845 345 9677 Scroll to read it. 4. From the home screen, press to a message and press Option. 4. Press OK to view the message or scroll to access the following options: View Send Edit Delete Delete all Properties Use details 12.3.2 Drafts 1. Scroll to enter the main menu. 2. Scroll to enter the main menu. 2. From the home screen, press to and select Messaging > MMS...
...: View Reply Call sender Forward Delete Delete all Properties Use details 43 Binatone Help Line : 0845 345 9677 Scroll to read it. 4. From the home screen, press to a message and press Option. 4. Press OK to view the message or scroll to access the following options: View Send Edit Delete Delete all Properties Use details 12.3.2 Drafts 1. Scroll to enter the main menu. 2. Scroll to enter the main menu. 2. From the home screen, press to and select Messaging > MMS...

User Manual
Page 45
... Messaging > SMS > Broadcast message. 3. Scroll to access the following options: Receive mode Read message Languages Channel settings Turn receive mode on or off. Read messages when there are public messages broadcast to mobile users. 13 BROADCAST MESSAGES Broadcast messages are received broadcast messages. Press Done and then Yes to enter the main menu. 2. Add channel for broadcast messages. From the home screen, press to save any changes. 45 Binatone Help Line : 0845 345 9677 Set languages for broadcast messages. 4. Please contact your network provider for a list...
... Messaging > SMS > Broadcast message. 3. Scroll to access the following options: Receive mode Read message Languages Channel settings Turn receive mode on or off. Read messages when there are public messages broadcast to mobile users. 13 BROADCAST MESSAGES Broadcast messages are received broadcast messages. Press Done and then Yes to enter the main menu. 2. Add channel for broadcast messages. From the home screen, press to save any changes. 45 Binatone Help Line : 0845 345 9677 Set languages for broadcast messages. 4. Please contact your network provider for a list...

User Manual
Page 48
... list/Firewall on or off. Scroll to Advance settings and press OK to set the following options: Call Firewall Settings Auto redial Call time display Call time reminder Auto quick end Add phone numbers to enter the main menu. 2. Enable or disable auto redial Enable or disable call time display Enable or disable call time reminder Enable or disable auto quick end www.binatonetelecom.com 48 From the home screen, press to Blacklist, White List, Block Unknown numbers or Block Anonymous numbers, Limit incall firewall. 15.2 Advanced Call settings 1. Scroll to and select Call history > Call...
... list/Firewall on or off. Scroll to Advance settings and press OK to set the following options: Call Firewall Settings Auto redial Call time display Call time reminder Auto quick end Add phone numbers to enter the main menu. 2. Enable or disable auto redial Enable or disable call time display Enable or disable call time reminder Enable or disable auto quick end www.binatonetelecom.com 48 From the home screen, press to Blacklist, White List, Block Unknown numbers or Block Anonymous numbers, Limit incall firewall. 15.2 Advanced Call settings 1. Scroll to and select Call history > Call...
User Manual
Page 54
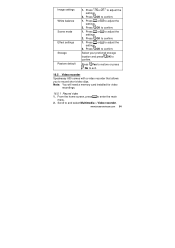
Press or to enter the main menu. 2. From the home screen, press to adjust the settings. 2. Press or to confirm. Select your preferred storage location and press OK to adjust the settings. 2. Note: You will need a memory card installed for video recordings. 16.5.1 Record video 1. Press OK to confirm. 1. Press OK to confirm. 1. Press OK to and select Multimedia > Video recorder. Scroll to confirm. 1. Press or settings. Press or to...
Press or to enter the main menu. 2. From the home screen, press to adjust the settings. 2. Press or to confirm. Select your preferred storage location and press OK to adjust the settings. 2. Note: You will need a memory card installed for video recordings. 16.5.1 Record video 1. Press OK to confirm. 1. Press OK to confirm. 1. Press OK to and select Multimedia > Video recorder. Scroll to confirm. 1. Press or settings. Press or to...

User Manual
Page 57
... enter the main menu. 2. Storage Restore default Press OK then or to select your list of ring tones. Press List to show the following options: Play Details Add to ringtones Refresh list Press OK to play , then press Option to show details of the size, time, title, artist and genre of the available songs. 4. Press to skip forward to exit. 16.10 Audio player Note: You will need a memory card installed...
... enter the main menu. 2. Storage Restore default Press OK then or to select your list of ring tones. Press List to show the following options: Play Details Add to ringtones Refresh list Press OK to play , then press Option to show details of the size, time, title, artist and genre of the available songs. 4. Press to skip forward to exit. 16.10 Audio player Note: You will need a memory card installed...

User Manual
Page 61
..., Ascending Enable/disable alert tone for the Ringtone and Key tone Set the alert type: Ring only - Press OK to and/or adjust the settings. 7. and ring - Press or and press OK/Select/Off/On/Back to move to confirm and save the settings (or press Back for Extra tone setting.) 61 Binatone Help Line : 0845 345 9677 Tone settings Volume Alert type Ring type Extra tone Set alert tone for SIM1/SIM2 incoming call, Alarm, Power on, Power off, Cover open...
..., Ascending Enable/disable alert tone for the Ringtone and Key tone Set the alert type: Ring only - Press OK to and/or adjust the settings. 7. and ring - Press or and press OK/Select/Off/On/Back to move to confirm and save the settings (or press Back for Extra tone setting.) 61 Binatone Help Line : 0845 345 9677 Tone settings Volume Alert type Ring type Extra tone Set alert tone for SIM1/SIM2 incoming call, Alarm, Power on, Power off, Cover open...

User Manual
Page 63
...network service provider). time LCD backlight Set Brightness and Time (duration). 18.3 Network settings SIM1/SIM2 network settings Search and select a network, set network selection mode and set network preferences 18.4 Security settings PIN Code Phone lock Enable/disable SIM card lock and set Greeting text on power up. Auto update Enable/disable Auto update of date of your SIM card (Default password: please check with your phone. Display Settings Select Wallpaper, Screen saver, Power on display, Power off display, and enable/disable Show date and time, or set PIN code to enter...
...network service provider). time LCD backlight Set Brightness and Time (duration). 18.3 Network settings SIM1/SIM2 network settings Search and select a network, set network selection mode and set network preferences 18.4 Security settings PIN Code Phone lock Enable/disable SIM card lock and set Greeting text on power up. Auto update Enable/disable Auto update of date of your SIM card (Default password: please check with your phone. Display Settings Select Wallpaper, Screen saver, Power on display, Power off display, and enable/disable Show date and time, or set PIN code to enter...

User Manual
Page 77
... Ebook To reset the settings To see shortcut keys that can add new folders and rename, delete or sort the files and folders. 1. From the main menu, scroll to erase all the files and folders you have created and stored in the phone memory or on a micro SD card memory, if inserted. Select Phone or Memory card, and press Option. 3. Press OK to select: Open Audio Ebook Images My Music Photos Received Videos Format Press...
... Ebook To reset the settings To see shortcut keys that can add new folders and rename, delete or sort the files and folders. 1. From the main menu, scroll to erase all the files and folders you have created and stored in the phone memory or on a micro SD card memory, if inserted. Select Phone or Memory card, and press Option. 3. Press OK to select: Open Audio Ebook Images My Music Photos Received Videos Format Press...


