

Manual
Page 3
L 1992 Fritz Gegauf Ltd. vooruitgang voorbehouden. Bernina Sewing Machines CH43266 Steckbern (Switzerland) 1992 Fritz Gegaut SA Faboque de machines a coudre Bernina CH-8266 Steckborn (Suisse) 1992 Fritz Gegauf AG Bernina Naaimachinefabtiek CH-8266 Steckbom (Zwitserland) We reserve the right to make technical changes in Sous reserve des modifications apponees dans Veranderir9en in het belang van de technische the interest of progress. l'intatet du progrilis technique.
L 1992 Fritz Gegauf Ltd. vooruitgang voorbehouden. Bernina Sewing Machines CH43266 Steckbern (Switzerland) 1992 Fritz Gegaut SA Faboque de machines a coudre Bernina CH-8266 Steckborn (Suisse) 1992 Fritz Gegauf AG Bernina Naaimachinefabtiek CH-8266 Steckbom (Zwitserland) We reserve the right to make technical changes in Sous reserve des modifications apponees dans Veranderir9en in het belang van de technische the interest of progress. l'intatet du progrilis technique.

Manual
Page 4
changing Buttons sewing on (Model 740E onlyl Buttonholes Colour code green and blue Colour code red and yellow COnneding the machine wrong tool 'Model 740E only) Deming Decorative stitches (Model 740E Only/ Details ol the machine Feed dog - upper thread 32 Three-slep zig-zag 54 Triple straight stitchatzag ...60.62 Trouble shooting gild., 92 Twin needle (Model 740E only 44 Zips sewing in 82 48 .14, 16 90 winding Bringing up the ...
changing Buttons sewing on (Model 740E onlyl Buttonholes Colour code green and blue Colour code red and yellow COnneding the machine wrong tool 'Model 740E only) Deming Decorative stitches (Model 740E Only/ Details ol the machine Feed dog - upper thread 32 Three-slep zig-zag 54 Triple straight stitchatzag ...60.62 Trouble shooting gild., 92 Twin needle (Model 740E only 44 Zips sewing in 82 48 .14, 16 90 winding Bringing up the ...
Manual
Page 5
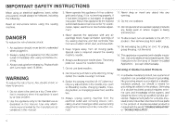
... the needle area. Do not unplug by qualified service per. not the cord. 16. No grounding means is required around the sewing machine needle. 6. electric shock. Always use bent needles. 8. In a double-insulated product, Iwo systems of grounding. sonnet. IMPORTANT SAFETY...only for grounding be done only by pulling on a doubleinsulated product, nor should always be indentical to break. 7. Always unplug sewing machine from the electric outlet immediately after using and before using an electrical appliance. basic safety precautions should a means for its intended...
... the needle area. Do not unplug by qualified service per. not the cord. 16. No grounding means is required around the sewing machine needle. 6. electric shock. Always use bent needles. 8. In a double-insulated product, Iwo systems of grounding. sonnet. IMPORTANT SAFETY...only for grounding be done only by pulling on a doubleinsulated product, nor should always be indentical to break. 7. Always unplug sewing machine from the electric outlet immediately after using and before using an electrical appliance. basic safety precautions should a means for its intended...
Manual
Page 7
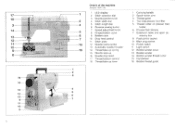
... 9 8 18 15 12 14 13 9 11 10 6 isaral ni•• 1 2 4 5 -6 7 -15 16 1 2 3 Details of the machine IA0F.7301 1 LED display 2 Stitch selection dial 3 Needle position knob 4 Stitch width dial 5 Stitch length dial 6 Reverse sewing button 7 Speed adjustment knob 8 Hinged bobbin cover 9 Bobbin case I0 Drop feed control I I Stitch plate 12 Needle...
... 9 8 18 15 12 14 13 9 11 10 6 isaral ni•• 1 2 4 5 -6 7 -15 16 1 2 3 Details of the machine IA0F.7301 1 LED display 2 Stitch selection dial 3 Needle position knob 4 Stitch width dial 5 Stitch length dial 6 Reverse sewing button 7 Speed adjustment knob 8 Hinged bobbin cover 9 Bobbin case I0 Drop feed control I I Stitch plate 12 Needle...
Manual
Page 11
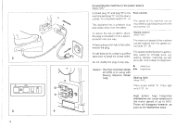
...iMode' 7400 The maximum speed Of the machine can be regulatedby applyingpressure to the fool control. (2) To reduce the nsk of up pat. matching up to install the proper outlet. and is for beginners. ► minimum ►► maximum Sewing light IModel 740E) Press power switch ...'A". If the plug does not lit hilly in any way. high frequency interference can be reduced with Sewing Machine Model 740E. Do not modify the plug in the outlet. sewing corners. e.g. reverse the plug. Press light switch '13'. (4) High power. Turn on power switch tr. ...
...iMode' 7400 The maximum speed Of the machine can be regulatedby applyingpressure to the fool control. (2) To reduce the nsk of up pat. matching up to install the proper outlet. and is for beginners. ► minimum ►► maximum Sewing light IModel 740E) Press power switch ...'A". If the plug does not lit hilly in any way. high frequency interference can be reduced with Sewing Machine Model 740E. Do not modify the plug in the outlet. sewing corners. e.g. reverse the plug. Press light switch '13'. (4) High power. Turn on power switch tr. ...
Manual
Page 12
Sewing light Modces 7.5. 733: If the plug does not fit fully in the Outlet, Turn on power switch -C'. (1) This appliance has a polarized plug (one way. Foot control The speeo 01 the machine can be...outlet Do not modify the plug in a Wadied outlet only one blade wider than the other). to the machine and plug 'B- Turn on power switch 'C' reverse the plug. Poem witch SeAukcilllaCrin4 allachrsent revertacte 1 lu ...T6 red ea the fisk of electric shock this plug is for using with Sewing Machine Model 715 and 730A 16 The Foot Controller Model 3C-135B or 4C-3168 is intended lo...
Sewing light Modces 7.5. 733: If the plug does not fit fully in the Outlet, Turn on power switch -C'. (1) This appliance has a polarized plug (one way. Foot control The speeo 01 the machine can be...outlet Do not modify the plug in a Wadied outlet only one blade wider than the other). to the machine and plug 'B- Turn on power switch 'C' reverse the plug. Poem witch SeAukcilllaCrin4 allachrsent revertacte 1 lu ...T6 red ea the fisk of electric shock this plug is for using with Sewing Machine Model 715 and 730A 16 The Foot Controller Model 3C-135B or 4C-3168 is intended lo...
Manual
Page 14
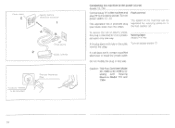
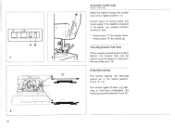
... e.g. the needle stops at its highest position. (1) Certain types of work . (2) Drop teed control For normal sewing. e.g. Press "K. (3) For certain types of sewing tasks aro made easier if the needle is lowered in the raised position. Press13". Press button 'A' for needle up... Two-step presser toot lever When sewing several layers or thick fabrics, the presser loot can be in the fabric. the feeddogmust belowered. starting to sew. - darning or free-hand embroidery. Press button 13" for needle down - r •...
... e.g. the needle stops at its highest position. (1) Certain types of work . (2) Drop teed control For normal sewing. e.g. Press "K. (3) For certain types of sewing tasks aro made easier if the needle is lowered in the raised position. Press13". Press button 'A' for needle up... Two-step presser toot lever When sewing several layers or thick fabrics, the presser loot can be in the fabric. the feeddogmust belowered. starting to sew. - darning or free-hand embroidery. Press button 13" for needle down - r •...
Manual
Page 25
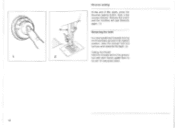
Sew a few reverse stitches. Release the button and the machine will sew forwards again. (1) Removing the work Turn the handwheel fontrardsto bring the thread take-up lever to its highest position, raise the presser foot and remove work towards the back (2) Cutting the thread: Hold the threads behind the presser foot with both hands, guide them to the slit 'A' and press down. 42 I 41 1 2 Reverse sewing At the end of the seam, press the Reverse sewing button.
Sew a few reverse stitches. Release the button and the machine will sew forwards again. (1) Removing the work Turn the handwheel fontrardsto bring the thread take-up lever to its highest position, raise the presser foot and remove work towards the back (2) Cutting the thread: Hold the threads behind the presser foot with both hands, guide them to the slit 'A' and press down. 42 I 41 1 2 Reverse sewing At the end of the seam, press the Reverse sewing button.
Manual
Page 31
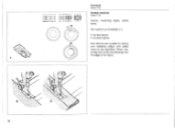
...elastic, darning, mending, reinforcing edges. it is advisable to use a piece of fabric and damage, sew between 3 and 5 rows. (3) 2 3 54 Set the machine as illustrated. (1) Place patch in position. First sew over the centre and then overlap onboth sides. 00000 666466.0600 t:32: 24 23 n vs ...• A A 00000000 . )g[181 $$$$$$ 32 3-Step Zig-zag Sewing on the type of backing fabric to ...
...elastic, darning, mending, reinforcing edges. it is advisable to use a piece of fabric and damage, sew between 3 and 5 rows. (3) 2 3 54 Set the machine as illustrated. (1) Place patch in position. First sew over the centre and then overlap onboth sides. 00000 666466.0600 t:32: 24 23 n vs ...• A A 00000000 . )g[181 $$$$$$ 32 3-Step Zig-zag Sewing on the type of backing fabric to ...
Manual
Page 33
cs 540,AM:: 58 t0 E for fine fabrics C for thick fabrics Both stitches aro suitable for sewing and neatening edges and visible • hems in ono operation. tening, the needle should just go over 1 the edge of the fabric. When nea- 0 0 0 0 0 0 0 9 1 t 0 0 00* OIM I1till UD 11111012 II • r 7 1 1 41 2 1-1 Overlock (IOUS 230) Stretch warlock (Model 2301 Seams, neatening edges, visible hems. 0 Set machine as illustrated.
cs 540,AM:: 58 t0 E for fine fabrics C for thick fabrics Both stitches aro suitable for sewing and neatening edges and visible • hems in ono operation. tening, the needle should just go over 1 the edge of the fabric. When nea- 0 0 0 0 0 0 0 9 1 t 0 0 00* OIM I1till UD 11111012 II • r 7 1 1 41 2 1-1 Overlock (IOUS 230) Stretch warlock (Model 2301 Seams, neatening edges, visible hems. 0 Set machine as illustrated.
Manual
Page 34
...,1E1 0 0 0 fa 0 e • 9 I I 6 4 3 21 rTh 1 715/730 740 E I Stitch selection Triple straight stitch (Models 733740E on y) For hardwearing seams. Turn the stitch length dial (3) to '0'. Turn the sfitch selection dial (1) until the red diode lights up as illustrated. Turn the stitch width dial (2) to W. The machine sews two stitches forwards and one stitch...
...,1E1 0 0 0 fa 0 e • 9 I I 6 4 3 21 rTh 1 715/730 740 E I Stitch selection Triple straight stitch (Models 733740E on y) For hardwearing seams. Turn the stitch length dial (3) to '0'. Turn the sfitch selection dial (1) until the red diode lights up as illustrated. Turn the stitch width dial (2) to W. The machine sews two stitches forwards and one stitch...
Manual
Page 35
etc. 62 The machine sews two stitches forward and one stitch backwards. Triple zig-zag tiloded ris only) For hardwearing seams. hems and decorative seams. Triple zig-zag is ideal for firm fabrics such as illustrated. This gives triple reinforcement. I rr to • o Stitch selection Triple straight stitch llkdel 715 only) For hardwearing seams. Set the machine as denim, corduroy.
etc. 62 The machine sews two stitches forward and one stitch backwards. Triple zig-zag tiloded ris only) For hardwearing seams. hems and decorative seams. Triple zig-zag is ideal for firm fabrics such as illustrated. This gives triple reinforcement. I rr to • o Stitch selection Triple straight stitch llkdel 715 only) For hardwearing seams. Set the machine as denim, corduroy.
Manual
Page 36
etc. This stitch can be used for all types of jersey as well as illustrated. Set the machine as for woven fabrics. (I ▪ 1 3 II 4 321 Smocking stitch Models raoiios wry) Seams, hems, T•shirts, underwear. 0 000 0 000 000 00000 24132221 la le • IT • 16 14 MTh 1-10-, 0 • O 00000 • 0 }MUN I ) Sew at 1 cm (7.") from the fabric edge and Him the surplus fabric. (2J • 2
etc. This stitch can be used for all types of jersey as well as illustrated. Set the machine as for woven fabrics. (I ▪ 1 3 II 4 321 Smocking stitch Models raoiios wry) Seams, hems, T•shirts, underwear. 0 000 0 000 000 00000 24132221 la le • IT • 16 14 MTh 1-10-, 0 • O 00000 • 0 }MUN I ) Sew at 1 cm (7.") from the fabric edge and Him the surplus fabric. (2J • 2
Manual
Page 37
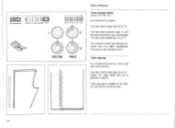
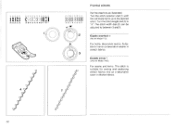
.... Shell hem 16 For decorative edges. Gathering with cord or shirring elastic Rampart 18 Nociel 740E Only) For flat joining seams, sewing on sheer, fine and stretch fabrics The larger stitch should go lusl over the edge of the fabric to suit the fabric. ...thikker fabrics. 0000 anna 0 0000 45M1:1101 Ito -a-• 0 \e• \--' \--1 r' \-' \-1 \--1 \-1 \-1 16 17 C er C , __,) r C 18 66 Practical stitches Set the machine as illustrated. Bridging 17 illoOels 730,'1&0( any, For seams. place mats. visible hems. This stitch can be used for a fagotted effect.
.... Shell hem 16 For decorative edges. Gathering with cord or shirring elastic Rampart 18 Nociel 740E Only) For flat joining seams, sewing on sheer, fine and stretch fabrics The larger stitch should go lusl over the edge of the fabric to suit the fabric. ...thikker fabrics. 0000 anna 0 0000 45M1:1101 Ito -a-• 0 \e• \--' \--1 r' \-' \-1 \--1 \-1 \-1 16 17 C er C , __,) r C 18 66 Practical stitches Set the machine as illustrated. Bridging 17 illoOels 730,'1&0( any, For seams. place mats. visible hems. This stitch can be used for a fagotted effect.
Manual
Page 38
so c.i5r itl i ii 0 00 i0 HOZ/21N IS 0 II 5 14 131111•-lt-, 1 11 • • Practical stitches Set the machine as a decorative seam in thicker fabrics. 68 The stitch width dial (2) can be adjusted to between 3 and 5. Turn the stitch selection dial (1) until the red .... Suitable for hems or decorative seams in StralCh fabrics. • Double arrow 7 lorty for Model 740E) For seams and hems. Tins stitch is suitable for sewing and neatening stretch fabrics and as Illustrated.
so c.i5r itl i ii 0 00 i0 HOZ/21N IS 0 II 5 14 131111•-lt-, 1 11 • • Practical stitches Set the machine as a decorative seam in thicker fabrics. 68 The stitch width dial (2) can be adjusted to between 3 and 5. Turn the stitch selection dial (1) until the red .... Suitable for hems or decorative seams in StralCh fabrics. • Double arrow 7 lorty for Model 740E) For seams and hems. Tins stitch is suitable for sewing and neatening stretch fabrics and as Illustrated.
Manual
Page 42
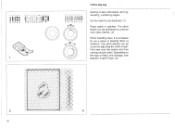
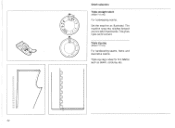
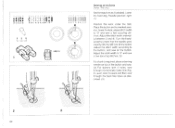
... knit fabrics. The gauge is now set for line or stretchy fabrics. - Tips' - Use a backing for sewing perfectly even length buttonholes. (3) When starting to sew the buttonhole. Always lest sew a buttonhole. A slightly reduced upper thread tension produces beget results. - It is Our -e.. 1 O a 2... vc 3 76 000 . 00 00 t131§1i Buttonholes Set the machine as illustrated. The zigzag should be ...
... knit fabrics. The gauge is now set for line or stretchy fabrics. - Tips' - Use a backing for sewing perfectly even length buttonholes. (3) When starting to sew the buttonhole. Always lest sew a buttonhole. A slightly reduced upper thread tension produces beget results. - It is Our -e.. 1 O a 2... vc 3 76 000 . 00 00 t131§1i Buttonholes Set the machine as illustrated. The zigzag should be ...
Manual
Page 43
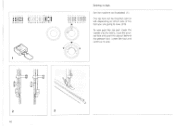
... fabrics. 15 Blind hemflingene for firm nab• rics. Fold the fabric as illustrated. (1) Note: It takes practice to sew blind hems. Always make a sewing test first. Sew slowly, guiding the fabric care. Set the machine as illustrated with the wrong side uppermost. (2) Place the fabric under the foot. trousers. 0 o 0 0 0 oineoe•nocioci 0 00...
... fabrics. 15 Blind hemflingene for firm nab• rics. Fold the fabric as illustrated. (1) Note: It takes practice to sew blind hems. Always make a sewing test first. Sew slowly, guiding the fabric care. Set the machine as illustrated with the wrong side uppermost. (2) Place the fabric under the foot. trousers. 0 o 0 0 0 oineoe•nocioci 0 00...
Manual
Page 45
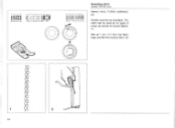
lower the needle into the fabric, raise the presser loot and push the zip pull behind the presser foot. Lower the fool and continue to sew. (2.3) To sew past the zip pull. 0 000 2:122 24 ZIA II 21 0000 c QSOGO NOef61a Own 1 (t) 1 Sewing in zips Set the machine as illustrated. (It The zip foot can be inserted right a left. depending on which side of the foot you are going to sow. 9 2 82 4:4 3
lower the needle into the fabric, raise the presser loot and push the zip pull behind the presser foot. Lower the fool and continue to sew. (2.3) To sew past the zip pull. 0 000 2:122 24 ZIA II 21 0000 c QSOGO NOef61a Own 1 (t) 1 Sewing in zips Set the machine as illustrated. (It The zip foot can be inserted right a left. depending on which side of the foot you are going to sow. 9 2 82 4:4 3
Manual
Page 46
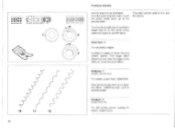
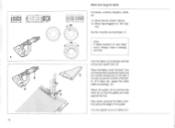
...• ches. Adjust the stitch width to 'V and sew a few securing stitches. (2) If a shank is required. ly between 3 and 4). Adjust the stitch width (noimal. push work under the foot. place adarning needle on buttons Imoce 140E ont, Set the machine as described. (3) 2 3 84 O 2413222120 4 ;...ii!h ° 110 ° 1 tl If 6 T4 131211 ,-10-• HMO 1 Sewing on top of the button (adjust the stitch width according to the button).
...• ches. Adjust the stitch width to 'V and sew a few securing stitches. (2) If a shank is required. ly between 3 and 4). Adjust the stitch width (noimal. push work under the foot. place adarning needle on buttons Imoce 140E ont, Set the machine as described. (3) 2 3 84 O 2413222120 4 ;...ii!h ° 110 ° 1 tl If 6 T4 131211 ,-10-• HMO 1 Sewing on top of the button (adjust the stitch width according to the button).
Manual
Page 49
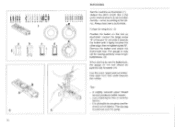
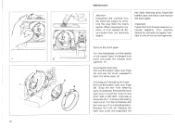
... the two hook retaining arms (31outwards. Remove the hook race cover (4) and the hook (5) and clean with sewing machine oil. if must be disconnected from the mains socket. two hook retaining arms. Insert the bobbin case and bobbin and replace the stitch plate.... is intretePosition Replace the hook (5). Remove the stitch plate: Turn the handwheel until thehook race(7)is hilly raised. 1 2 7 90 Maintenance Attention: Disconnect the machine from the electricity supply by removing the plug from the electricity supply. --- - Replace the hook race cover and snap back the Your...
... the two hook retaining arms (31outwards. Remove the hook race cover (4) and the hook (5) and clean with sewing machine oil. if must be disconnected from the mains socket. two hook retaining arms. Insert the bobbin case and bobbin and replace the stitch plate.... is intretePosition Replace the hook (5). Remove the stitch plate: Turn the handwheel until thehook race(7)is hilly raised. 1 2 7 90 Maintenance Attention: Disconnect the machine from the electricity supply by removing the plug from the electricity supply. --- - Replace the hook race cover and snap back the Your...


