
Manual
Page 7
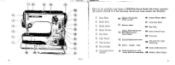
...9 the controls referred to in the Operating Instructions being marked and identified. Length - 9 16 • A.. 1 Fig. 2 on the preceding page shows a BERNINA-Record Model 630-2 knee operated; e) (26) 8 devo 12 15 59 Fig. 2 1 Cover Plate 1 Needle Plate 3 Needle Holder 4 Thread Tension Face Plate... 6 Light Switch 7 Take-up lever 0 Thread Guide 9 Ornamental Stitch Selector I' 10 Zigzag/ Ornamental Stitch control Balance wheel 16 Bobbin Winder Shaft 17 Drop Feed Knob...
...9 the controls referred to in the Operating Instructions being marked and identified. Length - 9 16 • A.. 1 Fig. 2 on the preceding page shows a BERNINA-Record Model 630-2 knee operated; e) (26) 8 devo 12 15 59 Fig. 2 1 Cover Plate 1 Needle Plate 3 Needle Holder 4 Thread Tension Face Plate... 6 Light Switch 7 Take-up lever 0 Thread Guide 9 Ornamental Stitch Selector I' 10 Zigzag/ Ornamental Stitch control Balance wheel 16 Bobbin Winder Shaft 17 Drop Feed Knob...
Manual
Page 8
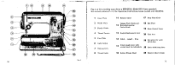
... 0 a 3 2 14 15 'a • et) :1•72 7 7. 17 18 20 19 Fig. 3 on the preceding page shows a BERNINA Mode) 532-2 knee operated; Stop se Set screw for satin stitch stop 15 Stitch length lever with control knob for buttonhole S9 Satin stitch atop ... Fig. 3 11 Length - the controls referred to in the Operating Instructions being marked and identified. 1 Cover Plate 2 Needle Plate 3 Needle Holder 4 Thread Tension 5 Face Plate 6 Light Switch 7 Take-up lever Thread Guide 11 Balance wheel 17 Drop Feed Knob Zigzag, Plain Stitch and 12 Buttonhole sewing Control knob 18 Bed Plate...
... 0 a 3 2 14 15 'a • et) :1•72 7 7. 17 18 20 19 Fig. 3 on the preceding page shows a BERNINA Mode) 532-2 knee operated; Stop se Set screw for satin stitch stop 15 Stitch length lever with control knob for buttonhole S9 Satin stitch atop ... Fig. 3 11 Length - the controls referred to in the Operating Instructions being marked and identified. 1 Cover Plate 2 Needle Plate 3 Needle Holder 4 Thread Tension 5 Face Plate 6 Light Switch 7 Take-up lever Thread Guide 11 Balance wheel 17 Drop Feed Knob Zigzag, Plain Stitch and 12 Buttonhole sewing Control knob 18 Bed Plate...
Manual
Page 9
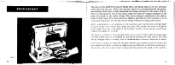
... the speed of the machine. the speed of the motor (Fig. 4). Do not rely on the foot control plate. turn it will evenly distribute light over the sewing area. This must always be checked, particularly if the machine is to the right, the great. Stait machine by slight pressure of... the foot on the voltage indicated un plugs and sockets. Electrical part Fig. 4 12 The drive of the BEIININA-Record Model 530-2 and Model 532-2 is by pressing the light button. It is switched on the knee control lever with your home. The lamp La arranged m the swivelled head cover so...
... the speed of the machine. the speed of the motor (Fig. 4). Do not rely on the foot control plate. turn it will evenly distribute light over the sewing area. This must always be checked, particularly if the machine is to the right, the great. Stait machine by slight pressure of... the foot on the voltage indicated un plugs and sockets. Electrical part Fig. 4 12 The drive of the BEIININA-Record Model 530-2 and Model 532-2 is by pressing the light button. It is switched on the knee control lever with your home. The lamp La arranged m the swivelled head cover so...

Manual
Page 15
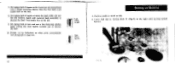
... is free from resin and acid such as is supplied by white lines. afterwards, Use clear oil which the -imuld l,u ca lled ti t. 'l ucidly hat lightly the pul l indicated try the :Ill (1W one fig. 1 1 -41, • L.r•- 4 f -i411 ciroirIc (,d quit/ NOICS ow I (ile ,, ot 14 the trfach I loc. IS...• • II Car• and may cause the machine to the stand- Pigs. 13 a, 13 b and 1-1 show the oiling points indicated by the Bernina dealers. Opening the hinged cover on the front of inferior oils may soil the fabric. aiM lengthens its life. oiling points not vi 'hie in...
... is free from resin and acid such as is supplied by white lines. afterwards, Use clear oil which the -imuld l,u ca lled ti t. 'l ucidly hat lightly the pul l indicated try the :Ill (1W one fig. 1 1 -41, • L.r•- 4 f -i411 ciroirIc (,d quit/ NOICS ow I (ile ,, ot 14 the trfach I loc. IS...• • II Car• and may cause the machine to the stand- Pigs. 13 a, 13 b and 1-1 show the oiling points indicated by the Bernina dealers. Opening the hinged cover on the front of inferior oils may soil the fabric. aiM lengthens its life. oiling points not vi 'hie in...

Manual
Page 16
... two bearings. 7. To oil the motor, remove the motor housing. The two diagonally opposite nickel-plated screws below the bed plate are removed and 4-5 drops light, odorless sewing machine oil are kept free from oil. 8. years is shown by abnormal noise. 6. If the motor is oiled too little, this is in...
... two bearings. 7. To oil the motor, remove the motor housing. The two diagonally opposite nickel-plated screws below the bed plate are removed and 4-5 drops light, odorless sewing machine oil are kept free from oil. 8. years is shown by abnormal noise. 6. If the motor is oiled too little, this is in...

Manual
Page 23
... gathering foot, that is to be gathered place the material beneath the gathering foot and lower it is made greater or smaller. 41 When sewing, lightly guide the prefolded edge (Fig. 21). To increase the amount of the ordinary presser foot, raising the presser foot bar for the purpose. the more...
... gathering foot, that is to be gathered place the material beneath the gathering foot and lower it is made greater or smaller. 41 When sewing, lightly guide the prefolded edge (Fig. 21). To increase the amount of the ordinary presser foot, raising the presser foot bar for the purpose. the more...

Manual
Page 36
... on left lust stitch on the left . Raise presser foot and turn cloth through 180° in knit material, select stitch width Vt. 2. Pull material lightly towards the left side of the shaft of said lever is used. Last needle hole should be on the stitch length scale plate. Last stitch...
... on left lust stitch on the left . Raise presser foot and turn cloth through 180° in knit material, select stitch width Vt. 2. Pull material lightly towards the left side of the shaft of said lever is used. Last needle hole should be on the stitch length scale plate. Last stitch...
Manual
Page 37
.... Set zigzag knob 12 again to shorten the feed. Set zigzag knob 12 again at zero and sew a few fastening stitches again pulling the cloth lightly towards you to shorten the feed. 10. Last needle hloe on left. 2. Lower feed dog by turning knob 17 (Fig. 2) to stitch on the left...
.... Set zigzag knob 12 again to shorten the feed. Set zigzag knob 12 again at zero and sew a few fastening stitches again pulling the cloth lightly towards you to shorten the feed. 10. Last needle hloe on left. 2. Lower feed dog by turning knob 17 (Fig. 2) to stitch on the left...


