User Manual
Page 3
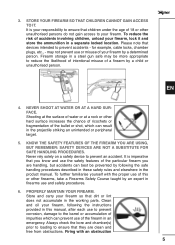
... in a steel gun safe may not prevent use and safety procedures. 6. for example, cable locks, chamber plugs, etc., - Firearm storage in a separate locked location. Firing with the proper use of this manual, after each use to prevent corrosion, damage to the barrel or accumulation of...following the safe handling procedures described in these safety rules and elsewhere in the projectile striking an unintended or peripheral target. 5. PROPERLY MAINTAIN YOUR FIREARM. It is your responsibility to ensure that you are clean and free from obstructions. To further familiarise...
... in a steel gun safe may not prevent use and safety procedures. 6. for example, cable locks, chamber plugs, etc., - Firearm storage in a separate locked location. Firing with the proper use of this manual, after each use to prevent corrosion, damage to the barrel or accumulation of...following the safe handling procedures described in these safety rules and elsewhere in the projectile striking an unintended or peripheral target. 5. PROPERLY MAINTAIN YOUR FIREARM. It is your responsibility to ensure that you are clean and free from obstructions. To further familiarise...
User Manual
Page 6
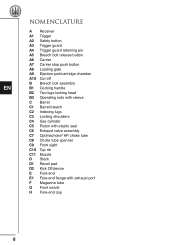
... bolt assembly B1 Cocking handle B2 Two lugs locking head B3 Operating rods with sleeve C Barrel C1 Barrel breech C2 Indexing lugs C3 Locking shoulders C4 Gas cylinder C5 Piston with elastic seal C6 Exhaust valve assembly C7 Optimachoke® HP choke tube C8 Choke tube spanner C9 Front sight C10 Top rib C11 Muzzle D Stock D1 Recoil pad D2 Kick...
... bolt assembly B1 Cocking handle B2 Two lugs locking head B3 Operating rods with sleeve C Barrel C1 Barrel breech C2 Indexing lugs C3 Locking shoulders C4 Gas cylinder C5 Piston with elastic seal C6 Exhaust valve assembly C7 Optimachoke® HP choke tube C8 Choke tube spanner C9 Front sight C10 Top rib C11 Muzzle D Stock D1 Recoil pad D2 Kick...
User Manual
Page 8
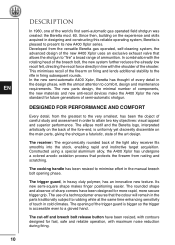
... the rotating head of components, the new materials and new anti-recoil devices make the A400 Xplor the new standard for more rapid, more secure trigger grip. The new parts design, the minimal number of the breech bolt, the new system further reduces the already low recoil felt, directing the recoil force directly in firing subsequent rounds. The rounded shape and absence of sharp corners...
... the rotating head of components, the new materials and new anti-recoil devices make the A400 Xplor the new standard for more rapid, more secure trigger grip. The new parts design, the minimal number of the breech bolt, the new system further reduces the already low recoil felt, directing the recoil force directly in firing subsequent rounds. The rounded shape and absence of sharp corners...
User Manual
Page 9
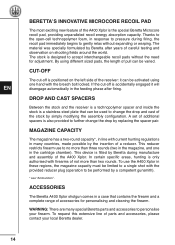
... protected and topped by the user, for enhanced recoil absorption. REDUCED NUMBER OF COMPONENTS The Beretta semi-automatic A400 Xplor is optimised thanks to clean. The shotgun is flush with the stock, creating an unparalleled effect of the A400 Xplor's overall design. The trigger mecchanism has been redesigned. The artistic interpretation of assemblies. The underside of the grip is composed of technopolymer...
... protected and topped by the user, for enhanced recoil absorption. REDUCED NUMBER OF COMPONENTS The Beretta semi-automatic A400 Xplor is optimised thanks to clean. The shotgun is flush with the stock, creating an unparalleled effect of the A400 Xplor's overall design. The trigger mecchanism has been redesigned. The artistic interpretation of assemblies. The underside of the grip is composed of technopolymer...
User Manual
Page 10
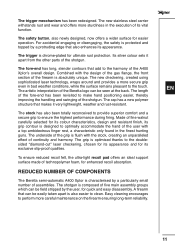
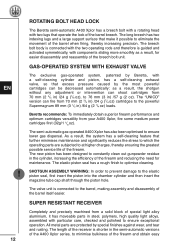
... piston hole. EN ! 12 ROTATING BOLT HEAD LOCK The Beretta semi-automatic A400 Xplor has a breech bolt with a rotating head with two lugs that make it has moveable parts in steel, polymers, high quality light alloys, assembled with particular care, checked and polished to ensure exceptional operation. As a result, the system has a self-cleaning feature that excess pressure caused...
... piston hole. EN ! 12 ROTATING BOLT HEAD LOCK The Beretta semi-automatic A400 Xplor has a breech bolt with a rotating head with two lugs that make it has moveable parts in steel, polymers, high quality light alloys, assembled with particular care, checked and polished to ensure exceptional operation. As a result, the system has a self-cleaning feature that excess pressure caused...
User Manual
Page 11
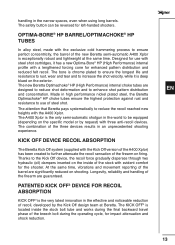
... the stock bolt tube and works during the operating cycle, for left-handed shooters. handling in an unprecedented shooting experience. The new Beretta Optimachoke® HP (High Performance) internal choke tubes are guaranteed. OPTIMA-BORE® HP BARREL/OPTIMACHOKE® HP TUBES In alloy steel, made with the A400 Xplor. The attention that Beretta pays systematically to reduce the recoil reached new heights...
... the stock bolt tube and works during the operating cycle, for left-handed shooters. handling in an unprecedented shooting experience. The new Beretta Optimachoke® HP (High Performance) internal choke tubes are guaranteed. OPTIMA-BORE® HP BARREL/OPTIMACHOKE® HP TUBES In alloy steel, made with the A400 Xplor. The attention that Beretta pays systematically to reduce the recoil reached new heights...
User Manual
Page 12
... to be used to further change the drop and cast of the stock by Beretta after firing. ACCESSORIES The Beretta A400 Xplor shotgun comes in a case that can be varied. In certain specific areas, hunting is a stainless steel plate that contains the firearm and a complete range of accessories for adjustment. WARNING: There are many countries, made possible by replacing the spacer...
... to be used to further change the drop and cast of the stock by Beretta after firing. ACCESSORIES The Beretta A400 Xplor shotgun comes in a case that can be varied. In certain specific areas, hunting is a stainless steel plate that contains the firearm and a complete range of accessories for adjustment. WARNING: There are many countries, made possible by replacing the spacer...
User Manual
Page 13
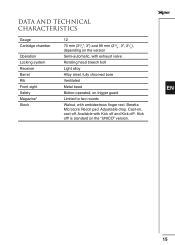
... system Receiver Barrel Rib Front sight Safety Magazine* Stock 12 70 mm (23/4", 3") and 89 mm (23/4", 3", 31/2), depending on the version Semi-automatic, with exhaust valve Rotating head breech bolt Light alloy Alloy steel, fully chromed bore Ventilated Metal bead Button-operated, on the "UNICO" version. Available with ambidextrous finger rest. Adjustable drop. Kick off . Beretta Microcore Recoil pad.
... system Receiver Barrel Rib Front sight Safety Magazine* Stock 12 70 mm (23/4", 3") and 89 mm (23/4", 3", 31/2), depending on the version Semi-automatic, with exhaust valve Rotating head breech bolt Light alloy Alloy steel, fully chromed bore Ventilated Metal bead Button-operated, on the "UNICO" version. Available with ambidextrous finger rest. Adjustable drop. Kick off . Beretta Microcore Recoil pad.

User Manual
Page 14
... the instructions in the "Disassembly" section and remove the barrel from the shotgun. • After removing the barrel, look right through the ejection port, the loading gate and the chamber. WARNING: Beretta assumes no obstructions in the chamber and bore. This is extremely important because serious injury can be used (steel or lead). OBSTRUCTION / CHOKE TUBES CONDITION CHECK Check the barrel to...
... the instructions in the "Disassembly" section and remove the barrel from the shotgun. • After removing the barrel, look right through the ejection port, the loading gate and the chamber. WARNING: Beretta assumes no obstructions in the chamber and bore. This is extremely important because serious injury can be used (steel or lead). OBSTRUCTION / CHOKE TUBES CONDITION CHECK Check the barrel to...
User Manual
Page 15
... insertion of the BASIC SAFETY RULES). CAUTION: When the release button is pressed, the breech bolt is pushed forward by the recoil spring, until it is advisable to carry out the assembly operations over a table to both parts. • Insert the barrel into the unlocked position (Fig. 7). Mount the barrel onto the stock-receiver-fore-end assembly as if it snaps...
... insertion of the BASIC SAFETY RULES). CAUTION: When the release button is pressed, the breech bolt is pushed forward by the recoil spring, until it is advisable to carry out the assembly operations over a table to both parts. • Insert the barrel into the unlocked position (Fig. 7). Mount the barrel onto the stock-receiver-fore-end assembly as if it snaps...

User Manual
Page 16
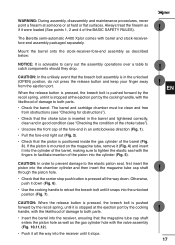
checking for use. In this occurs, the breech bolt will be kept open by pulling back the breech bolt. The hammer is cocked by the cut-off lever. WARNING: Store your fingers away from the ejection port (Fig. 17). • Keeping the breech bolt retracted 2 cm, pull the trigger to ...gas cylinder / the valve assembly and magazine tube (Fig. 13). Keep the fingers away from the ejection port, press the breech bolt release button and gently guide the breech bolt to lock (Fig. 16). WARNING: The safety can only be sure to close the breech bolt while disengaging the cut -...
checking for use. In this occurs, the breech bolt will be kept open by pulling back the breech bolt. The hammer is cocked by the cut-off lever. WARNING: Store your fingers away from the ejection port (Fig. 17). • Keeping the breech bolt retracted 2 cm, pull the trigger to ...gas cylinder / the valve assembly and magazine tube (Fig. 13). Keep the fingers away from the ejection port, press the breech bolt release button and gently guide the breech bolt to lock (Fig. 16). WARNING: The safety can only be sure to close the breech bolt while disengaging the cut -...
User Manual
Page 17
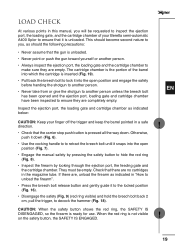
...the cartridge chamber of the barrel into which the cartridge is pressed all the way down (Fig. 6). • Use the cocking handle to to retract the breech bolt until it into the open position and engage the safety before handing the shotgun to another person. •...gun is unloaded. LOAD CHECK At various points in this manual, you , as indicated below: CAUTION: Keep your Beretta semi-automatic A400 Xplor to ensure that it to the locked position (Fig. 16). • Disengage the safety (Fig. 9) (red ring visible) and hold the breech bolt back 2 cm, pull the trigger, to decock the hammer...
...the cartridge chamber of the barrel into which the cartridge is pressed all the way down (Fig. 6). • Use the cocking handle to to retract the breech bolt until it into the open position and engage the safety before handing the shotgun to another person. •...gun is unloaded. LOAD CHECK At various points in this manual, you , as indicated below: CAUTION: Keep your Beretta semi-automatic A400 Xplor to ensure that it to the locked position (Fig. 16). • Disengage the safety (Fig. 9) (red ring visible) and hold the breech bolt back 2 cm, pull the trigger, to decock the hammer...
User Manual
Page 18
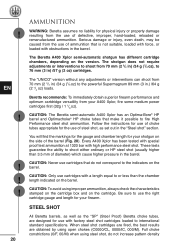
... gauge and chamber length for the use cartridges with high performance steel shot. STEEL SHOT All Beretta barrels, as well as set out in ) /57 g (2 oz) cartridges. The shotgun does not require adjustments or interventions to shoot from 70 mm (2 3/4 in) /24 g (7/8 oz) to 76 mm (3 in the "Steel shot" section. Follow the instructions for use of steel shot, as the "SP" (Steel Proof) Beretta choke tubes, are obtained by using...
... gauge and chamber length for the use cartridges with high performance steel shot. STEEL SHOT All Beretta barrels, as well as set out in ) /57 g (2 oz) cartridges. The shotgun does not require adjustments or interventions to shoot from 70 mm (2 3/4 in) /24 g (7/8 oz) to 76 mm (3 in the "Steel shot" section. Follow the instructions for use of steel shot, as the "SP" (Steel Proof) Beretta choke tubes, are obtained by using...
User Manual
Page 19
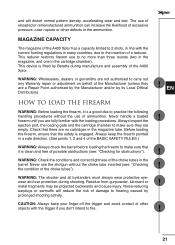
...choke tube inserted (see : "Checking for obstructions"). "Checking the condition of the A400 Xplor. MAGAZINE CAPACITY The magazine of the A400 Xplor has a capacity limited to 2 shots, in line with the current hunting regulations in a safe direction. (See points 1, 2 and 4 of the BASIC SAFETY RULES.) WARNING: Always check the barrel...Check that the safety is clean and free of a reducer. Residue from gunpowder, lubricant or metal fragments may be projected backwards and cause injury. The use the shotgun without the use to carry out any Warranty repair or adjustment on behalf of ...
...choke tube inserted (see : "Checking for obstructions"). "Checking the condition of the A400 Xplor. MAGAZINE CAPACITY The magazine of the A400 Xplor has a capacity limited to 2 shots, in line with the current hunting regulations in a safe direction. (See points 1, 2 and 4 of the BASIC SAFETY RULES.) WARNING: Always check the barrel...Check that the safety is clean and free of a reducer. Residue from gunpowder, lubricant or metal fragments may be projected backwards and cause injury. The use the shotgun without the use to carry out any Warranty repair or adjustment on behalf of ...

User Manual
Page 23
...the shotgun is unloaded (empty cartridge chamber, empty receiver, empty magazine). Always treat the shotgun as instructed in order to clean its components. • Keeping the index or middle finger of the left hand on the cocking handle, press the release button and allow the breech bolt to...;rearm at someone or at hard, flat surface, with the ejection port pointed upwards, pull forward on the breech bolt assembly, the operating rods with sleeve, the recoil spring, and the spring holder, to catch components should they drop. If it is not, push it remains open (Fig...
...the shotgun is unloaded (empty cartridge chamber, empty receiver, empty magazine). Always treat the shotgun as instructed in order to clean its components. • Keeping the index or middle finger of the left hand on the cocking handle, press the release button and allow the breech bolt to...;rearm at someone or at hard, flat surface, with the ejection port pointed upwards, pull forward on the breech bolt assembly, the operating rods with sleeve, the recoil spring, and the spring holder, to catch components should they drop. If it is not, push it remains open (Fig...

User Manual
Page 24
... the release button pushed all the way down, remove the trigger plate from the receiver using the trigger guard as a lever, first in order to be disassembled in the direction of the A400 Xplor can also shoot High Performance steel ammunitions. They can only mount Optimachoke® HP tubes. Other types of steel shot. trigger mechanism. • Engage the safety (the hammer is...
... the release button pushed all the way down, remove the trigger plate from the receiver using the trigger guard as a lever, first in order to be disassembled in the direction of the A400 Xplor can also shoot High Performance steel ammunitions. They can only mount Optimachoke® HP tubes. Other types of steel shot. trigger mechanism. • Engage the safety (the hammer is...

User Manual
Page 25
... steel shot. CAUTION: The safety can only be used (steel or lead). CHECKING THE CONDITION OF THE CHOKE TUBES • Always check the appearance and cleaning of the choke tubes before using the shotgun. • Check correct tightness in an anticlockwise direction, with the spanner provided (Fig. 38). • Remove the choke tube from the muzzle and do not replace the choke with the shotgun...
... steel shot. CAUTION: The safety can only be used (steel or lead). CHECKING THE CONDITION OF THE CHOKE TUBES • Always check the appearance and cleaning of the choke tubes before using the shotgun. • Check correct tightness in an anticlockwise direction, with the spanner provided (Fig. 38). • Remove the choke tube from the muzzle and do not replace the choke with the shotgun...

User Manual
Page 29
... proper knowledge or training. Any alterations or adjustments that the shotgun is not empty, unload it is unloaded (empty cartridge chamber, empty receiver, empty magazine). RECEIVER • Proceed as instructed in perfect working order. BREECH BOLT ASSEMBLY (Breech bolt, operating rods with sleeve, recoil spring, and piston stop). • Spray the parts and clean with Beretta Gun Oil. • Thoroughly dry with a soft...
... proper knowledge or training. Any alterations or adjustments that the shotgun is not empty, unload it is unloaded (empty cartridge chamber, empty receiver, empty magazine). RECEIVER • Proceed as instructed in perfect working order. BREECH BOLT ASSEMBLY (Breech bolt, operating rods with sleeve, recoil spring, and piston stop). • Spray the parts and clean with Beretta Gun Oil. • Thoroughly dry with a soft...

User Manual
Page 30
... ! 32 TRIGGER PLATE (Fig. 39) • Work in reverse order to assembly, taking care to ensure that the hammer is cocked, the safety is engaged and the carrier stop push button is pressed down. • Keeping the release button pressed well down, make it stops. BREECH BOLT ASSEMBLY (Fig. 35) (Breech bolt, operating rods with sleeve, recoil spring, and piston...
... ! 32 TRIGGER PLATE (Fig. 39) • Work in reverse order to assembly, taking care to ensure that the hammer is cocked, the safety is engaged and the carrier stop push button is pressed down. • Keeping the release button pressed well down, make it stops. BREECH BOLT ASSEMBLY (Fig. 35) (Breech bolt, operating rods with sleeve, recoil spring, and piston...
User Manual
Page 31
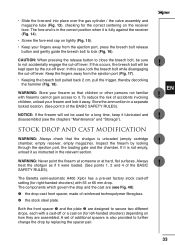
...the front spacer and the plate are assembled. EN ! ! ! ! 33 The Beretta semi-automatic A400 Xplor has a pre-set of the BASIC SAFETY RULES). STOCK DROP AND CAST MODIFICATION WARNING: Always check that children or other persons not ...replacing the spacer pair. ! Always treat the shotgun as instructed in a separate locked location. (See point 3 of reinforced technopolymer fibreglass. the stock steel plate. checking for left-handed shooters) depending on tightly (Fig. 15). • Keep your firearm and lock it lubricated and disassembled...
...the front spacer and the plate are assembled. EN ! ! ! ! 33 The Beretta semi-automatic A400 Xplor has a pre-set of the BASIC SAFETY RULES). STOCK DROP AND CAST MODIFICATION WARNING: Always check that children or other persons not ...replacing the spacer pair. ! Always treat the shotgun as instructed in a separate locked location. (See point 3 of reinforced technopolymer fibreglass. the stock steel plate. checking for left-handed shooters) depending on tightly (Fig. 15). • Keep your firearm and lock it lubricated and disassembled...

