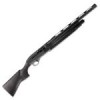
User Manual
Page 3
... to the gun, to the loading, unloading, disassembly, assembly and use of the barrel/s. EN 3 THE FOLLOWING SAFETY RULES ARE AN IMPORTANT REMINDER THAT FIREARM SAFETY IS YOUR RESPONSIBILITY. In addition to any product malfunction, property damage, physical injury or legal repercussions which change the ammunition capacity voids the manufacturer's warranty. THE USE OF OTHER MANUFACTURER'S SPARE PARTS AND ACCESSORIES COULD...
... to the gun, to the loading, unloading, disassembly, assembly and use of the barrel/s. EN 3 THE FOLLOWING SAFETY RULES ARE AN IMPORTANT REMINDER THAT FIREARM SAFETY IS YOUR RESPONSIBILITY. In addition to any product malfunction, property damage, physical injury or legal repercussions which change the ammunition capacity voids the manufacturer's warranty. THE USE OF OTHER MANUFACTURER'S SPARE PARTS AND ACCESSORIES COULD...
User Manual
Page 5
... you know and use the safety features of the particular firearm you are clean and free from obstructions. Shooting at the surface of water or at a rock or other hard surface increases the chance of ricochets or fragmentation of the bullet or shot, which can prevent use to prevent corrosion, damage to the barrel or accumulation...
... you know and use the safety features of the particular firearm you are clean and free from obstructions. Shooting at the surface of water or at a rock or other hard surface increases the chance of ricochets or fragmentation of the bullet or shot, which can prevent use to prevent corrosion, damage to the barrel or accumulation...
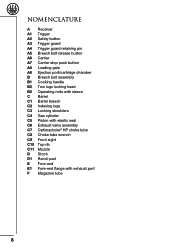
User Manual
Page 8
... B Breech bolt assembly B1 Cocking handle B2 Two lugs locking head B3 Operating rods with sleeve C Barrel C1 Barrel breech C2 Indexing lugs C3 Locking shoulders C4 Gas cylinder C5 Piston with elastic seal C6 Exhaust valve assembly C7 Optimachoke® HP choke tube C8 Choke tube wrench C9 Front sight C10 Top rib C11 Muzzle D Stock D1 Recoil pad...
... B Breech bolt assembly B1 Cocking handle B2 Two lugs locking head B3 Operating rods with sleeve C Barrel C1 Barrel breech C2 Indexing lugs C3 Locking shoulders C4 Gas cylinder C5 Piston with elastic seal C6 Exhaust valve assembly C7 Optimachoke® HP choke tube C8 Choke tube wrench C9 Front sight C10 Top rib C11 Muzzle D Stock D1 Recoil pad...
User Manual
Page 10
... then insert the magazine tube through the piston hole. This minimizes recoil of the firearm on trigger guard is connected to the barrel, making assembly and disassembly of the firearm and reducing the need for left-handed shooters. The shotgun without any adjustment or intervention can shoot cartridges from the versatile Beretta gas operated, self-cleaning system, the new 1301 Comp utilizes an...
... then insert the magazine tube through the piston hole. This minimizes recoil of the firearm on trigger guard is connected to the barrel, making assembly and disassembly of the firearm and reducing the need for left-handed shooters. The shotgun without any adjustment or intervention can shoot cartridges from the versatile Beretta gas operated, self-cleaning system, the new 1301 Comp utilizes an...
User Manual
Page 11
... technology of the Beretta barrels that transforms the special tri-alloy steel into an exceptional barrel, also due to manufacturing process that can be used to change the drop by the use of the Optimachoke® HP choke tubes. DROP AND CAST SPACERS EN Between the stock and the receiver is a technopolymer spacer and inside the stock is a stainless steel plate that...
... technology of the Beretta barrels that transforms the special tri-alloy steel into an exceptional barrel, also due to manufacturing process that can be used to change the drop by the use of the Optimachoke® HP choke tubes. DROP AND CAST SPACERS EN Between the stock and the receiver is a technopolymer spacer and inside the stock is a stainless steel plate that...
User Manual
Page 12
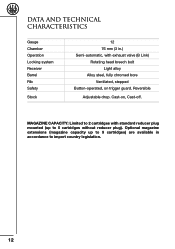
... Button-operated, on , Cast-off. Optional magazine extensions (magazine capacity up to 5 cartridges without reducer plug). DATA AND TECHNICAL CHARACTERISTICS Gauge Chamber Operation Locking system Receiver Barrel Rib EN Safety Stock 12 76 mm (3 in.) Semi-automatic, with standard reducer plug mounted (up to 9 cartridges) are available in accordance to import country legislation. 12 Cast-on trigger guard. Reversible Adjustable drop.
... Button-operated, on , Cast-off. Optional magazine extensions (magazine capacity up to 5 cartridges without reducer plug). DATA AND TECHNICAL CHARACTERISTICS Gauge Chamber Operation Locking system Receiver Barrel Rib EN Safety Stock 12 76 mm (3 in.) Semi-automatic, with standard reducer plug mounted (up to 9 cartridges) are available in accordance to import country legislation. 12 Cast-on trigger guard. Reversible Adjustable drop.
User Manual
Page 13
... barrel, following procedure should be used (steel or lead). EN CHECKING THE CONDITION OF THE CHOKE TUBES • Always check the appearance and cleaning of the choke tubes before using the shotgun. • Check correct tightness in the barrel with the wrench provided. • Never use choke tubes that the choke tube inserted is appropriate for the intended use and shot type to completely assembling...
... barrel, following procedure should be used (steel or lead). EN CHECKING THE CONDITION OF THE CHOKE TUBES • Always check the appearance and cleaning of the choke tubes before using the shotgun. • Check correct tightness in the barrel with the wrench provided. • Never use choke tubes that the choke tube inserted is appropriate for the intended use and shot type to completely assembling...
User Manual
Page 14
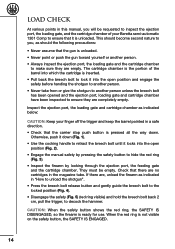
... is ready for use. EN LOAD CHECK At various points in this manual, you , as indicated in "How to unload the shotgun". • Press the breech bolt release button and gently guide the breech bolt to the locked position (Fig. 4). • Disengage the safety (Fig. 5) (red ring visible) and hold the breech bolt back 2 cm, pull the trigger, to make sure...
... is ready for use. EN LOAD CHECK At various points in this manual, you , as indicated in "How to unload the shotgun". • Press the breech bolt release button and gently guide the breech bolt to the locked position (Fig. 4). • Disengage the safety (Fig. 5) (red ring visible) and hold the breech bolt back 2 cm, pull the trigger, to make sure...
User Manual
Page 15
... Beretta 1301 Comp does not require adjustments or interventions to shoot from 70 mm (2 3/4 in) /24 g (7/8 oz), to 76 mm (3 in many countries, due to the indicators on the cartridge. CAUTION: Never use cartridges that do not increase pattern density and will find the markings for the gauge and chamber length for your firearm. STEEL SHOT All Beretta barrels...
... Beretta 1301 Comp does not require adjustments or interventions to shoot from 70 mm (2 3/4 in) /24 g (7/8 oz), to 76 mm (3 in many countries, due to the indicators on the cartridge. CAUTION: Never use cartridges that do not increase pattern density and will find the markings for the gauge and chamber length for your firearm. STEEL SHOT All Beretta barrels...
User Manual
Page 17
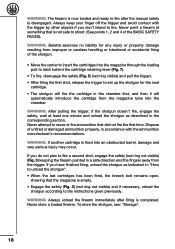
... and guide the breech bolt to make sure they are no way a substitute for use. When the safety button shows the red ring, the SAFETY IS DISENGAGED (Fig. 5), so the firearm is in no cartridges in a safe direction. (See points 1, 2 and 4 of other objects with the trigger if you are fully familiar with the hammer in the barrel...
... and guide the breech bolt to make sure they are no way a substitute for use. When the safety button shows the red ring, the SAFETY IS DISENGAGED (Fig. 5), so the firearm is in no cartridges in a safe direction. (See points 1, 2 and 4 of other objects with the trigger if you are fully familiar with the hammer in the barrel...
User Manual
Page 18
... the instructions given previously. Never store a loaded firearm. Dispose of the shotgun. • Move the carrier to insert the cartridges into the magazine through the loading port to latch behind the cartridge retaining lever (Fig. 7). • To fire, disengage the safety (Fig. 5) (red ring visible) and pull the trigger. • After firing the first shot, release the trigger to set...
... the instructions given previously. Never store a loaded firearm. Dispose of the shotgun. • Move the carrier to insert the cartridges into the magazine through the loading port to latch behind the cartridge retaining lever (Fig. 7). • To fire, disengage the safety (Fig. 5) (red ring visible) and pull the trigger. • After firing the first shot, release the trigger to set...
User Manual
Page 20
.... BREECH BOLT ASSEMBLY (Breech bolt, operating rods with sleeve, the recoil spring, and The valve device is decocked. NOTICE: NEVER STRIP the spring of the BASIC SAFETY RULES.) NOTICE: It is unloaded (empty cartridge chamber, empty receiver, empty magazine). If necessary, contact a competent gunsmith. Check that the hammer is self-cleaning and requires no maintenance. Always treat the shotgun as instructed in...
.... BREECH BOLT ASSEMBLY (Breech bolt, operating rods with sleeve, the recoil spring, and The valve device is decocked. NOTICE: NEVER STRIP the spring of the BASIC SAFETY RULES.) NOTICE: It is unloaded (empty cartridge chamber, empty receiver, empty magazine). If necessary, contact a competent gunsmith. Check that the hammer is self-cleaning and requires no maintenance. Always treat the shotgun as instructed in...
User Manual
Page 21
...). • Keeping the release button pushed all the way down, remove the trigger plate from the receiver (Fig. 15). EN 21 TRIGGER PLATE NOTICE: The trigger plate only needs to be disassembled in order to force the breech bolt out from the receiver using the trigger guard as a lever, first in the direction of the barrel and then outward (Fig...
...). • Keeping the release button pushed all the way down, remove the trigger plate from the receiver (Fig. 15). EN 21 TRIGGER PLATE NOTICE: The trigger plate only needs to be disassembled in order to force the breech bolt out from the receiver using the trigger guard as a lever, first in the direction of the barrel and then outward (Fig...
User Manual
Page 22
... protection and are designed to withstand the use and shot type to the barrel. NOTICE: The Optima-Bore® HP barrel of Fabbrica d'Armi Pietro Beretta S.p.A. CHECKING THE CONDITION OF THE CHOKE TUBES • Always check the appearance and cleaning of steel shot. Other types of interchangeable Beretta choke tubes are registered trademarks of the 1301 Comp can also shoot High Performance...
... protection and are designed to withstand the use and shot type to the barrel. NOTICE: The Optima-Bore® HP barrel of Fabbrica d'Armi Pietro Beretta S.p.A. CHECKING THE CONDITION OF THE CHOKE TUBES • Always check the appearance and cleaning of steel shot. Other types of interchangeable Beretta choke tubes are registered trademarks of the 1301 Comp can also shoot High Performance...
User Manual
Page 23
...; Remove the choke tube from the muzzle and do not replace the choke with the shotgun loaded even with Beretta Gun Oil. CAUTION: Never look directly through the barrel from the barrel. When the safety button shows the red ring, the SAFETY IS DISENGAGED, so the firearm is cocked by pulling back the breech bolt. INSERTION OF CHOKE TUBE CAUTION: Always check that the hammer...
...; Remove the choke tube from the muzzle and do not replace the choke with the shotgun loaded even with Beretta Gun Oil. CAUTION: Never look directly through the barrel from the barrel. When the safety button shows the red ring, the SAFETY IS DISENGAGED, so the firearm is cocked by pulling back the breech bolt. INSERTION OF CHOKE TUBE CAUTION: Always check that the hammer...
User Manual
Page 25
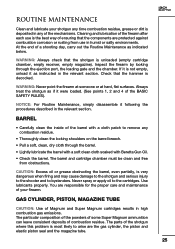
... problem is very dangerous when firing and may cause damage to the shotgun and serious injury to the shooter and to the cartridges. WARNING: Always check that the hammer is unloaded (empty cartridge chamber, empty receiver, empty magazine). Inspect the firearm by looking through the barrel. • Lightly lubricate the barrel with a soft clean cloth soaked with Beretta Gun...
... problem is very dangerous when firing and may cause damage to the shotgun and serious injury to the shooter and to the cartridges. WARNING: Always check that the hammer is unloaded (empty cartridge chamber, empty receiver, empty magazine). Inspect the firearm by looking through the barrel. • Lightly lubricate the barrel with a soft clean cloth soaked with Beretta Gun...
User Manual
Page 27
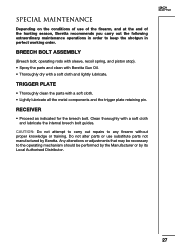
... carry out repairs to keep the shotgun in order to any firearm without proper knowledge or training. Any alterations or adjustments that may be necessary to the operating mechanism should be performed by the Manufacturer or by Beretta. BREECH BOLT ASSEMBLY (Breech bolt, operating rods with sleeve, recoil spring, and piston stop). • Spray the parts and clean with Beretta Gun Oil. •...
... carry out repairs to keep the shotgun in order to any firearm without proper knowledge or training. Any alterations or adjustments that may be necessary to the operating mechanism should be performed by the Manufacturer or by Beretta. BREECH BOLT ASSEMBLY (Breech bolt, operating rods with sleeve, recoil spring, and piston stop). • Spray the parts and clean with Beretta Gun Oil. •...
User Manual
Page 28
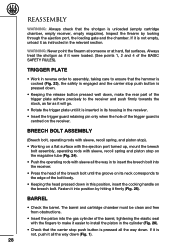
Always treat the shotgun as instructed in the relevant section. If it is pressed down. • Keeping the release button pressed well down . TRIGGER PLATE • Work in reverse order to assembly, taking care to ensure that the carrier stop on the receiver. The barrel and cartridge chamber must be clean and free from obstructions. • Insert the...
Always treat the shotgun as instructed in the relevant section. If it is pressed down. • Keeping the release button pressed well down . TRIGGER PLATE • Work in reverse order to assembly, taking care to ensure that the carrier stop on the receiver. The barrel and cartridge chamber must be clean and free from obstructions. • Insert the...
User Manual
Page 29
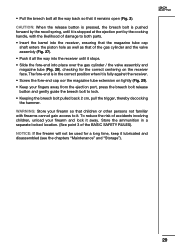
... disassembled (see the chapters "Maintenance" and "Storage"). NOTICE: If the firearm will not be used for the correct centering on tightly (Fig. 29). • Keep your fingers away from the ejection port, press the breech bolt release button and gently guide the breech bolt to lock. • Keeping the breech bolt pulled back 2 cm, pull the trigger, thereby decocking the hammer...
... disassembled (see the chapters "Maintenance" and "Storage"). NOTICE: If the firearm will not be used for the correct centering on tightly (Fig. 29). • Keep your fingers away from the ejection port, press the breech bolt release button and gently guide the breech bolt to lock. • Keeping the breech bolt pulled back 2 cm, pull the trigger, thereby decocking the hammer...

User Manual
Page 30
... The Beretta semi-automatic 1301 Comp has a pre-set of additional spacers is not empty, unload it as if it were loaded. (See points 1, 2 and 4 of the BASIC SAFETY RULES). A set factory stock cast-off or a cast-on (for right-handed shooters) with these instructions can ...stock steel plate. The left -handed shooters) depending on how they are (see Fig. 30): Πthe drop-cast front spacer, made of the front spacer and plate must be synchronised. Inspect the firearm by the initials SX. REPLACING THE STOCK DROP AND CAST SPACERS NOTICE: The right-hand cast...
... The Beretta semi-automatic 1301 Comp has a pre-set of additional spacers is not empty, unload it as if it were loaded. (See points 1, 2 and 4 of the BASIC SAFETY RULES). A set factory stock cast-off or a cast-on (for right-handed shooters) with these instructions can ...stock steel plate. The left -handed shooters) depending on how they are (see Fig. 30): Πthe drop-cast front spacer, made of the front spacer and plate must be synchronised. Inspect the firearm by the initials SX. REPLACING THE STOCK DROP AND CAST SPACERS NOTICE: The right-hand cast...


