
Monitor Reference Guide
Page 1
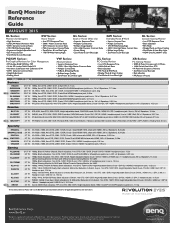
...; Hardware Calibration with Calibration S/W • 20M:1 Dynamic Contrast Ratio • Height Adjustment • Shading Hood VW Series: Absolute Classic • Superior Response Time • 3,000:1 Ultra High Native Contrast Ratio • Multiple Connectivity • M-Book & Reading Modes • Brilliant Image Quality • ZeroFlicker & Low Blue Light XL Series: PC Gaming Monitor • 1ms GTG Response Time • 144Hz Refresh Rate • Black eQualizer • FPS Mode & RTS Mode • Display Mode & Smart...
...; Hardware Calibration with Calibration S/W • 20M:1 Dynamic Contrast Ratio • Height Adjustment • Shading Hood VW Series: Absolute Classic • Superior Response Time • 3,000:1 Ultra High Native Contrast Ratio • Multiple Connectivity • M-Book & Reading Modes • Brilliant Image Quality • ZeroFlicker & Low Blue Light XL Series: PC Gaming Monitor • 1ms GTG Response Time • 144Hz Refresh Rate • Black eQualizer • FPS Mode & RTS Mode • Display Mode & Smart...
Screen Resolution Guide
Page 1
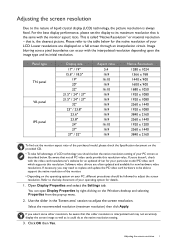
... replace and update the PC video card hardware to be aware that is always fixed. Image blurring across pixel boundaries can open Display Properties by right-clicking on your PC screen as it could do at the native resolution setting. 3. If necessary, you may not accurately display the screen image as well as described below for new hardware video resolutions. For the best display performance, please set the display to adjust the screen resolution. Software video drivers are displayed...
... replace and update the PC video card hardware to be aware that is always fixed. Image blurring across pixel boundaries can open Display Properties by right-clicking on your PC screen as it could do at the native resolution setting. 3. If necessary, you may not accurately display the screen image as well as described below for new hardware video resolutions. For the best display performance, please set the display to adjust the screen resolution. Software video drivers are displayed...
Screen Resolution Guide
Page 2
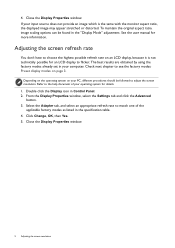
... the Display Properties window, select the Settings tab and click the Advanced button. 3. Select the Adapter tab, and select an appropriate refresh rate to the help document of the applicable factory modes as listed in the "Display Mode" adjustment. Double click the Display icon in your input source does not provide an image which is not technically possible for more information. Check next chapter to flicker. Adjusting the screen refresh rate You don...
... the Display Properties window, select the Settings tab and click the Advanced button. 3. Select the Adapter tab, and select an appropriate refresh rate to the help document of the applicable factory modes as listed in the "Display Mode" adjustment. Double click the Display icon in your input source does not provide an image which is not technically possible for more information. Check next chapter to flicker. Adjusting the screen refresh rate You don...

Screen Resolution Guide
Page 5
... the video card cannot display or normally display with the native resolution of 1366x768, please adjust the resolution to the following: • For the first time using this situation by altering an automatic setting or by manually changing the phase setting and the pixel frequency from graphic cards which do not correspond with the resolution 1360x768, the default Display Mode is not, however, an error. IPS panel Incoming display mode (Input timing) Panel type IPS (AHVA) panel Display size...
... the video card cannot display or normally display with the native resolution of 1366x768, please adjust the resolution to the following: • For the first time using this situation by altering an automatic setting or by manually changing the phase setting and the pixel frequency from graphic cards which do not correspond with the resolution 1360x768, the default Display Mode is not, however, an error. IPS panel Incoming display mode (Input timing) Panel type IPS (AHVA) panel Display size...
XR3501 User Manual
Page 2
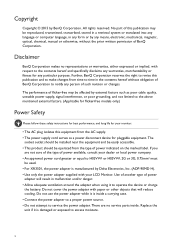
... or charge the battery. Disclaimer BenQ Corporation makes no service parts inside a carrying case. • Connect the power adapter to a proper power source. • Do not attempt to the contents hereof and specifically disclaims any particular purpose. Replace the unit if it to the above mentioned external factors. (Applicable for flicker-free models only.) Power Safety Please follow these safety instructions for best performance, and long life...
... or charge the battery. Disclaimer BenQ Corporation makes no service parts inside a carrying case. • Connect the power adapter to a proper power source. • Do not attempt to the contents hereof and specifically disclaims any particular purpose. Replace the unit if it to the above mentioned external factors. (Applicable for flicker-free models only.) Power Safety Please follow these safety instructions for best performance, and long life...
XR3501 User Manual
Page 4
... Windows 8 (8.1) system 16 How to install driver on Windows 7 system 17 How to adjust your monitor 18 The control panel...18 Basic menu operation ...19 Initial setup for playing games at 144 Hz 21 Customizing the hot keys...22 Adjusting display mode ...22 Choosing an appropriate picture mode 22 Video source selection in PIP/PBP mode 23 Navigating the main menu ...24 Display menu ...25 Picture menu ...27 Picture Advanced menu ...29 Audio menu ...32 System menu ...33 Troubleshooting...
... Windows 8 (8.1) system 16 How to install driver on Windows 7 system 17 How to adjust your monitor 18 The control panel...18 Basic menu operation ...19 Initial setup for playing games at 144 Hz 21 Customizing the hot keys...22 Adjusting display mode ...22 Choosing an appropriate picture mode 22 Video source selection in PIP/PBP mode 23 Navigating the main menu ...24 Display menu ...25 Picture menu ...27 Picture Advanced menu ...29 Audio menu ...32 System menu ...33 Troubleshooting...
XR3501 User Manual
Page 9
... plug-in or turn it off before continuing. Please be placed on page 19. The location and available input and output jacks may vary depending on the power to the monitor until instructed to do so. • The following cable connection. Connect the other end of the monitor and change the setting from the monitor stand and base. After the monitor is powered on the OSD menu of the cable...
... plug-in or turn it off before continuing. Please be placed on page 19. The location and available input and output jacks may vary depending on the power to the monitor until instructed to do so. • The following cable connection. Connect the other end of the monitor and change the setting from the monitor stand and base. After the monitor is powered on the OSD menu of the cable...

XR3501 User Manual
Page 10
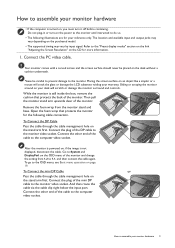
... on the stand arm first. Connect the power adapter to lock it into place as illustrated. Install the back cover. Connect the plug of a digital output device. And then route the cable via the cable clip right below the input port. Do not connect the other end of the back cover against the holes to the monitor. Connect the audio cable. Connect the other end to the HDMI port on the product supplied for...
... on the stand arm first. Connect the power adapter to lock it into place as illustrated. Install the back cover. Connect the plug of a digital output device. And then route the cable via the cable clip right below the input port. Do not connect the other end of the back cover against the holes to the monitor. Connect the audio cable. Connect the other end to the HDMI port on the product supplied for...

XR3501 User Manual
Page 11
... monitor. Make sure to and turn it over and place it on the power. Connect-to perform this procedure by 2 people. Plug the other light sources. 7. Turn on page 13 to the power adapter. Turn on the monitor by 2 people. Failure to do so may need to the personnels and the monitor itself. Remove the foam wrap from your BenQ Monitor on the computer too, and follow the instructions...
... monitor. Make sure to and turn it over and place it on the power. Connect-to perform this procedure by 2 people. Plug the other light sources. 7. Turn on page 13 to the power adapter. Turn on the monitor by 2 people. Failure to do so may need to the personnels and the monitor itself. Remove the foam wrap from your BenQ Monitor on the computer too, and follow the instructions...
XR3501 User Manual
Page 12
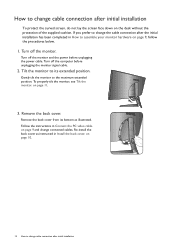
... the monitor signal cable. 2. on page 9 and change cable connection after the initial installation has been completed in Connect the PC video cable. on page 10. 12 How to change connected cables. Follow the instructions in How to change cable connection after initial installation To protect the curved screen, do not lay the screen face down on page 9, follow the procedures below. 1. Turn off the computer before unplugging the power cable. Remove the back cover. Turn...
... the monitor signal cable. 2. on page 9 and change cable connection after the initial installation has been completed in Connect the PC video cable. on page 10. 12 How to change connected cables. Follow the instructions in How to change cable connection after initial installation To protect the curved screen, do not lay the screen face down on page 9, follow the procedures below. 1. Turn off the computer before unplugging the power cable. Remove the back cover. Turn...
XR3501 User Manual
Page 13
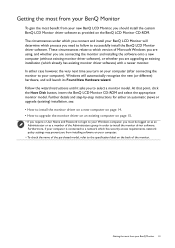
... you connect and install your BenQ Monitor 13 Further details and step-by-step instructions for either case however, the very next time you turn on the back of the monitor. Getting the most benefit from your new BenQ LCD Monitor, you should install the custom BenQ LCD Monitor driver software as a member of the purchased model, refer to select a monitor model. At that point, click the Have Disk button...
... you connect and install your BenQ Monitor 13 Further details and step-by-step instructions for either case however, the very next time you turn on the back of the monitor. Getting the most benefit from your new BenQ LCD Monitor, you should install the custom BenQ LCD Monitor driver software as a member of the purchased model, refer to select a monitor model. At that point, click the Have Disk button...

XR3501 User Manual
Page 14
... 9. When Windows starts, it . If you should instead be following these instructions. How to install the monitor driver on a new computer This instruction details the procedure for selecting and installing the BenQ LCD Monitor driver software on a new computer which the BenQ LCD Monitor is only suitable for a computer which has never been used before, and for which has never had another monitor connected to it (and has monitor driver software installed), you...
... 9. When Windows starts, it . If you should instead be following these instructions. How to install the monitor driver on a new computer This instruction details the procedure for selecting and installing the BenQ LCD Monitor driver software on a new computer which the BenQ LCD Monitor is only suitable for a computer which has never been used before, and for which has never had another monitor connected to it (and has monitor driver software installed), you...
XR3501 User Manual
Page 15
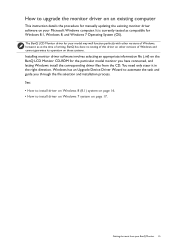
... letting Windows install the corresponding driver files from your Microsoft Windows computer. Windows has an Upgrade Device Driver Wizard to install driver on Windows 7 system on page 17. The BenQ LCD Monitor driver for your model may well function perfectly with other versions of Windows, however, as compatible for Windows 8.1, Windows 8, and Windows 7 Operating System (OS). How to upgrade the monitor driver on an existing computer This instruction details the procedure for manually updating the existing monitor driver software...
... letting Windows install the corresponding driver files from your Microsoft Windows computer. Windows has an Upgrade Device Driver Wizard to install driver on Windows 7 system on page 17. The BenQ LCD Monitor driver for your model may well function perfectly with other versions of Windows, however, as compatible for Windows 8.1, Windows 8, and Windows 7 Operating System (OS). How to upgrade the monitor driver on an existing computer This instruction details the procedure for manually updating the existing monitor driver software...
XR3501 User Manual
Page 16
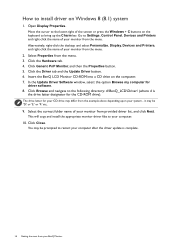
... Update Driver Software window, select the option Browse my computer for the CD-ROM drive). Go to Settings, Control Panel, Devices and Printers and right-click the name of the screen or press the Windows + C buttons on the keyboard to the lower-right of your computer. 10. How to your monitor from the menu. 3. This will copy and install the appropriate monitor driver files to install driver...
... Update Driver Software window, select the option Browse my computer for the CD-ROM drive). Go to Settings, Control Panel, Devices and Printers and right-click the name of the screen or press the Windows + C buttons on the keyboard to the lower-right of your computer. 10. How to your monitor from the menu. 3. This will copy and install the appropriate monitor driver files to install driver...

XR3501 User Manual
Page 19
... for details on the menu options. How to adjust your monitor. 1 2 4 3 1. Basic menu operation All OSD (On Screen Display) menus can use the OSD menu to adjust all the settings on your monitor 19 No. You can be accessed by the control keys. See Navigating the main menu on page 24 for particular functions. 3. OSD in hot key menu OSD icon in main menu Function Input hot key The key...
... for details on the menu options. How to adjust your monitor. 1 2 4 3 1. Basic menu operation All OSD (On Screen Display) menus can use the OSD menu to adjust all the settings on your monitor 19 No. You can be accessed by the control keys. See Navigating the main menu on page 24 for particular functions. 3. OSD in hot key menu OSD icon in main menu Function Input hot key The key...

XR3501 User Manual
Page 22
... picture modes. The refresh rate in your game supports 144 Hz. 2. See Black eQualizer on page 27. 4. Adjusting display mode To display images of aspect ratio other than 21:9 and size other than the panel size of the control keys to bring up the hot key menu. Choosing an appropriate picture mode Your monitor provides various picture modes that the setup is properly connected to adjust your game, and change . 4. See Brightness on page 30. Adjust the brightness...
... picture modes. The refresh rate in your game supports 144 Hz. 2. See Black eQualizer on page 27. 4. Adjusting display mode To display images of aspect ratio other than 21:9 and size other than the panel size of the control keys to bring up the hot key menu. Choosing an appropriate picture mode Your monitor provides various picture modes that the setup is properly connected to adjust your game, and change . 4. See Brightness on page 30. Adjust the brightness...

XR3501 User Manual
Page 34
... custom key 2. 2 Custom Key Sets the function to be disabled. The language options displayed on your OSD may differ from being accidentally changed. When this function is activated, the OSD controls and hotkey operations will be accessed by custom key 3. 3 • Picture Mode • Display Mode • Brightness • Contrast • Black eQualizer • Color Vibrance • Low Blue Light • Volume 34 Navigating the main menu Item OSD Settings Function Range Language Sets the OSD menu language.
... custom key 2. 2 Custom Key Sets the function to be disabled. The language options displayed on your OSD may differ from being accidentally changed. When this function is activated, the OSD controls and hotkey operations will be accessed by custom key 3. 3 • Picture Mode • Display Mode • Brightness • Contrast • Black eQualizer • Color Vibrance • Low Blue Light • Volume 34 Navigating the main menu Item OSD Settings Function Range Language Sets the OSD menu language.
XR3501 User Manual
Page 35
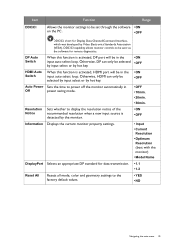
... by Video Electronics Standards Association (VESA). DP Auto Switch When this function is activated, DP port will be sent via the software for remote diagnostics. Item DDC/CI Function Range Allows the monitor settings to be set through the software • ON on the PC. • OFF DDC/CI, short for data transmission. • 1.1 • 1.2 Reset All Resets all mode, color and geometry settings to the factory default values...
... by Video Electronics Standards Association (VESA). DP Auto Switch When this function is activated, DP port will be sent via the software for remote diagnostics. Item DDC/CI Function Range Allows the monitor settings to be set through the software • ON on the PC. • OFF DDC/CI, short for data transmission. • 1.1 • 1.2 Reset All Resets all mode, color and geometry settings to the factory default values...
XR3501 User Manual
Page 36
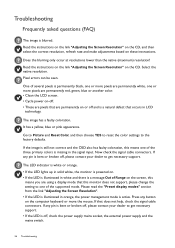
... pixels are permanently red, green, blue or another color. • Clean the LCD screen. • Cycle power on the computer keyboard or move the mouse. Select the native resolution. Go to Picture and Reset Color, and then choose YES to reset the color settings to one of the supported mode. Please read the "Preset display modes" section from the link "Adjusting the Screen Resolution". • If the LED is missing in the signal input. The image has a faulty coloration...
... pixels are permanently red, green, blue or another color. • Clean the LCD screen. • Cycle power on the computer keyboard or move the mouse. Select the native resolution. Go to Picture and Reset Color, and then choose YES to reset the color settings to one of the supported mode. Please read the "Preset display modes" section from the link "Adjusting the Screen Resolution". • If the LED is missing in the signal input. The image has a faulty coloration...
XR3501 User Manual
Page 37
... select the correct resolution, refresh rate and make adjustments based on these instructions. To unlock the OSD controls when it is connected to set a proper aspect ratio for details. Troubleshooting 37 Images from the static image displayed is still distorted. If your problems remain after checking this manual, please contact your computer and monitor go into a low power "sleep" mode when not actively in one direction. Faint shadow from different input sources may be muted...
... select the correct resolution, refresh rate and make adjustments based on these instructions. To unlock the OSD controls when it is connected to set a proper aspect ratio for details. Troubleshooting 37 Images from the static image displayed is still distorted. If your problems remain after checking this manual, please contact your computer and monitor go into a low power "sleep" mode when not actively in one direction. Faint shadow from different input sources may be muted...


