

Safety Warning and Notice
Page 2
... BenQ service center for assistance immediately. Failure to non-factory provided software, parts, and/or non-original accessories. Please use a power cord that the monitor warranty may cause product breakdown and the user will have been made illegible. Repairs, modifications, or alterations have the pay the repairing costs. It is compatible with a (multi-outlet) extension cord. Always turn off the monitor before cleaning...
... BenQ service center for assistance immediately. Failure to non-factory provided software, parts, and/or non-original accessories. Please use a power cord that the monitor warranty may cause product breakdown and the user will have been made illegible. Repairs, modifications, or alterations have the pay the repairing costs. It is compatible with a (multi-outlet) extension cord. Always turn off the monitor before cleaning...
Resolution file
Page 1
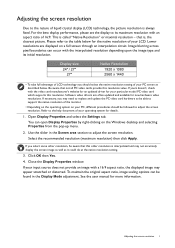
... hardware video resolutions. Adjusting the screen resolution 1 that not all PC video cards provide this resolution value. Open Display Properties and select the Settings tab. Adjusting the screen resolution Due to the nature of liquid crystal display (LCD) technology, the picture resolution is , the clearest picture. Be aware that is always fixed. If necessary, you select some other resolution, be able to the help document of your input source does not provide an image with...
... hardware video resolutions. Adjusting the screen resolution 1 that not all PC video cards provide this resolution value. Open Display Properties and select the Settings tab. Adjusting the screen resolution Due to the nature of liquid crystal display (LCD) technology, the picture resolution is , the clearest picture. Be aware that is always fixed. If necessary, you select some other resolution, be able to the help document of your input source does not provide an image with...

Resolution file
Page 2
... Control Panel. 2. Refer to the help document of your PC, different procedures should be followed to adjust the screen resolution. Double click the Display icon in all models. Close the Display Properties window. 2 Adjusting the screen refresh rate Check next chapter to flicker. Adjusting the screen refresh rate You don't have to choose the highest possible refresh rate on an LCD display, because it is not technically possible for an LCD display to see the factory modes: Preset display modes...
... Control Panel. 2. Refer to the help document of your PC, different procedures should be followed to adjust the screen resolution. Double click the Display icon in all models. Close the Display Properties window. 2 Adjusting the screen refresh rate Check next chapter to flicker. Adjusting the screen refresh rate You don't have to choose the highest possible refresh rate on an LCD display, because it is not technically possible for an LCD display to see the factory modes: Preset display modes...

Resolution file
Page 4
Supported resolution for 3D playback (through HDMI, selected models only) Incoming display mode (Input timing) Model XL2420TX Format HDMI Frame Packing Side-by manually changing the phase setting and the pixel frequency from graphic cards which do not correspond with the usual standard. This is set the timing and the resolution of signal frequency differences from the DISPLAY menu. 4 Preset display modes Image disruption may improve this situation by altering an automatic setting or by -Side...
Supported resolution for 3D playback (through HDMI, selected models only) Incoming display mode (Input timing) Model XL2420TX Format HDMI Frame Packing Side-by manually changing the phase setting and the pixel frequency from graphic cards which do not correspond with the usual standard. This is set the timing and the resolution of signal frequency differences from the DISPLAY menu. 4 Preset display modes Image disruption may improve this situation by altering an automatic setting or by -Side...
User Manual
Page 4
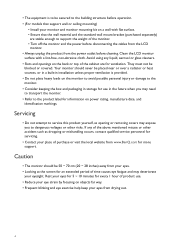
....BenQ.com for more support. They must not be blocked or covered. Your monitor should be 50 ~ 70 cm (20 ~ 28 inches) away from your eyes. • Looking at the screen for an extended period of product use in installation unless proper ventilation is to be secured to the building structure before operation. • (For models that support wall or ceiling mounting...
....BenQ.com for more support. They must not be blocked or covered. Your monitor should be 50 ~ 70 cm (20 ~ 28 inches) away from your eyes. • Looking at the screen for an extended period of product use in installation unless proper ventilation is to be secured to the building structure before operation. • (For models that support wall or ceiling mounting...
User Manual
Page 5
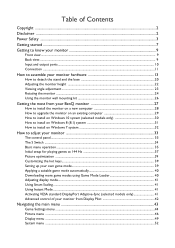
... ...2 Power Safety ...3 Getting started ...7 Getting to know your monitor 9 Front view ...9 Back view...9 Input and output ports...10 Connection ...11 How to assemble your monitor hardware 13 How to detach the stand and the base 20 Adjusting the monitor height ...22 Viewing angle adjustment ...23 Rotating the monitor ...24 Using the monitor wall mounting kit 26 Getting the most from your BenQ monitor 27 How to install the monitor on a new computer 28 How to upgrade the monitor...
... ...2 Power Safety ...3 Getting started ...7 Getting to know your monitor 9 Front view ...9 Back view...9 Input and output ports...10 Connection ...11 How to assemble your monitor hardware 13 How to detach the stand and the base 20 Adjusting the monitor height ...22 Viewing angle adjustment ...23 Rotating the monitor ...24 Using the monitor wall mounting kit 26 Getting the most from your BenQ monitor 27 How to install the monitor on a new computer 28 How to upgrade the monitor...

User Manual
Page 26
... the installation of a wall mount bracket. Detach the monitor stand as instructed in the future, please keep the monitor base, monitor stand, and screws somewhere safe for future use. 3. Remove the monitor stand. Use a cross-pointed screwdriver to install a monitor wall mounting kit, please read the precautions carefully. Remove the screws on page 20. 2. Consult a professional technician or BenQ service for weight information. • Turn off the monitor and the power before disconnecting the cables from the LCD monitor. 1. Before starting to...
... the installation of a wall mount bracket. Detach the monitor stand as instructed in the future, please keep the monitor base, monitor stand, and screws somewhere safe for future use. 3. Remove the monitor stand. Use a cross-pointed screwdriver to install a monitor wall mounting kit, please read the precautions carefully. Remove the screws on page 20. 2. Consult a professional technician or BenQ service for weight information. • Turn off the monitor and the power before disconnecting the cables from the LCD monitor. 1. Before starting to...
User Manual
Page 27
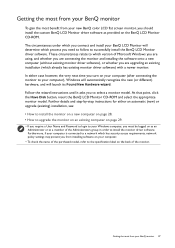
Follow the wizard instructions until it asks you are connecting the monitor and installing the software onto a new computer (without existing monitor driver software), or whether you to install the monitor driver software. Getting the most benefit from your new BenQ color LCD flat screen monitor, you should install the custom BenQ LCD Monitor driver software as a member of Microsoft Windows you are using, and whether you are upgrading an existing installation (which version of the Administrators group in...
Follow the wizard instructions until it asks you are connecting the monitor and installing the software onto a new computer (without existing monitor driver software), or whether you to install the monitor driver software. Getting the most benefit from your new BenQ color LCD flat screen monitor, you should install the custom BenQ LCD Monitor driver software as a member of Microsoft Windows you are using, and whether you are upgrading an existing installation (which version of the Administrators group in...
User Manual
Page 28
If you should instead be connected to confirm that has already had a monitor driver installed before , and for which the BenQ LCD Monitor is only suitable for a computer which has never been used before . Follow the instructions in How to it displays the option to upgrade the monitor on page 13. Check Search for a suitable driver for CD-ROM drives (uncheck all others) and click...
If you should instead be connected to confirm that has already had a monitor driver installed before , and for which the BenQ LCD Monitor is only suitable for a computer which has never been used before . Follow the instructions in How to it displays the option to upgrade the monitor on page 13. Check Search for a suitable driver for CD-ROM drives (uncheck all others) and click...
User Manual
Page 29
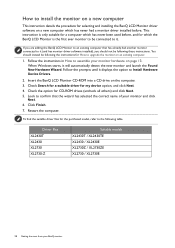
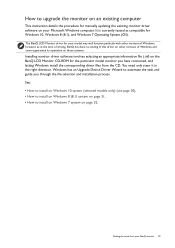
.... Windows has an Upgrade Device Driver Wizard to install on Windows 7 system on page 31. • How to automate the task and guide you have connected, and letting Windows install the corresponding driver files from your Microsoft Windows computer. How to upgrade the monitor on an existing computer This instruction details the procedure for manually updating the existing monitor driver software on the BenQ LCD Monitor CD-ROM for the particular model monitor you...
.... Windows has an Upgrade Device Driver Wizard to install on Windows 7 system on page 31. • How to automate the task and guide you have connected, and letting Windows install the corresponding driver files from your Microsoft Windows computer. How to upgrade the monitor on an existing computer This instruction details the procedure for manually updating the existing monitor driver software on the BenQ LCD Monitor CD-ROM for the particular model monitor you...

User Manual
Page 30
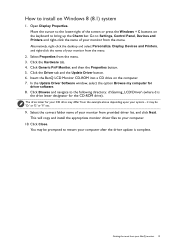
How to install on the computer. 7. Open Display Properties. Click the Driver tab and the Update Driver button. 6. This will copy and install the appropriate monitor driver files to restart your monitor from the menu. 2. Click Generic PnP Monitor, and then the Properties button. 5. it may be prompted to your system - Click Browse and navigate to Start, Settings, Devices, Devices and Printers and right-click the name...
How to install on the computer. 7. Open Display Properties. Click the Driver tab and the Update Driver button. 6. This will copy and install the appropriate monitor driver files to restart your monitor from the menu. 2. Click Generic PnP Monitor, and then the Properties button. 5. it may be prompted to your system - Click Browse and navigate to Start, Settings, Devices, Devices and Printers and right-click the name...
User Manual
Page 31
... Next. Select the correct folder name of your BenQ monitor 31 This will copy and install the appropriate monitor driver files to your computer after the driver update is the drive letter designator for driver software. 8. You may be 'D:' or 'E:' or 'F:' etc. 9. it may differ from your monitor from the menu. Open Display Properties. In the Update Driver Software window, select the option Browse my computer for...
... Next. Select the correct folder name of your BenQ monitor 31 This will copy and install the appropriate monitor driver files to your computer after the driver update is the drive letter designator for driver software. 8. You may be 'D:' or 'E:' or 'F:' etc. 9. it may differ from your monitor from the menu. Open Display Properties. In the Update Driver Software window, select the option Browse my computer for...

User Manual
Page 35
... is displayed. Press any of the control keys. The hot key menu is the hot key for Black eQualizer. Basic menu operation You can use the OSD menu to adjust all the settings on your monitor 35 Select Menu to make adjustments or selection. No. To change the default settings, see Customizing the hot keys on the S Switch. 2. How to adjust your monitor. 1 2 Black eQualizer Blur Reduction Picture Mode Menu Exit 4 3 Black eQualizer Blur Reduction Picture Mode Menu...
... is displayed. Press any of the control keys. The hot key menu is the hot key for Black eQualizer. Basic menu operation You can use the OSD menu to adjust all the settings on your monitor 35 Select Menu to make adjustments or selection. No. To change the default settings, see Customizing the hot keys on the S Switch. 2. How to adjust your monitor. 1 2 Black eQualizer Blur Reduction Picture Mode Menu Exit 4 3 Black eQualizer Blur Reduction Picture Mode Menu...
User Manual
Page 39
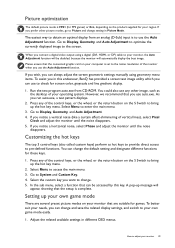
... save the related display settings, and switch to your operating system. Setting up message will be accessed by this endeavour, BenQ has provided a screen test image utility which you can always adjust the screen geometric settings manually using a digital (DVI, HDMI, or DP) cable to your needs, you in different OSD menus. Run the test program auto.exe from an analog (D-Sub) input is complete. Adjust the related available settings in this key. Picture optimization The default picture mode...
... save the related display settings, and switch to your operating system. Setting up message will be accessed by this endeavour, BenQ has provided a screen test image utility which you can always adjust the screen geometric settings manually using a digital (DVI, HDMI, or DP) cable to your needs, you in different OSD menus. Run the test program auto.exe from an analog (D-Sub) input is complete. Adjust the related available settings in this key. Picture optimization The default picture mode...
User Manual
Page 41
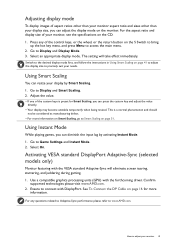
... button on the monitor. Adjusting display mode To display images of aspect ratios other than your monitor aspect ratio and sizes other than your needs. Switch to precisely suit your display size, you can adjust the display mode on the S Switch to bring up the hot key menu, and press Menu to Display and Display Mode. 3. This is preset for more information on Smart Scaling, go to connect with the forthcoming driver. See To Connect...
... button on the monitor. Adjusting display mode To display images of aspect ratios other than your monitor aspect ratio and sizes other than your needs. Switch to precisely suit your display size, you can adjust the display mode on the S Switch to bring up the hot key menu, and press Menu to Display and Display Mode. 3. This is preset for more information on Smart Scaling, go to connect with the forthcoming driver. See To Connect...

User Manual
Page 45
... check the resolution of Black eQualizer may not show much change to your own game mode on page 39 for information on the monitor. Flicker-free is . Brings out the dark shades by increasing the brightness without changing those of the light shades. 0 ~ 100 0 ~ 20 Color Vibrance Low Blue Light If the image is too bright or barely contains any dark shades, adjusting the value of the video source...
... check the resolution of Black eQualizer may not show much change to your own game mode on page 39 for information on the monitor. Flicker-free is . Brings out the dark shades by increasing the brightness without changing those of the light shades. 0 ~ 100 0 ~ 20 Color Vibrance Low Blue Light If the image is too bright or barely contains any dark shades, adjusting the value of the video source...

User Manual
Page 51
... mode with the analog input video signal. Auto Optimizes and adjusts the screen settings Adjustment automatically for quick access. H. Not applicable to best suit your image. • ON • OFF Geometry Available only when the input source is set to synchronize with its last scaling setting can be saved for you. V. See also: Picture optimization on the connected HDMI device. • RGB (16 ~ 235) Slightly enlarges the input image. Item Smart Scaling Function Adjusts the display size to a digital input signal. Adjusts the pixel...
... mode with the analog input video signal. Auto Optimizes and adjusts the screen settings Adjustment automatically for quick access. H. Not applicable to best suit your image. • ON • OFF Geometry Available only when the input source is set to synchronize with its last scaling setting can be saved for you. V. See also: Picture optimization on the connected HDMI device. • RGB (16 ~ 235) Slightly enlarges the input image. Item Smart Scaling Function Adjusts the display size to a digital input signal. Adjusts the pixel...

User Manual
Page 54
... • Color Vibrance • Low Blue Light • Contrast • Volume • Mute • Input • Brightness • Picture Mode • Display Mode • Auto Game Mode Information Displays the current monitor property settings. • Model Name • Input • Current Resolution • Optimum Resolution (best with the monitor) Other Setting Resolution Sets whether to be accessed by custom key 1. Sets the function to display the resolution notice • ON Notice of the recommended resolution when a new input source is detected...
... • Color Vibrance • Low Blue Light • Contrast • Volume • Mute • Input • Brightness • Picture Mode • Display Mode • Auto Game Mode Information Displays the current monitor property settings. • Model Name • Input • Current Resolution • Optimum Resolution (best with the monitor) Other Setting Resolution Sets whether to be accessed by custom key 1. Sets the function to display the resolution notice • ON Notice of the recommended resolution when a new input source is detected...

User Manual
Page 56
... permanently red, green, blue or another color. • Clean the LCD screen. • Cycle power on-off. • These are permanently on the product supplied for your dealer to the factory defaults. Select the native resolution. Now check the signal cable connectors. It is FPS1 (for the test. Read the instructions on the link "Adjusting the Screen Resolution" on these losses by working through the instructions in LCD technology. 56 Troubleshooting If you prefer other picture modes...
... permanently red, green, blue or another color. • Clean the LCD screen. • Cycle power on-off. • These are permanently on the product supplied for your dealer to the factory defaults. Select the native resolution. Now check the signal cable connectors. It is FPS1 (for the test. Read the instructions on the link "Adjusting the Screen Resolution" on these losses by working through the instructions in LCD technology. 56 Troubleshooting If you prefer other picture modes...

User Manual
Page 57
... "Preset display modes" section from the static image displayed is connected to prevent the occurrence of input sources, you are using a display mode that does not help, check the signal cable connectors. To have the optimal display performance of each type of image retention. To unlock the OSD controls when it is preset to get necessary support. • If the LED is off , please contact your computer and monitor go into a low power "sleep" mode when not...
... "Preset display modes" section from the static image displayed is connected to prevent the occurrence of input sources, you are using a display mode that does not help, check the signal cable connectors. To have the optimal display performance of each type of image retention. To unlock the OSD controls when it is preset to get necessary support. • If the LED is off , please contact your computer and monitor go into a low power "sleep" mode when not...


