
XL Series User Manual
Page 7
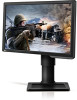
Getting started 7 USB Cable Video Cable: D-Sub Video Cable: DVI-D Dual Link Video Cable: HDMI (Optional accessory, sold separately) Video Cable: DP (Optional accessory, sold separately) NVIDIA 3D Vision Kit (XL2420TX only) Protective cover Headphone hook (Pre-installed, can be ...
Getting started 7 USB Cable Video Cable: D-Sub Video Cable: DVI-D Dual Link Video Cable: HDMI (Optional accessory, sold separately) Video Cable: DP (Optional accessory, sold separately) NVIDIA 3D Vision Kit (XL2420TX only) Protective cover Headphone hook (Pre-installed, can be ...

XL Series User Manual
Page 9
D-Sub socket 19 13. Headphone jack 16 18. USB port x 2 (downstream; 15 14 connecting to USB devices) 17. HDMI socket x 2 15. USB port (downstream; connecting to USB devices) 13 19. VESA mount release button Getting to the PC) 17 16. DVI-D socket 14. S Switch socket 11. 10 1112 10. connecting 18 to know your monitor 9 USB port (upstream; DisplayPort socket 12.
D-Sub socket 19 13. Headphone jack 16 18. USB port x 2 (downstream; 15 14 connecting to USB devices) 17. HDMI socket x 2 15. USB port (downstream; connecting to USB devices) 13 19. VESA mount release button Getting to the PC) 17 16. DVI-D socket 14. S Switch socket 11. 10 1112 10. connecting 18 to know your monitor 9 USB port (upstream; DisplayPort socket 12.
XL Series User Manual
Page 13
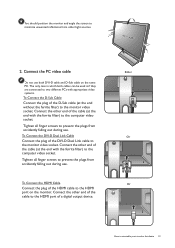
... with appropriate video systems. To Connect the D-Sub Cable Connect the plug of the D-Sub cable (at the end without the ferrite filter) to the HDMI port of the cable (at the end with the ferrite filter) to prevent the plugs from accidently falling out during use . Tighten all finger screws... only case in which both DVI-D cable and D-Sub cable on the monitor. Tighten all finger screws to the computer video socket. To Connect the HDMI Cable Connect the plug of the cable to the monitor video socket. Connect the PC video cable Do not use both cables can be used...
... with appropriate video systems. To Connect the D-Sub Cable Connect the plug of the D-Sub cable (at the end without the ferrite filter) to the HDMI port of the cable (at the end with the ferrite filter) to prevent the plugs from accidently falling out during use . Tighten all finger screws... only case in which both DVI-D cable and D-Sub cable on the monitor. Tighten all finger screws to the computer video socket. To Connect the HDMI Cable Connect the plug of the cable to the monitor video socket. Connect the PC video cable Do not use both cables can be used...

XL Series User Manual
Page 14
Better quality: HDMI / DVI-D / DP - Connect USB devices. Connect USB devices via the upstream USB port at the back). See picture on the monitor. You may vary depending ...
Better quality: HDMI / DVI-D / DP - Connect USB devices. Connect USB devices via the upstream USB port at the back). See picture on the monitor. You may vary depending ...

XL Series User Manual
Page 30
... Dual Link cable. Playing 3D content Follow the instruction manuals of your BenQ monitor To improve the performance of your monitor Your monitor supports playing three-dimensional (3D) content transferred through HDMI cable (version 1.3 or above) as needed. If you want to ...programs that keep the sensor from receiving signals from your 3D accessories to Picture and NVIDIA® 3D LightBoost™. System requirements • BenQ LCD Monitor XL2420T / XL2420TX / XL2720T • Compatible 3D glasses • PC with Microsoft Windows Vista, Windows 7, or Windows 8 Operating...
... Dual Link cable. Playing 3D content Follow the instruction manuals of your BenQ monitor To improve the performance of your monitor Your monitor supports playing three-dimensional (3D) content transferred through HDMI cable (version 1.3 or above) as needed. If you want to ...programs that keep the sensor from receiving signals from your 3D accessories to Picture and NVIDIA® 3D LightBoost™. System requirements • BenQ LCD Monitor XL2420T / XL2420TX / XL2720T • Compatible 3D glasses • PC with Microsoft Windows Vista, Windows 7, or Windows 8 Operating...

XL Series User Manual
Page 38
... run auto.exe, a test pattern displays. 2. Select the custom key you can always adjust the screen geometric settings manually using a digital (DVI, HDMI, or DP) cable to adjust your own game mode easily. 1. Setting up your own game mode There are : 38 How to your monitor, the... Auto Adjustment function will be disabled, because the monitor will appear, showing that can be accessed by this endeavour, BenQ has provided a screen test image utility which is designed for screen color, grayscale and line gradient display. 1. Settings that the setup is complete...
... run auto.exe, a test pattern displays. 2. Select the custom key you can always adjust the screen geometric settings manually using a digital (DVI, HDMI, or DP) cable to adjust your own game mode easily. 1. Setting up your own game mode There are : 38 How to your monitor, the... Auto Adjustment function will be disabled, because the monitor will appear, showing that can be accessed by this endeavour, BenQ has provided a screen test image utility which is designed for screen color, grayscale and line gradient display. 1. Settings that the setup is complete...

XL Series User Manual
Page 46
... the menu, select . Display Picture Picture Advanced Save Settings Audio System Picture Mode Senseye Demo Dynamic Contrast Over-scan Display Mode Smart Scaling Color Format HDMI 3D Format Standard Movie Photo sRGB Eco FPS1 FPS2 RTS Mode: FPS1 1.
... the menu, select . Display Picture Picture Advanced Save Settings Audio System Picture Mode Senseye Demo Dynamic Contrast Over-scan Display Mode Smart Scaling Color Format HDMI 3D Format Standard Movie Photo sRGB Eco FPS1 FPS2 RTS Mode: FPS1 1.

XL Series User Manual
Page 47
... playing FPS (First Person Shooting) games. Range • ON • OFF 0 to fill the screen. Gamer1 Applies customized display settings. Aspect The input image is HDMI, DP, or D-Sub (VGA converted from Picture Mode.
... playing FPS (First Person Shooting) games. Range • ON • OFF 0 to fill the screen. Gamer1 Applies customized display settings. Aspect The input image is HDMI, DP, or D-Sub (VGA converted from Picture Mode.
XL Series User Manual
Page 48
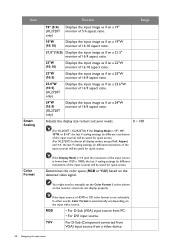
....6"W (16:9) (XL2720T only) 24"W (16:9) (XL2720T only) Displays the input image as if on a 24"W monitor of 16:9 aspect ratio. If the input source is HDMI or DP, color format is automatically set the Color Format if colors shown on the monitor screen do not display properly. RGB • For D-Sub...
....6"W (16:9) (XL2720T only) 24"W (16:9) (XL2720T only) Displays the input image as if on a 24"W monitor of 16:9 aspect ratio. If the input source is HDMI or DP, color format is automatically set the Color Format if colors shown on the monitor screen do not display properly. RGB • For D-Sub...

XL Series User Manual
Page 49
Item Function Range HDMI 3D Format (XL2420TX only) HDMI RGB PC Range Selects an appropriate format to focus on certain content, e.g. Scaling Scales the highlight area. 0 ~ 100 0 ~ 100 0 ~ 100 Navigating the main menu 49 ... • Top Bottom Determines the range of the highlight area. Select an option that • RGB (0 ~ 255) matches the RGB range setting on the connected HDMI device. • RGB (16 ~ 235) Smart Focus This feature provides a highlight area to play 3D content. Position Adjusts the vertical position of color scales.
Item Function Range HDMI 3D Format (XL2420TX only) HDMI RGB PC Range Selects an appropriate format to focus on certain content, e.g. Scaling Scales the highlight area. 0 ~ 100 0 ~ 100 0 ~ 100 Navigating the main menu 49 ... • Top Bottom Determines the range of the highlight area. Select an option that • RGB (0 ~ 255) matches the RGB range setting on the connected HDMI device. • RGB (16 ~ 235) Smart Focus This feature provides a highlight area to play 3D content. Position Adjusts the vertical position of color scales.
XL Series User Manual
Page 52
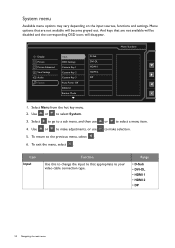
..., select . 6. Item Input Function Use this to change the input to that are not available will disappear. Range • D-Sub • DVI-DL • HDMI 1 • HDMI 2 • DP 52 Navigating the main menu Select to go to your video cable connection type. or to make adjustments, or use 4. And keys that... Picture Advanced Save Settings Audio System Input OSD Settings Custom Key 1 Custom Key 2 Custom Key 3 Auto Power Off DDC/CI Emitter Mode D-Sub DVI-DL HDMI 1 HDMI 2 DP Mode: Standard 1.
..., select . 6. Item Input Function Use this to change the input to that are not available will disappear. Range • D-Sub • DVI-DL • HDMI 1 • HDMI 2 • DP 52 Navigating the main menu Select to go to your video cable connection type. or to make adjustments, or use 4. And keys that... Picture Advanced Save Settings Audio System Input OSD Settings Custom Key 1 Custom Key 2 Custom Key 3 Auto Power Off DDC/CI Emitter Mode D-Sub DVI-DL HDMI 1 HDMI 2 DP Mode: Standard 1.

XL Series User Manual
Page 54
... • Mute • Input • Black eQualizer Auto Power Sets the time to power off the monitor automatically in the Switch input auto select loop. HDMI Auto When this function is detected by the monitor. • ON • OFF 54 Navigating the main menu Otherwise... by custom key 2. DDC/CI capability allows monitor controls to display the resolution notice of the Notice recommended resolution when a new input source is activated, HDMI port will be accessed by custom key 1. DDC/CI Allows the monitor settings to be set through the software • ON on the PC. •...
... • Mute • Input • Black eQualizer Auto Power Sets the time to power off the monitor automatically in the Switch input auto select loop. HDMI Auto When this function is detected by the monitor. • ON • OFF 54 Navigating the main menu Otherwise... by custom key 2. DDC/CI capability allows monitor controls to display the resolution notice of the Notice recommended resolution when a new input source is activated, HDMI port will be accessed by custom key 1. DDC/CI Allows the monitor settings to be set through the software • ON on the PC. •...