
XL Series User Manual
Page 4
... the monitor height ...20 Rotating the monitor ...21 Viewing angle adjustment ...22 Using the monitor wall mounting kit 23 Getting the most from your BenQ monitor 24 How to install the monitor on a new computer 25 How to upgrade the monitor on an existing computer 26 How to install on Windows 8 system...
... the monitor height ...20 Rotating the monitor ...21 Viewing angle adjustment ...22 Using the monitor wall mounting kit 23 Getting the most from your BenQ monitor 24 How to install the monitor on a new computer 25 How to upgrade the monitor on an existing computer 26 How to install on Windows 8 system...

XL Series User Manual
Page 16
Turn on the computer too, and follow the instructions in Getting the most from your BenQ monitor on page 24 to assemble your computer's power management function. Turn on the monitor by pressing the power button on , to prevent overheating, do not cover the monitor with the supplied protective cover or obstruct the ventilation holes. 16 How to install the monitor software. To extend the service life of the product, we recommend that you use your monitor hardware When the monitor is powered on the monitor.
Turn on the computer too, and follow the instructions in Getting the most from your BenQ monitor on page 24 to assemble your computer's power management function. Turn on the monitor by pressing the power button on , to prevent overheating, do not cover the monitor with the supplied protective cover or obstruct the ventilation holes. 16 How to install the monitor software. To extend the service life of the product, we recommend that you use your monitor hardware When the monitor is powered on the monitor.
XL Series User Manual
Page 24
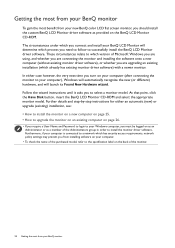
... you from installing software on your computer. • To check the name of the purchased model, refer to the specification label on the BenQ LCD Monitor CD-ROM. These circumstances relate to select a monitor model. Follow the wizard instructions until it asks you are upgrading an existing installation...must be logged on as an Administrator or as provided on the back of the monitor. 24 Getting the most benefit from your new BenQ color LCD flat screen monitor, you should install the custom BenQ LCD Monitor driver software as a member of Microsoft Windows you are using, and whether you...
... you from installing software on your computer. • To check the name of the purchased model, refer to the specification label on the BenQ LCD Monitor CD-ROM. These circumstances relate to select a monitor model. Follow the wizard instructions until it asks you are upgrading an existing installation...must be logged on as an Administrator or as provided on the back of the monitor. 24 Getting the most benefit from your new BenQ color LCD flat screen monitor, you should install the custom BenQ LCD Monitor driver software as a member of Microsoft Windows you are using, and whether you...

XL Series User Manual
Page 25
... Monitor is only suitable for a computer which has never been used before . Insert the BenQ LCD Monitor CD-ROM into a CD drive on page 24. You should not be following the instructions for my device option, and click Next. 4. How to install the monitor on a new computer This ... and launch the Found New Hardware Wizard. Follow the prompts until it . Look to Install Hardware Device Drivers. 2. Getting the most from your BenQ monitor 25 Click Finish. 7. This instruction is the first ever monitor to be connected to it displays the option to confirm that the wizard has...
... Monitor is only suitable for a computer which has never been used before . Insert the BenQ LCD Monitor CD-ROM into a CD drive on page 24. You should not be following the instructions for my device option, and click Next. 4. How to install the monitor on a new computer This ... and launch the Found New Hardware Wizard. Follow the prompts until it . Look to Install Hardware Device Drivers. 2. Getting the most from your BenQ monitor 25 Click Finish. 7. This instruction is the first ever monitor to be connected to it displays the option to confirm that the wizard has...
XL Series User Manual
Page 48
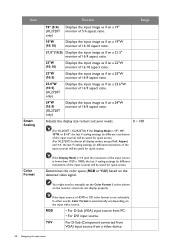
...video device. 48 Navigating the main menu Displays the input image as if on a 23"W monitor of 16:9 aspect ratio. 23.6"W (16:9) (XL2720T only) 24"W (16:9) (XL2720T only) Displays the input image as if on the detected video signal. Color Format If the Display Mode is 1:1 (and the resolution ...be saved for quick access. Range 0 ~ 100 (For XL2420T / XL2420TX) If the Display Mode is automatically set the Color Format if colors shown on a 24"W monitor of the input source) will be saved for quick access. (For XL2720T) In almost all display modes except Full, Aspect, and 1:1, the last 9 ...
...video device. 48 Navigating the main menu Displays the input image as if on a 23"W monitor of 16:9 aspect ratio. 23.6"W (16:9) (XL2720T only) 24"W (16:9) (XL2720T only) Displays the input image as if on the detected video signal. Color Format If the Display Mode is 1:1 (and the resolution ...be saved for quick access. Range 0 ~ 100 (For XL2420T / XL2420TX) If the Display Mode is automatically set the Color Format if colors shown on a 24"W monitor of the input source) will be saved for quick access. (For XL2720T) In almost all display modes except Full, Aspect, and 1:1, the last 9 ...

