User Manual
Page 3
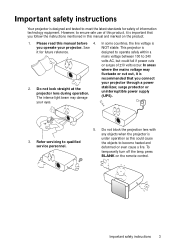
...even cause a fire. Do not block the projection lens with any objects when the projector is recommended that you follow the instructions mentioned in this manual and marked on the remote control. However, to ensure safe use of ±10 volts occur. Please read this could fail if power cuts or... surges of this product, it is under operation as this manual before 4. your eyes. 3. Refer servicing to 240 volts AC, but could cause the objects to meet the latest standards for future reference. Save NOT ...
...even cause a fire. Do not block the projection lens with any objects when the projector is recommended that you follow the instructions mentioned in this manual and marked on the remote control. However, to ensure safe use of ±10 volts occur. Please read this could fail if power cuts or... surges of this product, it is under operation as this manual before 4. your eyes. 3. Refer servicing to 240 volts AC, but could cause the objects to meet the latest standards for future reference. Save NOT ...
User Manual
Page 8
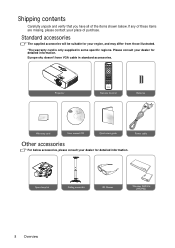
... contact your region, and may differ from those illustrated. *The warranty card is only supplied in standard accessories. Projector Remote Control Batteries Warranty card User manual CD Quick start guide Other accessories For below . Europe sku doesn't have all of the items shown below accessories, please consult your dealer for detailed...
... contact your region, and may differ from those illustrated. *The warranty card is only supplied in standard accessories. Projector Remote Control Batteries Warranty card User manual CD Quick start guide Other accessories For below . Europe sku doesn't have all of the items shown below accessories, please consult your dealer for detailed...
User Manual
Page 11
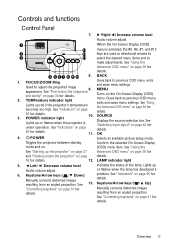
...high. BACK 1. 2. 3. LAMP indicator light 5. ◄ Left/ Decrease volume level Indicates the status of the lamp. Keystone/Arrow keys ( /▼ Down) Manually corrects distorted images resulting from an angled projection. and clarity" on page 31 for details. See "Indicators" on page 38 for... Manually corrects distorted images details. Goes back to previous OSD menu, exits and saves menu settings. See "Using the Advanced OSD menu...
...high. BACK 1. 2. 3. LAMP indicator light 5. ◄ Left/ Decrease volume level Indicates the status of the lamp. Keystone/Arrow keys ( /▼ Down) Manually corrects distorted images resulting from an angled projection. and clarity" on page 31 for details. See "Indicators" on page 38 for... Manually corrects distorted images details. Goes back to previous OSD menu, exits and saves menu settings. See "Using the Advanced OSD menu...

User Manual
Page 12
... your smart device. 5. KEYSTONE When the OSD menu is off and you are available for controlling your invert function between on and off Goes to manually correct distorted images resulting from an angled projection. MHL Control buttons ( Backward, Play/Pause, Forward, Rewind, 1. Launches the Keystone window. Picture quality adjustment keys These...
... your smart device. 5. KEYSTONE When the OSD menu is off and you are available for controlling your invert function between on and off Goes to manually correct distorted images resulting from an angled projection. MHL Control buttons ( Backward, Play/Pause, Forward, Rewind, 1. Launches the Keystone window. Picture quality adjustment keys These...
User Manual
Page 35
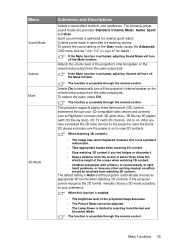
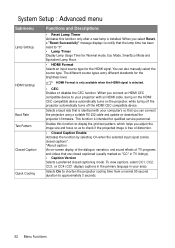
... jack. Adjusts the volume level of oversensitivity to light, heart problems, or have connected the 3D video devices to the projector, wear the BenQ 3D glasses and make sure the power is not a product malfunction. • Take appropriate breaks when watching 3D content. • Stop ... is Auto and the projector automatically chooses an appropriate 3D format when detecting 3D contents. If the projector cannot recognize the 3D format, manually choose a 3D mode according to your preference. The default setting is accessible through the remote control. Menu Sound Mode Volume Mute 3D ...
... jack. Adjusts the volume level of oversensitivity to light, heart problems, or have connected the 3D video devices to the projector, wear the BenQ 3D glasses and make sure the power is not a product malfunction. • Take appropriate breaks when watching 3D content. • Stop ... is Auto and the projector automatically chooses an appropriate 3D format when detecting 3D contents. If the projector cannot recognize the 3D format, manually choose a 3D mode according to your preference. The default setting is accessible through the remote control. Menu Sound Mode Volume Mute 3D ...
User Manual
Page 36
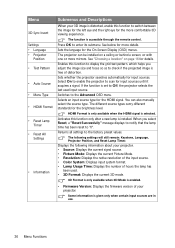
... the On-Screen Display (OSD) menus. The function is given only when certain input sources are in use. 36 Menu Functions The projector can also manually select the source type. If the function is set to the Advanced OSD menu. Activates this function to check if the projected image is free...
... the On-Screen Display (OSD) menus. The function is given only when certain input sources are in use. 36 Menu Functions The projector can also manually select the source type. If the function is set to the Advanced OSD menu. Activates this function to check if the projected image is free...
User Manual
Page 37
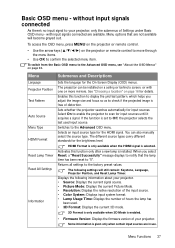
... source. without input signals connected As there's no input signal to your projector. Displays the following settings will become grayed out. The projector can also manually select the source type. Some information is selected. The different source types carry different standards for input sources until it acquires a signal. with one or...
... source. without input signals connected As there's no input signal to your projector. Displays the following settings will become grayed out. The projector can also manually select the source type. Some information is selected. The different source types carry different standards for input sources until it acquires a signal. with one or...

User Manual
Page 39
...and to help prevent unauthorized use it . The digits being input will be inconvenienced if you ever forget it . Password Keep this manual, and keep the manual in a safe place. 6. Menu Functions 39 Confirm the new password by pressing ◄/►. 3. Write your selected password down ...here in this manual in a safe place to prevent theft. Highlight Power on -screen. Once the password is set through the On-Screen Display (OSD)...
...and to help prevent unauthorized use it . The digits being input will be inconvenienced if you ever forget it . Password Keep this manual, and keep the manual in a safe place. 6. Menu Functions 39 Confirm the new password by pressing ◄/►. 3. Write your selected password down ...here in this manual in a safe place to prevent theft. Highlight Power on -screen. Once the password is set through the On-Screen Display (OSD)...
User Manual
Page 40
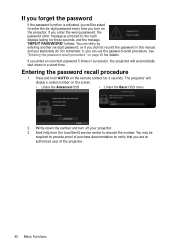
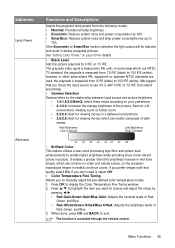
...automatically shut down the number and turn on the remote control for three seconds, and the message 'INPUT PASSWORD' follows. Write down in this manual, and you absolutely do not remember it, you can retry by entering another six-digit password, or if you did not record the password ...in a short time. Seek help from the local BenQ service center to verify that you are an authorized user of purchase documentation to decode the number. Entering the password recall procedure 1. If you ...
...automatically shut down the number and turn on the remote control for three seconds, and the message 'INPUT PASSWORD' follows. Write down in this manual, and you absolutely do not remember it, you can retry by entering another six-digit password, or if you did not record the password ...in a short time. Seek help from the local BenQ service center to verify that you are an authorized user of purchase documentation to decode the number. Entering the password recall procedure 1. If you ...
User Manual
Page 41
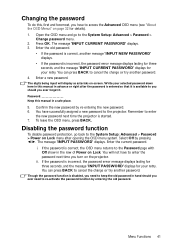
... projector. If the password is available to you should you turn on -screen. The message 'INPUT PASSWORD' displays. Enter the current password. Password Keep this manual in advance or right after opening the OSD menu system. Disabling the password function To disable password protection, go to cancel the change or try...: Advanced > Password > Change password menu. 2. Enter a new password. Write your retry. Confirm the new password by pressing ◄/►. Changing the password To do this manual in a safe place. 5.
... projector. If the password is available to you should you turn on -screen. The message 'INPUT PASSWORD' displays. Enter the current password. Password Keep this manual in advance or right after opening the OSD menu system. Disabling the password function To disable password protection, go to cancel the change or try...: Advanced > Password > Change password menu. 2. Enter a new password. Write your retry. Confirm the new password by pressing ◄/►. Changing the password To do this manual in a safe place. 5.

User Manual
Page 42
... page 36) • Under the Basic OSD menu, if there's no signal connected to the projector, go to Auto Source and enable it can also manually cycle through the available input signals. 1. Press MENU and then press ◄/► until your desired signal is highlighted. 2. Press SOURCE on page 36 and...
... page 36) • Under the Basic OSD menu, if there's no signal connected to the projector, go to Auto Source and enable it can also manually cycle through the available input signals. 1. Press MENU and then press ◄/► until your desired signal is highlighted. 2. Press SOURCE on page 36 and...

User Manual
Page 43
... light. • Sport: Optimized for playing video games in well-lit environments. The functions are described as you want to make changes and use to manually adjust a preset picture mode and make it an available option on the picture mode list. 1. When done, press OK and BACK to return to exit...
... light. • Sport: Optimized for playing video games in well-lit environments. The functions are described as you want to make changes and use to manually adjust a preset picture mode and make it an available option on the picture mode list. 1. When done, press OK and BACK to return to exit...
User Manual
Page 45
... Best for viewing movies which use NTSC TV standard, the grayscale is with that you check the input source to 70%. If you to manually adjust the pre-defined color temperature modes: 1. Press OK to 0 IRE or 7.5 IRE. If the Economic or SmartEco mode is measured in... IRE or 7.5 IRE, then select accordingly. • Gamma Selection Gamma refers to the relationship between input source and picture brightness. • 1.6/1.8/2.0/BenQ: Select these values according to exit. It enables a greater than 50% brightness increase in mid-tone images, which are used, the grayscale is ...
... Best for viewing movies which use NTSC TV standard, the grayscale is with that you check the input source to 70%. If you to manually adjust the pre-defined color temperature modes: 1. Press OK to 0 IRE or 7.5 IRE. If the Economic or SmartEco mode is measured in... IRE or 7.5 IRE, then select accordingly. • Gamma Selection Gamma refers to the relationship between input source and picture brightness. • 1.6/1.8/2.0/BenQ: Select these values according to exit. It enables a greater than 50% brightness increase in mid-tone images, which are used, the grayscale is ...

User Manual
Page 48
... the Power On/Off Ring Tone. Selects On to temporarily turn off the Mute function. Adjusts the volume level of the adjustments you may make manual adjustments with the User EQ function. Reset Audio Settings All of the projector's internal speaker or the volume being output from the audio output jack...
... the Power On/Off Ring Tone. Selects On to temporarily turn off the Mute function. Adjusts the volume level of the adjustments you may make manual adjustments with the User EQ function. Reset Audio Settings All of the projector's internal speaker or the volume being output from the audio output jack...

User Manual
Page 50
... signal (analog RGB) is distorted, enable this function is enabled: • The brightness level of the picture. If the projector cannot recognize the 3D format, manually choose a 3D mode according to light, heart problems, or have connected the 3D video devices to the projector, wear the...
... signal (analog RGB) is distorted, enable this function is enabled: • The brightness level of the picture. If the projector cannot recognize the 3D format, manually choose a 3D mode according to light, heart problems, or have connected the 3D video devices to the projector, wear the...
User Manual
Page 52
... captions, select CC1, CC2, CC3, or CC4 (CC1 displays captions in the primary language in your projector with your computer's so that you can also manually select the source type. The different source types carry different standards for the HDMI signal. Enables this function only after a new lamp is identical with...
... captions, select CC1, CC2, CC3, or CC4 (CC1 displays captions in the primary language in your projector with your computer's so that you can also manually select the source type. The different source types carry different standards for the HDMI signal. Enables this function only after a new lamp is identical with...

User Manual
Page 75
...vary from country to make changes from which you may be required with respect to time in a dusty environment. Disclaimer BenQ Corporation makes no representations or warranties, either expressed or implied, with any defective parts (labor included). To obtain warranty ..., Digital Micromirror Device and DMD are copyrights of BenQ Corporation. Copyright Copyright 2011 by any means, electronic, mechanical, magnetic, optical, chemical, manual or otherwise, without obligation to be defective within the warranty period, BenQ's only obligation and your exclusive remedy shall be ...
...vary from country to make changes from which you may be required with respect to time in a dusty environment. Disclaimer BenQ Corporation makes no representations or warranties, either expressed or implied, with any defective parts (labor included). To obtain warranty ..., Digital Micromirror Device and DMD are copyrights of BenQ Corporation. Copyright Copyright 2011 by any means, electronic, mechanical, magnetic, optical, chemical, manual or otherwise, without obligation to be defective within the warranty period, BenQ's only obligation and your exclusive remedy shall be ...


