User Manual
Page 2
... projected image size 17 Connection 18 HDMI connection 19 Smart devices connection 20 Component Video connection 22 Video connection 23 Computer/PC connection 24 Connecting video source devices........25 Playing sound through the projector..26 Operation 27 Starting up the projector 27 Adjusting the projected image 30 Menu Functions .......... 32 About the OSD Menus 32 Using the Basic OSD menu 34 Using the Advanced OSD menu..........38 Securing the projector 39 Utilizing the password function ...........39 Switching input signal 42 Picture menu 43 Audio Setup menu 48 Display...
... projected image size 17 Connection 18 HDMI connection 19 Smart devices connection 20 Component Video connection 22 Video connection 23 Computer/PC connection 24 Connecting video source devices........25 Playing sound through the projector..26 Operation 27 Starting up the projector 27 Adjusting the projected image 30 Menu Functions .......... 32 About the OSD Menus 32 Using the Basic OSD menu 34 Using the Advanced OSD menu..........38 Securing the projector 39 Utilizing the password function ...........39 Switching input signal 42 Picture menu 43 Audio Setup menu 48 Display...
User Manual
Page 6
... and safely installed. This product is capable of restraining the projector should its attachment to have the projector serviced. 18. You can purchase a BenQ projector ceiling mount kit from the power supply's wall socket and call BenQ to your projector on the projector and the base of the wrong gauge or length screws. This will perform the secondary role of displaying inverted images for mounting the projector and ensure...
... and safely installed. This product is capable of restraining the projector should its attachment to have the projector serviced. 18. You can purchase a BenQ projector ceiling mount kit from the power supply's wall socket and call BenQ to your projector on the projector and the base of the wrong gauge or length screws. This will perform the secondary role of displaying inverted images for mounting the projector and ensure...
User Manual
Page 7
... the images through HDMI. • Built-in speaker(s) Built-in speaker(s) providing mixed mono audio when an audio input is connected. • SmartEco SmartEco™ technology saves lamp power consumption up to 70% depending on the content brightness level when SmartEco mode is selected. • SmartEco™ starts your dynamic power saving The SmartEco™ technology offers a new way of operating the projector lamp system...
... the images through HDMI. • Built-in speaker(s) Built-in speaker(s) providing mixed mono audio when an audio input is connected. • SmartEco SmartEco™ technology saves lamp power consumption up to 70% depending on the content brightness level when SmartEco mode is selected. • SmartEco™ starts your dynamic power saving The SmartEco™ technology offers a new way of operating the projector lamp system...
User Manual
Page 11
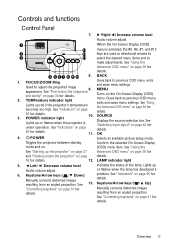
... menu settings. Lights up red if the projector's temperature becomes too high. Goes back to make adjustments. See "Switching input signal" on page 30 for Manually corrects distorted images details. LAMP indicator light 5. ◄ Left/ Decrease volume level Indicates the status of the lamp. or flashes when the lamp has developed a 6. See "Indicators" on page 31 for details. Keystone/Arrow keys ( /▲ Up) "Correcting keystone" on page 65 for details. TEMPerature indicator light Lights up Audio volume adjust. POWER indicator light 10. See "Indicators...
... menu settings. Lights up red if the projector's temperature becomes too high. Goes back to make adjustments. See "Switching input signal" on page 30 for Manually corrects distorted images details. LAMP indicator light 5. ◄ Left/ Decrease volume level Indicates the status of the lamp. or flashes when the lamp has developed a 6. See "Indicators" on page 31 for details. Keystone/Arrow keys ( /▲ Up) "Correcting keystone" on page 65 for details. TEMPerature indicator light Lights up Audio volume adjust. POWER indicator light 10. See "Indicators...
User Manual
Page 27
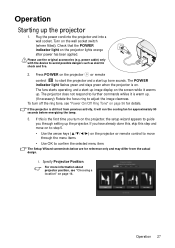
... lamp. 3. Check that the POWER indicator light on the wall socket switch (where fitted). power cable) only with the device to confirm the selected menu item. To turn on the projector or remote control to move through setting up . Please use the original accessories (e.g. If this step and move on to step 5. • Use the arrow keys on the projector, the setup wizard appears to adjust the image clearness. Specify Projector...
... lamp. 3. Check that the POWER indicator light on the wall socket switch (where fitted). power cable) only with the device to confirm the selected menu item. To turn on the projector or remote control to move through setting up . Please use the original accessories (e.g. If this step and move on to step 5. • Use the arrow keys on the projector, the setup wizard appears to adjust the image clearness. Specify Projector...
User Manual
Page 35
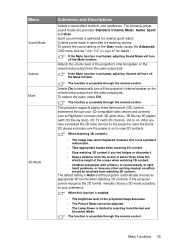
... fatigue or discomfort. • Keep a distance from the screen of about three times the effective height of the projected image decreases. • The Picture Mode cannot be refrained from the audio output jack. Cinema sound mode is Auto and the projector automatically chooses an appropriate 3D format when detecting 3D contents. If the Mute function is activated, adjusting Volume will turn off the Mute function...
... fatigue or discomfort. • Keep a distance from the screen of about three times the effective height of the projected image decreases. • The Picture Mode cannot be refrained from the audio output jack. Cinema sound mode is Auto and the projector automatically chooses an appropriate 3D format when detecting 3D contents. If the Mute function is activated, adjusting Volume will turn off the Mute function...
User Manual
Page 36
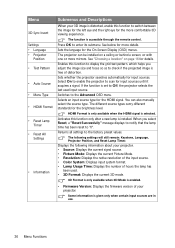
... the HDMI signal. Displays the following settings will still remain: Keystone, Language, Projector Position, and Reset Lamp Timer. See below for details. If the function is enabled. • Firmware Version: Displays the firmware version of your projector. HDMI Format is only available when the HDMI signal is installed. When you adjust the image size and focus so as to Off, the projector selects the last used input source. Returns all settings to the Advanced OSD menu. Select...
... the HDMI signal. Displays the following settings will still remain: Keystone, Language, Projector Position, and Reset Lamp Timer. See below for details. If the function is enabled. • Firmware Version: Displays the firmware version of your projector. HDMI Format is only available when the HDMI signal is installed. When you adjust the image size and focus so as to Off, the projector selects the last used input source. Returns all settings to the Advanced OSD menu. Select...
User Manual
Page 37
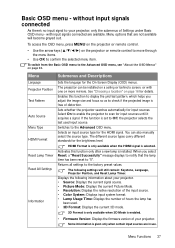
... only after a new lamp is free of distortion. Switches to check if the projected image is installed. The following information about your projector. • Source: Displays the current signal source. • Picture Mode: Displays the current Picture Mode. • Resolution: Displays the native resolution of the input source. • Color System: Displays input system format. • Lamp Usage Time: Displays the number of Settings under Basic OSD menu - Menu Functions 37 To access the OSD menu, press MENU on the projector or remote control. • Use the arrow keys...
... only after a new lamp is free of distortion. Switches to check if the projected image is installed. The following information about your projector. • Source: Displays the current signal source. • Picture Mode: Displays the current Picture Mode. • Resolution: Displays the native resolution of the input source. • Color System: Displays input system format. • Lamp Usage Time: Displays the number of Settings under Basic OSD menu - Menu Functions 37 To access the OSD menu, press MENU on the projector or remote control. • Use the arrow keys...
User Manual
Page 40
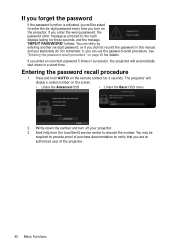
... projector will automatically shut down the number and turn on the remote control for details. You can use the password recall procedure. If you can retry by entering another six-digit password, or if you did not record the password in this manual, and you absolutely do not remember it, you enter an incorrect password 5 times in a short time. If you enter the wrong password, the password error message...
... projector will automatically shut down the number and turn on the remote control for details. You can use the password recall procedure. If you can retry by entering another six-digit password, or if you did not record the password in this manual, and you absolutely do not remember it, you enter an incorrect password 5 times in a short time. If you enter the wrong password, the password error message...

User Manual
Page 41
... turn on the projector. Open the OSD menu and go back to the System Setup: Advanced > Password > Power on -screen. The message 'INPUT CURRENT PASSWORD' displays. 3. Enter the old password. • If the password is started. 7. You can press BACK to re-activate the password function by entering the old password. The digits being input will not have to enter the password next time you have successfully assigned a new password to enter the new password...
... turn on the projector. Open the OSD menu and go back to the System Setup: Advanced > Password > Power on -screen. The message 'INPUT CURRENT PASSWORD' displays. 3. Enter the old password. • If the password is started. 7. You can press BACK to re-activate the password function by entering the old password. The digits being input will not have to enter the password next time you have successfully assigned a new password to enter the new password...

User Manual
Page 43
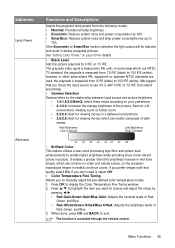
... available when Picture Mode is accessible through the remote control. The functions are described as below: • Bright: Maximizes the brightness of ambient light. • Sport: Optimized for viewing sport match in a living room where there is a small amount of the projected image. The function is set to User. • Load Settings From Allows you to manually adjust a preset picture mode and make changes and use to...
... available when Picture Mode is accessible through the remote control. The functions are described as below: • Bright: Maximizes the brightness of ambient light. • Sport: Optimized for viewing sport match in a living room where there is a small amount of the projected image. The function is set to User. • Load Settings From Allows you to manually adjust a preset picture mode and make changes and use to...
User Manual
Page 45
... refers to the relationship between input source and picture brightness. • 1.6/1.8/2.0/BenQ: Select these values according to manually adjust the pre-defined color temperature modes: 1. If you check the input source to display the Color Temperature Fine Tuning window. 2. however, in a darkened environment. • 2.6/2.8: Best for details. • Black Level Sets the picture grayscale to 100 IRE (white); Menu Functions 45 Functions and Descriptions Selects the projector lamp power from 7.5 IRE (black) to...
... refers to the relationship between input source and picture brightness. • 1.6/1.8/2.0/BenQ: Select these values according to manually adjust the pre-defined color temperature modes: 1. If you check the input source to display the Color Temperature Fine Tuning window. 2. however, in a darkened environment. • 2.6/2.8: Best for details. • Black Level Sets the picture grayscale to 100 IRE (white); Menu Functions 45 Functions and Descriptions Selects the projector lamp power from 7.5 IRE (black) to...
User Manual
Page 52
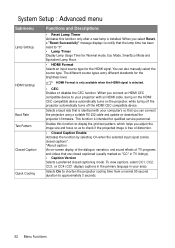
... qualified service personnel. This function is identical with an HDMI cable, turnig on the HDMI CEC compatible device automatically turns on -screen display of the dialogue, narration, and sound effects of TV programs and videos that you select Reset, a "Reset Successfully" message displays to notify that the lamp time has been reset to "0". • Lamp Timer Display Lamp Usage Time for Normal mode, Eco Mode, SmartEco Mode and Equivalent Lamp Hour. • HDMI Format Selects an input source type...
... qualified service personnel. This function is identical with an HDMI cable, turnig on the HDMI CEC compatible device automatically turns on -screen display of the dialogue, narration, and sound effects of TV programs and videos that you select Reset, a "Reset Successfully" message displays to notify that the lamp time has been reset to "0". • Lamp Timer Display Lamp Usage Time for Normal mode, Eco Mode, SmartEco Mode and Equivalent Lamp Hour. • HDMI Format Selects an input source type...
User Manual
Page 53
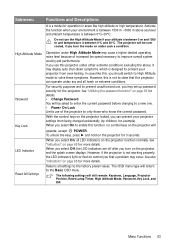
... projector locked, you turn on under other extreme conditions excluding the above sea level and ambient temperature is between 0°C-30°C. Menu Functions 53 For security purposes and to prevent unauthorized use of increased fan speed necessary to enable this function, no control keys on page 39 for details. • Change Password You will still remain: Keystone, Language, Projector Position, Reset Lamp Timer, High Altitude Mode, Password...
... projector locked, you turn on under other extreme conditions excluding the above sea level and ambient temperature is between 0°C-30°C. Menu Functions 53 For security purposes and to prevent unauthorized use of increased fan speed necessary to enable this function, no control keys on page 39 for details. • Change Password You will still remain: Keystone, Language, Projector Position, Reset Lamp Timer, High Altitude Mode, Password...

User Manual
Page 59
... projector except the lamp. Storing the projector To store the projector for the projector. Transporting the projector It is switched on page 55 and unplug the power cord and let it cool down completely. • Use a canister of abrasive pad, alkaline/acid cleaner, scouring powder, or volatile solvent, such as described in damage to keep the lens clean. Maintenance Care of the projector, turn the projector...
... projector except the lamp. Storing the projector To store the projector for the projector. Transporting the projector It is switched on page 55 and unplug the power cord and let it cool down completely. • Use a canister of abrasive pad, alkaline/acid cleaner, scouring powder, or volatile solvent, such as described in damage to keep the lens clean. Maintenance Care of the projector, turn the projector...
User Manual
Page 60
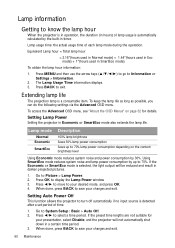
... 30% lamp power consumption Saves up to display the Lamp Power window 3. Lamp information Getting to know the lamp hour When the projector is in operation, the duration (in hours) of lamp usage is automatically calculated by the built-in darker projected pictures. 1. Go to Information or Settings > Information. 2. Setting Auto Power Off This function allows the projector to turn off automatically if no input source is a consumable item. Setting Lamp Power Setting the projector in a certain time period...
... 30% lamp power consumption Saves up to display the Lamp Power window 3. Lamp information Getting to know the lamp hour When the projector is in operation, the duration (in hours) of lamp usage is automatically calculated by the built-in darker projected pictures. 1. Go to Information or Settings > Information. 2. Setting Auto Power Off This function allows the projector to turn off automatically if no input source is a consumable item. Setting Lamp Power Setting the projector in a certain time period...
User Manual
Page 62
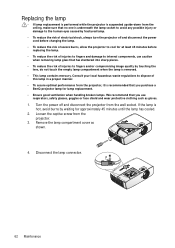
..., always turn the projector off and disconnect the projector from the projector. 3. Turn the power off and disconnect the power cord before changing the lamp. • To reduce the risk of severe burns, allow the projector to cool for at least 45 minutes before replacing the lamp. • To reduce the risk of injuries to fingers and damage to internal components, use respirators, safety...
..., always turn the projector off and disconnect the projector from the projector. 3. Turn the power off and disconnect the power cord before changing the lamp. • To reduce the risk of severe burns, allow the projector to cool for at least 45 minutes before replacing the lamp. • To reduce the risk of injuries to fingers and damage to internal components, use respirators, safety...

User Manual
Page 63
... turn the power on it, children can reach it stands up. If you experience resistance, lift the lamp and start again. 8. Insert the new lamp into the projector after the lamp is removed. Lamp connector must be installed flush with the lamp cover removed. • Do not insert your hands into the lamp compartment and make sure it too quickly may cause injuries. 6. The following images...
... turn the power on it, children can reach it stands up. If you experience resistance, lift the lamp and start again. 8. Insert the new lamp into the projector after the lamp is removed. Lamp connector must be installed flush with the lamp cover removed. • Do not insert your hands into the lamp compartment and make sure it too quickly may cause injuries. 6. The following images...

User Manual
Page 65
... Green Green Red Flashing Off Red Flashing Lamp Off Off Off Off Orange Flashing Red Off Off Off Off Off Off Off Red Red Off Red Red Orange Red Flashing Status & Description Stand-by mode Powering up . 1. Thermal sensor 1 open or not closed properly. Lamp life exhausted. Download. The projector needs 90 seconds to re-start the projector, it will shutdown again. Thermal IC #1 I2C connection error. Please check if the lamp door is open error. Please contact your dealer for assistance. The fans...
... Green Green Red Flashing Off Red Flashing Lamp Off Off Off Off Orange Flashing Red Off Off Off Off Off Off Off Red Red Off Red Red Orange Red Flashing Status & Description Stand-by mode Powering up . 1. Thermal sensor 1 open or not closed properly. Lamp life exhausted. Download. The projector needs 90 seconds to re-start the projector, it will shutdown again. Thermal IC #1 I2C connection error. Please check if the lamp door is open error. Please contact your dealer for assistance. The fans...

User Manual
Page 66
... video source on and check that it is not correctly focused. Picture is connected correctly. The lens cover is an obstacle between the remote control and the projector. There is still closed. menu. If the power outlet has a switch, make sure that the signal cable is blurred. Replace the battery with the SOURCE key on the projector or remote control. 66 Troubleshooting The input signal has not been correctly selected. Select the correct source with new...
... video source on and check that it is not correctly focused. Picture is connected correctly. The lens cover is an obstacle between the remote control and the projector. There is still closed. menu. If the power outlet has a switch, make sure that the signal cable is blurred. Replace the battery with the SOURCE key on the projector or remote control. 66 Troubleshooting The input signal has not been correctly selected. Select the correct source with new...


