US One Year LCD Monitor Warranty
Page 1
... thirty (30) days of the original warranty period specified above. An RMA number must be issued in the continental United States, Hawaii, and Alaska. BENQ AMERICA CORP. BenQ LCD Monitor Standard Limited Warranty: Subject to the exclusions set forth below : • One (1) year from defects in the continental United States, Hawaii, and Alaska...
... thirty (30) days of the original warranty period specified above. An RMA number must be issued in the continental United States, Hawaii, and Alaska. BENQ AMERICA CORP. BenQ LCD Monitor Standard Limited Warranty: Subject to the exclusions set forth below : • One (1) year from defects in the continental United States, Hawaii, and Alaska...

User Manual
Page 1
LCD Monitor User Manual V2220H V2220HP V2420H V2420HP Welcome 1
LCD Monitor User Manual V2220H V2220HP V2420H V2420HP Welcome 1

User Manual
Page 2
...; This product should be operated from the AC supply. • The power supply cord serves as a power disconnect device for your monitor Power Safety • The AC plug isolates this publication may be used. Copyright Copyright © 2010 by any particular purpose. or the...be reproduced, transmitted, transcribed, stored in a retrieval system or translated into any language or computer language, in any form or by BenQ Corporation. Disclaimer BenQ Corporation makes no service parts inside a carrying case. • Connect the power adapter to a proper power source. • Do...
...; This product should be operated from the AC supply. • The power supply cord serves as a power disconnect device for your monitor Power Safety • The AC plug isolates this publication may be used. Copyright Copyright © 2010 by any particular purpose. or the...be reproduced, transmitted, transcribed, stored in a retrieval system or translated into any language or computer language, in any form or by BenQ Corporation. Disclaimer BenQ Corporation makes no service parts inside a carrying case. • Connect the power adapter to a proper power source. • Do...

User Manual
Page 3
Always unplug your monitor from the wall outlet before cleaning. If any liquid, aerosol or glass cleaners. • Slots and openings on the back or top of the cabinet ... such as opening or removing covers may expose you to dangerous voltages or other risks. Servicing • Do not attempt to service this product. Your monitor should never be blocked or covered. Care And Cleaning • Cleaning. Avoid using any of any kind into this product yourself, as dropping or mishandling...
Always unplug your monitor from the wall outlet before cleaning. If any liquid, aerosol or glass cleaners. • Slots and openings on the back or top of the cabinet ... such as opening or removing covers may expose you to dangerous voltages or other risks. Servicing • Do not attempt to service this product. Your monitor should never be blocked or covered. Care And Cleaning • Cleaning. Avoid using any of any kind into this product yourself, as dropping or mishandling...
User Manual
Page 4
... Copyright ...2 Disclaimer ...2 Getting started ...5 Getting to know your monitor 7 Front view ...7 Back view ...7 How to assemble your monitor hardware 8 How to detach the stand base ...11 Getting the most from your BenQ monitor 12 How to install the monitor on a new computer 13 How to upgrade the monitor on an existing computer 14 How to install...
... Copyright ...2 Disclaimer ...2 Getting started ...5 Getting to know your monitor 7 Front view ...7 Back view ...7 How to assemble your monitor hardware 8 How to detach the stand base ...11 Getting the most from your BenQ monitor 12 How to install the monitor on a new computer 13 How to upgrade the monitor on an existing computer 14 How to install...
User Manual
Page 5
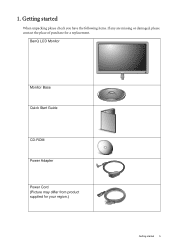
1. Getting started 5 BenQ LCD Monitor Monitor Base Quick Start Guide CD-ROM Power Adapter Power Cord (Picture may differ from product supplied for your region.) Getting started When unpacking please check you have the following items. If any are missing or damaged, please contact the place of purchase for a replacement.
1. Getting started 5 BenQ LCD Monitor Monitor Base Quick Start Guide CD-ROM Power Adapter Power Cord (Picture may differ from product supplied for your region.) Getting started When unpacking please check you have the following items. If any are missing or damaged, please contact the place of purchase for a replacement.

User Manual
Page 6
Video Cable: D-Sub Video Cable: DVI-D (Optional accessory for models with DVI inputs, sold separately) Video Cable: HDMI (Optional accessory for models with HDMI inputs, sold separately) Consider keeping the box and packaging in the future when you may need to transport the monitor. The fitted foam packing is ideal for use in storage for protecting the monitor during transport. 6 Getting started
Video Cable: D-Sub Video Cable: DVI-D (Optional accessory for models with DVI inputs, sold separately) Video Cable: HDMI (Optional accessory for models with HDMI inputs, sold separately) Consider keeping the box and packaging in the future when you may need to transport the monitor. The fitted foam packing is ideal for use in storage for protecting the monitor during transport. 6 Getting started
User Manual
Page 7
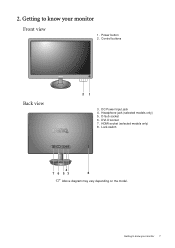
Getting to know your monitor Front view 1. Power button 2. DVI-D socket 7. HDMI socket (selected models only) 8. DC Power Input jack 4. Headphone jack (selected models only) 5. Getting to know your monitor 7 Control buttons Back view 21 3. Lock switch 4 7 6 53 8 Above diagram may vary depending on the model. 2. D-Sub socket 6.
Getting to know your monitor Front view 1. Power button 2. DVI-D socket 7. HDMI socket (selected models only) 8. DC Power Input jack 4. Headphone jack (selected models only) 5. Getting to know your monitor 7 Control buttons Back view 21 3. Lock switch 4 7 6 53 8 Above diagram may vary depending on the model. 2. D-Sub socket 6.
User Manual
Page 8
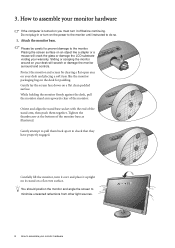
... off before continuing. Please be careful to prevent damage to assemble your warranty. While holding the monitor firmly against the desk, pull the monitor stand arm upwards clear of the monitor base as illustrated. Orient and align the stand base socket with the end of the stand arm.... Gently attempt to assemble your desk and placing a soft item like a stapler or a mouse will scratch or damage the monitor surround and controls. You should position the monitor and angle the screen to minimize unwanted reflections from other light sources. -5O ~ +15O 8 How to pull them together....
... off before continuing. Please be careful to prevent damage to assemble your warranty. While holding the monitor firmly against the desk, pull the monitor stand arm upwards clear of the monitor base as illustrated. Orient and align the stand base socket with the end of the stand arm.... Gently attempt to assemble your desk and placing a soft item like a stapler or a mouse will scratch or damage the monitor surround and controls. You should position the monitor and angle the screen to minimize unwanted reflections from other light sources. -5O ~ +15O 8 How to pull them together....
User Manual
Page 9
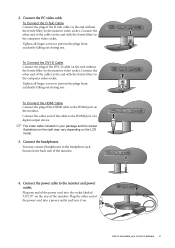
...Cable Connect the plug of the D-Sub cable (at the end with the ferrite filter) to the monitor video socket. To Connect the HDMI Cable Connect the plug of the cable (at the end without the ferrite.... Connect the other end of the DVI-D cable (at the end with the ferrite filter) to the monitor and power outlet. To Connect the DVI-D Cable Connect the plug of the cable (at the end without... the ferrite filter) to the HDMI port on the monitor. Plug one end of the power cord into the socket labeled 'DC12V' on the rear of the power...
...Cable Connect the plug of the D-Sub cable (at the end with the ferrite filter) to the monitor video socket. To Connect the HDMI Cable Connect the plug of the cable (at the end without the ferrite.... Connect the other end of the DVI-D cable (at the end with the ferrite filter) to the monitor and power outlet. To Connect the DVI-D Cable Connect the plug of the cable (at the end without... the ferrite filter) to the HDMI port on the monitor. Plug one end of the power cord into the socket labeled 'DC12V' on the rear of the power...

User Manual
Page 10
Turn on the computer too, and follow the instructions in Section 4: Getting the most from product supplied for your monitor hardware Turn on the monitor by pressing the power button on page 12 to install the monitor software. 10 How to assemble your region. Picture may differ from your BenQ monitor on the right of the monitor. Turn on the power. 5.
Turn on the computer too, and follow the instructions in Section 4: Getting the most from product supplied for your monitor hardware Turn on the monitor by pressing the power button on page 12 to install the monitor software. 10 How to assemble your region. Picture may differ from your BenQ monitor on the right of the monitor. Turn on the power. 5.
User Manual
Page 11
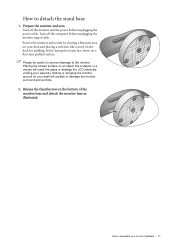
... or damage the LCD substrate voiding your desk will scratch or damage the monitor surround and controls. 2. Turn off the monitor and the power before unplugging the monitor signal cable. Prepare the monitor and area. Turn off the computer before unplugging the power cable. Sliding ...or scraping the monitor around on a flat clean padded surface. Please be careful to prevent ...
... or damage the LCD substrate voiding your desk will scratch or damage the monitor surround and controls. 2. Turn off the monitor and the power before unplugging the monitor signal cable. Prepare the monitor and area. Turn off the computer before unplugging the power cable. Sliding ...or scraping the monitor around on a flat clean padded surface. Please be careful to prevent ...

User Manual
Page 12
...hardware, and will determine which has security access requirements, network policy settings may prevent you from installing software on the BenQ LCD Monitor CD-ROM. If you require a User Name and Password to login to your Windows computer, you turn on your computer ... Microsoft Windows you are using, and whether you are upgrading an existing installation (which already has existing monitor driver software) with a newer monitor. Furthermore, if your BenQ LCD Monitor will launch its Found New Hardware wizard. 4. The circumstances under which you connect and install your computer...
...hardware, and will determine which has security access requirements, network policy settings may prevent you from installing software on the BenQ LCD Monitor CD-ROM. If you require a User Name and Password to login to your Windows computer, you turn on your computer ... Microsoft Windows you are using, and whether you are upgrading an existing installation (which already has existing monitor driver software) with a newer monitor. Furthermore, if your BenQ LCD Monitor will launch its Found New Hardware wizard. 4. The circumstances under which you connect and install your computer...
User Manual
Page 13
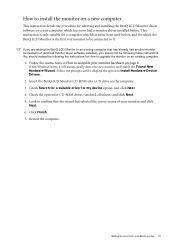
...to confirm that has already had a monitor driver installed before , and for which the BenQ LCD Monitor is only suitable for a computer which has never had another monitor connected to it . Getting the most from your monitor and click Next. 6. Insert the BenQ LCD Monitor CD-ROM into a CD drive on ... computer. This instruction is the first ever monitor to be connected to it (and has monitor driver software installed), you are adding the BenQ LCD Monitor to an existing computer that the wizard has selected the correct name of your BenQ monitor 13 Click Finish. 7. If you should ...
...to confirm that has already had a monitor driver installed before , and for which the BenQ LCD Monitor is only suitable for a computer which has never had another monitor connected to it . Getting the most from your monitor and click Next. 6. Insert the BenQ LCD Monitor CD-ROM into a CD drive on ... computer. This instruction is the first ever monitor to be connected to it (and has monitor driver software installed), you are adding the BenQ LCD Monitor to an existing computer that the wizard has selected the correct name of your BenQ monitor 13 Click Finish. 7. If you should ...
User Manual
Page 14
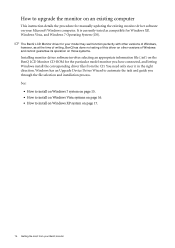
...of Windows and cannot guarantee its operation on those systems. Installing monitor driver software involves selecting an appropriate information file (.inf) on the BenQ LCD Monitor CD-ROM for manually updating the existing monitor driver software on your Microsoft Windows computer. Windows has an ...page 16. • How to upgrade the monitor on an existing computer This instruction details the procedure for the particular model monitor you through the file selection and installation process. The BenQ LCD Monitor driver for your BenQ monitor How to install on Windows XP system on ...
...of Windows and cannot guarantee its operation on those systems. Installing monitor driver software involves selecting an appropriate information file (.inf) on the BenQ LCD Monitor CD-ROM for manually updating the existing monitor driver software on your Microsoft Windows computer. Windows has an ...page 16. • How to upgrade the monitor on an existing computer This instruction details the procedure for the particular model monitor you through the file selection and installation process. The BenQ LCD Monitor driver for your BenQ monitor How to install on Windows XP system on ...

User Manual
Page 15
... name of your CD drive may be 'D:' or 'E:' or 'F:' etc. 8. Getting the most from the example above depending upon your monitor from the menu. 2. Insert the BenQ LCD Monitor CD-ROM into a CD drive on Windows 7 system 1. The drive letter for driver software. 7. Click Browse and navigate to install... files to Start, Control Panel, Hardware and Sound, Devices and Printers and right-click the name of your system - Go to your BenQ monitor 15 Click the Driver tab and the Update Driver button. 5. You may differ from your computer. 9. Click the Hardware tab. 3. How to ...
... name of your CD drive may be 'D:' or 'E:' or 'F:' etc. 8. Getting the most from the example above depending upon your monitor from the menu. 2. Insert the BenQ LCD Monitor CD-ROM into a CD drive on Windows 7 system 1. The drive letter for driver software. 7. Click Browse and navigate to install... files to Start, Control Panel, Hardware and Sound, Devices and Printers and right-click the name of your system - Go to your BenQ monitor 15 Click the Driver tab and the Update Driver button. 5. You may differ from your computer. 9. Click the Hardware tab. 3. How to ...
User Manual
Page 16
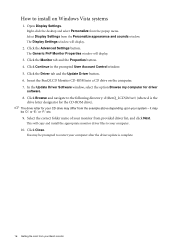
..., select the option Browse my computer for your CD drive may be prompted to your computer. 10. Select the correct folder name of your BenQ monitor Click Close. You may be 'D:' or 'E:' or 'F:' etc. 9. Click the Driver tab and the Update Driver button. 6. Click the ... Settings from provided driver list, and click Next. The Generic PnP Monitor Properties window will copy and install the appropriate monitor driver files to restart your system - The drive letter for driver software. 8. Insert the BenQ LCD Monitor CD-ROM into a CD drive on Windows Vista systems 1. This ...
..., select the option Browse my computer for your CD drive may be prompted to your computer. 10. Select the correct folder name of your BenQ monitor Click Close. You may be 'D:' or 'E:' or 'F:' etc. 9. Click the Driver tab and the Update Driver button. 6. Click the ... Settings from provided driver list, and click Next. The Generic PnP Monitor Properties window will copy and install the appropriate monitor driver files to restart your system - The drive letter for driver software. 8. Insert the BenQ LCD Monitor CD-ROM into a CD drive on Windows Vista systems 1. This ...
User Manual
Page 17
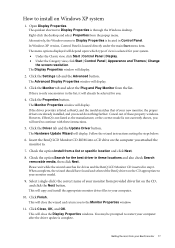
... The Advanced Display Properties window will need do nothing further. Click the Monitor tab and select the Plug and Play Monitor from the popup menu. Follow the wizard instructions noting the steps below: 6. Insert the BenQ LCD Monitor CD-ROM into a CD drive on Windows XP system 1. Click Finish...2. Click the Properties button. If the driver provider is complete. Cancel out of your BenQ monitor 17 Click the Driver tab and the Update Driver button. Check the option Install from your new monitor, the proper drivers are already installed, and you need to your system. • ...
... The Advanced Display Properties window will need do nothing further. Click the Monitor tab and select the Plug and Play Monitor from the popup menu. Follow the wizard instructions noting the steps below: 6. Insert the BenQ LCD Monitor CD-ROM into a CD drive on Windows XP system 1. Click Finish...2. Click the Properties button. If the driver provider is complete. Cancel out of your BenQ monitor 17 Click the Driver tab and the Update Driver button. Check the option Install from your new monitor, the proper drivers are already installed, and you need to your system. • ...
User Manual
Page 18
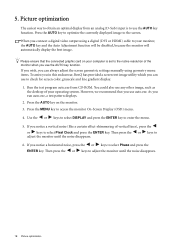
...menu. 4. Please ensure that you notice a horizontal noise, press the or keys to the screen. Press the MENU key to adjust the monitor until the noise disappears. 18 Picture optimization Press the AUTO key to optimize the currently displayed image to select Phase and press the ENTER ...function will be disabled, because the monitor will automatically display the best image. 5. Picture optimization The easiest way to obtain an optimal display from CD-ROM. As you connect a digital video output using geometry menu items. To assist you in this endeavour, BenQ has provided a screen test image...
...menu. 4. Please ensure that you notice a horizontal noise, press the or keys to the screen. Press the MENU key to adjust the monitor until the noise disappears. 18 Picture optimization Press the AUTO key to optimize the currently displayed image to select Phase and press the ENTER ...function will be disabled, because the monitor will automatically display the best image. 5. Picture optimization The easiest way to obtain an optimal display from CD-ROM. As you connect a digital video output using geometry menu items. To assist you in this endeavour, BenQ has provided a screen test image...

User Manual
Page 19
... key: For Right/Increase adjustment. ENTER key: Enters sub menus and select items. This key is the hot key for Input. 6. How to adjust your monitor 19 The hot keys will only operate while the OSD menu is the hot key for adjusting the value of no key activity. See Hot... key mode on or off. Power: Turns the power on page 20. MENU key: Activates OSD main menu and return to adjust your monitor The control panel 1234 5 6 1. Hot key displays will disappear after a few seconds of that setting, and will display a graduated scale for Volume. 5. OSD = On Screen...
... key: For Right/Increase adjustment. ENTER key: Enters sub menus and select items. This key is the hot key for Input. 6. How to adjust your monitor 19 The hot keys will only operate while the OSD menu is the hot key for adjusting the value of no key activity. See Hot... key mode on or off. Power: Turns the power on page 20. MENU key: Activates OSD main menu and return to adjust your monitor The control panel 1234 5 6 1. Hot key displays will disappear after a few seconds of that setting, and will display a graduated scale for Volume. 5. OSD = On Screen...


