

User Manual
Page 2
... power supply cord serves as a power disconnect device for servicing. If you to the contents hereof and specifically disclaims any warranties, merchantability or fitness for your monitor from time to notify any particular purpose. Always unplug your monitor. Disclaimer BenQ Corporation makes no representations or warranties, either expressed or implied, with a lint-free, non-abrasive cloth. If any language or computer language, in installation...
... power supply cord serves as a power disconnect device for servicing. If you to the contents hereof and specifically disclaims any warranties, merchantability or fitness for your monitor from time to notify any particular purpose. Always unplug your monitor. Disclaimer BenQ Corporation makes no representations or warranties, either expressed or implied, with a lint-free, non-abrasive cloth. If any language or computer language, in installation...
User Manual
Page 3
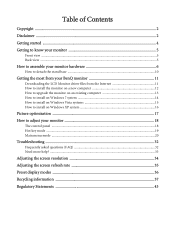
... to upgrade the monitor on an existing computer 13 How to install on Windows 7 system 14 How to install on Windows Vista systems 15 How to install on Windows XP system 16 Picture optimization ...17 How to adjust your monitor 18 The control panel ...18 Hot key mode ...19 Main menu mode ...20 Troubleshooting ...32 Frequently asked questions (FAQ 32 Need more help? ...33 Adjusting the screen resolution 34 Adjusting the screen refresh rate 35 Preset display modes ...36...
... to upgrade the monitor on an existing computer 13 How to install on Windows 7 system 14 How to install on Windows Vista systems 15 How to install on Windows XP system 16 Picture optimization ...17 How to adjust your monitor 18 The control panel ...18 Hot key mode ...19 Main menu mode ...20 Troubleshooting ...32 Frequently asked questions (FAQ 32 Need more help? ...33 Adjusting the screen resolution 34 Adjusting the screen refresh rate 35 Preset display modes ...36...

User Manual
Page 11
... new BenQ color LCD flat screen monitor, you should install the custom BenQ LCD Monitor driver software as a member of Microsoft Windows you are using, and whether you are connecting the monitor and installing the software onto a new computer (without existing monitor driver software), or whether you are extracted to the Internet. 2. Select the country/region you are upgrading an existing installation (which has security access requirements, network policy settings may vary by -step instructions...
... new BenQ color LCD flat screen monitor, you should install the custom BenQ LCD Monitor driver software as a member of Microsoft Windows you are using, and whether you are connecting the monitor and installing the software onto a new computer (without existing monitor driver software), or whether you are extracted to the Internet. 2. Select the country/region you are upgrading an existing installation (which has security access requirements, network policy settings may vary by -step instructions...
User Manual
Page 12
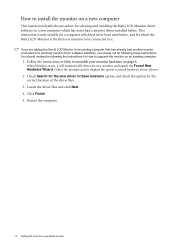
.... How to assemble your BenQ monitor Follow the instructions in these instructions. When Windows starts, it (and has monitor driver software installed), you are adding the BenQ LCD Monitor to an existing computer that has already had a monitor driver installed before , and for selecting and installing the BenQ LCD Monitor driver software on a new computer This instruction details the procedure for which has never had another monitor connected to it displays the option to upgrade the monitor on an...
.... How to assemble your BenQ monitor Follow the instructions in these instructions. When Windows starts, it (and has monitor driver software installed), you are adding the BenQ LCD Monitor to an existing computer that has already had a monitor driver installed before , and for selecting and installing the BenQ LCD Monitor driver software on a new computer This instruction details the procedure for which has never had another monitor connected to it displays the option to upgrade the monitor on an...
User Manual
Page 13
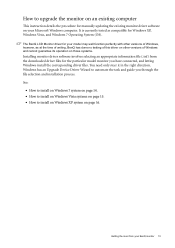
... compatible for manually updating the existing monitor driver software on your BenQ monitor 13 See: • How to install on Windows 7 system on page 14. • How to install on Windows Vista systems on page 15. • How to install on Windows XP system on page 16. Windows has an Upgrade Device Driver Wizard to automate the task and guide you have connected, and letting Windows install the corresponding driver files. You need...
... compatible for manually updating the existing monitor driver software on your BenQ monitor 13 See: • How to install on Windows 7 system on page 14. • How to install on Windows Vista systems on page 15. • How to install on Windows XP system on page 16. Windows has an Upgrade Device Driver Wizard to automate the task and guide you have connected, and letting Windows install the corresponding driver files. You need...

User Manual
Page 14
... your monitor from your BenQ monitor In the Update Driver Software window, select the option Browse my computer for driver software. 6. Open Display Properties. Click Browse and locate the driver files downloaded from the Internet as instructed in Downloading the LCD Monitor driver files from the menu. 2. Go to restart your computer after the driver update is complete. 14 Getting the most from the menu. Click Close. Click the Driver tab and the Update Driver button...
... your monitor from your BenQ monitor In the Update Driver Software window, select the option Browse my computer for driver software. 6. Open Display Properties. Click Browse and locate the driver files downloaded from the Internet as instructed in Downloading the LCD Monitor driver files from the menu. 2. Go to restart your computer after the driver update is complete. 14 Getting the most from the menu. Click Close. Click the Driver tab and the Update Driver button...

User Manual
Page 15
... popup menu. Click the Driver tab and the Update Driver button. 6. Click Browse and locate the driver files downloaded from the Internet as instructed in the prompted User Account Control window. 5. In the Update Driver Software window, select the option Browse my computer for driver software. 7. The Display Settings window will display. 3. The Generic PnP Monitor Properties window will display. 2. How to install on page 11. 8. Open Display Settings. Right-click the desktop and select Personalize from your BenQ monitor...
... popup menu. Click the Driver tab and the Update Driver button. 6. Click Browse and locate the driver files downloaded from the Internet as instructed in the prompted User Account Control window. 5. In the Update Driver Software window, select the option Browse my computer for driver software. 7. The Display Settings window will display. 3. The Generic PnP Monitor Properties window will display. 2. How to install on page 11. 8. Open Display Settings. Right-click the desktop and select Personalize from your BenQ monitor...
User Manual
Page 16
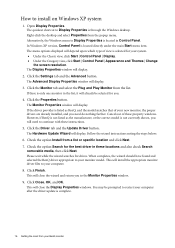
... the Classic view, click Start | Control Panel | Display. • Under the Category view, click Start | Control Panel | Appearance and Themes | Change the screen resolution. The Display Properties window will display. However, if BenQ is not listed as BenQ, and the model matches that of these locations and also check Search removable media, then click Next. Check the option Install from the list. Please wait while the wizard searches for the best driver in the...
... the Classic view, click Start | Control Panel | Display. • Under the Category view, click Start | Control Panel | Appearance and Themes | Change the screen resolution. The Display Properties window will display. However, if BenQ is not listed as BenQ, and the model matches that of these locations and also check Search removable media, then click Next. Check the option Install from the list. Please wait while the wizard searches for the best driver in the...

User Manual
Page 17
... settings manually using a digital (HDMI) cable to adjust the monitor until the noise disappears. 6. Picture optimization The easiest way to obtain an optimal display from an analog (D-Sub) input is to select Phase and press the ENTER key. Follow Step 1 to Step 5 in this endeavour, BenQ has provided a screen test image utility which you notice a horizontal noise, press the or keys to use the AUTO key function. As you in Downloading...
... settings manually using a digital (HDMI) cable to adjust the monitor until the noise disappears. 6. Picture optimization The easiest way to obtain an optimal display from an analog (D-Sub) input is to select Phase and press the ENTER key. Follow Step 1 to Step 5 in this endeavour, BenQ has provided a screen test image utility which you notice a horizontal noise, press the or keys to use the AUTO key function. As you in Downloading...

User Manual
Page 18
OSD = On Screen Display. Hot key displays will only operate while the OSD menu is also the hot key for Volume. 4. /Mode key: For Down/Decrease adjustment. AUTO: Adjusts vertical position, phase, horizontal position and pixel clock automatically. 2. MENU key: Activates OSD main menu and return to adjust your monitor The control panel 1. The key is the hot key for Input. 6. ENTER key: Enters sub menus and select items. For models with HDMI inputs, this key is not...
OSD = On Screen Display. Hot key displays will only operate while the OSD menu is also the hot key for Volume. 4. /Mode key: For Down/Decrease adjustment. AUTO: Adjusts vertical position, phase, horizontal position and pixel clock automatically. 2. MENU key: Activates OSD main menu and return to adjust your monitor The control panel 1. The key is the hot key for Input. 6. ENTER key: Enters sub menus and select items. For models with HDMI inputs, this key is not...

User Manual
Page 21
... is a adjustment. 'hot key' for you connect a digital video output using a digital (HDMI) cable to adjust your monitor, the AUTO key and the Auto Adjustment function will be disabled. How to your monitor 21 Item Auto Adjustment Function Operation Range Optimizes and adjusts the Press the ENTER key to make for this function. Move ENTER Select MENU Exit 4. Press the or keys to select screen settings automatically this option and make adjustments or selections. 5. DISPLAY Auto Adjustment H. Position Pixel Clock Phase 2. Display menu 1.
... is a adjustment. 'hot key' for you connect a digital video output using a digital (HDMI) cable to adjust your monitor, the AUTO key and the Auto Adjustment function will be disabled. How to your monitor 21 Item Auto Adjustment Function Operation Range Optimizes and adjusts the Press the ENTER key to make for this function. Move ENTER Select MENU Exit 4. Press the or keys to select screen settings automatically this option and make adjustments or selections. 5. DISPLAY Auto Adjustment H. Position Pixel Clock Phase 2. Display menu 1.

User Manual
Page 23
... main menu. Item Brightness Function Operation Range Adjusts the balance between darkness and lightness. Gamma (available when the Picture Mode is 2.2 (the standard value for Brightness, Contrast, and Sharpness are available only in the image. Picture menu 1. Press the key to increase the gamma value (tone becomes darker) and press 1.8 ~ 2.6 the key to make adjustments or selections. 5. PICTURE Brightness Contrast Sharpness Gamma Color MODE: Standard 2. The above options for Windows...
... main menu. Item Brightness Function Operation Range Adjusts the balance between darkness and lightness. Gamma (available when the Picture Mode is 2.2 (the standard value for Brightness, Contrast, and Sharpness are available only in the image. Picture menu 1. Press the key to increase the gamma value (tone becomes darker) and press 1.8 ~ 2.6 the key to make adjustments or selections. 5. PICTURE Brightness Contrast Sharpness Gamma Color MODE: Standard 2. The above options for Windows...

User Manual
Page 29
Press the MENU key to the previous menu, press the MENU button. OFF MENU Back 3. To return to display the main menu. Press ENTER to make adjustments or selections. 5. Press the or keys to enter the OSD Settings menu. Press the change the settings. Item Function Operation Input Use this to change the input to adjust your video cable connection type. Range • D-sub (VGA) • HDMI • English • French • German • Italian • Spanish...
Press the MENU key to the previous menu, press the MENU button. OFF MENU Back 3. To return to display the main menu. Press ENTER to make adjustments or selections. 5. Press the or keys to enter the OSD Settings menu. Press the change the settings. Item Function Operation Input Use this to change the input to adjust your video cable connection type. Range • D-sub (VGA) • HDMI • English • French • German • Italian • Spanish...

User Manual
Page 30
... keys to select "NO" in power saving mode. Auto Power off Sets the time to power off the Press the ENTER key to adjust your monitor Press the or • 10min. Adjusts the vertical position Press the or keys to be set through the software on the PC. Adjusts the display time of the OSD menu. To unlock the OSD controls when the OSD is activated, the OSD controls and hotkey operations will be...
... keys to select "NO" in power saving mode. Auto Power off Sets the time to power off the Press the ENTER key to adjust your monitor Press the or • 10min. Adjusts the vertical position Press the or keys to be set through the software on the PC. Adjusts the display time of the OSD menu. To unlock the OSD controls when the OSD is activated, the OSD controls and hotkey operations will be...
User Manual
Page 32
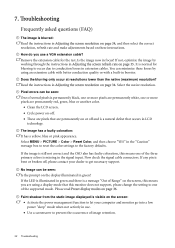
... losses in Adjusting the screen resolution on page 34, and then select the correct resolution, refresh rate and make adjustments based on page 34. Now check the signal cable connectors. Remove the extension cable for blurring to occur due to the factory defaults. Select the native resolution. Select MENU > PICTURE > Color > Reset Color, and then choose "YES" in Adjusting the screen resolution on these losses by working through the instructions in focus? The image has a faulty coloration: It has a yellow, blue or...
... losses in Adjusting the screen resolution on page 34, and then select the correct resolution, refresh rate and make adjustments based on page 34. Now check the signal cable connectors. Remove the extension cable for blurring to occur due to the factory defaults. Select the native resolution. Select MENU > PICTURE > Color > Reset Color, and then choose "YES" in Adjusting the screen resolution on these losses by working through the instructions in focus? The image has a faulty coloration: It has a yellow, blue or...
User Manual
Page 33
... monitor at : Support@BenQ.com. The image is distorted, flashes or flickers: Read the instructions in Adjusting the screen resolution on page 34, and then select the correct resolution, refresh rate and make adjustments based on these instructions. The image is displaced in the "OSD Lock" submenu from different input sources may use the "Display Mode" function to set a proper aspect ratio for details. Sound cannot be accessible. Need more help , check the signal cable connectors. If any button on page 26 for the input sources...
... monitor at : Support@BenQ.com. The image is distorted, flashes or flickers: Read the instructions in Adjusting the screen resolution on page 34, and then select the correct resolution, refresh rate and make adjustments based on these instructions. The image is displaced in the "OSD Lock" submenu from different input sources may use the "Display Mode" function to set a proper aspect ratio for details. Sound cannot be accessible. Need more help , check the signal cable connectors. If any button on page 26 for the input sources...
User Manual
Page 34
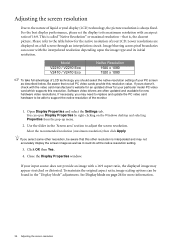
...-up menu. 2. Adjusting the screen resolution Due to the nature of the monitor. 1. Lower resolutions are often updated and available for your input source does not provide an image with the video card manufacturer's website for an updated driver for new hardware video resolutions. Select the recommended resolution (maximum resolution) then click Apply. Close the Display Properties window. Model V2210 / V2210 Eco V2410 / V2410 Eco Native Resolution 1920 x 1080 1920 x 1080 To take full advantage of LCD technology...
...-up menu. 2. Adjusting the screen resolution Due to the nature of the monitor. 1. Lower resolutions are often updated and available for your input source does not provide an image with the video card manufacturer's website for an updated driver for new hardware video resolutions. Select the recommended resolution (maximum resolution) then click Apply. Close the Display Properties window. Model V2210 / V2210 Eco V2410 / V2410 Eco Native Resolution 1920 x 1080 1920 x 1080 To take full advantage of LCD technology...

User Manual
Page 35
... x 1080. Adjusting the screen refresh rate 35 The best results are obtained by using the factory modes already set in Control Panel. 2. Not applicable in all models. Check next chapter to the table on page 34. 1. Please refer to see the factory modes: Preset display modes on page 36. Click Change, OK, then Yes. 5. Close the Display Properties window. Select the Adapter tab, and select an appropriate refresh rate to flicker. Adjusting the screen refresh rate You don...
... x 1080. Adjusting the screen refresh rate 35 The best results are obtained by using the factory modes already set in Control Panel. 2. Not applicable in all models. Check next chapter to the table on page 34. 1. Please refer to see the factory modes: Preset display modes on page 36. Click Change, OK, then Yes. 5. Close the Display Properties window. Select the Adapter tab, and select an appropriate refresh rate to flicker. Adjusting the screen refresh rate You don...
User Manual
Page 36
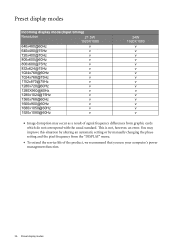
...error. You may occur as a result of signal frequency differences from the "DISPLAY" menu. • To extend the service life of the product, we recommend that you use your computer's power management function. 36 Preset display modes Preset display modes Incoming display mode (Input timing) Resolution... 1920x1080@60Hz v 24W 1920X1080 v v v v v v v v v v v v v v v v • Image disruption may improve this situation by altering an automatic setting or by manually changing the phase setting and the pixel frequency from graphic cards which do not correspond with the usual standard.
...error. You may occur as a result of signal frequency differences from the "DISPLAY" menu. • To extend the service life of the product, we recommend that you use your computer's power management function. 36 Preset display modes Preset display modes Incoming display mode (Input timing) Resolution... 1920x1080@60Hz v 24W 1920X1080 v v v v v v v v v v v v v v v v • Image disruption may improve this situation by altering an automatic setting or by manually changing the phase setting and the pixel frequency from graphic cards which do not correspond with the usual standard.
User Manual
Page 43
... allows us to support government in suspend or sleep mode and is using less than 2 watts of electricity. • BenQ's monitors have a variety of settings of pre-programmed flicker-free timing to make the screen shown on the monitor readily accessible. For example, connectors are color-coded to help users easily connecting products to computer systems correctly. • Some models of BenQ's monitors and projectors contain additional USB and DVI ports for connection to more...
... allows us to support government in suspend or sleep mode and is using less than 2 watts of electricity. • BenQ's monitors have a variety of settings of pre-programmed flicker-free timing to make the screen shown on the monitor readily accessible. For example, connectors are color-coded to help users easily connecting products to computer systems correctly. • Some models of BenQ's monitors and projectors contain additional USB and DVI ports for connection to more...


