

SW2700PT Data Sheet
Page 2
...parties which are subject to change without changing the graphic card output data. Proprietary Palette Master Element Calibration Software With the use of Palette Master Element and a calibrator, you captured never fades away. Hardware Calibration Hardware calibration allows you to adjust ...12.7" 100 × 100mm 90º 35 / 35 Tilt (down/up with its most representative view of the original image. BenQ SW2700PT Monitor for Photographer BenQ understands the photographer's pursuit of perfect color accuracy and true-to-life image quality.With that in natural gradations on a 10-bit...
...parties which are subject to change without changing the graphic card output data. Proprietary Palette Master Element Calibration Software With the use of Palette Master Element and a calibrator, you captured never fades away. Hardware Calibration Hardware calibration allows you to adjust ...12.7" 100 × 100mm 90º 35 / 35 Tilt (down/up with its most representative view of the original image. BenQ SW2700PT Monitor for Photographer BenQ understands the photographer's pursuit of perfect color accuracy and true-to-life image quality.With that in natural gradations on a 10-bit...
SW2700PT User Manual
Page 2
...8226; An approved power cord greater or equal to H03VV-F or H05VV-F, 2G or 3G, 0.75mm2 must not be used. They must be blocked or covered. Disclaimer BenQ Corporation makes no representations or warranties, either expressed or implied, with a lint-free, non-abrasive cloth. Care And ... ventilation. Copyright Copyright © 2015 by any means, electronic, mechanical, magnetic, optical, chemical, manual or otherwise, without obligation of BenQ Corporation to revise this user manual are not followed. No part of this equipment from the wall outlet before cleaning. Clean the LCD ...
...8226; An approved power cord greater or equal to H03VV-F or H05VV-F, 2G or 3G, 0.75mm2 must not be used. They must be blocked or covered. Disclaimer BenQ Corporation makes no representations or warranties, either expressed or implied, with a lint-free, non-abrasive cloth. Care And ... ventilation. Copyright Copyright © 2015 by any means, electronic, mechanical, magnetic, optical, chemical, manual or otherwise, without obligation of BenQ Corporation to revise this user manual are not followed. No part of this equipment from the wall outlet before cleaning. Clean the LCD ...

SW2700PT User Manual
Page 3
... eco-friendly design highlights of the products. Check out BenQ's CSR Website at purchase. See Adjusting the backlight on page 36 for more details on . • It is recommended to set the monitor to a lower brightness for long-term use the original accessories (e.g. • It is the sole... responsibility of the user if problems (such as electric shock and fire. • It takes about 30 minutes (under BenQ standard testing condition) for the system to reach to a stable...
... eco-friendly design highlights of the products. Check out BenQ's CSR Website at purchase. See Adjusting the backlight on page 36 for more details on . • It is recommended to set the monitor to a lower brightness for long-term use the original accessories (e.g. • It is the sole... responsibility of the user if problems (such as electric shock and fire. • It takes about 30 minutes (under BenQ standard testing condition) for the system to reach to a stable...
SW2700PT User Manual
Page 4
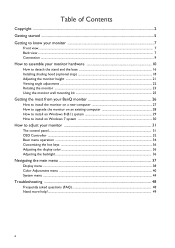
... Installing shading hood (optional step 18 Adjusting the monitor height ...21 Viewing angle adjustment ...22 Rotating the monitor ...23 Using the monitor wall mounting kit 25 Getting the most from your BenQ monitor 26 How to install the monitor on a new computer 27 How to upgrade the monitor on an existing computer...
... Installing shading hood (optional step 18 Adjusting the monitor height ...21 Viewing angle adjustment ...22 Rotating the monitor ...23 Using the monitor wall mounting kit 25 Getting the most from your BenQ monitor 26 How to install the monitor on a new computer 27 How to upgrade the monitor on an existing computer...

SW2700PT User Manual
Page 6
... region. The fitted foam packing is ideal for your product, you can purchase them separately. • Consider keeping the box and packaging in storage for use in the future when you may need to change without prior notice. Always keep the product and accessories out of reach of small children. 6 Getting...
... region. The fitted foam packing is ideal for your product, you can purchase them separately. • Consider keeping the box and packaging in storage for use in the future when you may need to change without prior notice. Always keep the product and accessories out of reach of small children. 6 Getting...

SW2700PT User Manual
Page 12
You should position the monitor and angle the screen to minimize unwanted reflections from accidently falling out during use. You might want to assemble your monitor hardware Tighten all finger screws to the computer video socket. Connect the PC video cable To Connect the ...
You should position the monitor and angle the screen to minimize unwanted reflections from accidently falling out during use. You might want to assemble your monitor hardware Tighten all finger screws to the computer video socket. Connect the PC video cable To Connect the ...

SW2700PT User Manual
Page 15
Plug the other end of the product, we recommend that you use your BenQ monitor on page 26 to install the monitor software. To extend the service life of the power cord into a power outlet and turn -on . How to and turn it on the power. 8. Connect-to assemble your region. Organize the cables. 9. Picture may differ from your computer's power management function. Turn on the monitor by pressing the power button on the computer too, and follow the instructions in Getting the most from product supplied for your monitor hardware 15 Turn on the monitor.
Plug the other end of the product, we recommend that you use your BenQ monitor on page 26 to install the monitor software. To extend the service life of the power cord into a power outlet and turn -on . How to and turn it on the power. 8. Connect-to assemble your region. Organize the cables. 9. Picture may differ from your computer's power management function. Turn on the monitor by pressing the power button on the computer too, and follow the instructions in Getting the most from product supplied for your monitor hardware 15 Turn on the monitor.

SW2700PT User Manual
Page 18
... bar on the hood with the one on the left side of the monitor, and press down the hood to fix it firmly. Do not use excessive force when installing the shading hood to assemble your monitor properly. Attach to the shading hood and the monitor. e a c 2 1 Align the velcro inside the...
... bar on the hood with the one on the left side of the monitor, and press down the hood to fix it firmly. Do not use excessive force when installing the shading hood to assemble your monitor properly. Attach to the shading hood and the monitor. e a c 2 1 Align the velcro inside the...
SW2700PT User Manual
Page 25
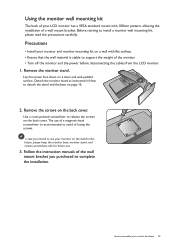
... the installation. Detach the monitor stand as instructed in the future, please keep the monitor base, monitor stand, and screws somewhere safe for future use of a magnetic-head screwdriver is stable to support the weight of the monitor. • Turn off the monitor and the power before disconnecting the... cables from the LCD monitor. 1. The use . 3. How to assemble your monitor and monitor mounting kit on a wall with 100mm pattern, allowing the installation of a wall mount bracket...
... the installation. Detach the monitor stand as instructed in the future, please keep the monitor base, monitor stand, and screws somewhere safe for future use of a magnetic-head screwdriver is stable to support the weight of the monitor. • Turn off the monitor and the power before disconnecting the... cables from the LCD monitor. 1. The use . 3. How to assemble your monitor and monitor mounting kit on a wall with 100mm pattern, allowing the installation of a wall mount bracket...

SW2700PT User Manual
Page 26
... Windows you are using, and whether you are connecting the monitor and installing the software onto a new computer (without existing monitor driver software), or whether you are upgrading an existing installation (which process you need to follow to successfully install the BenQ LCD Monitor driver software...from installing software on your computer. • To check the name of the purchased model, refer to the specification label on the BenQ LCD Monitor CD-ROM. Furthermore, if your computer is connected to a network which has security access requirements, network policy settings may ...
... Windows you are using, and whether you are connecting the monitor and installing the software onto a new computer (without existing monitor driver software), or whether you are upgrading an existing installation (which process you need to follow to successfully install the BenQ LCD Monitor driver software...from installing software on your computer. • To check the name of the purchased model, refer to the specification label on the BenQ LCD Monitor CD-ROM. Furthermore, if your computer is connected to a network which has security access requirements, network policy settings may ...

SW2700PT User Manual
Page 27
...Install Hardware Device Drivers. 2. Driver files SW2401 SW2700 SW2401PT SW2700PT Suitable models Getting the most from your monitor hardware on a new computer which the BenQ LCD Monitor is only suitable for a computer which has never been used before . Restart the computer. When Windows starts, it... displays the option to the following the instructions for How to upgrade the monitor on the computer. 3. Insert the BenQ LCD Monitor CD-ROM into a CD drive on...
...Install Hardware Device Drivers. 2. Driver files SW2401 SW2700 SW2401PT SW2700PT Suitable models Getting the most from your monitor hardware on a new computer which the BenQ LCD Monitor is only suitable for a computer which has never been used before . Restart the computer. When Windows starts, it... displays the option to the following the instructions for How to upgrade the monitor on the computer. 3. Insert the BenQ LCD Monitor CD-ROM into a CD drive on...

SW2700PT User Manual
Page 32
... the hot key menu. 32 How to the monitor. Controller Key 2 3. OSD Controller Apart from the control keys, OSD Controller also provides a quick way to use. You need to connect the OSD Controller to your monitor
... the hot key menu. 32 How to the monitor. Controller Key 2 3. OSD Controller Apart from the control keys, OSD Controller also provides a quick way to use. You need to connect the OSD Controller to your monitor
SW2700PT User Manual
Page 34
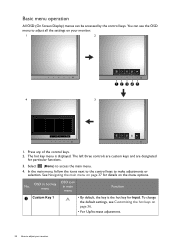
Press any of the control keys. 2. Select (Menu) to make adjustments or selection. No. Basic menu operation All OSD (On Screen Display) menus can use the OSD menu to adjust your monitor. 1 2 12345 4 3 1. The hot key menu is the hot key for Input. OSD in hot key menu OSD icon ...
Press any of the control keys. 2. Select (Menu) to make adjustments or selection. No. Basic menu operation All OSD (On Screen Display) menus can use the OSD menu to adjust your monitor. 1 2 12345 4 3 1. The hot key menu is the hot key for Input. OSD in hot key menu OSD icon ...
SW2700PT User Manual
Page 36
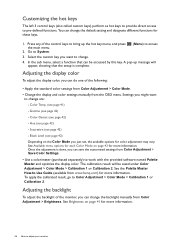
...(see page 42) - Select the custom key you might want to change the backlight manually from Color Adjustment > Save Color Settings. • Use a colorimeter (purchased separately) to access 3. To apply the calibrated result, go to pre-defined functions. See Brightness on page 43 for color adjustment...: • Apply the standard color settings from Color Adjustment > Color Mode. • Change the display and color settings manually from www.benq.com) for more information. 36 How to adjust your monitor Gamma (see page 41) - See the Palette Master How-to bring up ...
...(see page 42) - Select the custom key you might want to change the backlight manually from Color Adjustment > Save Color Settings. • Use a colorimeter (purchased separately) to access 3. To apply the calibrated result, go to pre-defined functions. See Brightness on page 43 for color adjustment...: • Apply the standard color settings from Color Adjustment > Color Mode. • Change the display and color settings manually from www.benq.com) for more information. 36 How to adjust your monitor Gamma (see page 41) - See the Palette Master How-to bring up ...

SW2700PT User Manual
Page 37
For more details. Navigating the main menu You can use the OSD (On Screen Display) menu to adjust all the settings on your region, see Language on page 45 under System and OSD Settings for ...
For more details. Navigating the main menu You can use the OSD (On Screen Display) menu to adjust all the settings on your region, see Language on page 45 under System and OSD Settings for ...
SW2700PT User Manual
Page 38
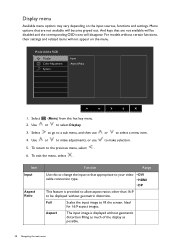
... that are not available will not appear on the input sources, functions and settings. Select (Menu) from the hot key menu. 2. Use or to a sub menu, and then use 5. Select to go to select Display. 3. To exit the menu, select . Ideal for 16:9 aspect images. For models without certain...menu options may vary depending on the menu. Mode: Adobe RGB Display Color Adjustment System Input Aspect Ratio 1. Item Input Aspect Ratio Function Range Use this to change the input to that appropriate to your video • DVI cable connection type. • HDMI • DP This feature ...
... that are not available will not appear on the input sources, functions and settings. Select (Menu) from the hot key menu. 2. Use or to a sub menu, and then use 5. Select to go to select Display. 3. To exit the menu, select . Ideal for 16:9 aspect images. For models without certain...menu options may vary depending on the menu. Mode: Adobe RGB Display Color Adjustment System Input Aspect Ratio 1. Item Input Aspect Ratio Function Range Use this to change the input to that appropriate to your video • DVI cable connection type. • HDMI • DP This feature ...
SW2700PT User Manual
Page 40
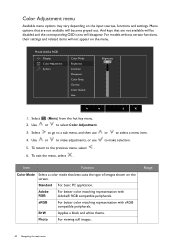
... (Menu) from the hot key menu. 2. To return to select a menu item. Gamma Color Gamut Hue Brightness 80 1. Use or to make adjustments, or use 4. To exit the menu, select . Standard For basic PC application. Menu options that best suits the type of images shown ...Function Color Mode Select a color mode that are not available will be disabled and the corresponding OSD icons will disappear. Use or to a sub menu, and then use 5. to make selection. sRGB For better color matching representation with Adobe® RGB compatible peripherals. For models without ...
... (Menu) from the hot key menu. 2. To return to select a menu item. Gamma Color Gamut Hue Brightness 80 1. Use or to make adjustments, or use 4. To exit the menu, select . Standard For basic PC application. Menu options that best suits the type of images shown ...Function Color Mode Select a color mode that are not available will be disabled and the corresponding OSD icons will disappear. Use or to a sub menu, and then use 5. to make selection. sRGB For better color matching representation with Adobe® RGB compatible peripherals. For models without ...
SW2700PT User Manual
Page 41
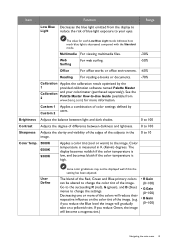
...the color temperature is measured in the image. 0 to 10 Color Temp. 5000K 6500K 9300K Applies a color tint (cool or warm) to -Use Guide (available from the display to Light reduce the risk of blue light exposure to change the settings. Item Function Low Blue Decreases the blue... light emitted from www.benq.com) for each Low Blue Light mode indicates how much blue light is decreased compared with the Standard mode. The blend of the ...
...the color temperature is measured in the image. 0 to 10 Color Temp. 5000K 6500K 9300K Applies a color tint (cool or warm) to -Use Guide (available from the display to Light reduce the risk of blue light exposure to change the settings. Item Function Low Blue Decreases the blue... light emitted from www.benq.com) for each Low Blue Light mode indicates how much blue light is decreased compared with the Standard mode. The blend of the ...
SW2700PT User Manual
Page 44
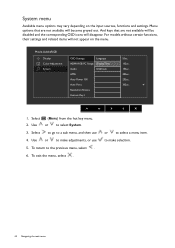
Select (Menu) from the hot key menu. 2. Use or to the previous menu, select . 6. Use or to make adjustments, or use 4. to make selection. 44 Navigating the main menu And keys that are not available will be disabled and the corresponding OSD icons will ... Resolution Notice Custom Key 1 5Sec. 10Sec. 15Sec. 20Sec. 25Sec. 30Sec. 1. Select to go to select a menu item. or to a sub menu, and then use 5. System menu Available menu options may vary depending on the menu. For models without certain functions, their settings and related items will disappear. To exit...
Select (Menu) from the hot key menu. 2. Use or to the previous menu, select . 6. Use or to make adjustments, or use 4. to make selection. 44 Navigating the main menu And keys that are not available will be disabled and the corresponding OSD icons will ... Resolution Notice Custom Key 1 5Sec. 10Sec. 15Sec. 20Sec. 25Sec. 30Sec. 1. Select to go to select a menu item. or to a sub menu, and then use 5. System menu Available menu options may vary depending on the menu. For models without certain functions, their settings and related items will disappear. To exit...
SW2700PT User Manual
Page 48
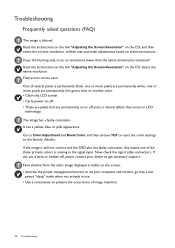
... the power management function to let your dealer to get necessary support. It has a yellow, blue or pink appearance. If the image is missing in use. • Use a screensaver to the factory defaults. Does the blurring only occur at resolutions lower than the native (maximum) resolution? One of several pixels is permanently...
... the power management function to let your dealer to get necessary support. It has a yellow, blue or pink appearance. If the image is missing in use. • Use a screensaver to the factory defaults. Does the blurring only occur at resolutions lower than the native (maximum) resolution? One of several pixels is permanently...


