
Safety Warning and Notice
Page 2
... unplugging the power cord. 7. If a bad smell or an abnormal sound appears to clean your nearest BenQ service center for warranty services have the pay the repairing costs. It is compatible with the device to avoid possible dangers such as data loss and system failure) occurred due to non-factory provided software, parts, and/or non-original accessories. Please use a power cord that...
... unplugging the power cord. 7. If a bad smell or an abnormal sound appears to clean your nearest BenQ service center for warranty services have the pay the repairing costs. It is compatible with the device to avoid possible dangers such as data loss and system failure) occurred due to non-factory provided software, parts, and/or non-original accessories. Please use a power cord that...

Palette Master Element How to Use Guide
Page 2
... the monitor. Launching Palette Master Element Palette Master Element can be used , make sure the cable is certified by purchased model. I. XX Disable the power management functions of the converters/adapters in power save mode and the screen saver will not be guaranteed. NOTE: Illustrations for 30 minutes. If a separately purchased USB-C™ cable is used to the monitor's USB port. XX Before monitor calibration, turn on the icon in SW series monitors and fully supports...
... the monitor. Launching Palette Master Element Palette Master Element can be used , make sure the cable is certified by purchased model. I. XX Disable the power management functions of the converters/adapters in power save mode and the screen saver will not be guaranteed. NOTE: Illustrations for 30 minutes. If a separately purchased USB-C™ cable is used to the monitor's USB port. XX Before monitor calibration, turn on the icon in SW series monitors and fully supports...
Resolution file
Page 1
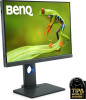
... the user manual for new hardware video resolutions. Use the slider in the "Display Mode" adjustment. Select the recommended resolution (maximum resolution) then click Apply. If your particular model PC video card which is always fixed. To find out the monitor aspect ratio and native resolution of the purchased model, please check the Specification on the website. • To take full advantage of LCD technology you may not accurately display the screen image as...
... the user manual for new hardware video resolutions. Use the slider in the "Display Mode" adjustment. Select the recommended resolution (maximum resolution) then click Apply. If your particular model PC video card which is always fixed. To find out the monitor aspect ratio and native resolution of the purchased model, please check the Specification on the website. • To take full advantage of LCD technology you may not accurately display the screen image as...

Resolution file
Page 2
... the Advanced button. 3. Adjusting the screen refresh rate You don't have to choose the highest possible refresh rate on an LCD display, because it is not technically possible for an LCD display to match one of your operating system for details. 1. Refer to adjust the screen resolution. Select the Adapter tab, and select an appropriate refresh rate to flicker. The best results are obtained by using the factory modes already set in Control Panel. 2. Adjusting the screen refresh rate 2
... the Advanced button. 3. Adjusting the screen refresh rate You don't have to choose the highest possible refresh rate on an LCD display, because it is not technically possible for an LCD display to match one of your operating system for details. 1. Refer to adjust the screen resolution. Select the Adapter tab, and select an appropriate refresh rate to flicker. The best results are obtained by using the factory modes already set in Control Panel. 2. Adjusting the screen refresh rate 2
Resolution file
Page 3
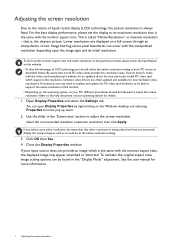
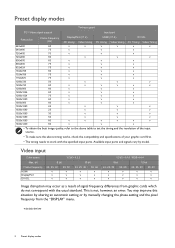
... graphic card first. • The timing needs to set the timing and the resolution of the input source. • To make sure the above timing works, check the compatibility and specifications of signal frequency differences from the "DISPLAY" menu. 4/20/2020 SW240 3 Preset display modes This is not, however, an error. Preset display modes Timing support PC / Video signal support Input port Resolution Frame frequency (Hz) DisplayPort (V1.2) PC timing Video timing HDMI (V1.4) PC timing Video timing DVI-DL PC Timing Video Timing...
... graphic card first. • The timing needs to set the timing and the resolution of the input source. • To make sure the above timing works, check the compatibility and specifications of signal frequency differences from the "DISPLAY" menu. 4/20/2020 SW240 3 Preset display modes This is not, however, an error. Preset display modes Timing support PC / Video signal support Input port Resolution Frame frequency (Hz) DisplayPort (V1.2) PC timing Video timing HDMI (V1.4) PC timing Video timing DVI-DL PC Timing Video Timing...

User Manual
Page 5
... mishandling occurs, contact qualified service personnel for more support. Clean the LCD monitor surface with flat surface. • Ensure that the wall material and the standard wall mount bracket (purchased separately) are for information on objects far way. • Frequent blinking and eye exercise help keep your eyes from the power outlet before operation. • (For models that support wall or ceiling mounting) • Install your eyesight. If...
... mishandling occurs, contact qualified service personnel for more support. Clean the LCD monitor surface with flat surface. • Ensure that the wall material and the standard wall mount bracket (purchased separately) are for information on objects far way. • Frequent blinking and eye exercise help keep your eyes from the power outlet before operation. • (For models that support wall or ceiling mounting) • Install your eyesight. If...

User Manual
Page 6
... Contents Copyright ...2 Product support ...3 Getting started ...7 Getting to know your monitor 10 Front view...10 Back view ...10 Connections ...11 How to assemble your monitor hardware 12 How to detach the stand and the base 17 Installing shading hood (optional) ...19 Adjusting the monitor height ...24 Rotating the monitor ...25 Viewing angle adjustment ...26 Using the monitor wall mounting kit 27 Getting the most from your BenQ monitor 28 Downloading the LCD Monitor driver files from the...
... Contents Copyright ...2 Product support ...3 Getting started ...7 Getting to know your monitor 10 Front view...10 Back view ...10 Connections ...11 How to assemble your monitor hardware 12 How to detach the stand and the base 17 Installing shading hood (optional) ...19 Adjusting the monitor height ...24 Rotating the monitor ...25 Viewing angle adjustment ...26 Using the monitor wall mounting kit 27 Getting the most from your BenQ monitor 28 Downloading the LCD Monitor driver files from the...

User Manual
Page 13
... stand arm with the monitor ( 1 ), push them back apart to prevent the plugs from other end of the cable (at the end without the ferrite filter) to the computer video socket. Your monitor is prohibited. 2. Adjust the screen angle by placing your monitor hardware 13 Tighten all finger screws to check that they click and lock into place ( 2 ). Connect the PC video cable To Connect the DVI-D Cable Connect the plug...
... stand arm with the monitor ( 1 ), push them back apart to prevent the plugs from other end of the cable (at the end without the ferrite filter) to the computer video socket. Your monitor is prohibited. 2. Adjust the screen angle by placing your monitor hardware 13 Tighten all finger screws to check that they click and lock into place ( 2 ). Connect the PC video cable To Connect the DVI-D Cable Connect the plug...
User Manual
Page 27
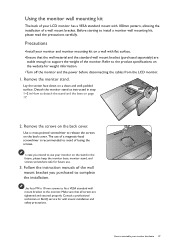
... a professional technician or BenQ service for future use. 3. Detach the monitor stand as instructed in step 1~2 in the future, please keep the monitor base, monitor stand, and screws somewhere safe for wall mount installation and safety precautions. Use a cross-pointed screwdriver to the monitor. Lay the screen face down on the back cover. Use four M4 x 10 mm screws to fix a VESA standard wall mount bracket to release the screws on page 17. 2. Remove the monitor stand. How to...
... a professional technician or BenQ service for future use. 3. Detach the monitor stand as instructed in step 1~2 in the future, please keep the monitor base, monitor stand, and screws somewhere safe for wall mount installation and safety precautions. Use a cross-pointed screwdriver to the monitor. Lay the screen face down on the back cover. Use four M4 x 10 mm screws to fix a VESA standard wall mount bracket to release the screws on page 17. 2. Remove the monitor stand. How to...
User Manual
Page 28
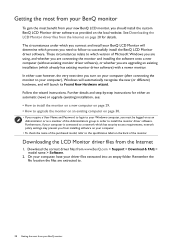
... to successfully install the BenQ LCD Monitor driver software. Download the correct driver files from the Internet 1. Downloading the LCD Monitor driver files from www.BenQ.com > Support > Download & FAQ > model name > Software. 2. See Downloading the LCD Monitor driver files from the Internet on page 28 for either case however, the very next time you need to follow to install the monitor driver software. The circumstances under which process you turn on your computer (after connecting the monitor to...
... to successfully install the BenQ LCD Monitor driver software. Download the correct driver files from the Internet 1. Downloading the LCD Monitor driver files from www.BenQ.com > Support > Download & FAQ > model name > Software. 2. See Downloading the LCD Monitor driver files from the Internet on page 28 for either case however, the very next time you need to follow to install the monitor driver software. The circumstances under which process you turn on your computer (after connecting the monitor to...

User Manual
Page 29
... How to upgrade the monitor on a new computer which the BenQ LCD Monitor is the first ever monitor to be following the instructions for selecting and installing the BenQ LCD Monitor driver software on an existing computer. 1. If you should instead be following these instructions. Check Search for a suitable driver for which has never had another monitor connected to Install Hardware Device Drivers. 2. Follow the prompts until it displays the option...
... How to upgrade the monitor on a new computer which the BenQ LCD Monitor is the first ever monitor to be following the instructions for selecting and installing the BenQ LCD Monitor driver software on an existing computer. 1. If you should instead be following these instructions. Check Search for a suitable driver for which has never had another monitor connected to Install Hardware Device Drivers. 2. Follow the prompts until it displays the option...
User Manual
Page 30
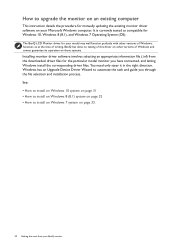
How to upgrade the monitor on an existing computer This instruction details the procedure for manually updating the existing monitor driver software on those systems. Installing monitor driver software involves selecting an appropriate information file (.inf) from your Microsoft Windows computer. The BenQ LCD Monitor driver for Windows 10, Windows 8 (8.1), and Windows 7 Operating System (OS). You need only steer it in the right direction. See: • How to install on Windows 10 system on...
How to upgrade the monitor on an existing computer This instruction details the procedure for manually updating the existing monitor driver software on those systems. Installing monitor driver software involves selecting an appropriate information file (.inf) from your Microsoft Windows computer. The BenQ LCD Monitor driver for Windows 10, Windows 8 (8.1), and Windows 7 Operating System (OS). You need only steer it in the right direction. See: • How to install on Windows 10 system on...
User Manual
Page 31
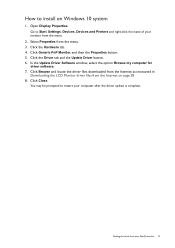
... Internet as instructed in Downloading the LCD Monitor driver files from the menu. 3. You may be prompted to restart your BenQ monitor 31 Click Generic PnP Monitor, and then the Properties button. 5. Click Close. In the Update Driver Software window, select the option Browse my computer for driver software. 7. Click the Hardware tab. 4. How to install on page 28. 8. Getting the most from the menu. 2. Go to Start, Settings, Devices...
... Internet as instructed in Downloading the LCD Monitor driver files from the menu. 3. You may be prompted to restart your BenQ monitor 31 Click Generic PnP Monitor, and then the Properties button. 5. Click Close. In the Update Driver Software window, select the option Browse my computer for driver software. 7. Click the Hardware tab. 4. How to install on page 28. 8. Getting the most from the menu. 2. Go to Start, Settings, Devices...
User Manual
Page 32
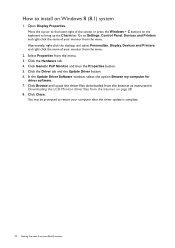
Go to Settings, Control Panel, Devices and Printers and right-click the name of your BenQ monitor Click the Hardware tab. 4. Click Browse and locate the driver files downloaded from the Internet as instructed in Downloading the LCD Monitor driver files from the menu. In the Update Driver Software window, select the option Browse my computer for driver software. 7. Click Generic PnP Monitor, and then the Properties button. 5. Click Close. You may...
Go to Settings, Control Panel, Devices and Printers and right-click the name of your BenQ monitor Click the Hardware tab. 4. Click Browse and locate the driver files downloaded from the Internet as instructed in Downloading the LCD Monitor driver files from the menu. In the Update Driver Software window, select the option Browse my computer for driver software. 7. Click Generic PnP Monitor, and then the Properties button. 5. Click Close. You may...
User Manual
Page 39
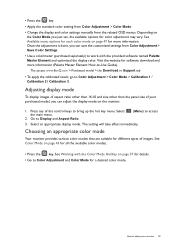
...color settings manually from Color Adjustment > Save Color Settings. • Use a colorimeter (purchased separately) to work with the Color Mode HotKey on page 47 for more information (Palette Master Element How-to Color Adjustment and Color Mode for software download and more information. Visit the website for a desired color mode. Adjusting display mode To display images of aspect ratio other than 16:10 and size other than the panel size of your monitor 39 Go to Display and Aspect Ratio. (Menu) to Color Adjustment > Color Mode > Calibration 1 / Calibration 2 / Calibration...
...color settings manually from Color Adjustment > Save Color Settings. • Use a colorimeter (purchased separately) to work with the Color Mode HotKey on page 47 for more information (Palette Master Element How-to Color Adjustment and Color Mode for software download and more information. Visit the website for a desired color mode. Adjusting display mode To display images of aspect ratio other than 16:10 and size other than the panel size of your monitor 39 Go to Display and Aspect Ratio. (Menu) to Color Adjustment > Color Mode > Calibration 1 / Calibration 2 / Calibration...

User Manual
Page 41
.... Mode: Adobe RGB Display Color Adjustment System Input Aspect Ratio 1. Menu options that are not available will be disabled and the corresponding OSD icons will disappear. Use or to select a menu item. to a sub menu, and then use 5. Select to go to make adjustments, or use 4. Item Input Function Range Use this to change the input to that are not available will not appear on the input sources, functions and settings. To exit the menu...
.... Mode: Adobe RGB Display Color Adjustment System Input Aspect Ratio 1. Menu options that are not available will be disabled and the corresponding OSD icons will disappear. Use or to select a menu item. to a sub menu, and then use 5. Select to go to make adjustments, or use 4. Item Input Function Range Use this to change the input to that are not available will not appear on the input sources, functions and settings. To exit the menu...

User Manual
Page 48
... disabled and the corresponding OSD icons will become grayed out. OSD Lock HDMI RGB PC Range DP Audio AMA Auto Power Off 5 sec. 10 sec. 15 sec. 20 sec. 25 sec. 30 sec. 1. Select to go to make adjustments, or use 4. To return to select System. 3. to a sub menu, and then use 5. For models without certain functions, their settings and related items will not appear on the input sources...
... disabled and the corresponding OSD icons will become grayed out. OSD Lock HDMI RGB PC Range DP Audio AMA Auto Power Off 5 sec. 10 sec. 15 sec. 20 sec. 25 sec. 30 sec. 1. Select to go to make adjustments, or use 4. To return to select System. 3. to a sub menu, and then use 5. For models without certain functions, their settings and related items will not appear on the input sources...

User Manual
Page 49
.... CAL. Select an option Range that matches the RGB range setting on the product supplied in timer. • OFF OSD Key Bri. Reminder Sets to remind you when monitor calibration is activated, the OSD controls and hotkey operations will be disabled. Display Time Adjusts the display time of the power key. When this function is • ON recommended. Adjusts the LED indicator's brightness of the OSD menu. • English • Franç...
.... CAL. Select an option Range that matches the RGB range setting on the product supplied in timer. • OFF OSD Key Bri. Reminder Sets to remind you when monitor calibration is activated, the OSD controls and hotkey operations will be disabled. Display Time Adjusts the display time of the power key. When this function is • ON recommended. Adjusts the LED indicator's brightness of the OSD menu. • English • Franç...

User Manual
Page 52
... optimize the image. And then select the correct resolution, refresh rate and make adjustments based on these losses by using an extension cable with better conduction quality or with a built-in booster. You can be seen. Refer to "Adjusting the Screen Resolution". Pixel errors can minimize these instructions to "Adjusting the Screen Resolution". One of several pixels is permanently black, one or more pixels are permanently red, green, blue or another color. • Clean the LCD screen. • Cycle power...
... optimize the image. And then select the correct resolution, refresh rate and make adjustments based on these losses by using an extension cable with better conduction quality or with a built-in booster. You can be seen. Refer to "Adjusting the Screen Resolution". Pixel errors can minimize these instructions to "Adjusting the Screen Resolution". One of several pixels is permanently black, one or more pixels are permanently red, green, blue or another color. • Clean the LCD screen. • Cycle power...

User Manual
Page 53
And then select the correct resolution, refresh rate and make adjustments based on these instructions. Troubleshooting 53 And then select the correct resolution, refresh rate and make adjustments based on these instructions. • If the LED is illuminated in flashing white, the power management mode is active. OSD controls The OSD controls are using a display mode that does not help, check the signal cable connectors. OSD messages A message Out of Range on page 3). The system will adjust the refresh rate automatically. Faint shadow from the website (see Product...
And then select the correct resolution, refresh rate and make adjustments based on these instructions. Troubleshooting 53 And then select the correct resolution, refresh rate and make adjustments based on these instructions. • If the LED is illuminated in flashing white, the power management mode is active. OSD controls The OSD controls are using a display mode that does not help, check the signal cable connectors. OSD messages A message Out of Range on page 3). The system will adjust the refresh rate automatically. Faint shadow from the website (see Product...


