
Safety Warning and Notice
Page 2
... the repairing costs. It is compatible with the device to non-factory provided software, parts, and/or non-original accessories. Please use it is the sole responsibility of the user to check whether the monitor is the sole responsibility of its intended sales area. Note that the power is connected to a grounded power outlet before turning on the monitor. Use only the power cord...
... the repairing costs. It is compatible with the device to non-factory provided software, parts, and/or non-original accessories. Please use it is the sole responsibility of the user to check whether the monitor is the sole responsibility of its intended sales area. Note that the power is connected to a grounded power outlet before turning on the monitor. Use only the power cord...
Display Pilot User Manual
Page 2
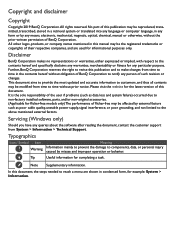
... make changes from time to reach a menu are used for example: System > Information. Copyright and disclaimer Copyright Copyright 2019 BenQ Corporation.All rights reserved. This document aims to provide the most updated and accurate information to non-factory installed software, parts, and/or non-original accessories. (Applicable for the latest version of such revision or changes. Please visit the website for flicker-free models...
... make changes from time to reach a menu are used for example: System > Information. Copyright and disclaimer Copyright Copyright 2019 BenQ Corporation.All rights reserved. This document aims to provide the most updated and accurate information to non-factory installed software, parts, and/or non-original accessories. (Applicable for the latest version of such revision or changes. Please visit the website for flicker-free models...
Display Pilot User Manual
Page 3
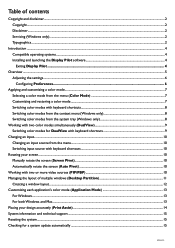
... 9 Changing an input...10 Changing an input source from the menu...10 Switching input source with keyboard shortcuts...10 Rotating your screen...10 Manually rotate the screen (Screen Pivot)...10 Automatically rotate the screen (Auto Pivot)...10 Working with two or more video sources (PIP/PBP)...10 Managing the layout of multiple windows (Desktop Partition 11 Creating a window layout...12 Customizing each application's color mode (Application Mode 13 For Windows...13 For both Windows and Mac...
... 9 Changing an input...10 Changing an input source from the menu...10 Switching input source with keyboard shortcuts...10 Rotating your screen...10 Manually rotate the screen (Screen Pivot)...10 Automatically rotate the screen (Auto Pivot)...10 Working with two or more video sources (PIP/PBP)...10 Managing the layout of multiple windows (Desktop Partition 11 Creating a window layout...12 Customizing each application's color mode (Application Mode 13 For Windows...13 For both Windows and Mac...
Display Pilot User Manual
Page 4
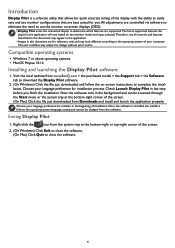
... the software. (On Mac) Click Quit to change without prior notice. Visit the local website from the software. Now the software runs in the background and can be changed from www.BenQ.com > the purchased model > the Support tab > the Software tab to download the Display Pilot software. 2. (On Windows) Click the file just downloaded and follow the on the monitor model and input selected.Therefore, not all controls...
... the software. (On Mac) Click Quit to change without prior notice. Visit the local website from the software. Now the software runs in the background and can be changed from www.BenQ.com > the purchased model > the Support tab > the Software tab to download the Display Pilot software. 2. (On Windows) Click the file just downloaded and follow the on the monitor model and input selected.Therefore, not all controls...
Display Pilot User Manual
Page 7
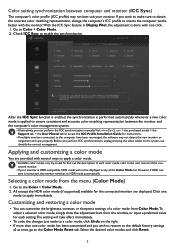
... video cables so the system can perform the ICC synchronization manually.Visit www.BenQ.com > the purchased model > the Support tab > the User Manual tab to access the ICC Profile Installation Guide for instructions. • If multiple monitors connected to the computer have been rearranged, the software may not best suit your monitor is done with the monitor.With the ICC Sync feature in Display Pilot, the adjustment is HDR-compatible...
... video cables so the system can perform the ICC synchronization manually.Visit www.BenQ.com > the purchased model > the Support tab > the User Manual tab to access the ICC Profile Installation Guide for instructions. • If multiple monitors connected to the computer have been rearranged, the software may not best suit your monitor is done with the monitor.With the ICC Sync feature in Display Pilot, the adjustment is HDR-compatible...
Display Pilot User Manual
Page 10
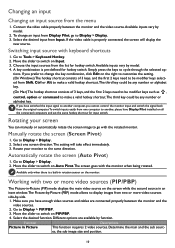
... to Display > Display. 2. Go to Tools > Keyboard Hotkey. 2. Working with two or more video sources side-by-side. 1. Function Descriptions Picture in rotation sensor on Auto Pivot.The screen goes with the monitor when being rotated. Simply press the keys to switch on the screen while the second source in an inset window.The Picture-by model. 4. Determine the main and the sub sources, the sub image size and position...
... to Display > Display. 2. Go to Tools > Keyboard Hotkey. 2. Working with two or more video sources side-by-side. 1. Function Descriptions Picture in rotation sensor on Auto Pivot.The screen goes with the monitor when being rotated. Simply press the keys to switch on the screen while the second source in an inset window.The Picture-by model. 4. Determine the main and the sub sources, the sub image size and position...
Display Pilot User Manual
Page 15
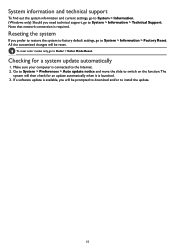
... to factory default settings, go to Color > Color Mode Reset. Go to System > Preferences > Auto update notice and move the slide to switch on the function.The system will then check for a system update automatically 1. System information and technical support To find out the system information and current settings, go to System > Information. (Windows only) Should you will be prompted to download and/or to install the update...
... to factory default settings, go to Color > Color Mode Reset. Go to System > Preferences > Auto update notice and move the slide to switch on the function.The system will then check for a system update automatically 1. System information and technical support To find out the system information and current settings, go to System > Information. (Windows only) Should you will be prompted to download and/or to install the update...
Resolution file
Page 1
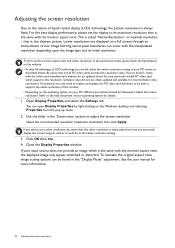
... is always fixed. If yours doesn't, check with the monitor aspect ratio. Open Display Properties and select the Settings tab. Select the recommended resolution (maximum resolution) then click Apply. See the user manual for new hardware video resolutions. This is the same with the video card manufacturer's website for an updated driver for your input source does not provide an image which supports this other resolution, be followed to adjust the screen resolution. If...
... is always fixed. If yours doesn't, check with the monitor aspect ratio. Open Display Properties and select the Settings tab. Select the recommended resolution (maximum resolution) then click Apply. See the user manual for new hardware video resolutions. This is the same with the video card manufacturer's website for an updated driver for your input source does not provide an image which supports this other resolution, be followed to adjust the screen resolution. If...

Resolution file
Page 2
... followed to adjust the screen resolution. Select the Adapter tab, and select an appropriate refresh rate to match one of your operating system for an LCD display to the help document of the applicable factory modes as listed in the specification table. 4. Click Change, OK, then Yes. 5. Close the Display Properties window. Adjusting the screen refresh rate 23 From the Display Properties window, select the Settings tab and click the Advanced button. 3. Depending...
... followed to adjust the screen resolution. Select the Adapter tab, and select an appropriate refresh rate to match one of your operating system for an LCD display to the help document of the applicable factory modes as listed in the specification table. 4. Click Change, OK, then Yes. 5. Close the Display Properties window. Adjusting the screen refresh rate 23 From the Display Properties window, select the Settings tab and click the Advanced button. 3. Depending...
Resolution file
Page 4
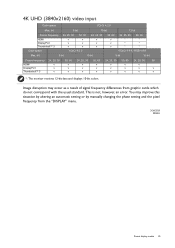
... 60 HDMI v v v v v v v DisplayPort v v v v v v v v Thunderbolt™ 3 v v v v v v v v *: The monitor receives 12-bit data and displays 10-bit colors. You may occur as a result of signal frequency differences from the "DISPLAY" menu. 3/24/2020 PD20U Preset display modes 25 This is not, however, an error. Image disruption may improve this situation by altering an automatic setting or by manually changing the phase setting and the pixel frequency from graphic cards which do...
... 60 HDMI v v v v v v v DisplayPort v v v v v v v v Thunderbolt™ 3 v v v v v v v v *: The monitor receives 12-bit data and displays 10-bit colors. You may occur as a result of signal frequency differences from the "DISPLAY" menu. 3/24/2020 PD20U Preset display modes 25 This is not, however, an error. Image disruption may improve this situation by altering an automatic setting or by manually changing the phase setting and the pixel frequency from graphic cards which do...

User Manual
Page 7
... support ...3 Getting started ...9 Getting to know your monitor 12 Front view ...12 Bottom view ...12 Back view ...13 Connections ...15 How to assemble your monitor hardware 20 How to detach the stand ...28 Adjusting the monitor height ...30 Rotating the monitor (PD2720U / PD3220U only 31 Viewing angle adjustment ...32 Using the monitor wall mounting kit 33 Getting the most from your BenQ monitor 34 Downloading the LCD Monitor driver files from the Internet 34 How to install the monitor...
... support ...3 Getting started ...9 Getting to know your monitor 12 Front view ...12 Bottom view ...12 Back view ...13 Connections ...15 How to assemble your monitor hardware 20 How to detach the stand ...28 Adjusting the monitor height ...30 Rotating the monitor (PD2720U / PD3220U only 31 Viewing angle adjustment ...32 Using the monitor wall mounting kit 33 Getting the most from your BenQ monitor 34 Downloading the LCD Monitor driver files from the Internet 34 How to install the monitor...

User Manual
Page 33
... x 10 mm screws to fix a VESA standard wall mount bracket to install a monitor wall mounting kit, please read the precautions carefully. Consult a professional technician or BenQ service for weight information. • Turn off the monitor and the power before disconnecting the cables from the LCD monitor. 1. Precautions • Install your monitor and monitor mounting kit on a wall with 100mm pattern, allowing the installation of the monitor. Refer to support the weight of a wall mount bracket. Remove the monitor stand. Use a cross...
... x 10 mm screws to fix a VESA standard wall mount bracket to install a monitor wall mounting kit, please read the precautions carefully. Consult a professional technician or BenQ service for weight information. • Turn off the monitor and the power before disconnecting the cables from the LCD monitor. 1. Precautions • Install your monitor and monitor mounting kit on a wall with 100mm pattern, allowing the installation of the monitor. Refer to support the weight of a wall mount bracket. Remove the monitor stand. Use a cross...
User Manual
Page 34
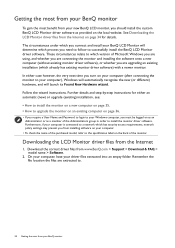
... are connecting the monitor and installing the software onto a new computer (without existing monitor driver software), or whether you should install the custom BenQ LCD Monitor driver software as a member of the Administrators group in order to the specification label on your computer. • To check the name of the purchased model, refer to install the monitor driver software. Follow the wizard instructions. See Downloading the LCD Monitor driver files from www.BenQ.com > Support > Download & FAQ > model name > Software...
... are connecting the monitor and installing the software onto a new computer (without existing monitor driver software), or whether you should install the custom BenQ LCD Monitor driver software as a member of the Administrators group in order to the specification label on your computer. • To check the name of the purchased model, refer to install the monitor driver software. Follow the wizard instructions. See Downloading the LCD Monitor driver files from www.BenQ.com > Support > Download & FAQ > model name > Software...

User Manual
Page 35
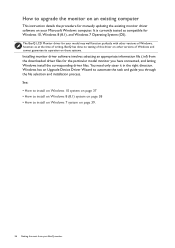
... procedure for selecting and installing the BenQ LCD Monitor driver software on an existing computer. 1. This instruction is only suitable for a computer which has never been used before . You should not be following the instructions for my device option, and click Next. 3. When Windows starts, it . Check Search for a suitable driver for How to upgrade the monitor on a new computer which the BenQ LCD Monitor is the first...
... procedure for selecting and installing the BenQ LCD Monitor driver software on an existing computer. 1. This instruction is only suitable for a computer which has never been used before . You should not be following the instructions for my device option, and click Next. 3. When Windows starts, it . Check Search for a suitable driver for How to upgrade the monitor on a new computer which the BenQ LCD Monitor is the first...
User Manual
Page 36
... BenQ LCD Monitor driver for your model may well function perfectly with other versions of Windows, however, as compatible for Windows 10, Windows 8 (8.1), and Windows 7 Operating System (OS). Windows has an Upgrade Device Driver Wizard to automate the task and guide you have connected, and letting Windows install the corresponding driver files. It is currently tested as at the time of writing, BenQ has done no testing of this driver...
... BenQ LCD Monitor driver for your model may well function perfectly with other versions of Windows, however, as compatible for Windows 10, Windows 8 (8.1), and Windows 7 Operating System (OS). Windows has an Upgrade Device Driver Wizard to automate the task and guide you have connected, and letting Windows install the corresponding driver files. It is currently tested as at the time of writing, BenQ has done no testing of this driver...
User Manual
Page 37
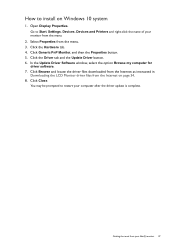
... install on page 34. 8. Open Display Properties. Click the Hardware tab. 4. Click Generic PnP Monitor, and then the Properties button. 5. Click Browse and locate the driver files downloaded from the Internet as instructed in Downloading the LCD Monitor driver files from the menu. 3. Click the Driver tab and the Update Driver button. 6. Click Close. Go to Start, Settings, Devices, Devices and Printers and right-click the name of your BenQ monitor...
... install on page 34. 8. Open Display Properties. Click the Hardware tab. 4. Click Generic PnP Monitor, and then the Properties button. 5. Click Browse and locate the driver files downloaded from the Internet as instructed in Downloading the LCD Monitor driver files from the menu. 3. Click the Driver tab and the Update Driver button. 6. Click Close. Go to Start, Settings, Devices, Devices and Printers and right-click the name of your BenQ monitor...

User Manual
Page 38
... Update Driver Software window, select the option Browse my computer for driver software. 7. Alternatively, right-click the desktop and select Personalize, Display, Devices and Printers, and right-click the name of the screen or press the Windows + C buttons on the keyboard to install on page 34. 8. Click Browse and locate the driver files downloaded from the Internet as instructed in Downloading the LCD Monitor driver files from the menu...
... Update Driver Software window, select the option Browse my computer for driver software. 7. Alternatively, right-click the desktop and select Personalize, Display, Devices and Printers, and right-click the name of the screen or press the Windows + C buttons on the keyboard to install on page 34. 8. Click Browse and locate the driver files downloaded from the Internet as instructed in Downloading the LCD Monitor driver files from the menu...

User Manual
Page 47
... on the monitor using an appropriate cable. Adjusting Display Mode To display images of aspect ratios other than your monitor aspect ratio and sizes other than your display size, you can adjust the display mode on page 60 for all the available color modes. See Color Mode on the monitor. 1. Visit www.BenQ.com > the purchased model > the Downloads or Support tab > the User Manual tab to Color > Color Mode for details. Now with one of the video sources is switched as...
... on the monitor using an appropriate cable. Adjusting Display Mode To display images of aspect ratios other than your monitor aspect ratio and sizes other than your display size, you can adjust the display mode on page 60 for all the available color modes. See Color Mode on the monitor. 1. Visit www.BenQ.com > the purchased model > the Downloads or Support tab > the User Manual tab to Color > Color Mode for details. Now with one of the video sources is switched as...

User Manual
Page 75
... one or more pixels are permanently red, green, blue or another color. • Clean the LCD screen. • Cycle power on page 3). One of several pixels is displaced in LCD technology. See Display Mode on these instructions. The image is permanently black, one or more pixels are permanently white, one direction. The image is blurred. And then select the correct resolution, refresh rate and make adjustments based on page 59 for the input sources. Refer to get...
... one or more pixels are permanently red, green, blue or another color. • Clean the LCD screen. • Cycle power on page 3). One of several pixels is displaced in LCD technology. See Display Mode on these instructions. The image is permanently black, one or more pixels are permanently white, one direction. The image is blurred. And then select the correct resolution, refresh rate and make adjustments based on page 59 for the input sources. Refer to get...

User Manual
Page 76
... USB-powered, check whether the USB connection is OK. • Increase the volume (volume may be locked, press and hold any button on the external speakers. 76 Troubleshooting Press any key for 10 seconds. If there is a message Out of Range on page 3). The system will adjust the refresh rate automatically. And then select the correct resolution, refresh rate and make adjustments based on the screen during computer boot up in solid white...
... USB-powered, check whether the USB connection is OK. • Increase the volume (volume may be locked, press and hold any button on the external speakers. 76 Troubleshooting Press any key for 10 seconds. If there is a message Out of Range on page 3). The system will adjust the refresh rate automatically. And then select the correct resolution, refresh rate and make adjustments based on the screen during computer boot up in solid white...


