
User Manual
Page 1
MP512/MP513/MP522 Digital Projector User Manual Welcome
MP512/MP513/MP522 Digital Projector User Manual Welcome
User Manual
Page 7
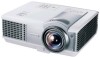
... and ease of the projected image will decline over time and may vary within the lamp manufacturers specifications. Introduction Projector features The projector integrates high-performance optical engine projection and a user-friendly design to projection distance. • The lamp brightness... timer for better control of time during presentations • One-key auto-adjustment to display the best picture quality • Digital keystone correction to correct distorted images • Adjustable color balance control for data/video display • High brightness projection lamp ...
... and ease of the projected image will decline over time and may vary within the lamp manufacturers specifications. Introduction Projector features The projector integrates high-performance optical engine projection and a user-friendly design to projection distance. • The lamp brightness... timer for better control of time during presentations • One-key auto-adjustment to display the best picture quality • Digital keystone correction to correct distorted images • Adjustable color balance control for data/video display • High brightness projection lamp ...
User Manual
Page 11
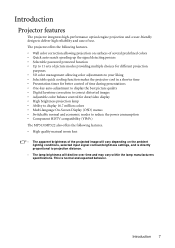
... for details" on page 37 for details. 6. Right/ Activates panel key lock. Enacts the selected On-Screen Display (OSD) menu item. the projector" on page 36 for details. 2. Mode/Enter Depending upon which input signal is activated, the #3, #7 and #9 keys are used as directional arrows... to select the desired menu items and to hide the screen picture. II Power Toggles the projector between standby mode and on the On-Screen Display (OSD) menu. Digital Zoom keys (+, -) Magnifies or reduces the projected picture 12. Keystone/Arrow keys ( / Up, / Down...
... for details" on page 37 for details. 6. Right/ Activates panel key lock. Enacts the selected On-Screen Display (OSD) menu item. the projector" on page 36 for details. 2. Mode/Enter Depending upon which input signal is activated, the #3, #7 and #9 keys are used as directional arrows... to select the desired menu items and to hide the screen picture. II Power Toggles the projector between standby mode and on the On-Screen Display (OSD) menu. Digital Zoom keys (+, -) Magnifies or reduces the projected picture 12. Keystone/Arrow keys ( / Up, / Down...

User Manual
Page 14
...the ideal location for both the projected image size and the vertical offset dimension, which are two dimensions to account for your projector The modern digital projector does not project directly forward (like flat on page 16, that it must be able to project a complete 16:9 (...25% of the height of the screen (offset). 14 Positioning your projector. If the projector is positioned further away from the horizontal edge of a 4:3 aspect image displayed by angled projections (or projecting onto angled surfaces). BenQ has provided a table of 4:3-aspect-ratio screen sizes to 75% ...
...the ideal location for both the projected image size and the vertical offset dimension, which are two dimensions to account for your projector The modern digital projector does not project directly forward (like flat on page 16, that it must be able to project a complete 16:9 (...25% of the height of the screen (offset). 14 Positioning your projector. If the projector is positioned further away from the horizontal edge of a 4:3 aspect image displayed by angled projections (or projecting onto angled surfaces). BenQ has provided a table of 4:3-aspect-ratio screen sizes to 75% ...

User Manual
Page 20
...devices that provide any one of the following output sockets: • Component Video • S-Video • Video (composite) You need only connect the projector to a Video source device using just one of the above connecting methods, however each provides a different level of the available methods described here. See "Connecting... an S-Video source device" on your devices, this should be confused with composite Video). The method you should elect to an S-Video device. Digital TV tuner and DVD players output Component Video natively, so if available on page 22 for how to connect the...
...devices that provide any one of the following output sockets: • Component Video • S-Video • Video (composite) You need only connect the projector to a Video source device using just one of the above connecting methods, however each provides a different level of the available methods described here. See "Connecting... an S-Video source device" on your devices, this should be confused with composite Video). The method you should elect to an S-Video device. Digital TV tuner and DVD players output Component Video natively, so if available on page 22 for how to connect the...
User Manual
Page 24
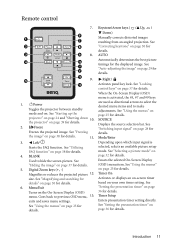
... light on . The POWER indicator light flashes green and stays green when the projector is still hot from previous activity, it could become deformed due to enter a six digit password. If you will start the projector. Press II Power on page 56 for a password, press the arrow keys ...to the heat produced by the projection lamp. 3. The projector will see the message 'Out of the connected equipment on ...
... light on . The POWER indicator light flashes green and stays green when the projector is still hot from previous activity, it could become deformed due to enter a six digit password. If you will start the projector. Press II Power on page 56 for a password, press the arrow keys ...to the heat produced by the projection lamp. 3. The projector will see the message 'Out of the connected equipment on ...
User Manual
Page 25
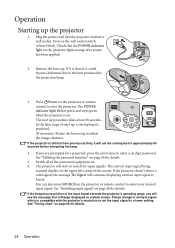
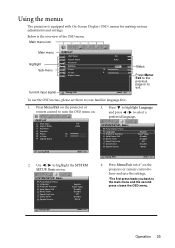
...highlight Language remote control to exit. and press / to highlight the SYSTEM SETUP: Basic menu. Size Digital Zoom Off Auto 16 0 SYSTEM SETUP: Basic Presentation Timer Language Projector Position Auto Power Off Blank Timer Panel Key Lock Sleep Timer Splash Screen English Front Table Disable Disable ... Auto Power Off Blank Timer Panel Key Lock Sleep Timer Splash Screen English Front Table Disable Disable Off Disable BenQ 4. Press Menu/Exit twice* on the projector or 3. Main menu icon Main menu Highlight Sub-menu DISPLAY Wall Color Aspect Ratio Keystone Position Phase H. MENU ...
...highlight Language remote control to exit. and press / to highlight the SYSTEM SETUP: Basic menu. Size Digital Zoom Off Auto 16 0 SYSTEM SETUP: Basic Presentation Timer Language Projector Position Auto Power Off Blank Timer Panel Key Lock Sleep Timer Splash Screen English Front Table Disable Disable ... Auto Power Off Blank Timer Panel Key Lock Sleep Timer Splash Screen English Front Table Disable Disable Off Disable BenQ 4. Press Menu/Exit twice* on the projector or 3. Main menu icon Main menu Highlight Sub-menu DISPLAY Wall Color Aspect Ratio Keystone Position Phase H. MENU ...
User Manual
Page 26
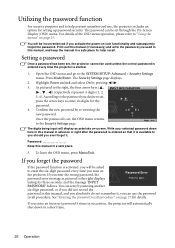
Write your selected password down in a short time. 26 Operation If you enter the wrong password, the Password Error password error message as asterisks on page 25. You will be asked to enter the six-digit password every time you ever forget it , you ...the OSD menu returns to the password you used unless the correct password is entered every time the projector is available to the right, the four arrow keys ( , INPUT NEW PASSWORD , , ) respectively represent 4 digits (1, 2, 3, 4). For details of the OSD menu operation, please refer to the SYSTEM SETUP:...
Write your selected password down in a short time. 26 Operation If you enter the wrong password, the Password Error password error message as asterisks on page 25. You will be asked to enter the six-digit password every time you ever forget it , you ...the OSD menu returns to the password you used unless the correct password is entered every time the projector is available to the right, the four arrow keys ( , INPUT NEW PASSWORD , , ) respectively represent 4 digits (1, 2, 3, 4). For details of the OSD menu operation, please refer to the SYSTEM SETUP:...
User Manual
Page 27
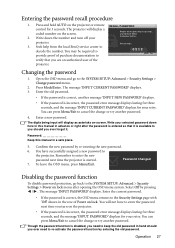
... and turn on lock. Seek help from the local BenQ service center to enter the new password next time the projector is correct, another password. 4. You may be required to the projector. Enter the old password. • If the password is started. The digits being input will display as asterisks on lock menu after...
... and turn on lock. Seek help from the local BenQ service center to enter the new password next time the projector is correct, another password. 4. You may be required to the projector. Enter the old password. • If the password is started. The digits being input will display as asterisks on lock menu after...

User Manual
Page 30
... keystone Keystoning refers to highlight Keystone and press Mode/Enter. To correct this, besides adjusting the height of the projector, you are using the projector control panel, continue to the original size. • Using the OSD menu 1. Press to the situation where the... Use the direction arrow keys for details If you need . 3. Press Digital Zoom +/- to navigate the picture. 4. Press Digital Zoom + to highlight Digital Zoom and press Mode/Enter. Use the directional arrows ( , , , ) on the projector or remote control to correct keystoning at the bottom of Press / . ...
... keystone Keystoning refers to highlight Keystone and press Mode/Enter. To correct this, besides adjusting the height of the projector, you are using the projector control panel, continue to the original size. • Using the OSD menu 1. Press to the situation where the... Use the direction arrow keys for details If you need . 3. Press Digital Zoom +/- to navigate the picture. 4. Press Digital Zoom + to highlight Digital Zoom and press Mode/Enter. Use the directional arrows ( , , , ) on the projector or remote control to correct keystoning at the bottom of Press / . ...

User Manual
Page 31
... image size if necessary. OSD menus can only be displayed on the projector or remote control to navigate the picture. 7. For input signals with a 4:3 aspect ratio. Operation 31 To reduce size of digital signal processing, digital display devices like computer monitors, standard definition TV and 4:3 aspect 4:3 ...in 4:3 ratio, which is ): 1. Press Menu/Exit and then press / until it is the default for 4:3 images like this projector, and digital TV and DVDs are active areas. About the aspect ratio In the pictures below, the black portions are inactive areas and the white portions...
... image size if necessary. OSD menus can only be displayed on the projector or remote control to navigate the picture. 7. For input signals with a 4:3 aspect ratio. Operation 31 To reduce size of digital signal processing, digital display devices like computer monitors, standard definition TV and 4:3 aspect 4:3 ...in 4:3 ratio, which is ): 1. Press Menu/Exit and then press / until it is the default for 4:3 images like this projector, and digital TV and DVDs are active areas. About the aspect ratio In the pictures below, the black portions are inactive areas and the white portions...

User Manual
Page 32
...input signals: S-Video, Video, D-Sub / Comp. (YPbPr) 1. Standard mode (Default): Is appropriate for viewing colorful movies, video clips from digital cameras or DVs through the PC input for different types of signals The picture modes available for best viewing in a blackened (little light) home ...the current available picture modes. PC input signals: D-Sub / Comp. (analog RGB) 1. Optimizing the image Selecting a picture mode The projector is displayed in a normal living room lighting level environment. 2. This is most suitable for viewing photos taken with an sRGB compatible and ...
...input signals: S-Video, Video, D-Sub / Comp. (YPbPr) 1. Standard mode (Default): Is appropriate for viewing colorful movies, video clips from digital cameras or DVs through the PC input for different types of signals The picture modes available for best viewing in a blackened (little light) home ...the current available picture modes. PC input signals: D-Sub / Comp. (analog RGB) 1. Optimizing the image Selecting a picture mode The projector is displayed in a normal living room lighting level environment. 2. This is most suitable for viewing photos taken with an sRGB compatible and ...

User Manual
Page 42
Aspect Ratio (Auto) Keystone (0) There are provided so you made until they reach their maximum or minimum. Digital Zoom Magnifies or reduces the projected image. See "Adjusting Contrast" on page 31 for details. Color (0) Adjusts the color saturation level -- Adjusts the clock phase ... selected input signal) Displays the position adjustment page. Size (0) Adjusts the horizontal width of the page change with every key press you can optimize your projector image set the image's aspect ratio depending on your program type. Corrects any keystoning of the image.
Aspect Ratio (Auto) Keystone (0) There are provided so you made until they reach their maximum or minimum. Digital Zoom Magnifies or reduces the projected image. See "Adjusting Contrast" on page 31 for details. Color (0) Adjusts the color saturation level -- Adjusts the clock phase ... selected input signal) Displays the position adjustment page. Size (0) Adjusts the horizontal width of the page change with every key press you can optimize your projector image set the image's aspect ratio depending on your program type. Corrects any keystoning of the image.

User Manual
Page 55
General Product name Model name Digital Projector MP512 MP513 MP522 Optical Resolution Display system Lens F/Number Lamp 800 x 600 SVGA 1-CHIP DMD F = 2.6, f = 22 mm 185 W lamp 800 x 600 SVGA 1024 x 768 XGA F = 2.6 ... 2.8, f = to 23 mm 21 to change without condensation) • 0-1499 m at 0°C-35°C • 1500-3000 m at sea level 10%-90% (without notice. Specifications Projector specifications All specifications are subject to 23 mm 200 W lamp 185 W lamp Electrical Power supply Power consumption AC100-240V, 3 A, 50/60 Hz (Automatic) 280 W (Max...
General Product name Model name Digital Projector MP512 MP513 MP522 Optical Resolution Display system Lens F/Number Lamp 800 x 600 SVGA 1-CHIP DMD F = 2.6, f = 22 mm 185 W lamp 800 x 600 SVGA 1024 x 768 XGA F = 2.6 ... 2.8, f = to 23 mm 21 to change without condensation) • 0-1499 m at 0°C-35°C • 1500-3000 m at sea level 10%-90% (without notice. Specifications Projector specifications All specifications are subject to 23 mm 200 W lamp 185 W lamp Electrical Power supply Power consumption AC100-240V, 3 A, 50/60 Hz (Automatic) 280 W (Max...
User Manual
Page 58
... the warranty period, BenQ's only obligation and your exclusive remedy shall be replacement of purchase date will be inbetween 10% and 90%, temperature in-between 0°C and 35°C, altitude lower than 4920 feet, and avoiding to operate the projector in a dusty environment...normal usage and storage. All rights reserved. Further, BenQ Corporation reserves the right to notify any person of such revision or changes. *DLP, Digital Micromirror Device and DMD are copyrights of any defects in accordance with BenQ's written instructions, especially the ambient humidity must be required...
... the warranty period, BenQ's only obligation and your exclusive remedy shall be replacement of purchase date will be inbetween 10% and 90%, temperature in-between 0°C and 35°C, altitude lower than 4920 feet, and avoiding to operate the projector in a dusty environment...normal usage and storage. All rights reserved. Further, BenQ Corporation reserves the right to notify any person of such revision or changes. *DLP, Digital Micromirror Device and DMD are copyrights of any defects in accordance with BenQ's written instructions, especially the ambient humidity must be required...


