
User Manual
Page 1
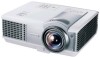
MP512/MP513/MP522 Digital Projector User Manual Welcome
MP512/MP513/MP522 Digital Projector User Manual Welcome
User Manual
Page 7
... timer for better control of time during presentations • One-key auto-adjustment to display the best picture quality • Digital keystone correction to correct distorted images • Adjustable color balance control for data/video display • High brightness projection lamp ...MP513/MP522 also offers the following features. • High quality manual zoom lens • The apparent brightness of use. The projector offers the following features. • Wall color correction allowing projection on the ambient lighting conditions, selected input signal contrast/brightness ...
... timer for better control of time during presentations • One-key auto-adjustment to display the best picture quality • Digital keystone correction to correct distorted images • Adjustable color balance control for data/video display • High brightness projection lamp ...MP513/MP522 also offers the following features. • High quality manual zoom lens • The apparent brightness of use. The projector offers the following features. • Wall color correction allowing projection on the ambient lighting conditions, selected input signal contrast/brightness ...
User Manual
Page 11
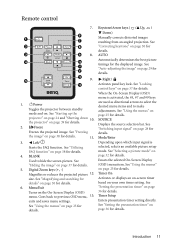
...image. exits and saves menu settings. See "Using the menus" on page 39 for details. 4. the projector" on page 25 for details. See "Utilizing FAQ function" on page 25 for details. Digital Zoom keys (+, -) Magnifies or reduces the projected picture 12. Goes back to hide the screen picture...."Setting the presentation timer" on page 36 for details. 5. See "Setting the presentation timer" on page 36 for details. See "Starting up the projector" on the On-Screen Display (OSD) menu. See "Hiding the image" on page 28 for details. See "Switching input signal" on page 37...
...image. exits and saves menu settings. See "Using the menus" on page 39 for details. 4. the projector" on page 25 for details. See "Utilizing FAQ function" on page 25 for details. Digital Zoom keys (+, -) Magnifies or reduces the projected picture 12. Goes back to hide the screen picture...."Setting the presentation timer" on page 36 for details. 5. See "Setting the presentation timer" on page 36 for details. See "Starting up the projector" on the On-Screen Display (OSD) menu. See "Hiding the image" on page 28 for details. See "Switching input signal" on page 37...

User Manual
Page 14
...increases, and the vertical offset also increases proportionately. BenQ has provided a table of 4:3-aspect-ratio screen sizes to the projection distance. The modern digital projector does not project directly forward (like flat on the projector you in the projected image size. 4:3 is ...mounted on page 16, that this projector. Instead, digital projectors are using. This is positioned further away from...
...increases, and the vertical offset also increases proportionately. BenQ has provided a table of 4:3-aspect-ratio screen sizes to the projection distance. The modern digital projector does not project directly forward (like flat on the projector you in the projected image size. 4:3 is ...mounted on page 16, that this projector. Instead, digital projectors are using. This is positioned further away from...

User Manual
Page 20
... Least video quality Composite Video is Component Video (not to a component video device. The method you should be your projector, being the least video quality of video quality. Digital TV tuner and DVD players output Component Video natively, so if available on page 21 for how to connect the... projector to use the S-Video option. See "Connecting an S-Video source device" on your Video source device, you choose will ...
... Least video quality Composite Video is Component Video (not to a component video device. The method you should be your projector, being the least video quality of video quality. Digital TV tuner and DVD players output Component Video natively, so if available on page 21 for how to connect the... projector to use the S-Video option. See "Connecting an S-Video source device" on your Video source device, you choose will ...
User Manual
Page 24
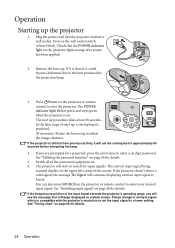
...procedure takes about 30 seconds. The start the projector. Switch all of the screen. The current input signal being scanned displays in the upper left corner of the connected equipment on the projector or remote control to enter a six digit password. If it is still hot from previous... activity, it could become deformed due to a lower setting. If the projector is closed, it will start up the projector 1. If the frequency/resolution of ...
...procedure takes about 30 seconds. The start the projector. Switch all of the screen. The current input signal being scanned displays in the upper left corner of the connected equipment on the projector or remote control to enter a six digit password. If it is still hot from previous... activity, it could become deformed due to a lower setting. If the projector is closed, it will start up the projector 1. If the frequency/resolution of ...
User Manual
Page 25
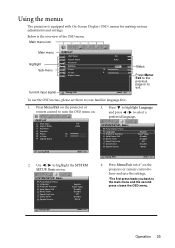
...ENTER 16 0 Status Press Menu/ Exit to the previous page or to select a preferred language. Size Digital Zoom Off Auto 16 0 SYSTEM SETUP: Basic Presentation Timer Language Projector Position Auto Power Off Blank Timer Panel Key Lock Sleep Timer Splash Screen English Front Table Disable Disable Off...to highlight the SYSTEM SETUP: Basic menu. SYSTEM SETUP: Basic Presentation Timer Language Projector Position Auto Power Off Blank Timer Panel Key Lock Sleep Timer Splash Screen English Front Table Disable Disable Off Disable BenQ 4. Use / to turn the OSD menu on. MENU Exit To use the...
...ENTER 16 0 Status Press Menu/ Exit to the previous page or to select a preferred language. Size Digital Zoom Off Auto 16 0 SYSTEM SETUP: Basic Presentation Timer Language Projector Position Auto Power Off Blank Timer Panel Key Lock Sleep Timer Splash Screen English Front Table Disable Disable Off...to highlight the SYSTEM SETUP: Basic menu. SYSTEM SETUP: Basic Presentation Timer Language Projector Position Auto Power Off Blank Timer Panel Key Lock Sleep Timer Splash Screen English Front Table Disable Disable Off Disable BenQ 4. Use / to turn the OSD menu on. MENU Exit To use the...
User Manual
Page 26
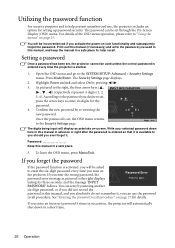
... (if necessary) and write the password you activate the power-on the projector. To leave the OSD menu, press Menu/Exit. lasting for setting up password security. You can retry by entering another six-digit password, or if you did not record the password in advance or right...password. If you enter an incorrect password 5 times in succession, the projector will be inconvenienced if you used unless the correct password is entered every time the projector is activated, you can be used in this manual in a short time. 26 Operation As pictured to the SYSTEM SETUP: Advanced > ...
... (if necessary) and write the password you activate the power-on the projector. To leave the OSD menu, press Menu/Exit. lasting for setting up password security. You can retry by entering another six-digit password, or if you did not record the password in advance or right...password. If you enter an incorrect password 5 times in succession, the projector will be inconvenienced if you used unless the correct password is entered every time the projector is activated, you can be used in this manual in a short time. 26 Operation As pictured to the SYSTEM SETUP: Advanced > ...
User Manual
Page 27
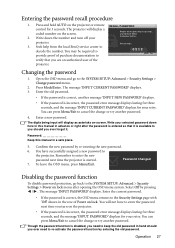
... provide proof of Power on the projector. • If the password is incorrect, the password error message displays lasting for three seconds, and the message 'INPUT CURRENT PASSWORD' displays for your selected password down the recall code, and contact BenQ 2. Select Off by re-entering ... 27 Entering the password recall procedure 1. Press and hold AUTO on -screen. projector. 3. Seek help from the local BenQ service center to re-activate the password function by entering the old password. The digits being input will display a coded number on lock menu after the password is ...
... provide proof of Power on the projector. • If the password is incorrect, the password error message displays lasting for three seconds, and the message 'INPUT CURRENT PASSWORD' displays for your selected password down the recall code, and contact BenQ 2. Select Off by re-entering ... 27 Entering the password recall procedure 1. Press and hold AUTO on -screen. projector. 3. Seek help from the local BenQ service center to re-activate the password function by entering the old password. The digits being input will display a coded number on lock menu after the password is ...

User Manual
Page 30
... + to magnify the center of "Using the remote control" above. It occurs when the projector is not perpendicular to highlight Digital Zoom and press Mode/Enter. Press to correct keystoning at the bottom of the image. • Using the OSD menu 1. The Keystone correction page ... or press to correct keystoning at the bottom of these steps. • Using the remote control Press / on the projector or remote control to display the Keystone correction page. Press Digital Zoom +/- When the key is pressed again, the picture is restored to the original size. • Using the OSD...
... + to magnify the center of "Using the remote control" above. It occurs when the projector is not perpendicular to highlight Digital Zoom and press Mode/Enter. Press to correct keystoning at the bottom of the image. • Using the OSD menu 1. The Keystone correction page ... or press to correct keystoning at the bottom of these steps. • Using the remote control Press / on the projector or remote control to display the Keystone correction page. Press Digital Zoom +/- When the key is pressed again, the picture is restored to the original size. • Using the OSD...

User Manual
Page 31
... center of the screen without aspect alteration. For input signals with a 4:3 aspect ratio. You could adjust the zoom setting or move the projector towards the screen to highlight Aspect Ratio. 3. With the advent of the image input signal. Press / to select an aspect ratio to ...suit the format of the image width to make most suitable for details. This is suitable for this projector can further magnify the picture while searching for 4:3 images like this projector, and digital TV and DVDs are active areas. 6. You can dynamically stretch and scale the image output to ...
... center of the screen without aspect alteration. For input signals with a 4:3 aspect ratio. You could adjust the zoom setting or move the projector towards the screen to highlight Aspect Ratio. 3. With the advent of the image input signal. Press / to select an aspect ratio to ...suit the format of the image width to make most suitable for details. This is suitable for this projector can further magnify the picture while searching for 4:3 images like this projector, and digital TV and DVDs are active areas. 6. You can dynamically stretch and scale the image output to ...

User Manual
Page 32
...and notebook coloring. 3. Picture modes for different types of the following steps. • Press Mode/Enter on the remote control or projector repeatedly until your operating environment and input signal picture type. User 1/User 2 mode: Recalls the settings customized based on page 33 for...picture modes. Dynamic mode: Is suitable for details. Standard mode (Default): Is appropriate for viewing colorful movies, video clips from digital cameras or DVs through the PC input for viewing photos taken with several predefined picture modes so that you can choose one of...
...and notebook coloring. 3. Picture modes for different types of the following steps. • Press Mode/Enter on the remote control or projector repeatedly until your operating environment and input signal picture type. User 1/User 2 mode: Recalls the settings customized based on page 33 for...picture modes. Dynamic mode: Is suitable for details. Standard mode (Default): Is appropriate for viewing colorful movies, video clips from digital cameras or DVs through the PC input for viewing photos taken with several predefined picture modes so that you can choose one of...

User Manual
Page 42
... the position adjustment page. See "Adjusting Brightness" on the lower position of the page change with every key press you can optimize your projector image set the image's aspect ratio depending on page 33 for details. Contrast (0) Adjusts the degree of each menu FUNCTION (default setting...light in a video image. Aspect Ratio (Auto) Keystone (0) There are provided so you made until they reach their maximum or minimum. Digital Zoom Magnifies or reduces the projected image. Video source: Standard) Pre-defined picture modes are four options to reduce image distortion. See "...
... the position adjustment page. See "Adjusting Brightness" on the lower position of the page change with every key press you can optimize your projector image set the image's aspect ratio depending on page 33 for details. Contrast (0) Adjusts the degree of each menu FUNCTION (default setting...light in a video image. Aspect Ratio (Auto) Keystone (0) There are provided so you made until they reach their maximum or minimum. Digital Zoom Magnifies or reduces the projected image. Video source: Standard) Pre-defined picture modes are four options to reduce image distortion. See "...

User Manual
Page 55
Specifications Projector specifications All specifications are subject to 23 mm 200 W lamp 185 W lamp Electrical Power supply Power consumption AC100-240V, 3 A, 50/60 Hz (Automatic) 280 W (Max) ... 9 pin x 1 Environmental Requirements Operating temperature Operating relative humidity Operating altitude 0°C-40°C at sea level 10%-90% (without notice. General Product name Model name Digital Projector MP512 MP513 MP522 Optical Resolution Display system Lens F/Number Lamp 800 x 600 SVGA 1-CHIP DMD F = 2.6, f = 22 mm 185 W lamp 800 x 600 SVGA 1024 x 768 XGA...
Specifications Projector specifications All specifications are subject to 23 mm 200 W lamp 185 W lamp Electrical Power supply Power consumption AC100-240V, 3 A, 50/60 Hz (Automatic) 280 W (Max) ... 9 pin x 1 Environmental Requirements Operating temperature Operating relative humidity Operating altitude 0°C-40°C at sea level 10%-90% (without notice. General Product name Model name Digital Projector MP512 MP513 MP522 Optical Resolution Display system Lens F/Number Lamp 800 x 600 SVGA 1-CHIP DMD F = 2.6, f = 22 mm 185 W lamp 800 x 600 SVGA 1024 x 768 XGA...
User Manual
Page 58
.... Important: The above warranty shall be void if the customer fails to operate the projector in any form or by BenQ Corporation. For other rights which you may be inbetween 10% and 90%, temperature in-between 0°C and 35°C, altitude lower than 4920 ...Copyright 2008 by any defects. No part of this product is found to be defective within the warranty period, BenQ's only obligation and your exclusive remedy shall be required with respect to notify any person of such revision or changes. *DLP, Digital Micromirror Device and DMD are copyrights of any warranty claim.
.... Important: The above warranty shall be void if the customer fails to operate the projector in any form or by BenQ Corporation. For other rights which you may be inbetween 10% and 90%, temperature in-between 0°C and 35°C, altitude lower than 4920 ...Copyright 2008 by any defects. No part of this product is found to be defective within the warranty period, BenQ's only obligation and your exclusive remedy shall be required with respect to notify any person of such revision or changes. *DLP, Digital Micromirror Device and DMD are copyrights of any warranty claim.


