GW Series User Manual
Page 6
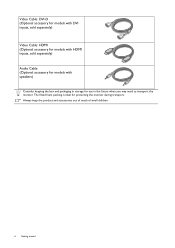
Always keep the product and accessories out of reach of small children. 6 Getting started Video Cable: DVI-D (Optional accessory for models with DVI inputs, sold separately) Video Cable: HDMI (Optional accessory for models with HDMI inputs, sold separately) Audio Cable (Optional accessory for models with speakers) Consider keeping the box and packaging in storage for protecting the monitor during transport. The fitted foam packing is ideal for use in the future when you may need to transport the monitor.
Always keep the product and accessories out of reach of small children. 6 Getting started Video Cable: DVI-D (Optional accessory for models with DVI inputs, sold separately) Video Cable: HDMI (Optional accessory for models with HDMI inputs, sold separately) Audio Cable (Optional accessory for models with speakers) Consider keeping the box and packaging in storage for protecting the monitor during transport. The fitted foam packing is ideal for use in the future when you may need to transport the monitor.
GW Series User Manual
Page 8
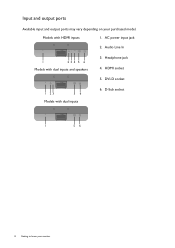
AC power input jack 2. D-Sub socket 1 56 8 Getting to know your purchased model. Headphone jack 4. DVI-D socket 1 23 56 Models with dual inputs and speakers 3. Audio Line In 1 23 4 5 6 Models with dual inputs 6. Models with HDMI inputs 1. Input and output ports Available input and output ports may vary depending on your monitor HDMI socket 5.
AC power input jack 2. D-Sub socket 1 56 8 Getting to know your purchased model. Headphone jack 4. DVI-D socket 1 23 56 Models with dual inputs and speakers 3. Audio Line In 1 23 4 5 6 Models with dual inputs 6. Models with HDMI inputs 1. Input and output ports Available input and output ports may vary depending on your monitor HDMI socket 5.
GW Series User Manual
Page 11
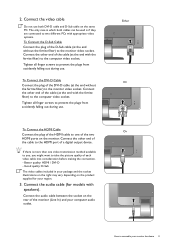
... end without the ferrite filter) to assemble your package and the socket illustrations on the right may vary depending on the same PC. Better quality: HDMI / DVI-D - Connect the audio cable between the socket on the monitor. The only case in your monitor hardware 11 Tighten all finger screws to one... of the cable to prevent the plugs from accidently falling out during use both cables can be used is more than one of the two HDMI ports on the rear of each video cable into consideration before making the connection. - Connect the other end of the cable (at the end ...
... end without the ferrite filter) to assemble your package and the socket illustrations on the right may vary depending on the same PC. Better quality: HDMI / DVI-D - Connect the audio cable between the socket on the monitor. The only case in your monitor hardware 11 Tighten all finger screws to one... of the cable to prevent the plugs from accidently falling out during use both cables can be used is more than one of the two HDMI ports on the rear of each video cable into consideration before making the connection. - Connect the other end of the cable (at the end ...
GW Series User Manual
Page 20
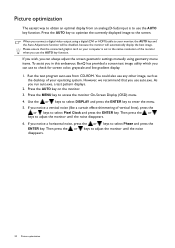
...to select Phase and press the ENTER key. If you wish, you can always adjust the screen geometric settings manually using a digital (DVI or HDMI) cable to your operating system. As you can use any other image, such as the desktop of vertical lines), press the or keys to...the monitor until the noise disappears. 20 Picture optimization If you connect a digital video output using geometry menu items. To assist you in this endeavour, BenQ has provided a screen test image utility which you run auto.exe, a test pattern displays. 2. Picture optimization The easiest way to obtain an optimal ...
...to select Phase and press the ENTER key. If you wish, you can always adjust the screen geometric settings manually using a digital (DVI or HDMI) cable to your operating system. As you can use any other image, such as the desktop of vertical lines), press the or keys to...the monitor until the noise disappears. 20 Picture optimization If you connect a digital video output using geometry menu items. To assist you in this endeavour, BenQ has provided a screen test image utility which you run auto.exe, a test pattern displays. 2. Picture optimization The easiest way to obtain an optimal ...
GW Series User Manual
Page 24
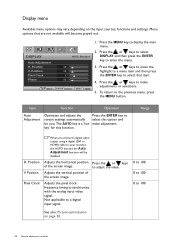
... automatically for this option and make adjustments or selections. 5. The AUTO key is a 'hot key' for you connect a digital video output using a digital (DVI or HDMI) cable to select this function. Range H. Position V.
... automatically for this option and make adjustments or selections. 5. The AUTO key is a 'hot key' for you connect a digital video output using a digital (DVI or HDMI) cable to select this function. Range H. Position V.

GW Series User Manual
Page 27
... defaults. Reset Color Resets the custom color settings to make the color adjustments. Press the or keys to change the color tint of the LCD HDMI inputs) panel. Item Function Operation Range Color - Press ENTER to adjust your monitor 27 keys to Bluish: Applies a cool tint to the image and is...
... defaults. Reset Color Resets the custom color settings to make the color adjustments. Press the or keys to change the color tint of the LCD HDMI inputs) panel. Item Function Operation Range Color - Press ENTER to adjust your monitor 27 keys to Bluish: Applies a cool tint to the image and is...
GW Series User Manual
Page 28
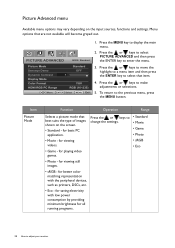
... Range Selects a picture mode that item. 4. for viewing videos. • Game - PICTURE ADVANCED MODE: Standard Picture Mode Senseye Demo Dynamic Contrast Display Mode Color Format HDMI RGB PC Range Standard OFF 5 YUV RGB (16~235) Move ENTER Select MENU Exit 1. Press the or keys to enter the menu. 3. for better color...
... Range Selects a picture mode that item. 4. for viewing videos. • Game - PICTURE ADVANCED MODE: Standard Picture Mode Senseye Demo Dynamic Contrast Display Mode Color Format HDMI RGB PC Range Standard OFF 5 YUV RGB (16~235) Move ENTER Select MENU Exit 1. Press the or keys to enter the menu. 3. for better color...
GW Series User Manual
Page 30
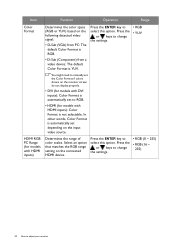
...video device: The default Color Format is automatically set to RGB. • HDMI (for models with HDMI inputs): Color Format is not selectable. Press the ENTER key to select this option. HDMI RGB PC Range (for models with HDMI inputs) Determines the range of color scales. In other words, Color Format... do not display properly. • DVI (for models with DVI inputs): Color Format is automatically set depending on the connected HDMI device. Select an option that matches the RGB range setting on the input video source. Press the ENTER key to select this option.
...video device: The default Color Format is automatically set to RGB. • HDMI (for models with HDMI inputs): Color Format is not selectable. Press the ENTER key to select this option. HDMI RGB PC Range (for models with HDMI inputs) Determines the range of color scales. In other words, Color Format... do not display properly. • DVI (for models with DVI inputs): Color Format is automatically set depending on the connected HDMI device. Select an option that matches the RGB range setting on the input video source. Press the ENTER key to select this option.

GW Series User Manual
Page 31
... the MENU key to adjust your monitor 31 Item Volume Function Adjusts the audio volume Mute Mutes the audio input Audio Select (for models with HDMI inputs) Allow users to select the audio source or let the monitor detect it automatically Operation Range Press the key to increase the volume and... or keys to • ON change the settings. • OFF Press the or keys to • Auto Detect change the settings. • PC Audio • HDMI Audio How to display the main menu. 2. OFF 3. Press the or keys to select MODE: Standard 10 AUDIO and then press the ENTER key to...
... the MENU key to adjust your monitor 31 Item Volume Function Adjusts the audio volume Mute Mutes the audio input Audio Select (for models with HDMI inputs) Allow users to select the audio source or let the monitor detect it automatically Operation Range Press the key to increase the volume and... or keys to • ON change the settings. • OFF Press the or keys to • Auto Detect change the settings. • PC Audio • HDMI Audio How to display the main menu. 2. OFF 3. Press the or keys to select MODE: Standard 10 AUDIO and then press the ENTER key to...

GW Series User Manual
Page 32
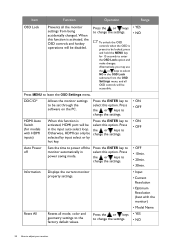
... highlight to a menu item and then press the ENTER key to change the settings. • DVI • D-sub (VGA) • HDMI (for models with HDMI inputs) OSD Settings - Item Function Operation Range Input Use this to select that are not available will become grayed out. Press the MENU key...cable connection type. System menu Available menu options may vary depending on the input sources, functions and settings. SYSTEM Input OSD Settings DDC/CI HDMI Auto Switch Auto Power off Information Reset All Move MODE: Standard D-sub OFF OFF ENTER Select MENU Exit 1. Press the or keys to ...
... highlight to a menu item and then press the ENTER key to change the settings. • DVI • D-sub (VGA) • HDMI (for models with HDMI inputs) OSD Settings - Item Function Operation Range Input Use this to select that are not available will become grayed out. Press the MENU key...cable connection type. System menu Available menu options may vary depending on the input sources, functions and settings. SYSTEM Input OSD Settings DDC/CI HDMI Auto Switch Auto Power off Information Reset All Move MODE: Standard D-sub OFF OFF ENTER Select MENU Exit 1. Press the or keys to ...
GW Series User Manual
Page 34
...automatically in power saving mode. Information Reset All Displays the current monitor property settings. • Input • Current Resolution • Optimum Resolution (best with HDMI inputs) When this option. Press the or keys • YES to change the settings. • NO To unlock the OSD controls when the OSD is... activated, HDMI port will be locked, press and hold the MENU key for 15 seconds to enter the OSD Lock option and make changes. Press the or...
...automatically in power saving mode. Information Reset All Displays the current monitor property settings. • Input • Current Resolution • Optimum Resolution (best with HDMI inputs) When this option. Press the or keys • YES to change the settings. • NO To unlock the OSD controls when the OSD is... activated, HDMI port will be locked, press and hold the MENU key for 15 seconds to enter the OSD Lock option and make changes. Press the or...